IONIC ERP Tutorial
Projects Modules
Introduction
A services company needs a lot more features than a project module to operate at its full potential. IONIC ERP has all these features built-in.
- You track your books of accounts using the Accounts module.
- Manage payroll, leaves and claims of your support staff in the HR module.
- Attend customer’s support queries better with the Support module of IONIC ERP.
Project Management in IONIC ERP
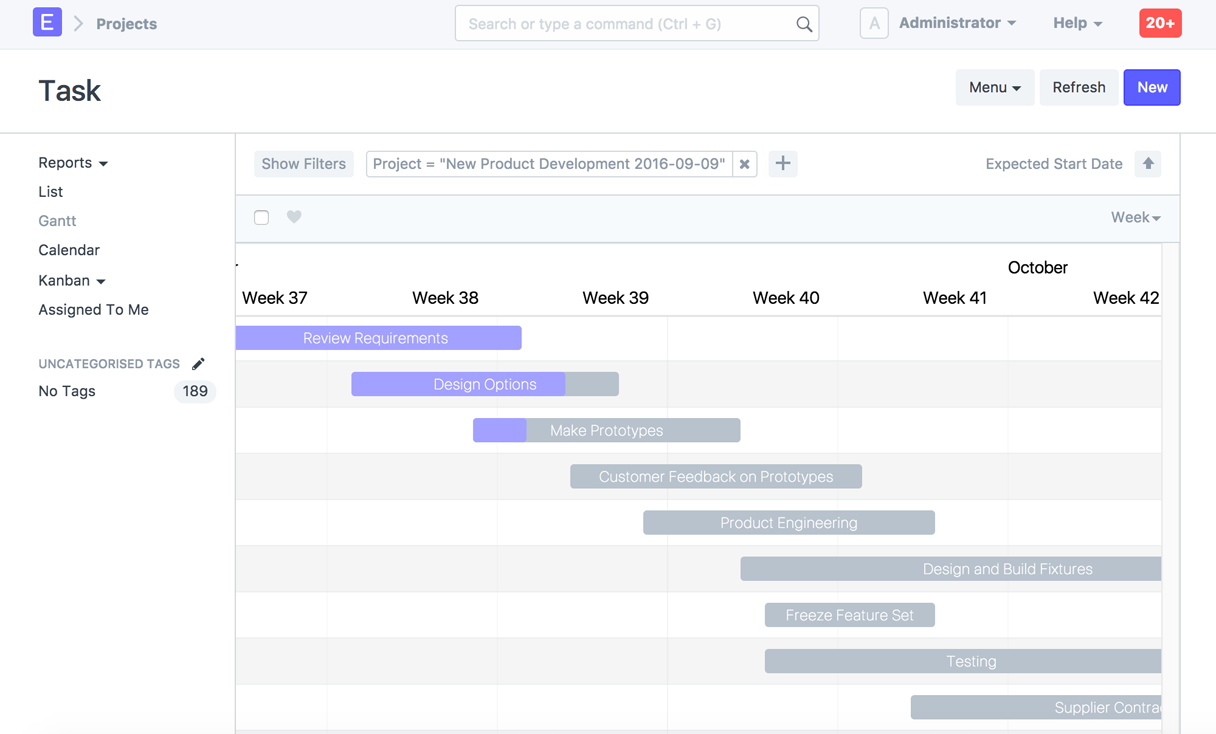
IONIC ERP helps you manage your Projects by breaking them into Tasks and allocating them to different people.

Projects can be used to manage internal projects, manufacturing jobs or service jobs. For service jobs, Time Sheets can also be created that can be used to bill Customers if billing is done on a Time & Money basis.
Sales, Purchase Management, and Customer Support
Purchasing and selling can also be tracked against Projects and this can help the company keep tabs on its budget, delivery and profitability for a Project.

Project
A Project is a planned piece of work that is designed to find information about something, to produce something new, or to improve something.
In IONIC ERP, project management is task-driven. You can create a Project and divide it into multiple Tasks.
A Project has a broad scope and hence can be divided into tasks. Think of coming up with a new smartphone for the next year as a Project. Then things like designing, prototyping, testing, delivery, etc. become tasks under the project.
Whilst each task within a Project can be assigned to an individual or a group of individuals, the assignment can also be done at the project level.
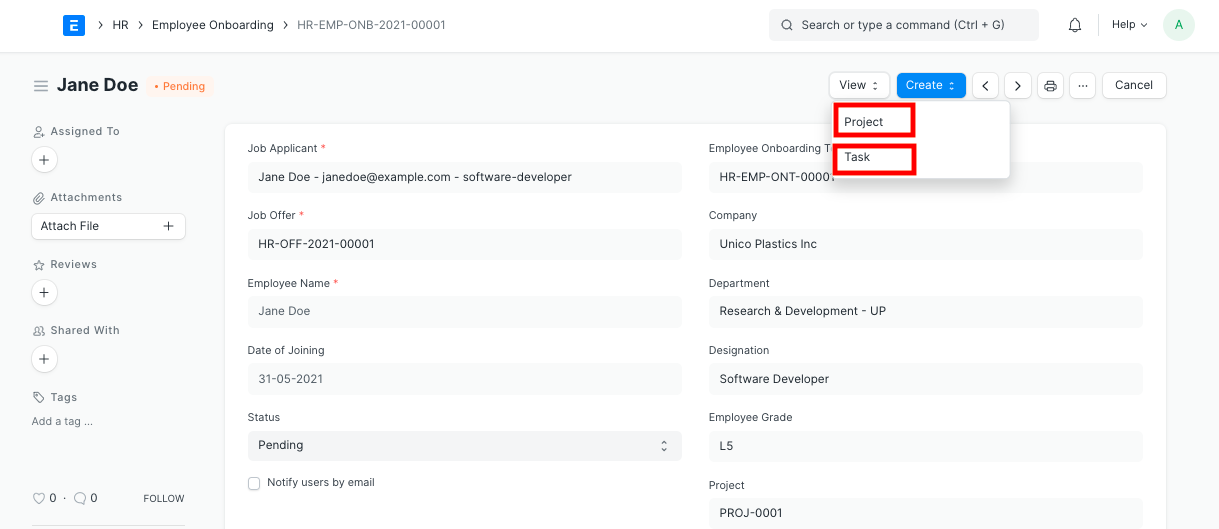
These Tasks can be created from a Project itself or a Task can be created separately as well.
To access Projects, go to:
> Home > Projects > Projects > Project
1. How to Create a Project
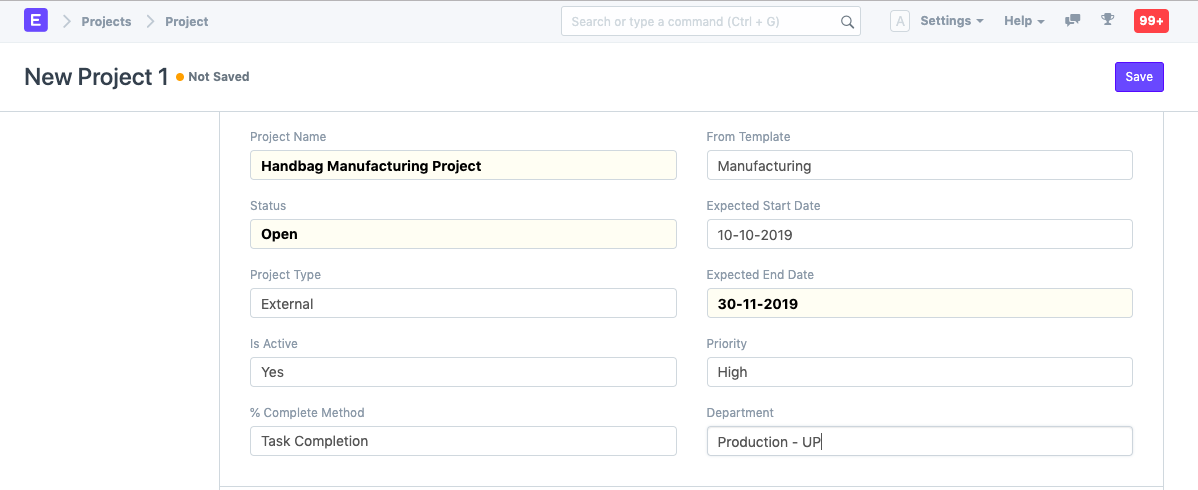
- Go to the Project list and click on New.
- Add the following details:
- Project Name: Title of the Project.
- Status: The default status of a Project is going to be ‘Open’ which can later be changed to ‘Completed’ or ‘Cancelled’.
- Expected End Date: Enter the date on which you aim to finish the project.
- Save.
1.1 Additional Options while creating a Project
- From Template: If you have an existing Project Template, you can choose to create your project using this template.
- Expected Start Date: If you have a time-line fixed for the project, you can define both expected Start Date and Expected End Date in the form.
- Project Type: You can classify your projects into different types, e.g., Internal or External.
- Priority: You can select the priority level of the Project based on how crucial it is. You can also add more priority levels.
- Department: If the project belongs to, or is owned by a Department in the organization, you can add that here.
- Is Active: A Yes/No tab, which lets you change the active status of the project at any later stage.
- Completion Method: You can track the % completion of your project based on one of the three methods, viz. Manual, Task Completion, Task Progress and Task Weight.
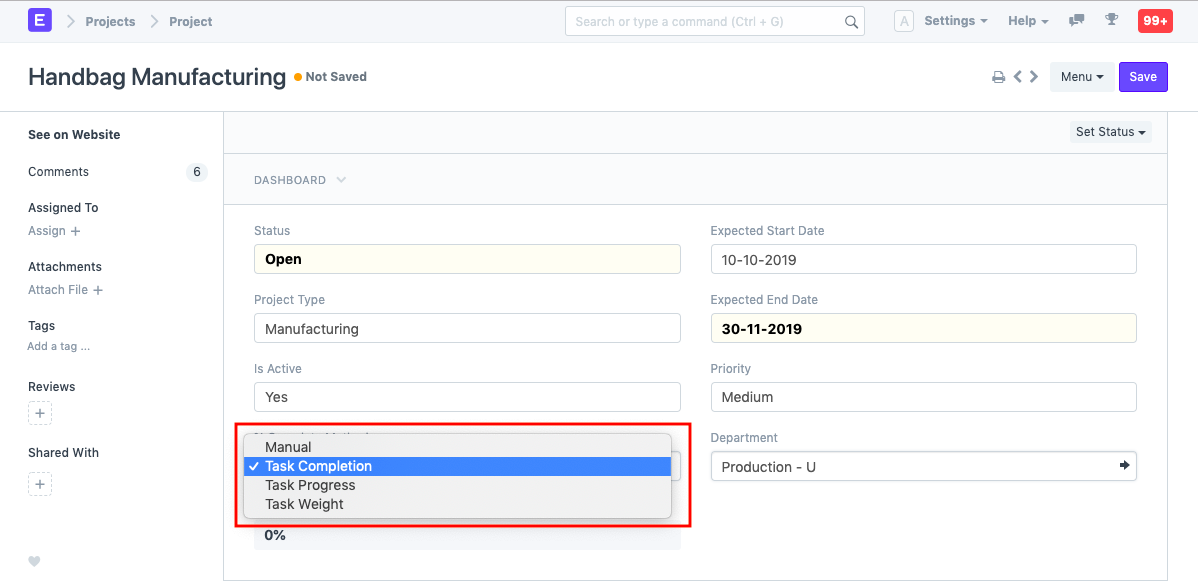 Some examples of how the Percentage Completion is calculated based on Tasks:
Project Activity % Progress Weight Status SC001 Build 100 0.4 Completed SC001 Operate 100 0.2 Completed SC001 Transfer 50 0.2 Open Method Formula Calculation % Task Completed Manual – – Manual Task Completion Task completed / Total no. of Tasks 2/3 66.66 Task Progress Sum of % Progress of all Tasks / Total No. of Tasks (100+100+50)/3 83.33 Task Weight Sum of (Task weight + % Progress) (0.4 * 100 + 0.2 * 100 + 0.2 * 100) 70
Note: If the total weight of the Tasks is not 100, then the calculated result will be divided by the total weight. For example, if the total of task weights is 70, then percentage completed = (70/0.8)% = 87.5%.
2. Features
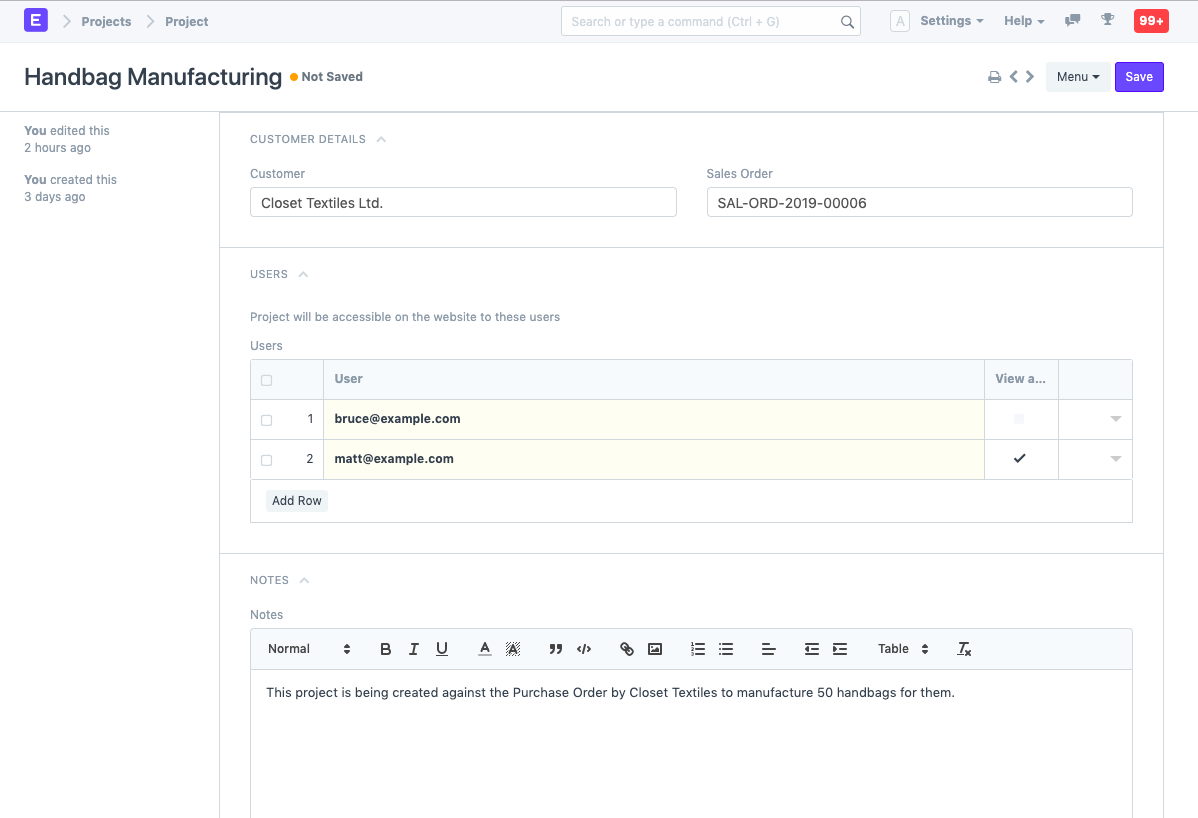
2.1. Customer Details, Users and Notes
- Customer: If a Project is being carried out for a particular Customer, the details can be fed in here.
- Sales Order: If a Project is based on a Sales Order from a Customer, you can fetch the details here. This would enable you to update the Customer on the Progress on the project as per the Sales Order issued.
- Users: You can add any website user to give them access to this Project. E.g., you can add your customer as a Website User, to enable them to have access to your project to monitor progress and/or give any inputs/remarks. Similarly, a Supplier or a Contractual Employee/Freelancer who is involved in the Project can be added as a User.Further, you can also expand the window and select if you want to send a Welcome Email to any particular user or give them Attachment Viewing rights.You can learn more about allowing users to view projects here.
- Notes: You can add any additional notes to the project.
2.2. Start and End Dates
- Actual Start Date: Basis the Actual Start of the project, tracked via Timesheets, the Actual Start Date and Time of the Project will get recorded automatically.
- Actual End Date: Basis the Actual End of the project, tracked via the last update of the Timesheet, the Actual End Date and Time of the Project will get recorded automatically. To know more about Timesheets, click here.

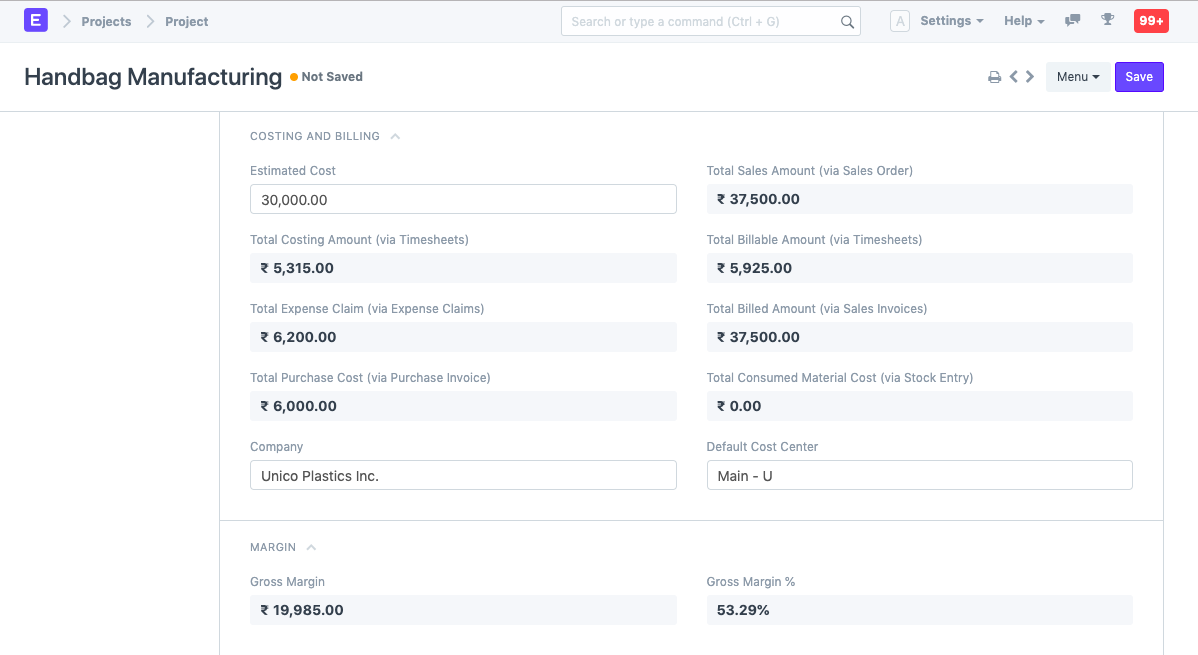
2.3. Costing and Billing
- Estimated Cost: Enter the Estimated Cost of the Project.
- Total Sales Amount: If you have already linked the Project with a Sales Order, the Total Sales Order Amount will be auto-populated here.
- Total Costing Amount: The system will automatically fetch the Total Costing Amount from all the Timesheets linked to this project.
- Total Billable Amount: The system will automatically fetch the Total Billable Amount from all the Timesheets linked to this project.
- Total Expense Claim: Based on the expenses claimed by an Employee for the completion of the Project, the Total Expense Claim will be auto-calculated.
- Total Billed Amount: The Total Billed Amount gets auto-populated in the system using the Sales Invoice created against the Sales Order.
- Total Purchase Cost: The Total Purchase Cost of a Project is the cost fetched from the Purchase Invoices that get created against a Purchase Order issued for supply of Materials required for a Project.
- Total Consumed Material Cost: Using the Stock Entry made as per the requirement of Materials in the Project, the Total Consumed Material Cost gets captured.
2.4. Margin
- Gross Margin: Gross Margin would give you the margin you have between your Total Costing Amount and the Total Billed Amount.Gross Margin = (Total Sales Amount + Total Billable Amount) – Total Costing Amount + Total Billable Amount + Total Expense Claim + Total Purchase Cost + Total Consumed Material Cost)
- Gross %: The percentage of the Total Billed Amount spent in the Total Costing Amount makes for the Gross %.((Total Sales Amount + Total Billable Amount) – Total Costing Amount + Total Billable Amount + Total Expense Claim + Total Purchase Cost + Total Consumed Material Cost) / Total Sales Amount)* 100
2.5. Monitor progress
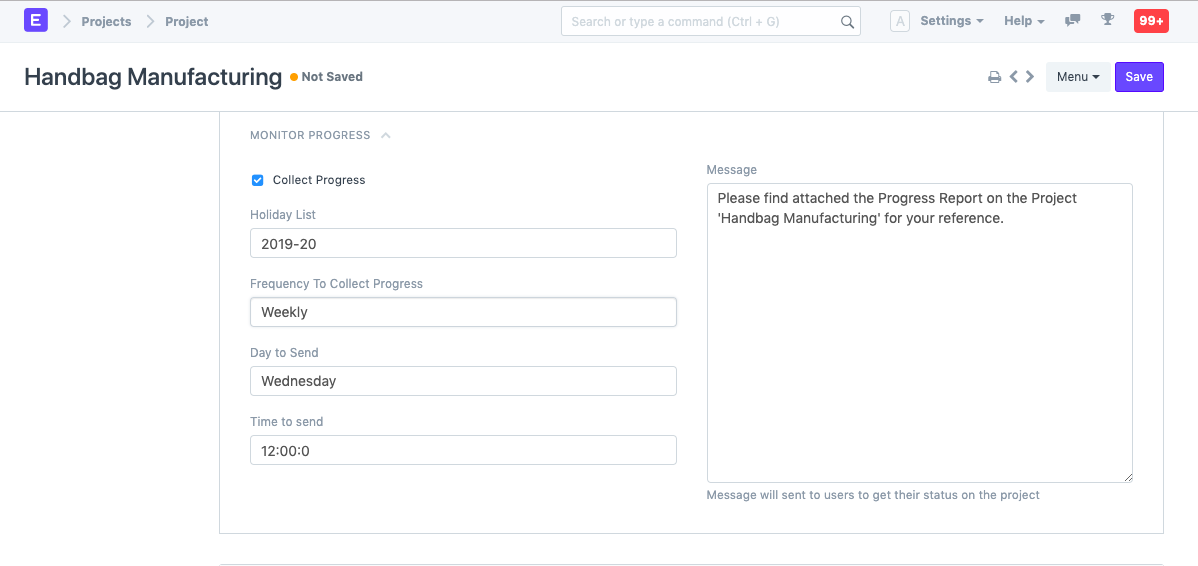
When you enable the ‘Collect Progress’ option by checking the box, it will enable you to add monitoring details to the project. A report on the progress of the project shall be sent to all stakeholders of the project.
- Holiday List: You can select the Holiday List for your company. This will allow you to collect the Progress Reports only on the Working Days.
- Frequency: You can set the frequency at which you wish to get the reports. It can be set to an hourly, twice daily, daily or on a weekly frequency.
Tasks
In project management, a task is an actionable unit or activity which needs to be completed.
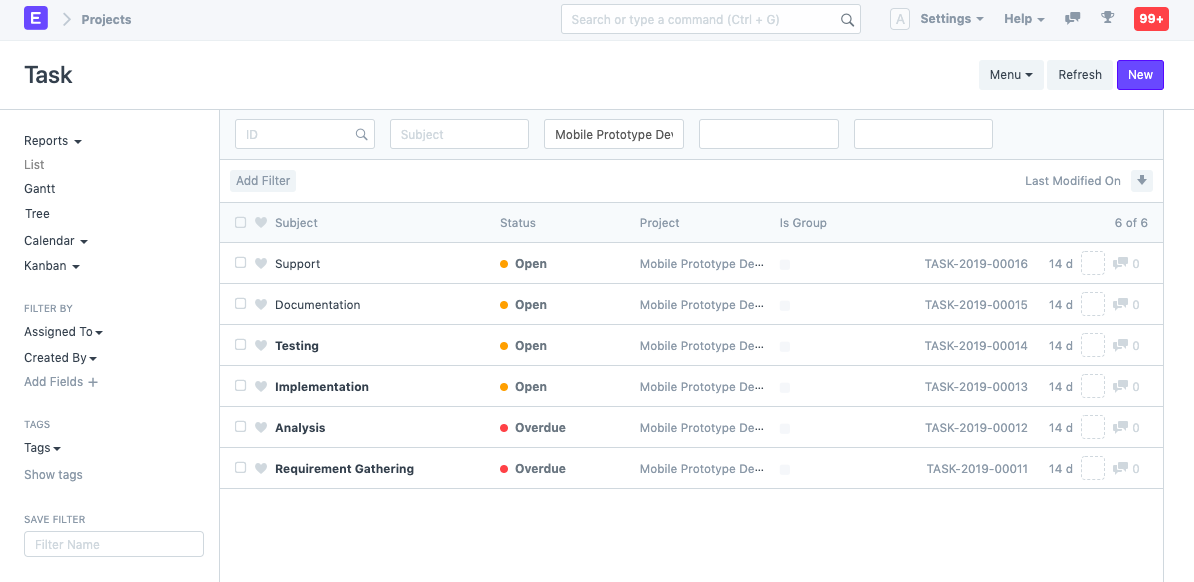
To access Tasks, go to,
> Home > Projects > Projects > Task
1. How to Create a Task
- Go to the Task List and click on New.
- Add the subject of the task.
- Save.
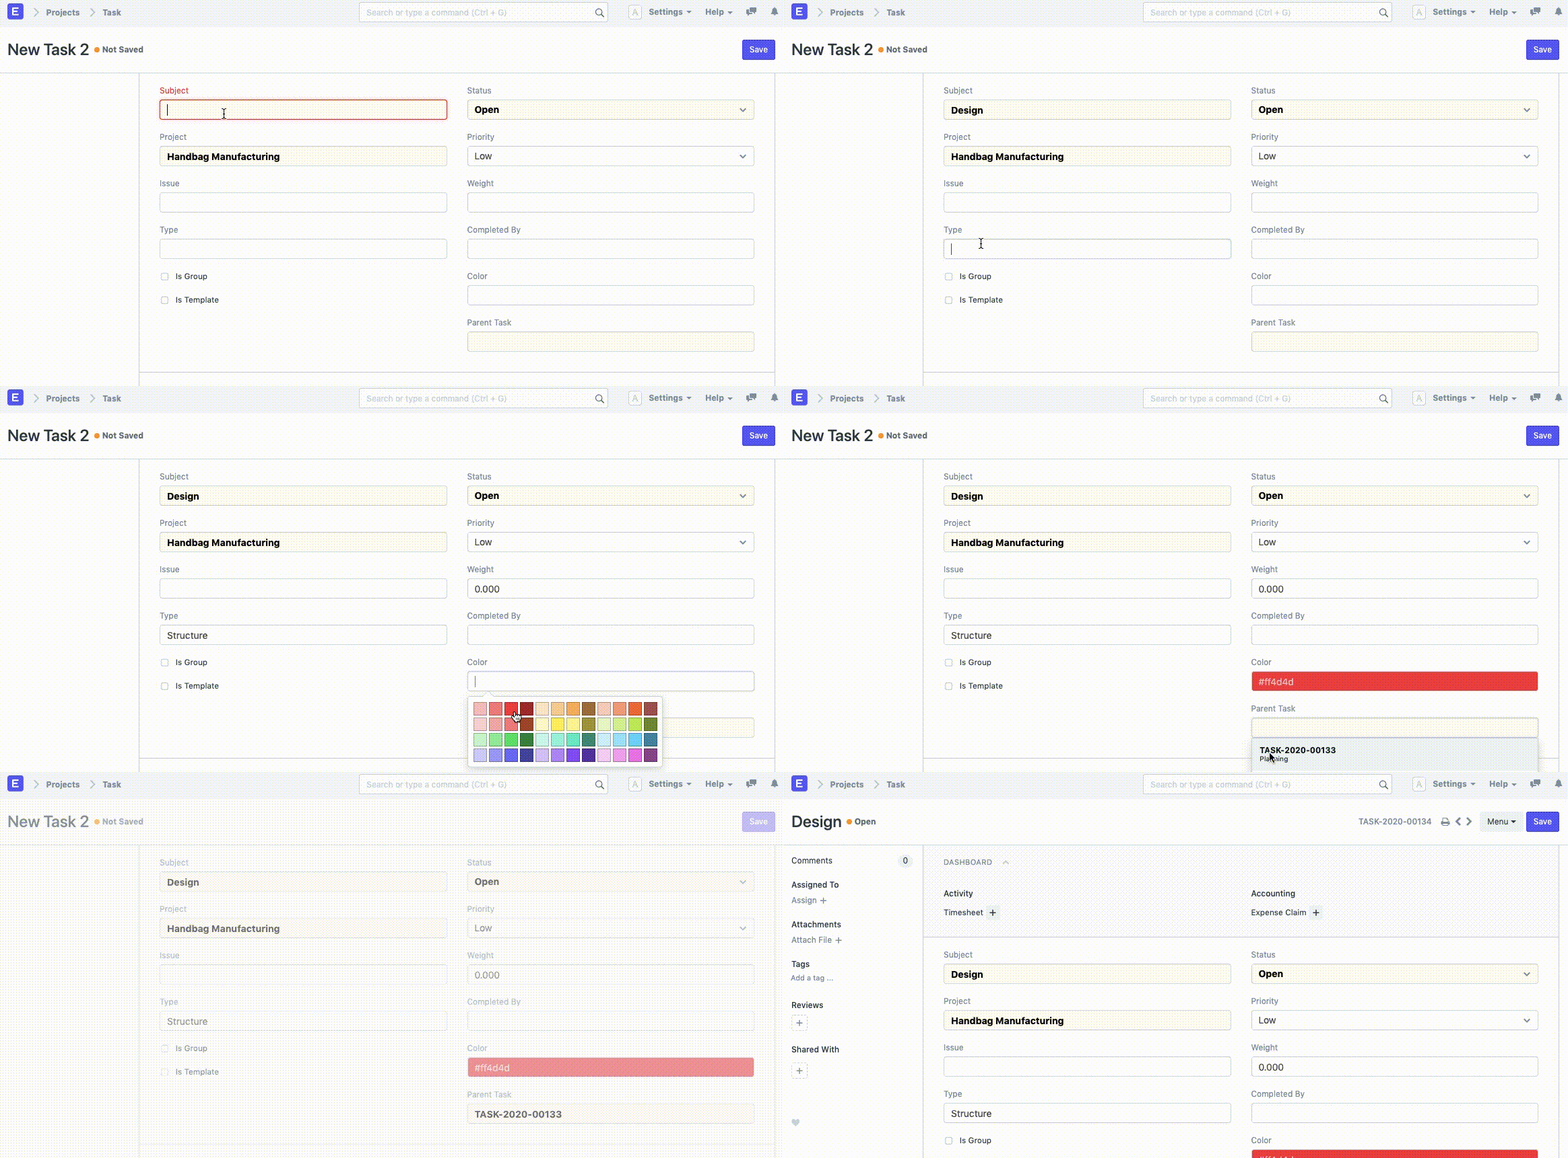
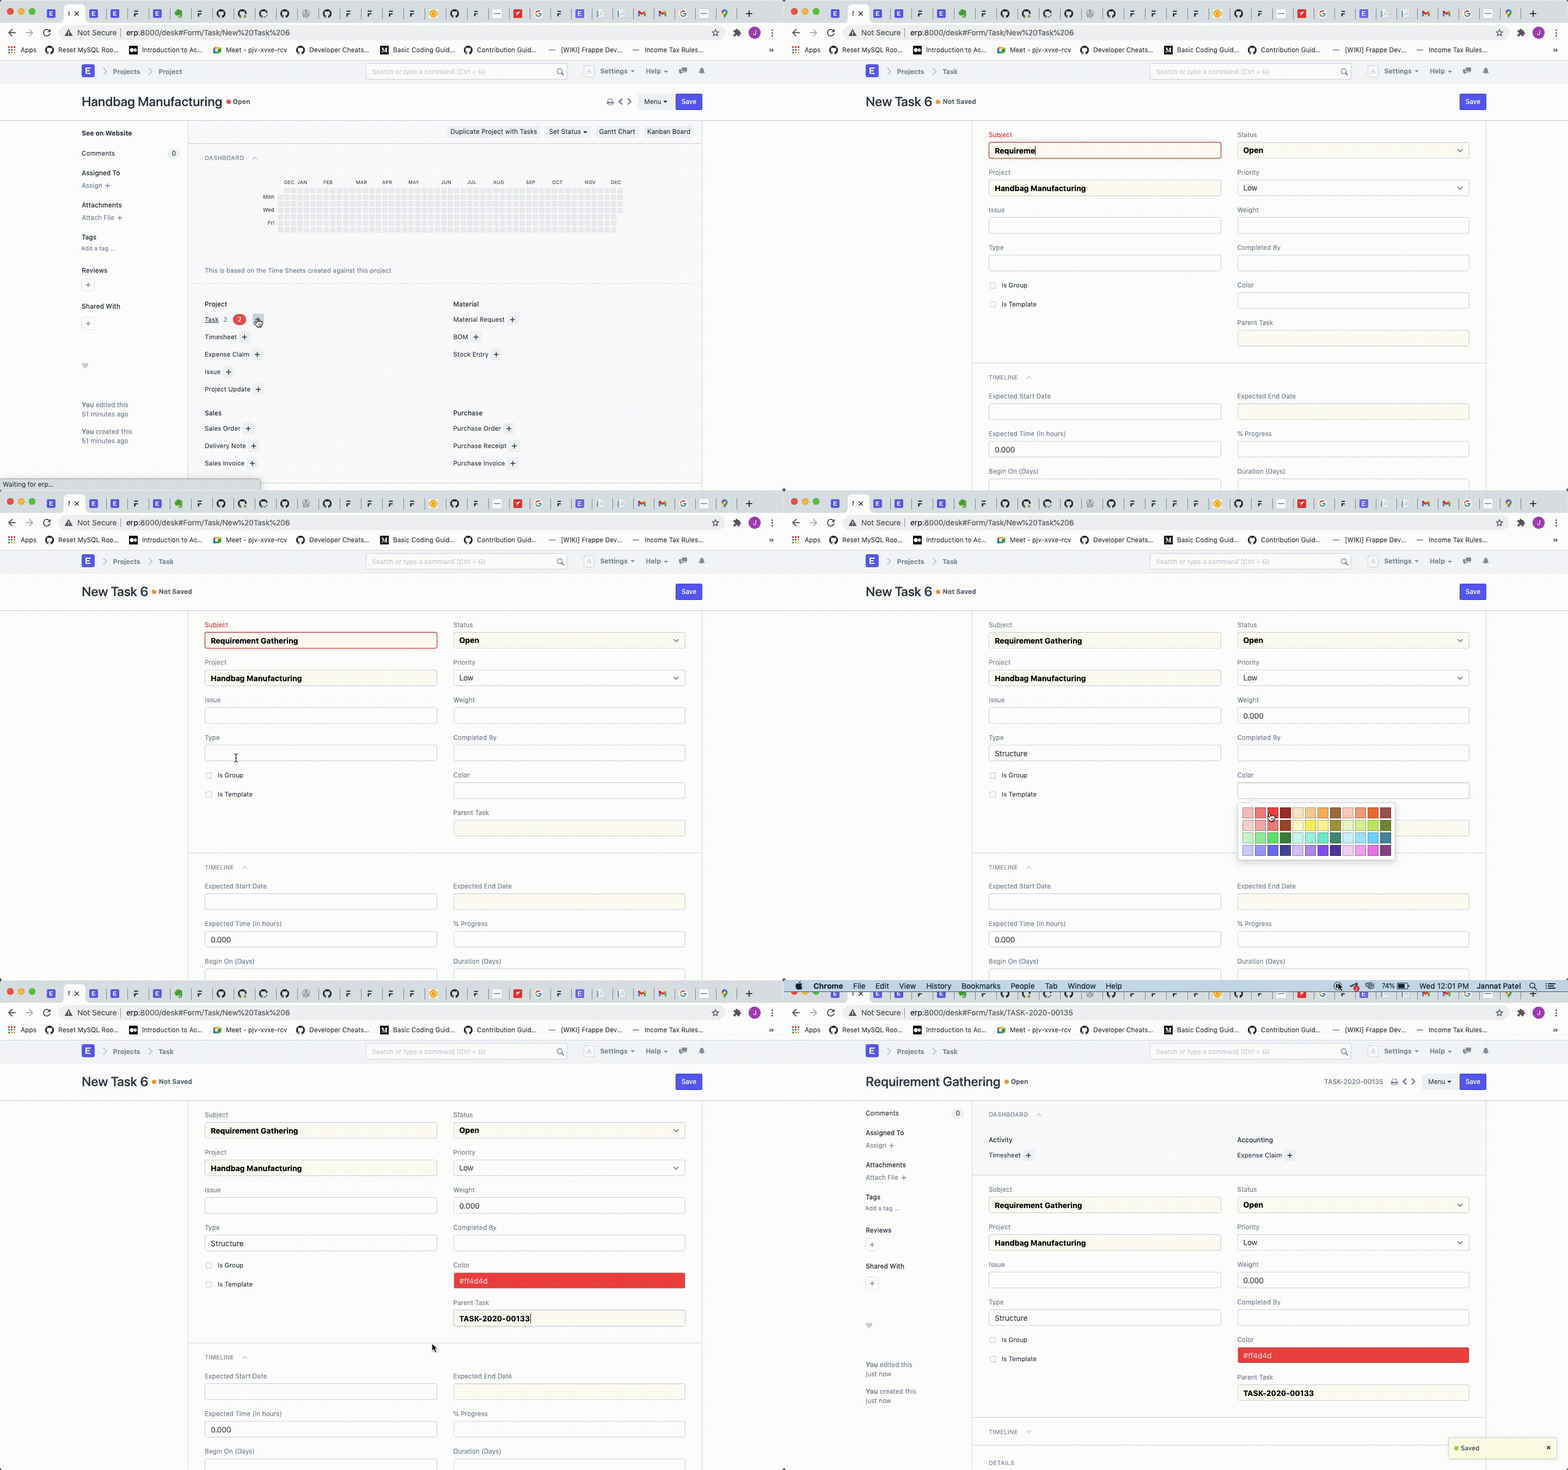
Alternatively, a task can also be created from a Project in the following way:
- Go to the Project for which you want to create a new task.
- Go to Task under the Project section on the Dashboard. The plus icon ‘+’ here would direct you to the task creation page.
- Add the subject of the task.
- Save.
1.1 Additional Options while creating a Project
The following additional details can be added when editing a new task:
- Status: You can add the status of the Project or change the same whenever needed, e.g., from ‘Open’ to ‘Working’, ‘Overdue’,’Pending Review’,’Completed’, or ‘Cancelled’
- Project: In case a task is added independently, you may choose to link the task to a particular Project. If the task is created from a Project, the details of the Project will get automatically added.
- Priority: You can choose to define the priority of the task, viz., Low, Medium, High or Urgent.
- Issue: If the task is an actionable that arises out of an Issue, that issue can be tagged here with the Task.
- Weight: If a particular task carries some weightage out of a project, or otherwise, the weightage can be specified here. This weightage gets calculated in the Percentage Task Completion Method by Task Weight.
- Type: If your task can be defined under a particular Task Type, say, User Training or User Demo, you can enter the Task Type here. It can be used to filter the Tasks based on Task Types.
- Color: Each task can be recognized by a different color. This helps in identifying a task while creating Gantt Charts.
- Is Group: This box can be checked to indicate that a task is a parent task, and can be further divided into multiple sub-tasks.
- Is Template: This box can be checked to indicate that this task is a template task, and is meant to be used in a Project Template.
- Parent Task: If a particular task is a part of a group task, the parent task can be linked to the task from this field.
2. Features
2.1. Timeline and Details
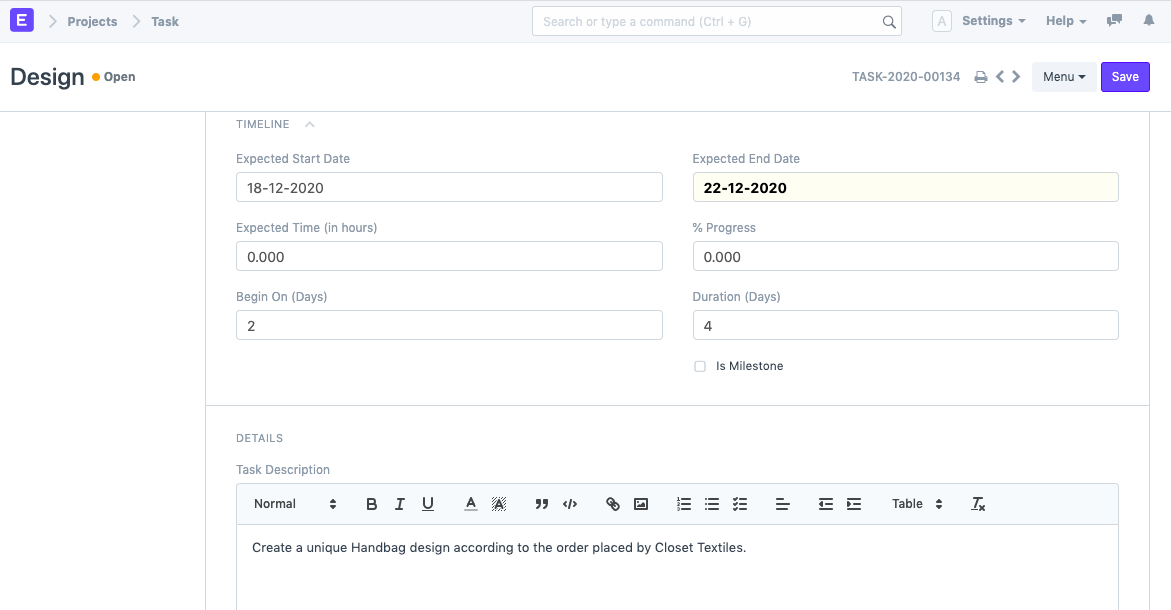
- Expected Start Date: You can enter the date on which you expect the Task to be started.
- Expected End Date: You can enter the date on which you expect this Task to be finished.
- Expected Time: You can enter the number of hours which you expect are going to be spent on this task.
- Progress: You can enter the Progress Percentage of a Task.
- Begin: If the task is a template task, this field can be used to specify the day on which this task should begin after the project is commenced.
- Duration: If the task is a template task, this field can be used to assign a specific number of days to this task.
- Is Milestone: This box can be checked in the cases where a particular task is a Milestone in a Project.
- Description: You can add a description of the task here.
Note: Based on the values of Begin and Duration field, the Expected Start Date and Expected End Date gets calculated for Project Tasks created using Project Template. This calculation skips holidays based on the holiday list of your company.
2.2. Dependencies and Actual Time
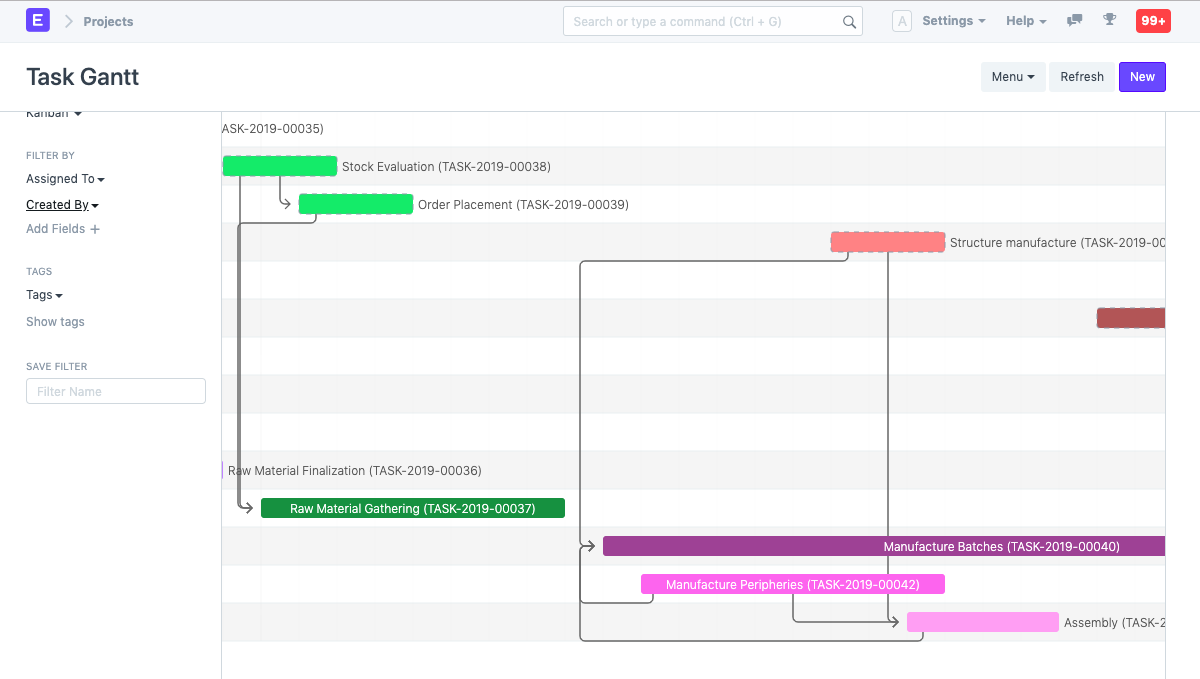
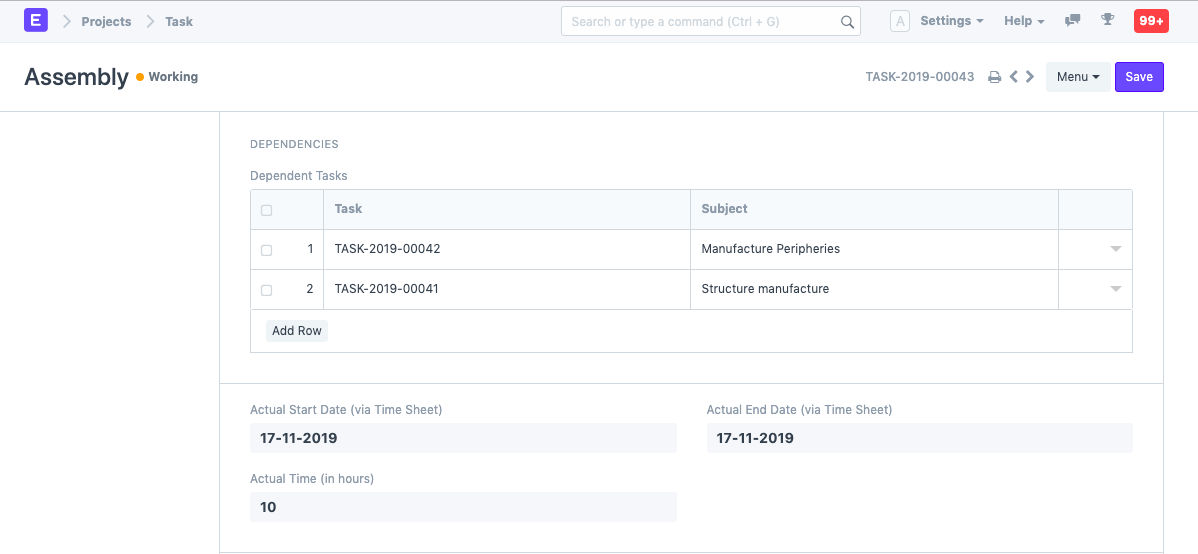
- Dependent Tasks: Dependent tasks indicate that a particular task is dependent on another task, and the former cannot be completed before the completion of the latter.Task dependencies can be viewed in the Gantt Charts in the following way.
- Actual Start Date: The actual date and time on which the Task is started get recorded basis the Timesheets.
- Actual End Date: The actual date and time on which the task was finished get recorded here via the Timesheets.
2.3. Costing
- Total Costing Amount: The Total Costing Amount gets captured here via the Timesheets submitted by the user while working on this task.
- Total Billing Amount: The Total Amount with which the Customer is to be billed via this task gets recorded here form the Timesheets.
- Total Expense Claim: The Total Amount of Expense claimed by an Employee for the completion of this Task gets recorded and reflected here.
2.4. More Info
- Department: You can enter the Owner Department for the task. Irrespective of the Owner department of the Project, each task can be carried out by a different department.
- Company: You can change the Company for which this Task is being carried out. This can be used in cases where A company is carrying out the Task for its Sister Company or its Parent Company or a Subsidiary.
Project Template
A Project Template is a predefined sequence of tasks arranged in stipulated schedule.
These templates can be pulled for similar kind of Projects and the tasks therein get auto-populated at the time of creation of each new project.
To access Project Template, go to:
> Home > Projects > Projects > Project Template
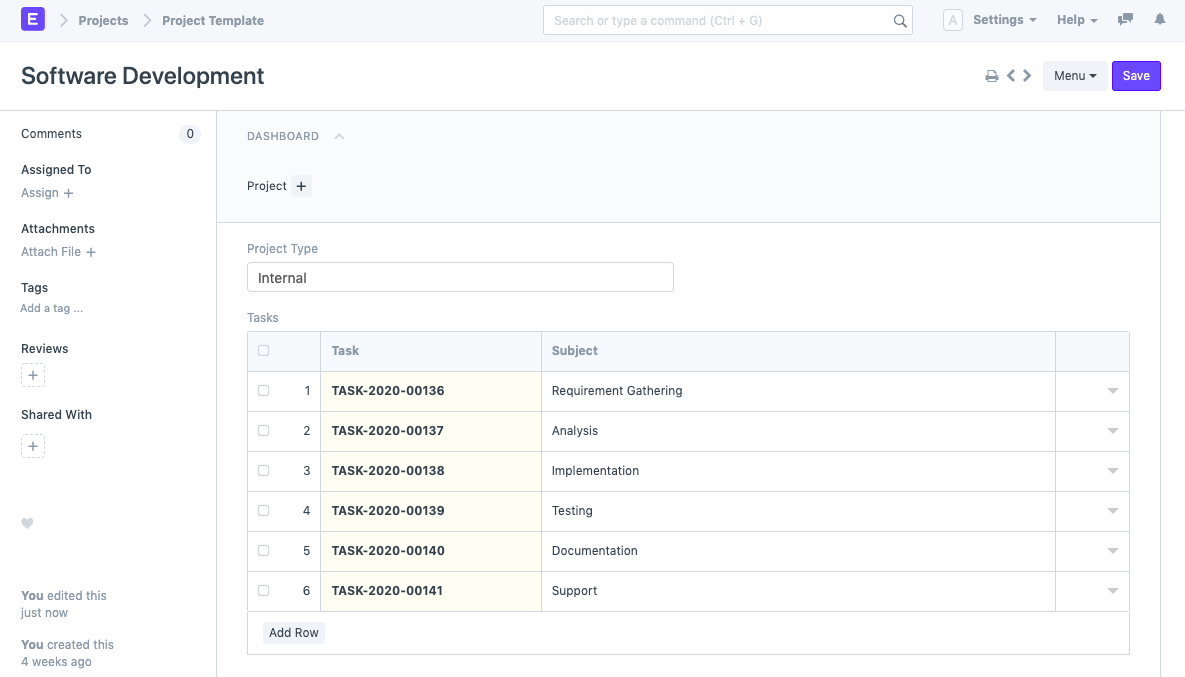
1. How to Create A New Project Template:
- Go to the Project Template List and click on New.
- Add the following details:
- Project Template Name: Title of the Project Template
- Project Type: Project Templates, just like projects can be classified into different project types, e.g., Internal or External.
- Tasks: Each Project Template will have a set of a predefined sequence of tasks. In this table, you can select the tasks you want for this template.
Project Type
A Project Type is the classification of projects into different types to group similar kind of projects.
Internal Projects, External Projects could be examples of Project types and are already created in the system. You can choose to add more Project Types. This comes handy when you are reviewing the Projects, and you want to filter the information based on Project Types.
To access Project Type, go to:
> Home > Projects > Projects > Project Type
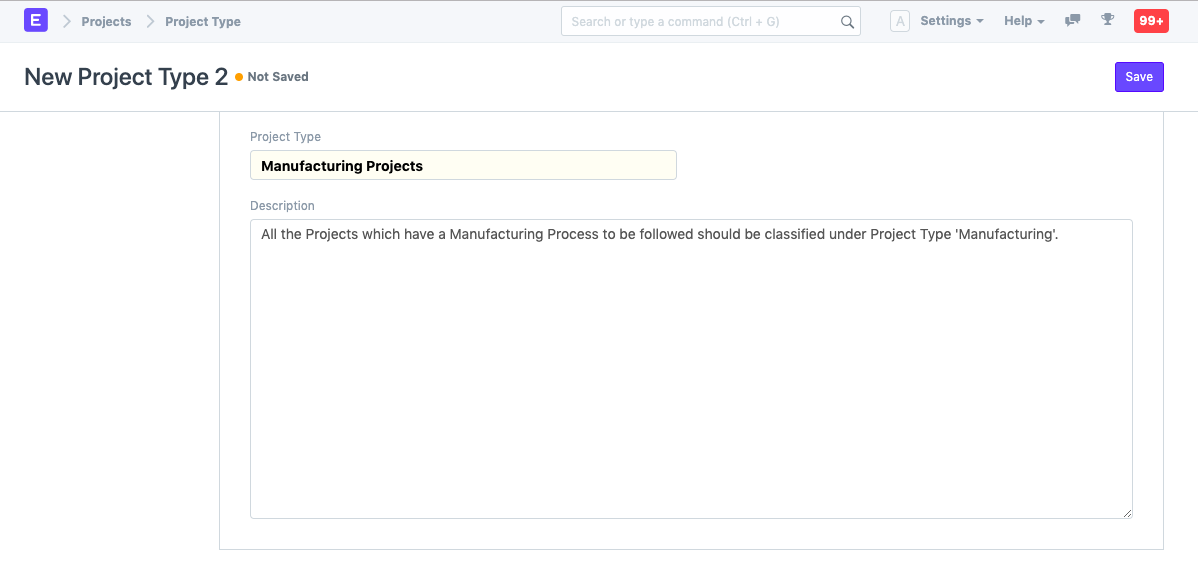
1. How to Create a Project Type
- Go to the Project Type List and click on New.
- Add the name of the Project Type and description
- Save.
Project Update
A Project Update is the status of the Project which can be sent to all the stakeholders of the Project.
Each time you want to update the stakeholders about the project, you can send a Project Update to them.
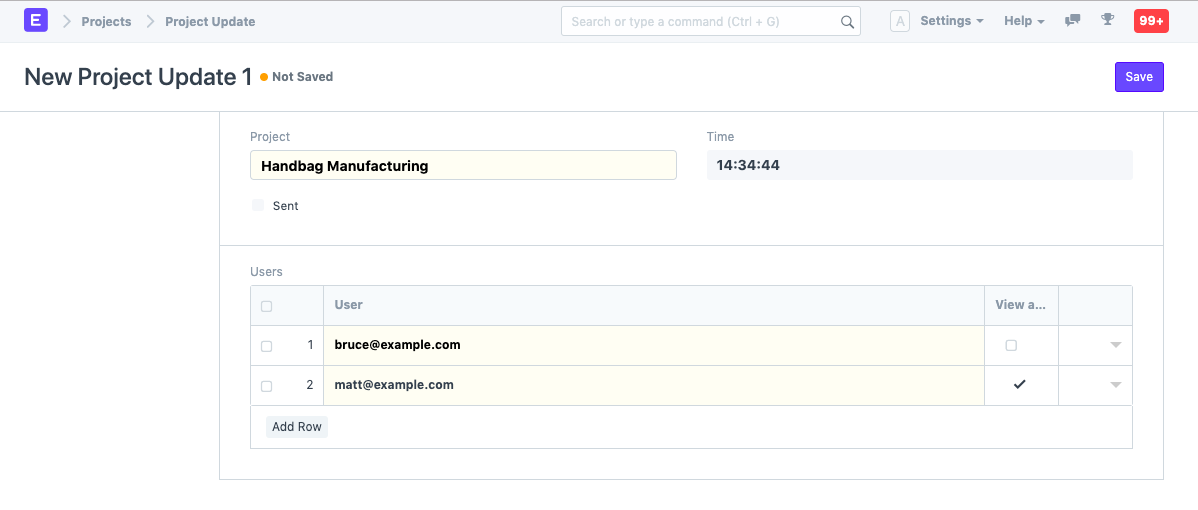
To access Project Update, go to:
> Home > Projects > Projects > Project Update
1. How to Create a Project Update
- Go to the Project Update List and click on New.
- Add the name of the Project for which you want to send an update.
- Add the name of the Users to whom you want to send the Project Update in the Child Table. These Users could be your Customers or any other Internal or External Stake Holders.
- Save and Submit.
Once you have submitted the Project Update, an email is sent to the selected stakeholders with project updates.
1.1. Additional Details
When you expand the table which has the names of the Users, you will be able to add the following details:
- You can select whether you want to send a Welcome Email to any particular User while sending them the Project Update.
- You can select whether you want any particular User to view Attachments in the Project Update.
- You can add the description of the Current Stage of the Project in the ‘Project Status’ field.
Project Views
As projects are time-sensitive, we need different kind of views to convey information in a visual manner to users viewing them.
Apart from the generic list and report views for projects and tasks, IONIC ERP also provides Gantt, Kanban, and Calendar views for tasks. You can access these views by going to the Task list and selecting them via the left sidebar.
Gantt View
A Gantt Chart shows how tasks are linked to each other and shows their execution sequence, based on start and end dates set in the tasks along with any dependencies, if available.
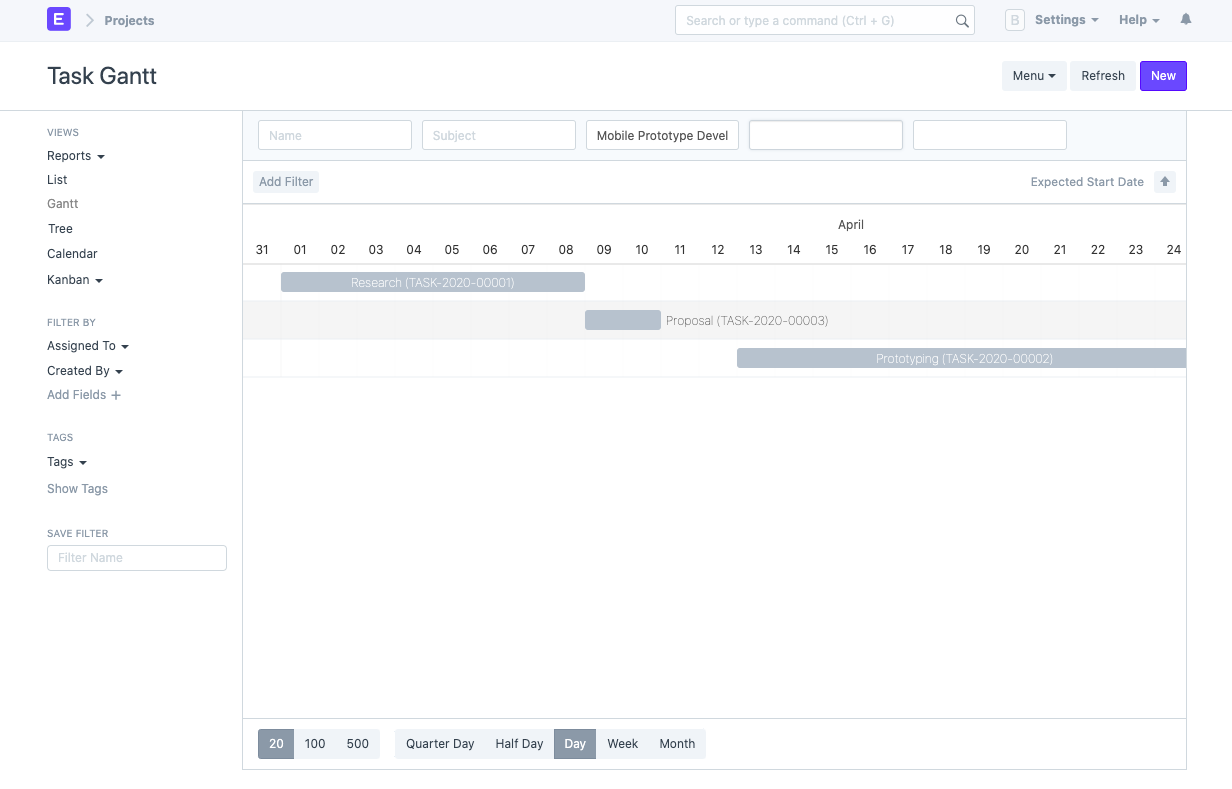 Gantt Chart for Tasks
You can update the range of the chart by selecting one of Quarter Day, Half Day, Day, Week, or Month.
Dragging a task along the dates will update the start and end date of a task.
If you want to further customize the chart and make it more colorful, read this article
Kanban View
Kanban in Japanese means “billboard” or “signboard” as the task management method traces its origin back to Toyota’s lean manufacturing process. In a typical kanban board setup, you have a board or wall which is divided into section which represent different stages of execution or realization. Tasks go up on the board as sticky notes or Post Its and move through the board updating its current stage in the process.
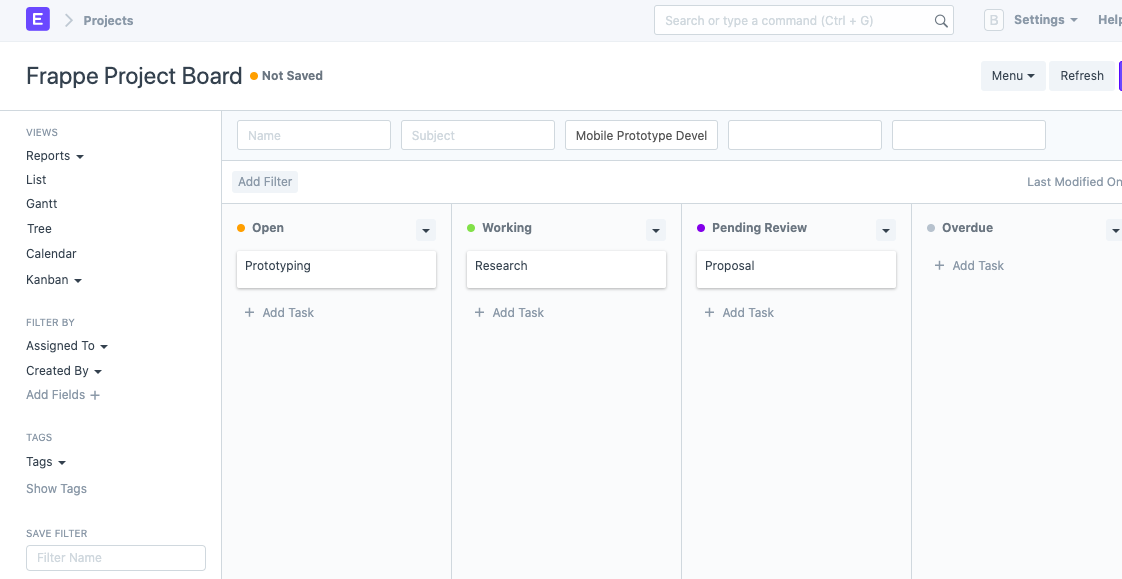 IONIC ERP Kanban Board
IONIC ERP renders the Kanban view for tasks based on its status. You can update the status of a task by moving the representative card from one column to the next. You can also assign colors to these columns for visual reference.
Read customizing Kanban board to learn more.
Calendar View
Like the Gantt chart, the calendar view also shows the task and the planned number of days it’ll take to complete. However, this one shows the task spread across your regular calendar.
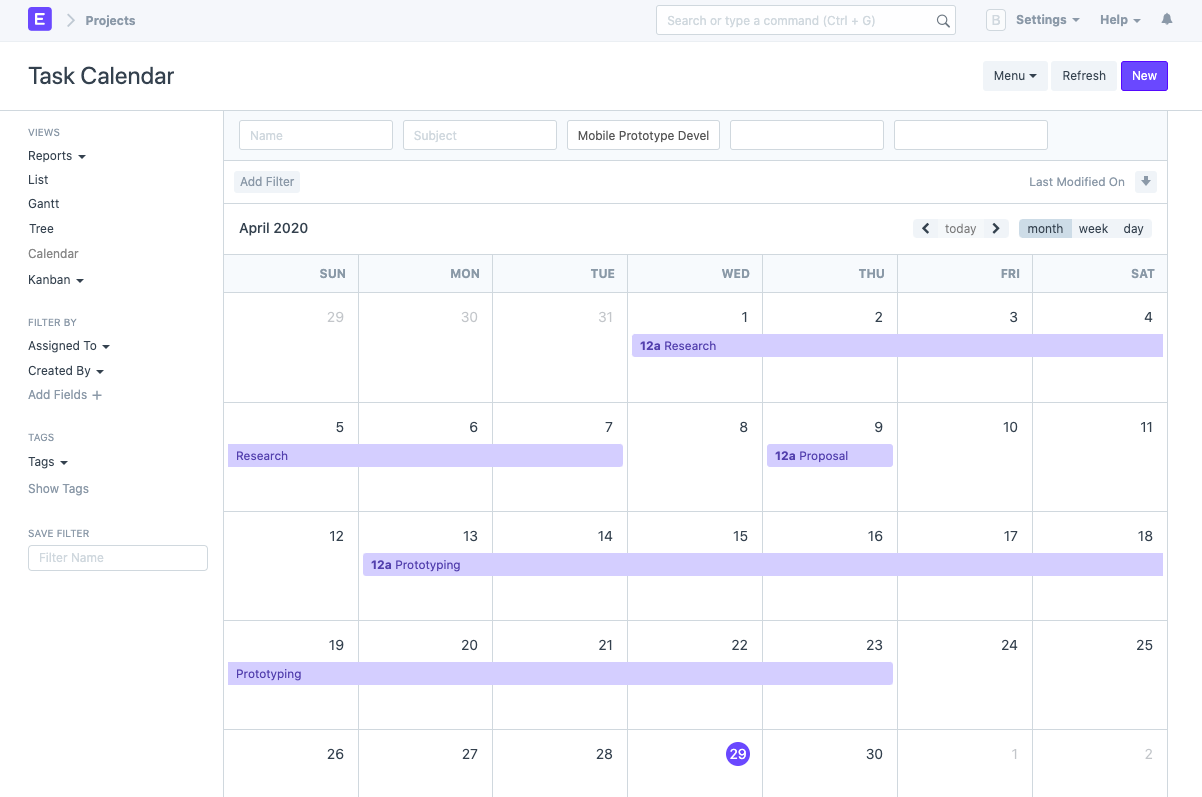 Calendar View for Tasks
Timesheet
A Timesheet is the record of the number of hours spent by an employee on completion of each task.
The Timesheet can also be used to calculate the billable towards an employee, to calculate their salaries, or to track an employee’s contribution towards a Project or a Task.
In IONIC ERP, a Timesheet can have an account of a particular employee working on multiple Tasks or Projects in a tabular format.
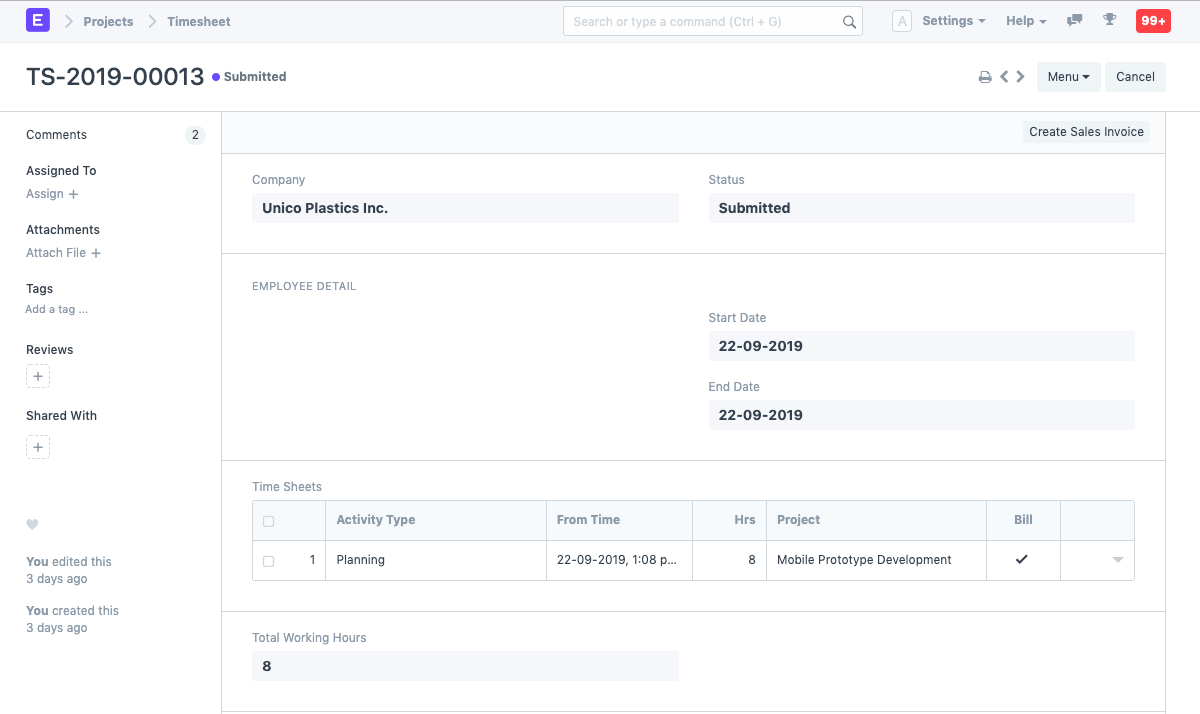
To access Timesheet, go to,
> Home > Projects > Time Tracking > Timesheet
1. How to create a Timesheet
- Go to Timesheet list and Click on New.
- Enter the Company name and the Employee Code.
- Add the following details to the field ‘Time Sheets’.
- Activity Type: Add the type of activity for which the Time Sheet has been created.
- From Time: Enter the date and time at which the work was started.
- Hrs: Enter the number of hours for which this Time Sheet has been created. One Timesheet can be used to track the work hours on multiple days as well.
- Project: If this Time Sheet needs to be tagged to a particular Project, you can add the name of the Project here.
- Bill: This box needs to be checked if this particular Time Sheet is a billable.
- Click on ‘Add Row’ to add more such Time Sheets.
- Save.
- After saving the Timesheet, according to the details entered in the different Time Sheets, the Start Date, End Date and the Total Working Hours will get updated automatically. Click Submit.
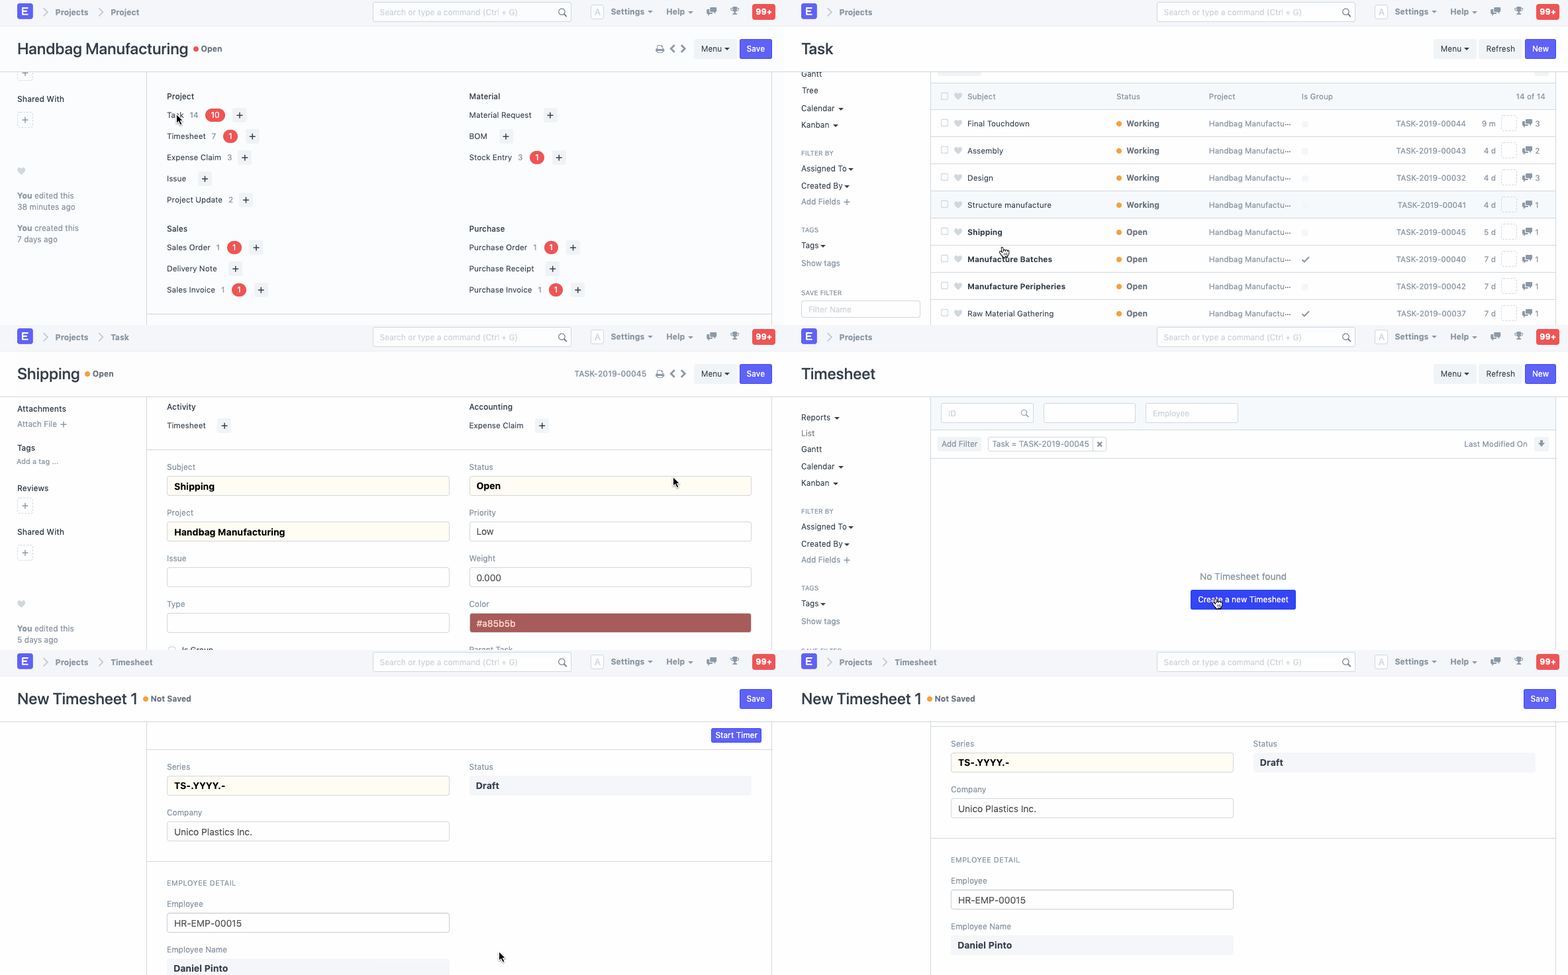
1.1. Alternatively, a Timesheet can also be created from a Task in the following way:
- Go to the Task for which you want to create a new Timesheet.
- Go to ‘Timesheet’ under the Activity section on the Dashboard. The plus icon ‘+’ here would re-direct you to the Timesheet creation page.
- Follow the steps to create a Time Sheet.
1.2. Timer in Timesheet
A Timer can be used to record the actual time taken by an employee to finish a particular activity in a Timesheet.
1.2.1. Steps to start a Timer:
- In a Timesheet On clicking Start Timer a dialog box pops up and you are required to enter the following details:
- Activity Type: The Activity for which you are recording the Time.
- Project: The Project for which you are creating the Timesheet.
- Task: The Task for which you are recording the time in the Timesheet.
- Expected Hrs: Enter the number of hours that you expect the Task to finish in.
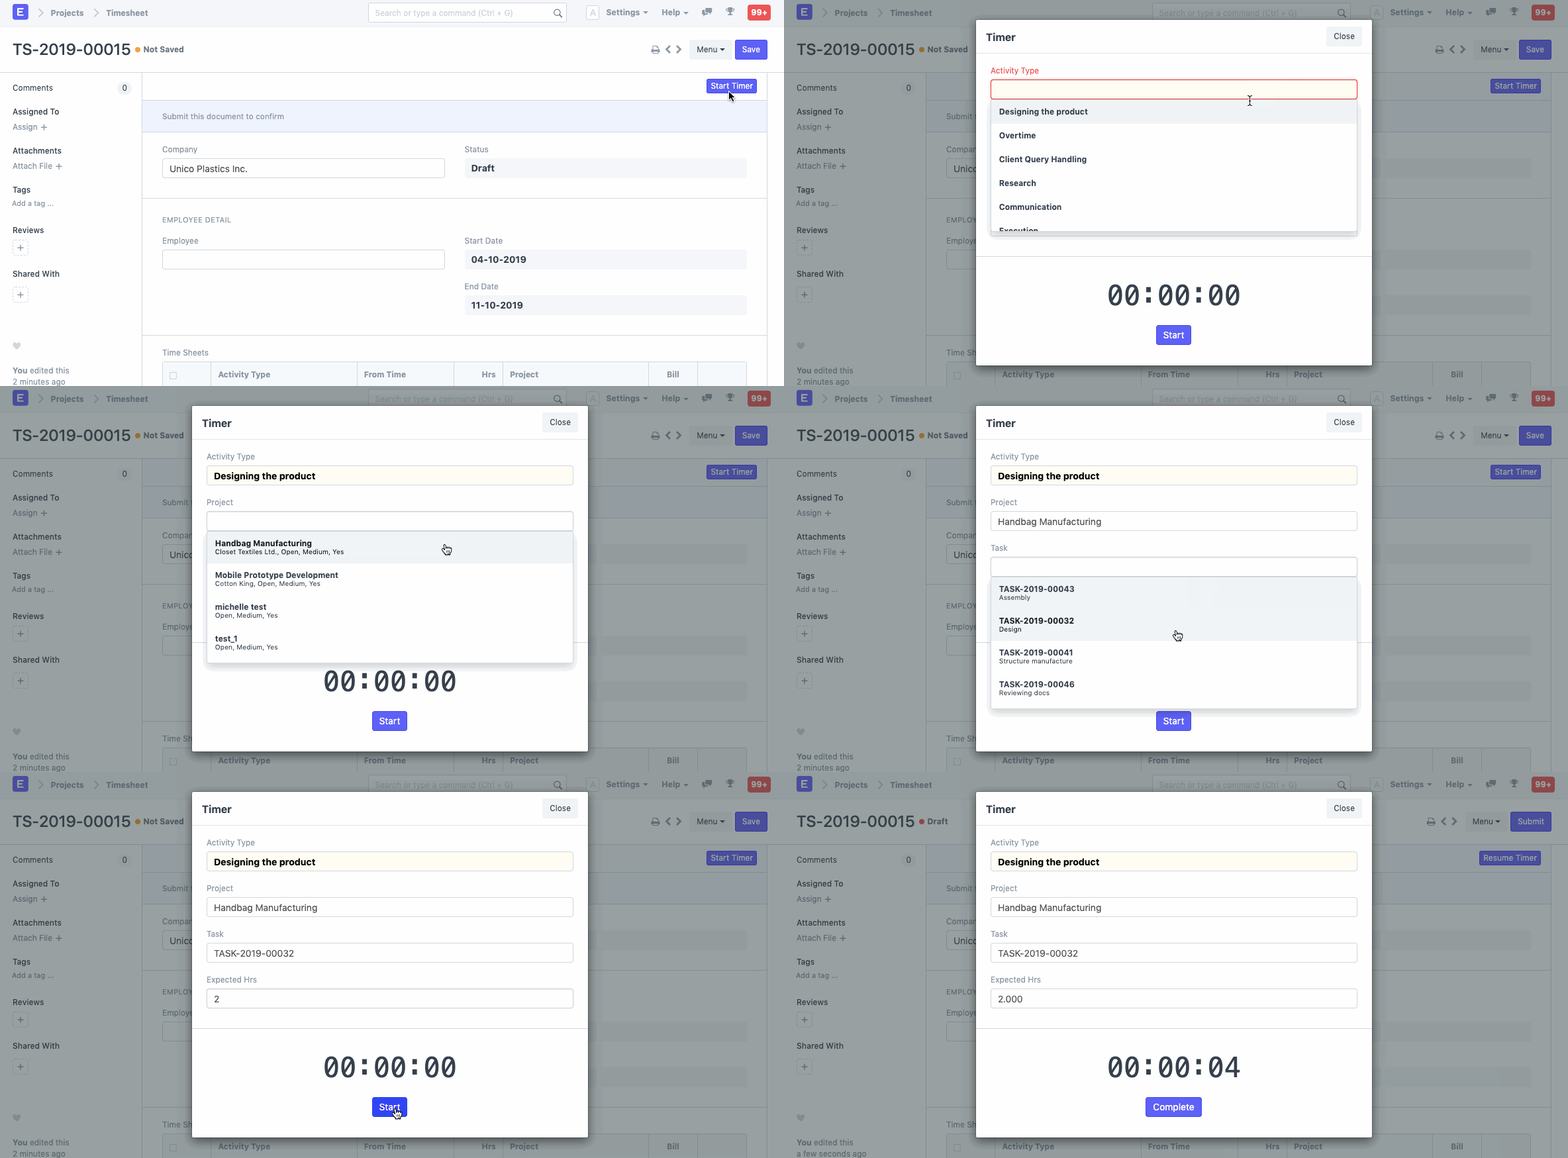
- Once you have completed the Task, click on Complete. A new entry will be created in the Timesheet, and the time will get recorded as a Time Sheet in the Time Sheets Table in the Timesheet.
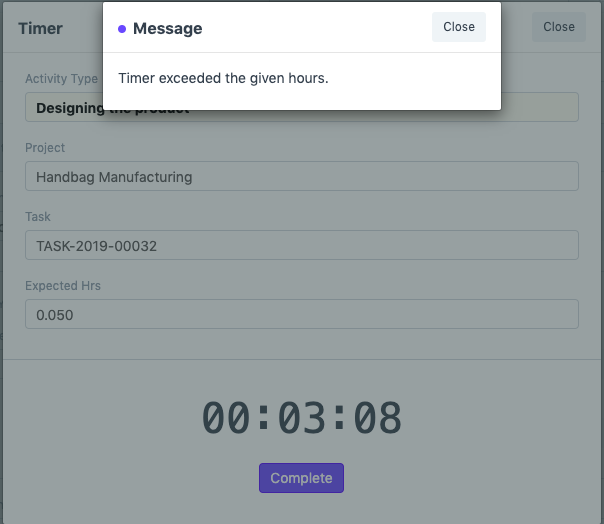
- If the time exceeds the ‘Expected Hrs’, an alert box appears.
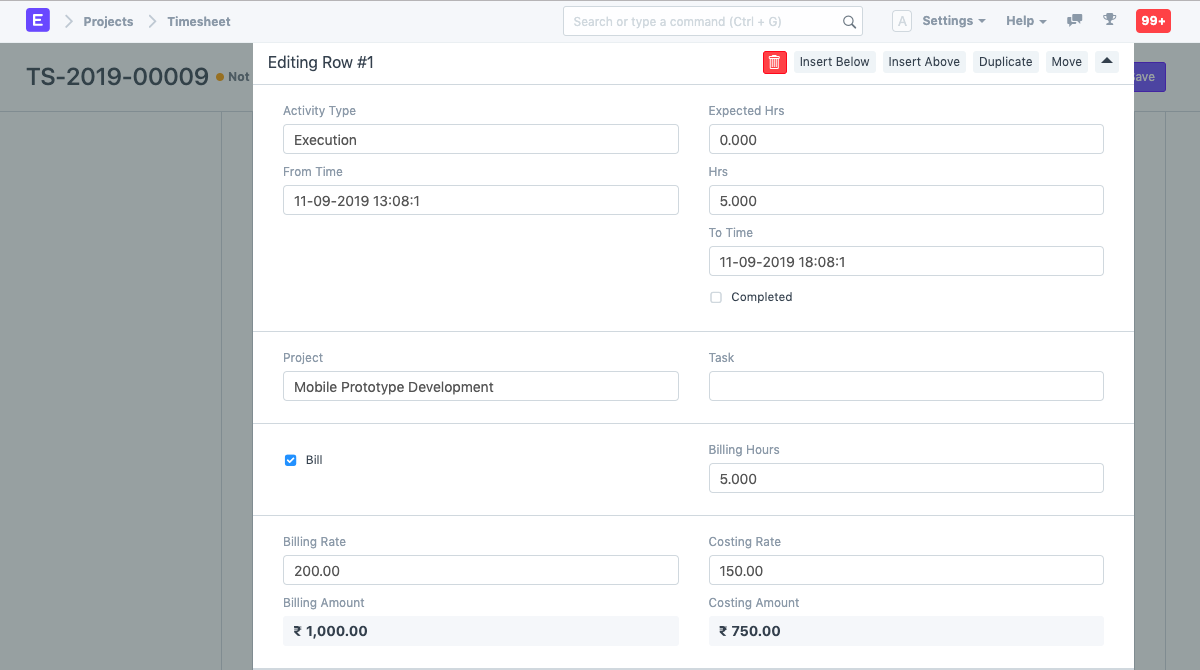
1.3. Additional Options while creating the Timesheet
The Time Sheet when expanded, allows you to enter the following details to it:
- Expected Hours: Enter the tentative time required to complete the Tasks on the Time Sheets.
- To Time: Enter the date and time at which the work was completed.
- Completed: This box needs to be checked if the Task has been completed while submitting the Timesheet.
- Task: If this Time Sheet needs to be tagged to a particular Task, you can do it here.
- Billing Hours: This number of hours for which the customer needs to be billed for this Timesheet.
- Billing Rate: The rate at which the customer needs to be billed for this work.
- Costing Rate: This is the actual cost of work done. It is fetched from the activity cost (per employee) or from activity type and can be edited.
- Billing Amount: The billing amount gets auto-calculated based on the billable number of hours and the billing Rate.
- Costing Amount: The costing amount gets auto-calculated based on the number of hours and the costing rate.
2. Features
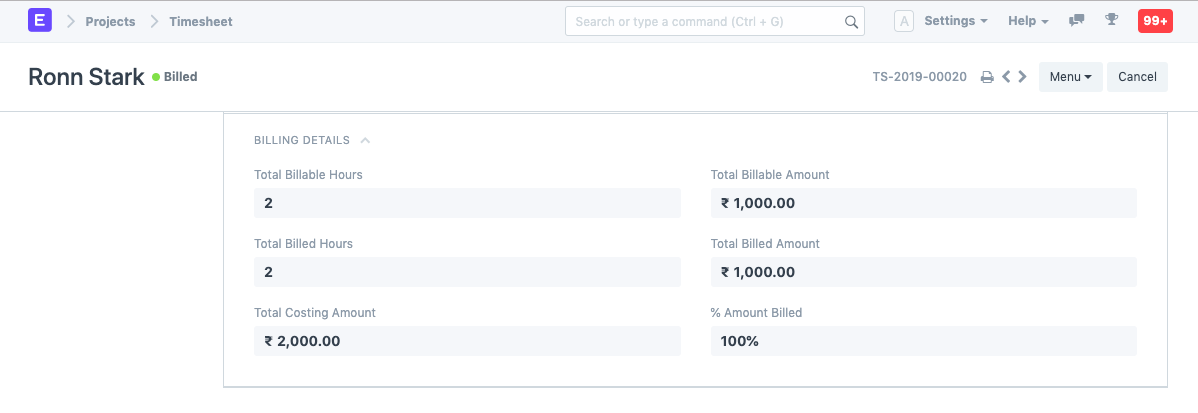
2.1 Billing Details
- Total Billable Hours: Based on the Timesheet, the Total Billable Hours will be auto-fetched here.
- Total Billable Amount: Based on the Timesheet, the Total Billable Amount will be auto-fetched here.
- Total Billed Hours: Once the Timesheet has been submitted, you will get an option to create a Sales Invoice from the Timesheet. The number of hours for which the Customer shall be billed will be fetched over here, and once the Sales Invoice is submitted, the Total Billed Hours will be fetched.
- Total Billed Amount: In a similar fashion as how the Total Billed Hours are fetched, the Total Billed Amount will also be fetched.
- Total Costing Amount: Based on the Timesheet, the Total Costing Amount, as specified by the Employee gets tagged here.
- % Amount Billed: Once the Timesheet is submitted, and a Sales Invoice is created from the Timesheet, the percentage of the Amount out of the Total Billable Amount which has been amounted for the Total Billed Amount gets calculated and is reflected here.
3. After Saving the Time Sheet
Once a Timesheet is saved and submitted, the details like Billing Rate and Costing rate get locked, and cannot be changed. The following DocTypes can be created after submitting a Timesheet.
Sales Invoice from Timesheet
A customer can be billed based on the total number of hours an employee has worked for that customer. The actual number of hours of billable work can be tracked via a Timesheet.
A sales invoice can be generated from each Timesheet submitted by an employee which can be used to bill the customer.
1. How to Create A Sales Invoice from A Timesheet
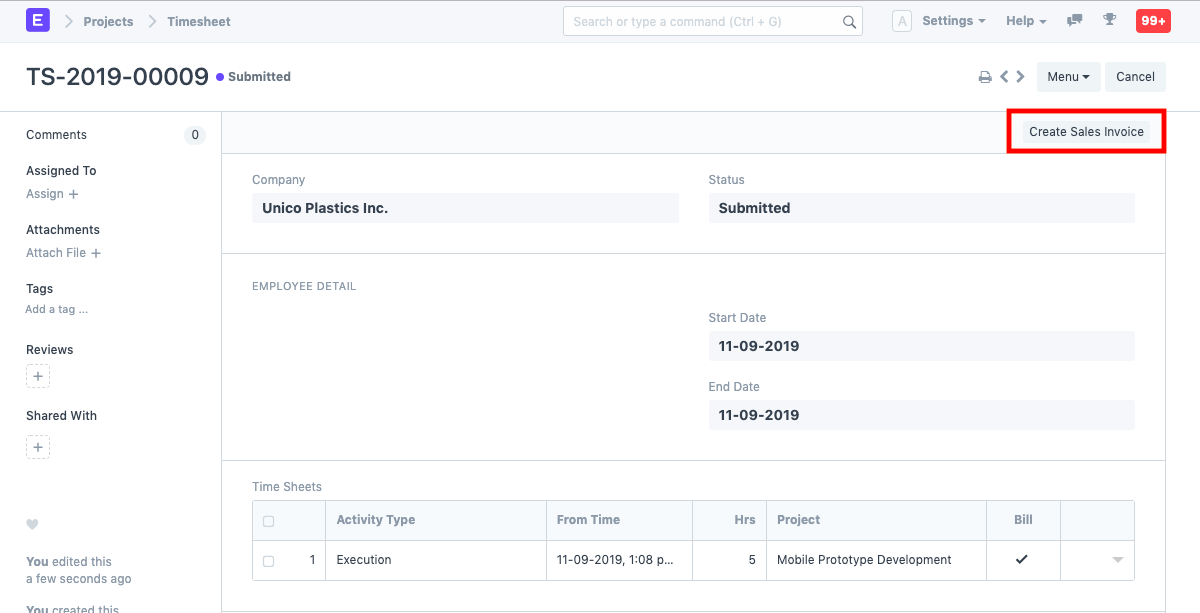
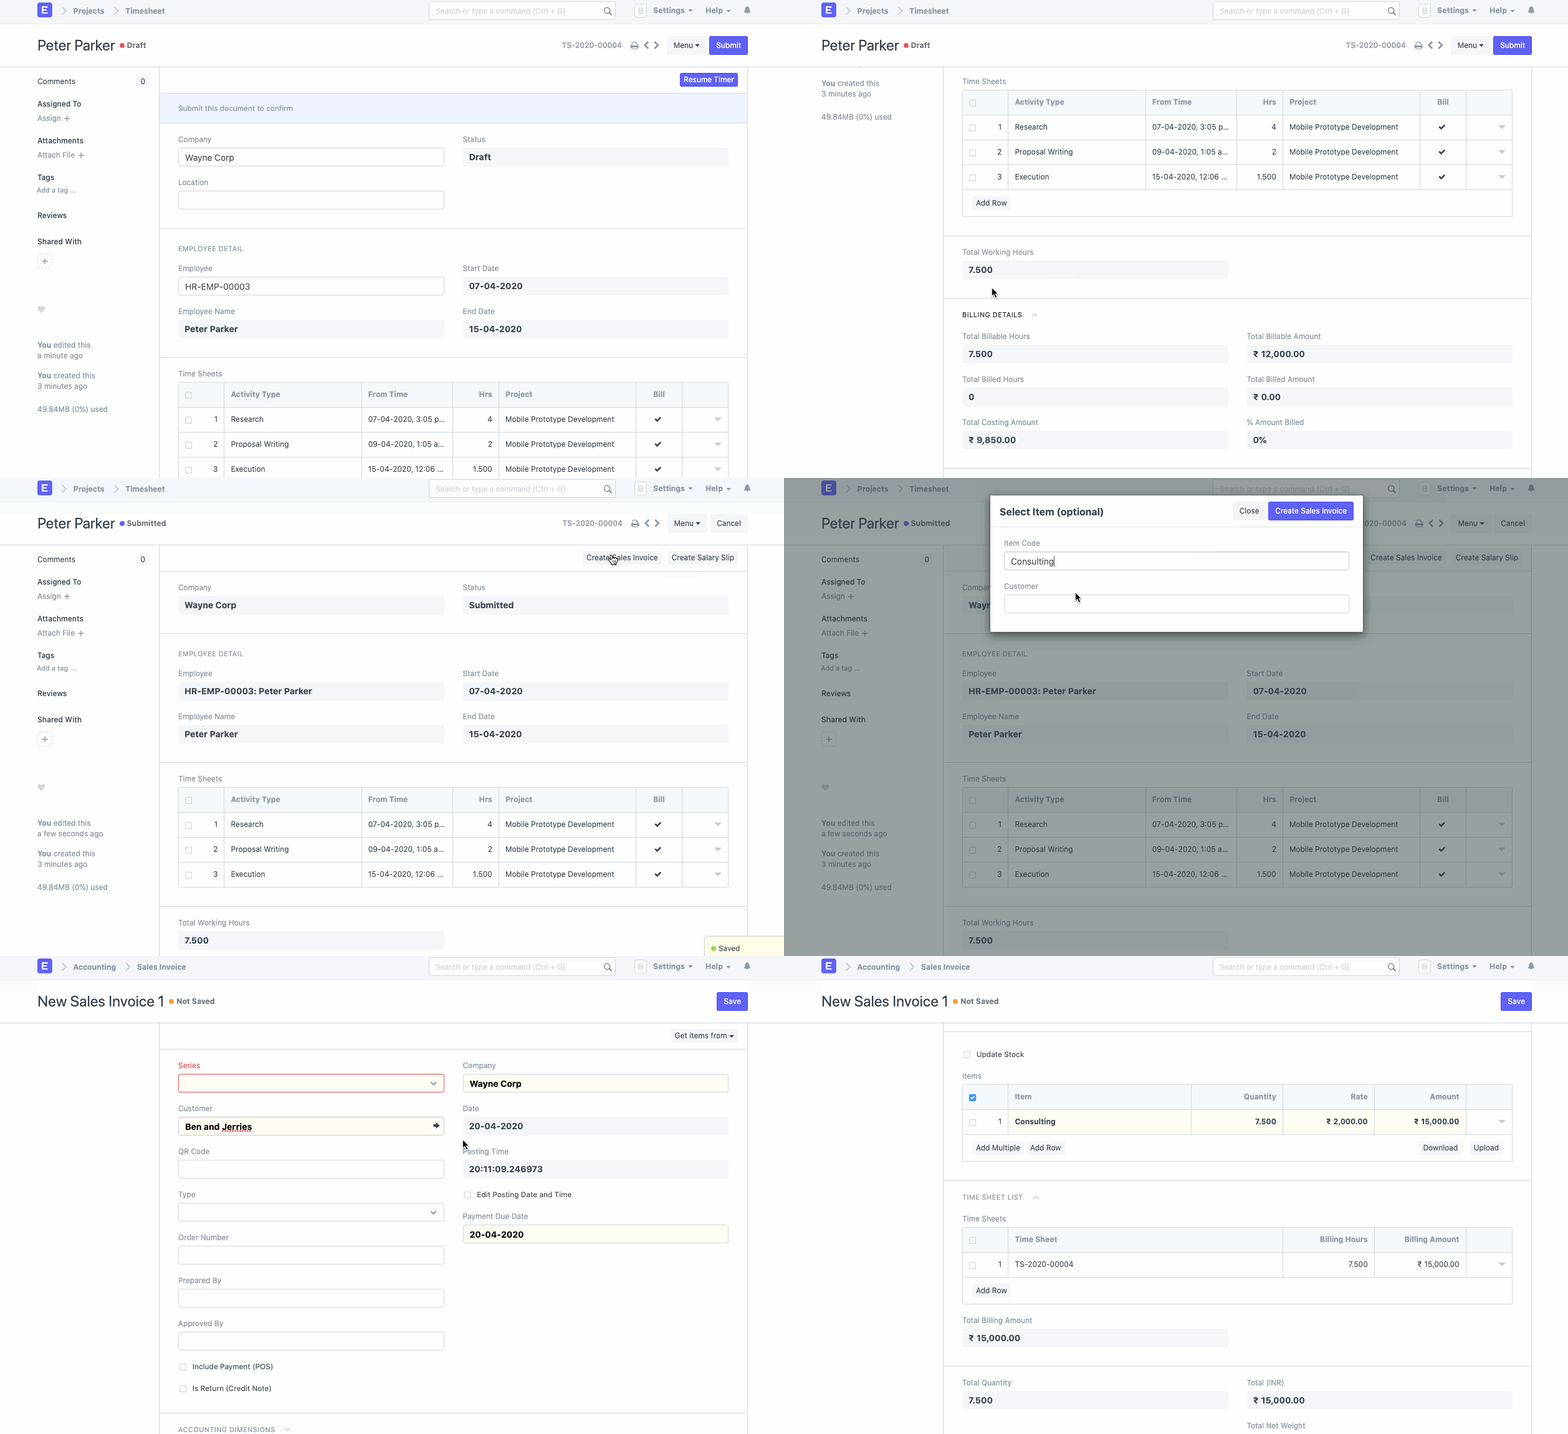
- Once the Timesheet is submitted, click on ‘Create Sales Invoice’.
- Enter the Item Code and name of the Customer who has to be billed against this Timesheet. The Item could be a Product as well as a Service. Click on ‘Create Sales Invoice’.
- All the details of the Timesheet will get auto-populated in the Sales Invoice.
- The posting date and time will be set to current, you can edit after you tick the checkbox below Posting Time.
- Optionally, you can include payments for POS or make this a credit note.
- Save and Submit.
To fetch the details automatically in a Sales Invoice, click on the Get items from button. The details can be fetched from a Sales Order, Delivery Note, or a Quotation. The details like Customer PO, Address and Contact Number, Currency and Price List, Items will get auto-populated.
2. Features
Additional Details while creating a Sales Invoice from a Timesheet:
- Accounting Dimensions: Accounting Dimensions lets you tag transactions to a specific Territory, Branch, Project, etc. This helps in viewing accounting statements separately based on the criteria selected. To know more, visit the Accounting Dimensions page.
- Time Sheet List: Since the Project is created from a Time Sheet, the details of the Time Sheet will get auto-fetched. You can click on ‘Add Row’ to add more Time Sheets to this Invoice.
All the other details can be added as you would add them in any Sales Invoice.
3. After submitting
Once you have submitted the Sales Invoice, The details like ‘Total Billed Hours’, ‘Total Billed Amount’ and ‘% Amount Billed’ will get updated in the Timesheet. Further, a Salary Slip can also be generated from the Timesheet.
Salary Slip from Timesheet
The salary of an employee can be calculated based on the number of hours that he has worked for on a particular project.
To enable the same, you may choose to create the Employee’s Salary Slip directly from a Timesheet.
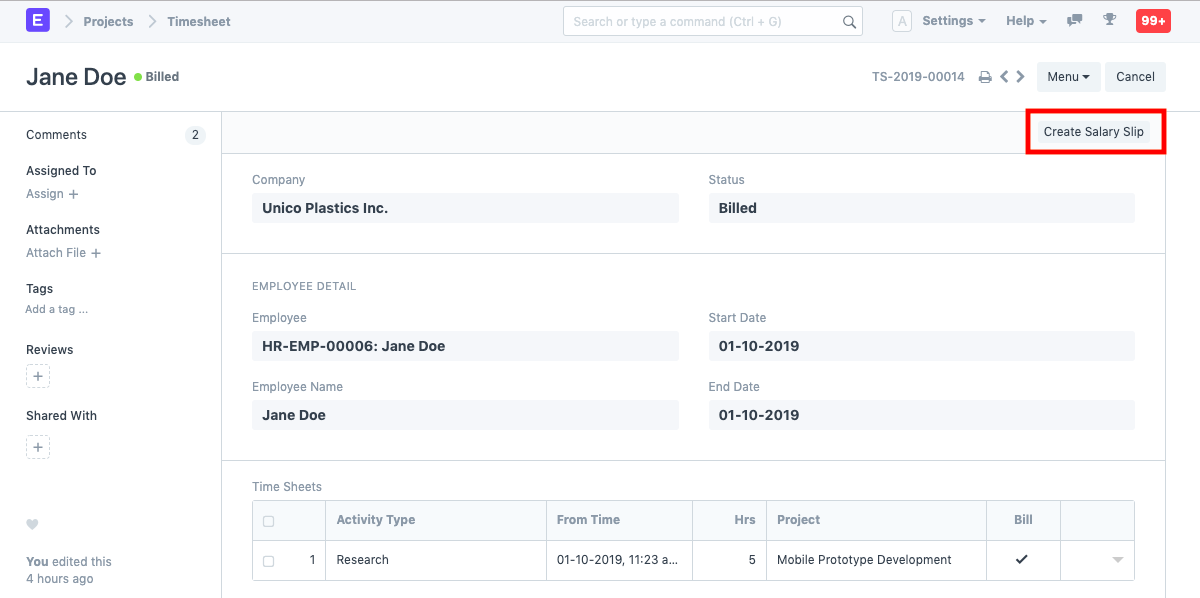
1. How to Create A Salary Slip from A Timesheet
- Once the Timesheet is submitted, and an invoice has been generated, go to the Timesheet and click on ‘Create Salary Slip’.
- All the details, like the Employee, Employee Name, Posting Date, Company Name, Letter Head, etc. will get captured from the Timesheet.
- Dates: Since this Salary Slip is getting generated out of a Timesheet, it will auto-fetch the Start Date and End Date from the Timesheet. However, the same can be changed.
- Salary Slip Timesheet: The details of the Timesheet from which the Salary Slip was created will be captured. You can also more Timesheets here to create a single Salary Slip against multiple Timesheets.
- Save and Submit.
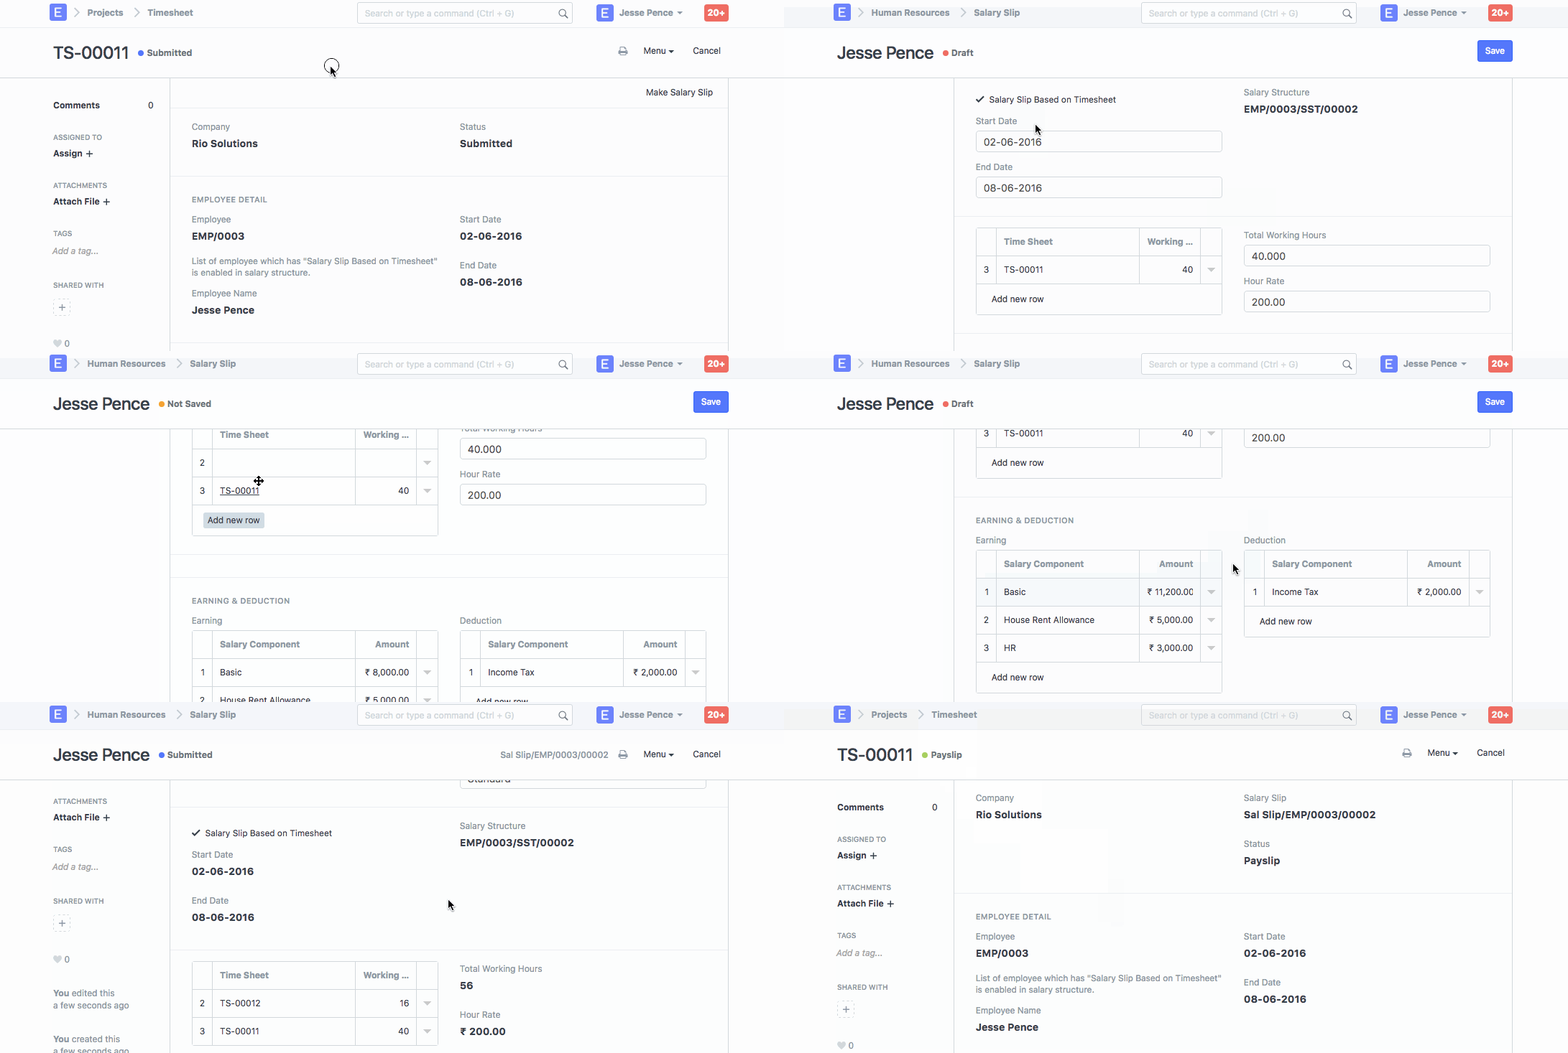
1.1. Additional Details while Creating a Salary Slip form a Time Sheet:
- Earnings and Deduction: Any Earnings like HRA, Incentives etc. or Deductions like Income Tax, Provident Fund etc. in the Salary generated from the Timesheet can be mentioned here.
- Other Information: According to the Salary Structure of the Employee, the Gross payment information, the Loan Repayment Information, and the Net Pay information will get auto-captured.
- For a detailed guide on setting up overtime via timesheets, click here.
Activity Type
Activity Type is a list of different types of activities against which a Timesheet can be made.
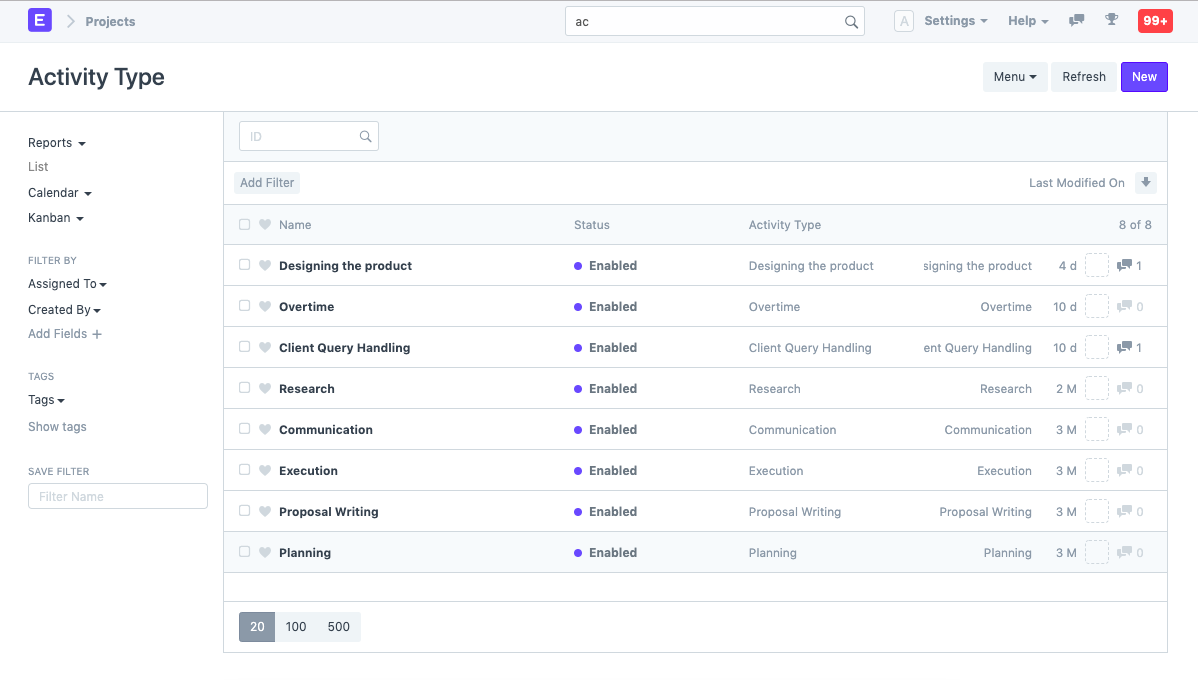
To access Activity Type, go to,
> Home > Projects > Time Tracking > Activity Type
1. How to create Activity Type
- Go to the Activity Type List and click on New.
- Add the subject of the Activity Type.
- Save.
Additionally, you can also add the Default Costing Rate and Default Billing Rate for each Activity.
Further, The Default Costing Rate and the Default Billing Rate for Individual Employees can also be configured. This can also be configured using Activity Cost.
By default, the following Activity Types are created in IONIC ERP.
- Planning
- Research
- Proposal Writing
- Execution
- Communication
Activity Cost
Activity Cost records the per-hour billing rate and costing rate of an Employee against a particular Activity Type.
The system pulls this rate while making Timesheets. It is used to determine the Project Cost.
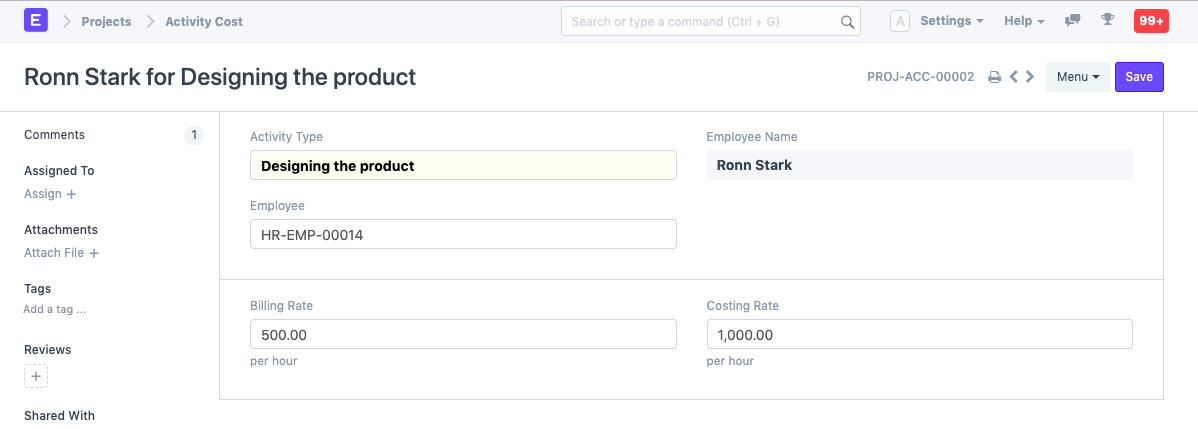
To access Activity Cost, go to,
> Home > Projects > Time Tracking > Activity Cost
1. How to create Activity Cost
- Go to the Activity Cost list and click on New.
- Add the name of the Employee for whom you are configuring the Activity Cost.
- Add the Costing Rate and the Billing Rate for the Employee.
- Save.
Alternatively, an Activity Cost can also be created via the Activity List.

