IONIC ERP Tutorial
Buying Modules
Buying
If your business involves physical goods, buying is one of your core business activities. Your suppliers are as important as your customers and they must be provided with accurate information.
Buying the right quantities in right amounts can affect your cash flow and profitability positively. IONIC ERP contains a set of transactions that will make your buying process as efficient and seamless as possible.
Video Tutorials
1 Purchase
- Procurement
- Purchase Cycle
- Supplier
- Material Request to Purchase Order
2 Pricing
- Request for Quotation
- Pricing Rule
3 Other
- Discounts
- Taxes
Request for Quotation
A Request for Quotation is a document that an organization sends to one or more suppliers asking a quotation for items.
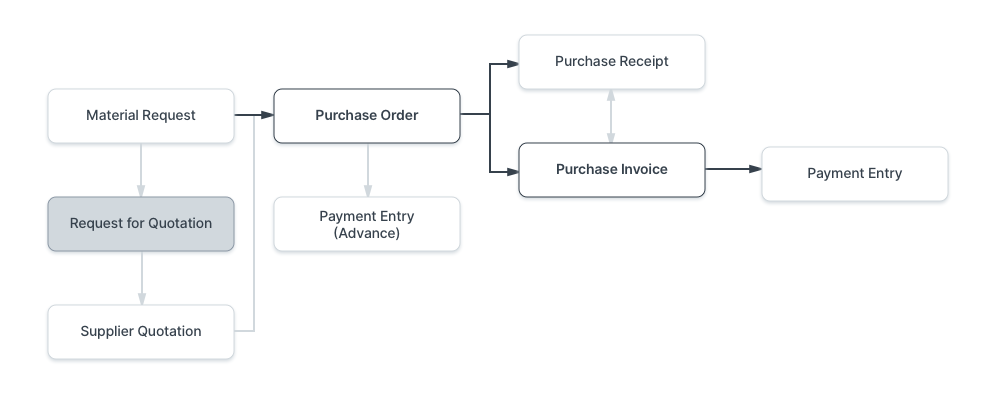
To access Request for Quotation, go to:
Home > Buying > Purchasing > Request for Quotation
1. Prerequisites
Before creating and using a Request for Quotation, it is advised that you create the following first:
- Supplier
- Item
2. How to create a Request For Quotation
- Go to the Request For Quotation list, click on New.
- Enter the date.
- Choose the Supplier to whom the Request for Quotation is to be sent.
- In the next table, enter items, quantity and the target warehouse where you’ll be sending the items.
- Warehouse can be left blank if ‘Maintain Stock’ is unticked for the item.
- Save and submit.
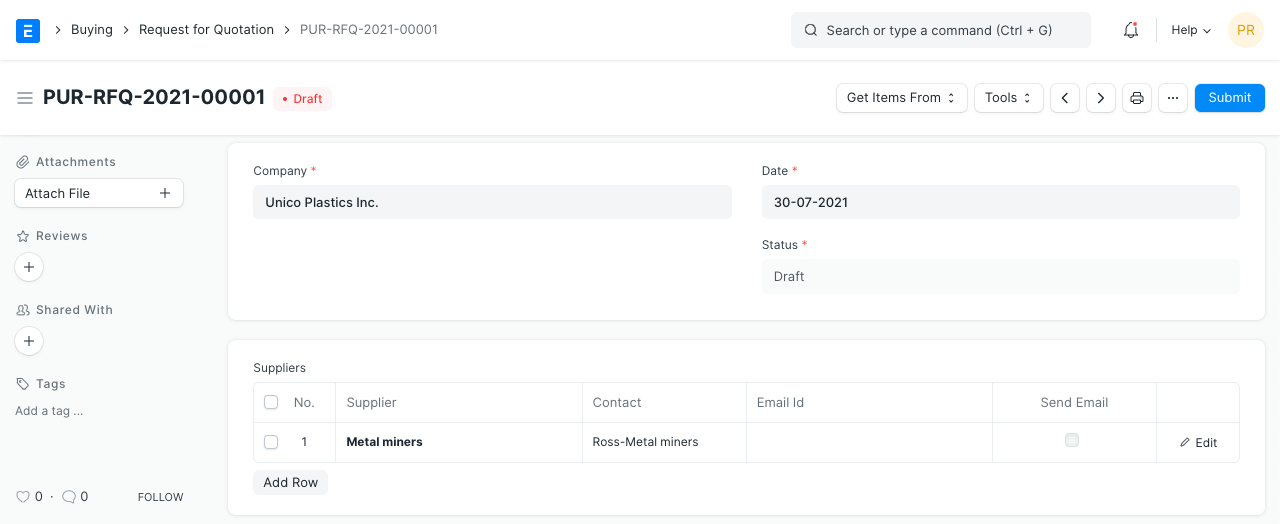
A Request for Quotation (RFQ) can also be created from a submitted Material Request. Once an RFQ is created, you can print and send suppliers the PDF which will have all the details you entered relevant to the RFQ. You can also get their reply (Supplier Quotation) in ERPNext itself, see section 4.1 Supplier Quotation by User. However, for a large number of items, your supplier may be more comfortable with an Excel sheet, etc.
3. Features
3.1 Get items from
The items in the items table can be fetched from other documents. The options are: Material Request, Opportunity, and Possible Supplier.
- Material Request: Items will be fetched from a submitted Material Request that you select. A Material Request can be searched with some matching words and a date range can also be selected to filter the Material Requests.
- Opportunity: Items will be fetched from a saved Opportunity. A date range can be selected here also.
- Possible Supplier: Select a possible supplier. Then if you have any submitted Material Requests against this supplier, items can be fetched from that.

3.2 Get Suppliers
Instead of entering the suppliers manually in the table, you can also fetch them using the ‘Get Suppliers’ button. When you click on Tools > Get Suppliers, you will see the field ‘Get Suppliers By’. There are two options to fetch suppliers: By Tag or By Group.
- By tag: Go to ‘Tag Category’ via searching from the search bar. You must have created tags here first and assigned them to a Supplier in the Buying module. Then you can select ‘By Tag’. On clicking Add ‘All Suppliers’, suppliers with matching tags will be fetched.
- By Group: Select ‘Supplier Group’ and choose the supplier group from which suppliers need to be added. For example, if you select Hardware, all your hardware suppliers will be added so that you can get a quote from all of them.

In the Supplier table, on expanding a row with the inverted triangle, you’ll see an option ‘Download PDF’ which will open a PDF of the RFQ.
3.3 Link to Material Requests:
When you click on Tools > Link to Material Requests, it links the Request for Quotation to available Material Requests. The items should be the same in the Request for Quotation and the Material Request.

Now, when the Request for Quotation is saved, you can see in the Dashboard that it is linked to the Material Request. If there are multiple Material Requests with the same items, then the link will be created with the newest Material Request.
3.4 Email Preview
In the ‘Email Details’ section, of a Draft Request for Quotation, there is a provision to build and preview your email to be sent to the Supplier. 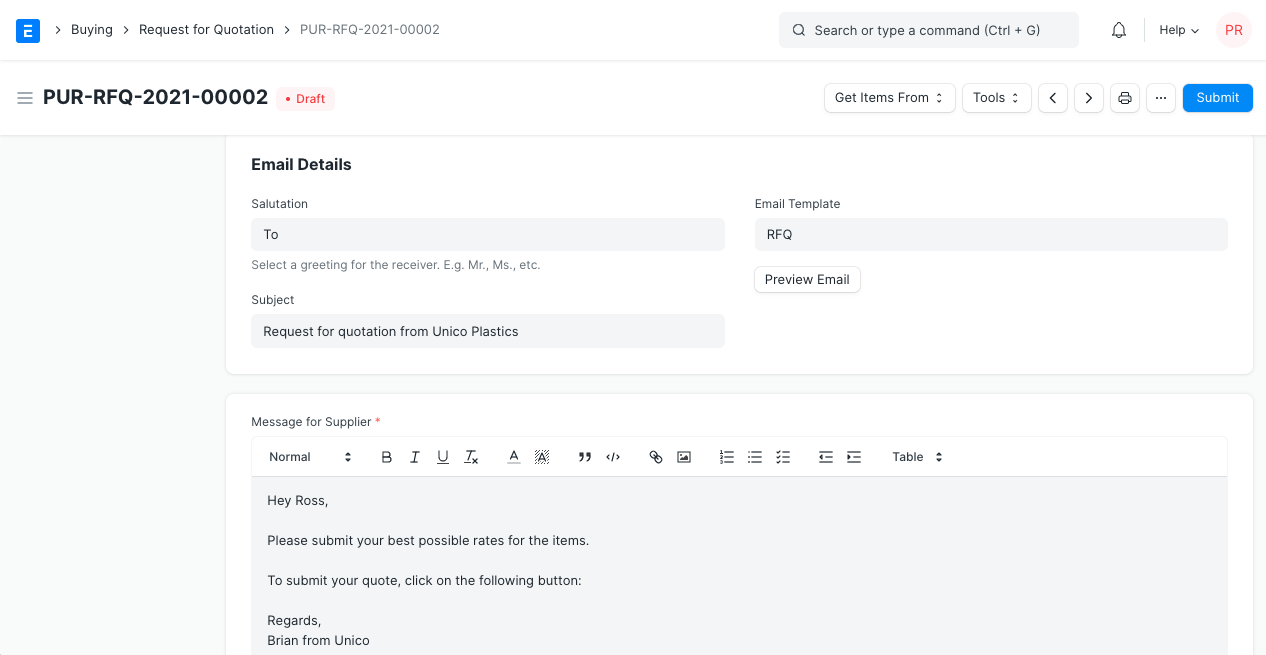
Enter any additional messages for the Supplier in the ‘Message for Supplier’ field. This field can be auto-filled using the ‘Email Template’ field.
A salutation can be added and the ‘Subject’ field can be changed as well. Once done, you can click on the ‘Preview Email’ button and see a preview of the email which will be sent. 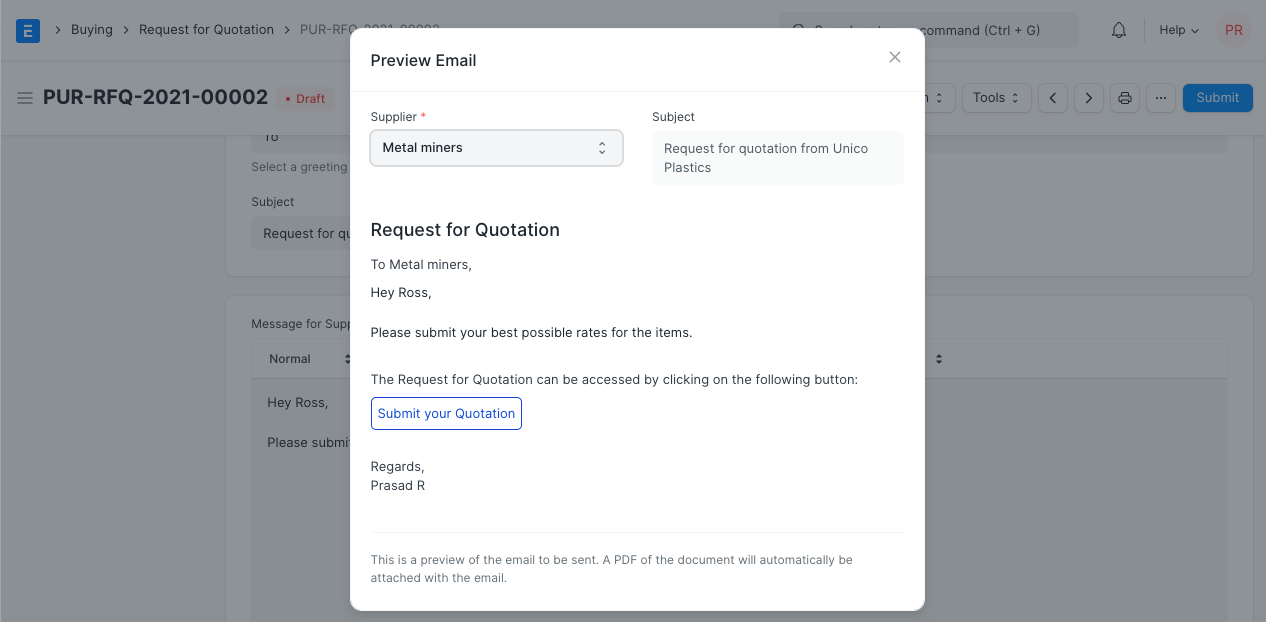
3.5 Terms and Conditions
In Sales/Purchase transactions, there might be certain Terms and Conditions based on which the Supplier provides goods or services to the Customer. You can apply the Terms and Conditions to transactions and they will appear when printing the document. To know about Terms and Conditions,
3.6 Print Settings
Letterhead
You can print your request for quotation/purchase order on your company’s letterhead.
‘Group same items’ will group the same items added multiple times in the items table. This can be seen when you print it.
Print Headings
Titles of your documents can be changed.
4. Creating a Supplier Quotation after RFQ
After creation of Request for Quotation, there are two ways to generate Supplier Quotation from Request for Quotation.
4.1 Supplier Quotation by User
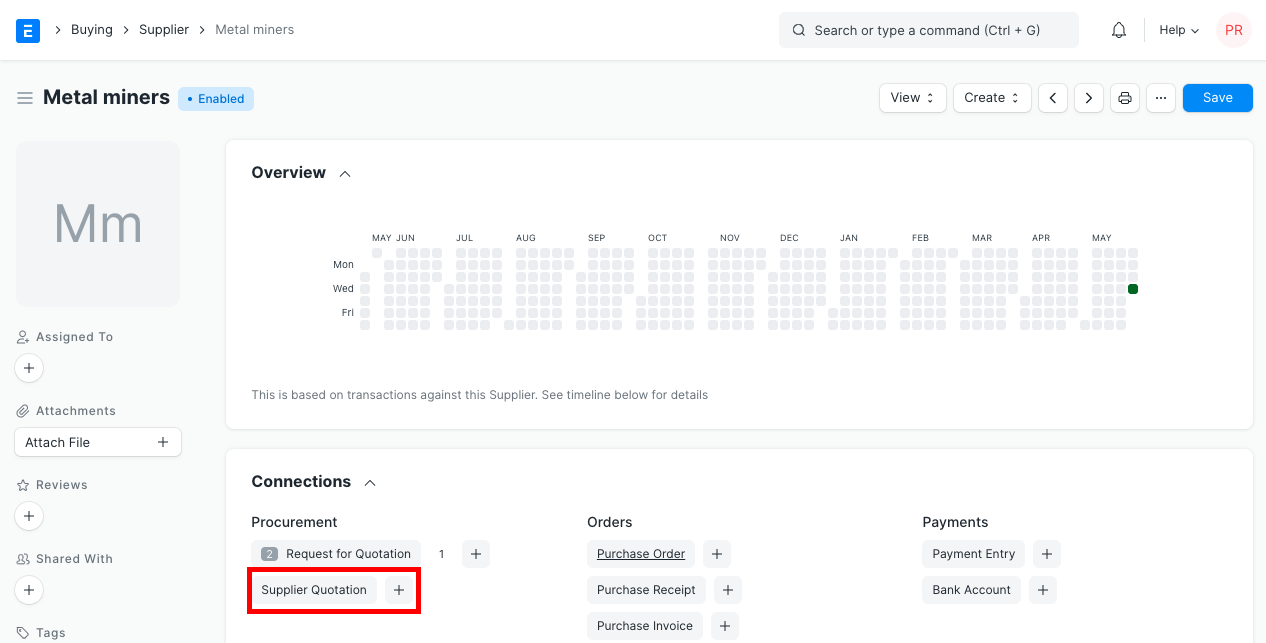
- Open Request for Quotation and click on Supplier Quotation > Create.

- Select the Supplier, click on the supplier again. In this page, click on the + next to ‘Supplier Quotation’. A new Supplier Quotation page will be opened, user has to enter the quantity, rate and submit it.
4.2 Supplier Quotation from Supplier
- If a Contact is created for the Supplier and an email address is associated with the Contact, the Contact details and the email address will be fetched on selecting the Supplier. Create a Contact and email address if not present already.
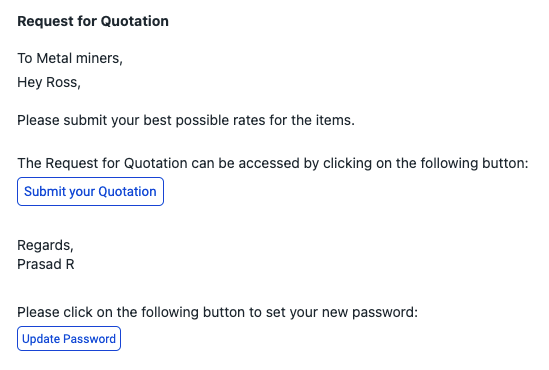
- Click on Tools > Send Emails to Suppliers.If the Supplier’s account is not present: The system will create the Supplier’s account and send details to the Supplier. The Supplier will need to click on the link (Password Update) present in the email. After the password update, the Supplier can access their portal with the ‘Request for Quotation’ form. The Supplier will be created as a Website User.
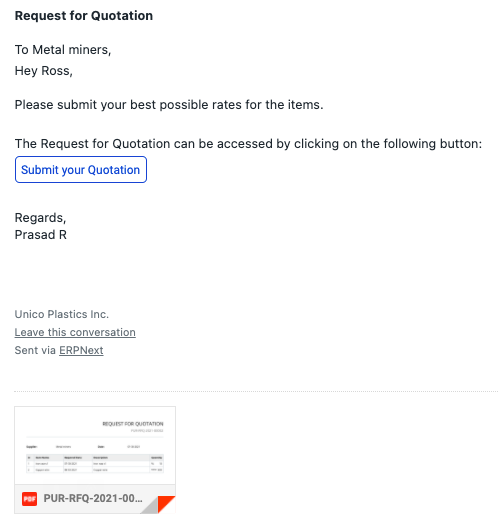
 If Supplier’s account is present: The system will send a Request for Quotation link to the Supplier. The Supplier must log in using his credentials to view the Request for Quotation form on the portal.
- Either way, when the Supplier logs in, the following screen will be shown to them. From here they can send you a quotation:
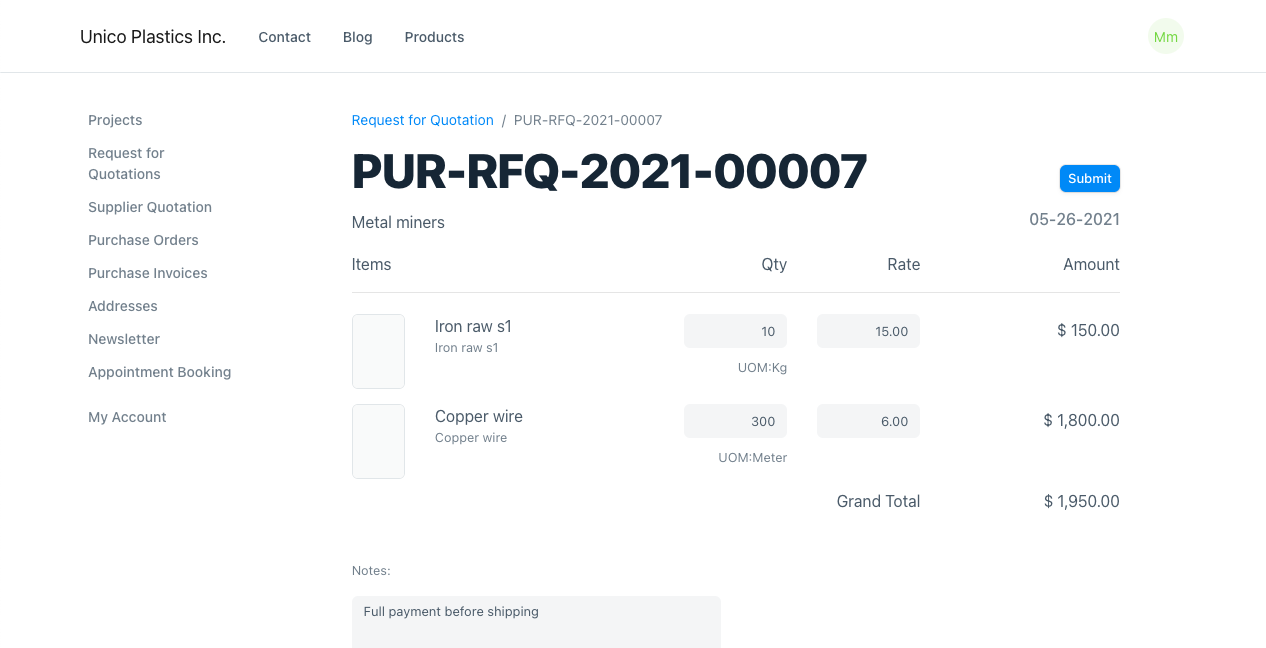 The Supplier has to enter the amount and notes (payment terms) on the form and click on Submit. In the Quotations section, previous quotations will be visible.
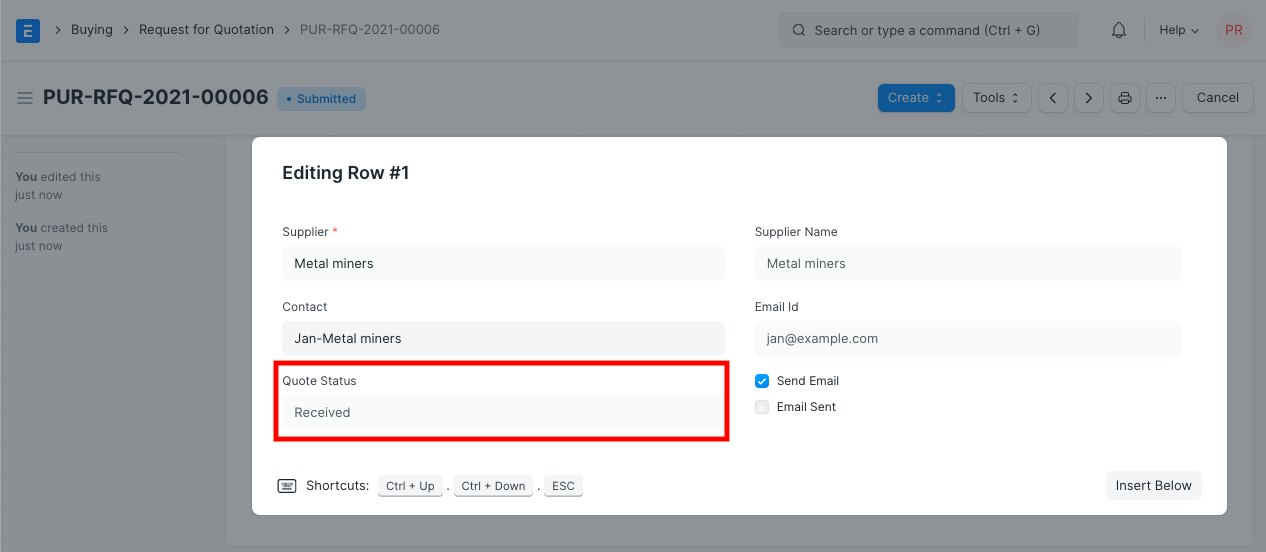
 - On submission, IONIC ERP will create a Supplier Quotation (draft mode) against the Supplier. The user has to review the Supplier Quotation and submit it. When all the items from the Request for Quotation have been quoted by a Supplier, the quote status is updated to ‘Received’ in the ‘Suppliers’ table of the Request for Quotation.
Purchase Order
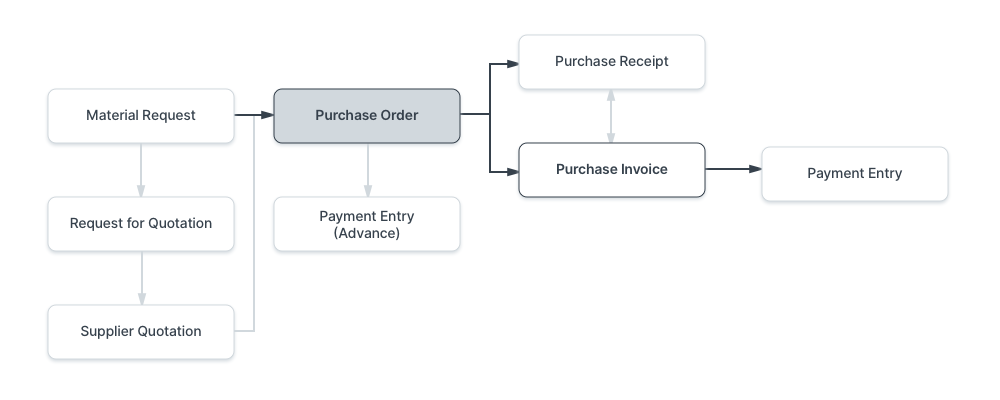
A Purchase Order is a binding contract with your Supplier that you promise to buy a set of items under given conditions.
It is similar to a Sales Order but instead of sending it to an external party, you keep it for internal records.
Home > Buying > Purchasing > Purchase Order
1. Prerequisites
Before creating and using a Purchase Order, it is advised that you create the following first:
- Supplier
- Item
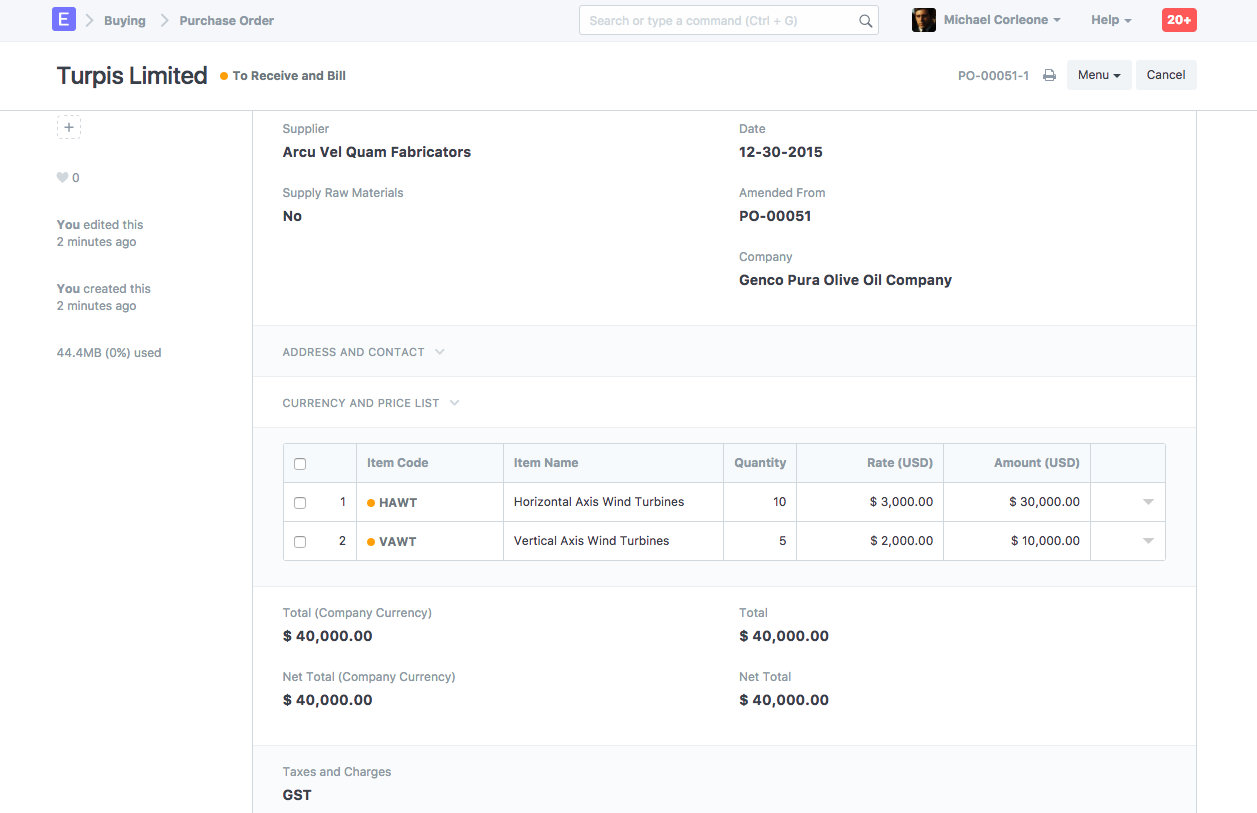
2. How to create a Purchase Order
A Purchase Order can be automatically created from a Material Request or Supplier Quotation.
- Go to the Purchase Order list, click on New.
- Select the Supplier, required by date.
- In the items table, select the item by code, you can change the required by date for each item.
- Set the quantity and the price will be fetched automatically if set in the Item master.
- Set taxes.
- Save and Submit.
2.1 Setting Warehouses
- Set Target Warehouse: Optionally, you can set the default target Warehouse where the purchased Items will be delivered. This will be fetched into the Item table rows.
2.2 Fetching Items from Open Material Requests
Items can be fetched into the Purchase Order automatically from open Material Requests. For this to work, the following steps need to be done:
- Select a Supplier in the Purchase Order.
- Set default Supplier in the Item form under Item Defaults.
- A Material Request needs to be present of type ‘Purchase’.
- Click on the Get Items from open Material Requests button below the Supplier name. Now a dialog will appear with Material Requests containing Items for which the default Supplier is the same as the one selected in the Purchase Order. On selecting the Material Requests and clicking on Get Items, the Items will be fetched from the Material Requests.
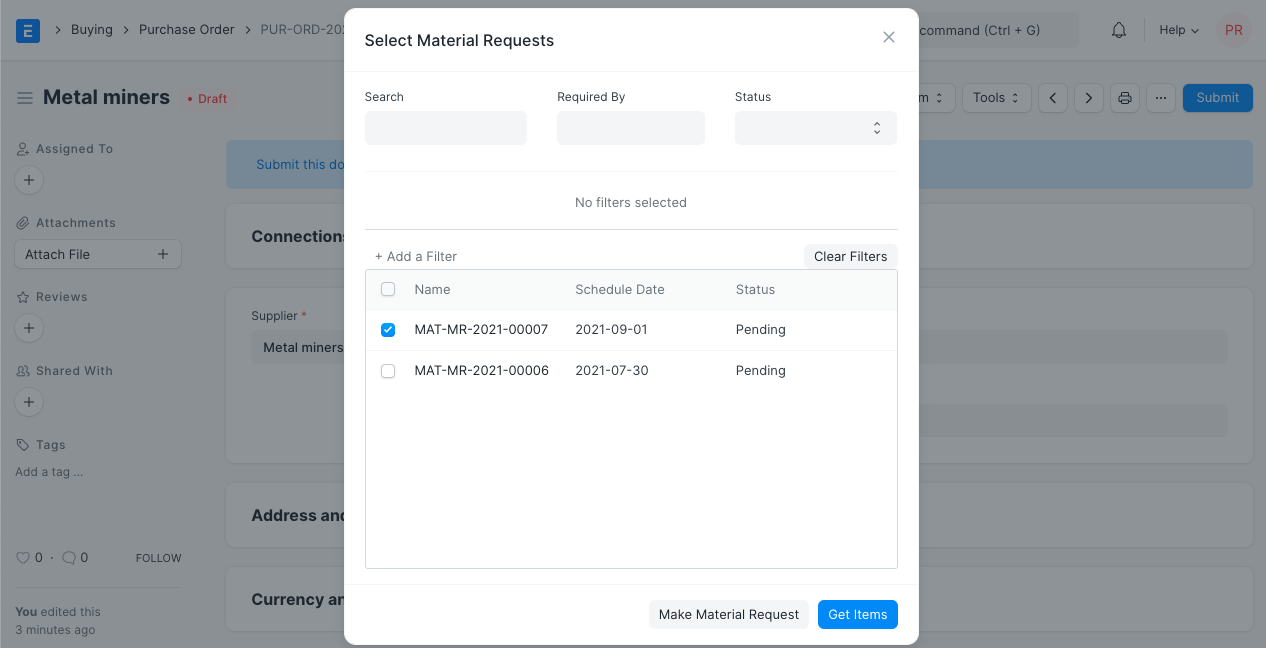
Note: The Get Items from Open Material Requests button is visible as long as the Items table is empty.
3. Features
3.1 Address and Contact
- Select Supplier Address: The Supplier’s billing address.
- Select Shipping Address: The Supplier’s shipping address from which they’ll be sending the items.
- Address, Shipping Address, Contact, Contact Email will be fetched if saved in the Supplier master.
For India:
- Supplier and Company GSTIN: The GST Identification Number of your Supplier and your company.
- Place of Supply: For GST, Place of Supply is necessary. It consists of the state’s name and number.
3.2 Currency and Price List
You can set the currency in which the purchase order is to be stored. If you set a Pricing List, then the item prices will be fetched from that list. Ticking on Ignore Pricing Rule will ignore the Pricing Rules set in Accounts > Pricing Rule.
Read about Price Lists and Multi-Currency Transactions to know more.
3.3 Subcontracting or ‘Supply Raw Materials’
Setting ‘Supply Raw Materials’ option is useful for subcontracting where you provide the raw materials for manufacturing an item. To know more, visit the Subcontracting page.
3.4 The Items table
- Scan Barcode: You can add Items in the Items table by scanning their barcodes if you have a barcode scanner. Read documentation for tracking items using barcode to know more.
- Quantity and Rate: When you select the Item code, it’s name, description, and UOM will be fetched. The ‘UOM Conversion Factor’ is set to 1 by default, you can change it depending on the UOM received from the seller, more in the next section.’Price List Rate’ will be fetched if a Standard Buying rate is set. ‘Last Purchase Rate’ shows the rate of the item from your last Purchase Order. Rate is fetched if set in the item master. You can attach an Item Tax Template to apply a specific tax rate to the item.
- Item weights will be fetched if set in the Item master else enter manually.
- Warehouse: The warehouse where the items will be delivered, will be auto-filled if ‘Set Target Warehouse’ was set in the Purchase Order. Via Blanket Order, a Blanket Order can be linked, to know more click here. A ‘Project’ can be linked to track progress. A ‘BOM’ or Bill of Materials can also be linked to track progress.
- ‘Qty as per Stock UOM’ will show the current stock as per the UOM set in the Item master. ‘Received Qty’ will be updated when the items are billed.
- Accounting Details: This section is autofilled for a Purchase Order. ‘Expense Account’ is the account against which the PO is billed and Cost Center is the CC against which the PO is charged.
A “Required By” date on each Item: If you are expecting part delivery, your Supplier will know how much quantity to deliver at which date. This will help you from preventing over-supply. It will also help you to track how well your Supplier is doing on timeliness.
Allow Zero Valuation Rate: Ticking on ‘Allow Zero Valuation Rate’ will allow submitting the Purchase Receipt even if the Valuation Rate of the Item is 0. This can be a sample item or due to a mutual understanding with your Supplier.
3.6 Raw Materials Supplied
This section appears when ‘Supply Raw Materials’ supplied is set to ‘Yes’. This section shows a table with the Items to be supplied to the Supplier for the subcontracting process.
- Set Reserve Warehouse: When Subcontracting, the raw materials can be reserved in a separate Warehouse. On selecting the Reserved Warehouse here, it’ll be fetched into Item rows of the Raw Materials Supplied table.
Supplied Items Table
- Required Quantity: The count of Items required to complete the subcontracting as specified in the BOM.
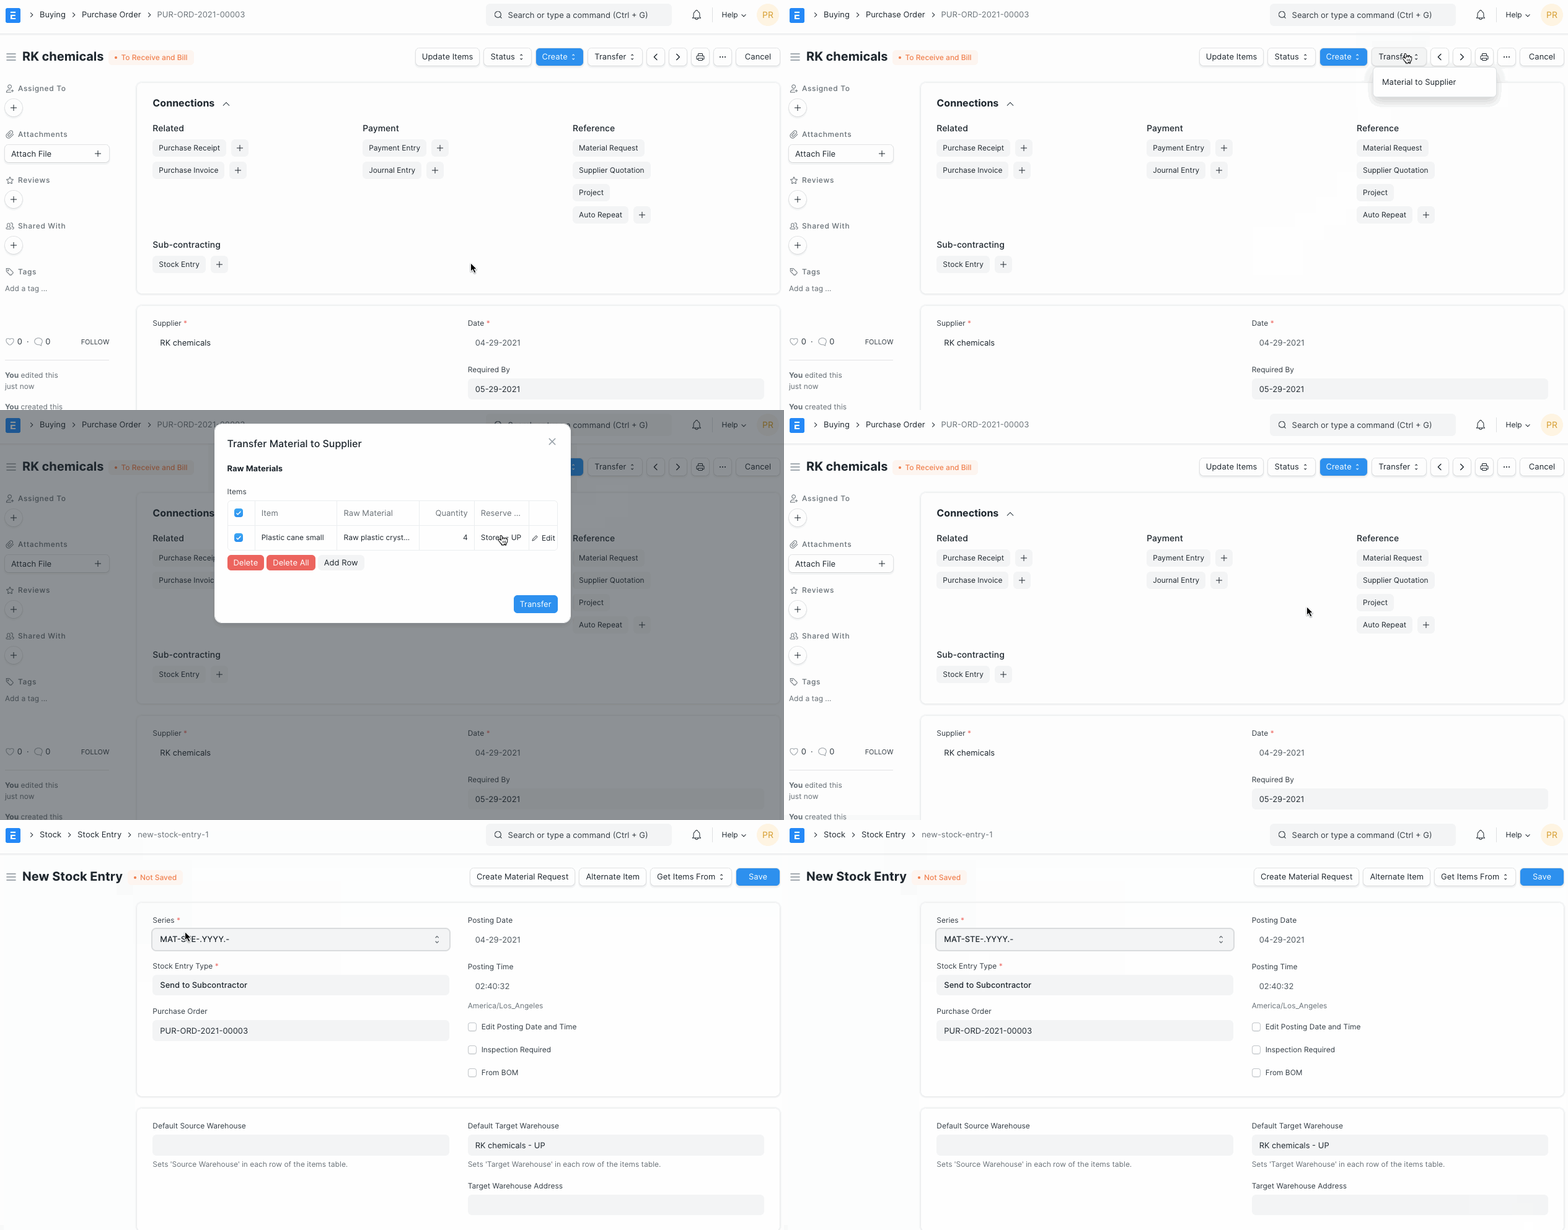
- Supplied Quantity: This will be updated when you create Stock Entries to transfer materials to Supplier Warehouse from the Reserve Warehouse using the Transfer button.
3.7 Purchase UOM and Stock UOM Conversion
You can change your UOM as per your stock requirements in the Purchase Order.
For example, If you have bought your raw material in large quantities with UOM – boxes, and wish to stock them in UOM – Nos; you can do so while making your Purchase Order.
- Store UOM as Nos in the Item master. Note that the UOM in the Item master is the stock UOM.
- In the Purchase Order mention UOM as Box. (Since material arrives in Boxes)
- In the Warehouse and Reference section, the UOM will be pulled in as Nos (from the Item form):

- Mention the UOM conversion factor. For example, (1); If one box has 1 kilo.
- Notice that the stock quantity will be updated accordingly.

3.8 Taxes and Charges
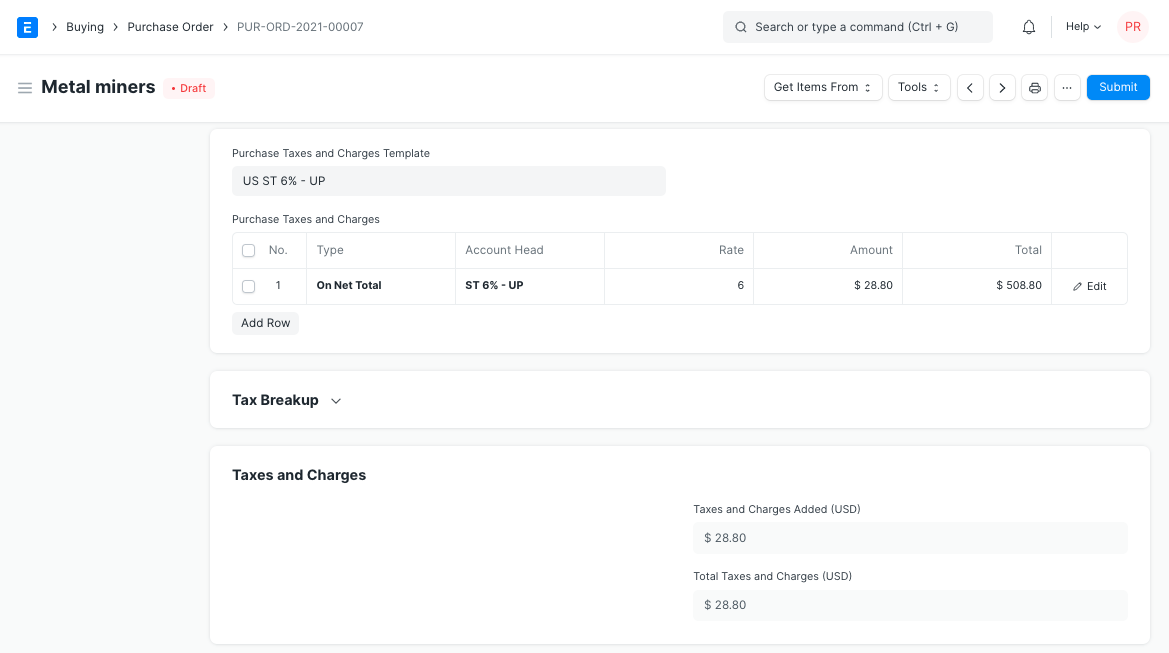
If your Supplier is going to charge you additional taxes or charge like a shipping or insurance charge, you can add it here. It will help you to accurately track your costs. Also, if some of these charges add to the value of the product you will have to mention them in the Taxes table.
Visit the Purchase Taxes and Charges Template page to know more about taxes.
The total taxes and charges will be displayed below the table.
To add taxes automatically via a Tax Category,
Make sure to mark all your taxes in the Taxes and Charges table correctly for an accurate valuation.
Shipping Rule
A Shipping Rule helps set the cost of shipping an Item. The cost will usually increase with the distance of shipping. To know more, visit the Shipping Rule page.
For example, you buy Items worth X and sell them for 1.3X. So your Customer pays 1.3 times the tax you pay your Supplier. Since you have already paid tax to your Supplier for X, what you owe your government is only the tax on 0.3X.
This is very easy to track in ERPNext since each tax head is also an Account. Ideally you must create two Accounts for each type of VAT you pay and collect, “Purchase VAT-X” (asset) and “Sales VAT-X” (liability), or something to that effect.
3.9 Additional Discount
Other than recording discount per item, you can add a discount to the whole purchase order in this section. This discount could be based on the Grand Total i.e., post tax/charges or Net total i.e., pre tax/charges. The additional discount can be applied as a percentage or an amount.
Read Applying Discount for more details.
3.10 Payment Terms
Sometimes payment is not done all at once. Depending on the agreement, half of the payment may be made before shipment and the other half after receiving the goods/services. You can add a Payment Terms template or add the terms manually in this section.
Read Payment Terms to know more.
3.11 Terms and Conditions
In Sales/Purchase transactions there might be certain Terms and Conditions based on which the Supplier provides goods or services to the Customer. You can apply the Terms and Conditions to transactions to transactions and they will appear when printing the document. To know about Terms and Conditions,
3.12 Print Settings
Letterhead
You can print your request for quotation / purchase order on your company’s letterhead.
‘Group same items’ will group the same items added multiple times in the items table. This can be seen when your print.
Print Headings
Titles of your documents can be changed.
The seller’s Additional Discount, Payment Terms, Terms and Conditions can be recorded in your Purchase Order.
3.13 More Information
This section shows the status of the Purchase Order, percentage of items received, and percentage of items billed. If this is an Inter Company Order, the Sales Order can be linked here.
3.14 After Submitting
Once you “Submit” your Purchase Order, you can trigger actions these actions:
- You can Add, Update, Delete items in the Purchase Order by clicking on the Update Items button. However you cannot delete items which has already been received.
- Status: Once submitted, you can hold a Purchase Order or Close it.
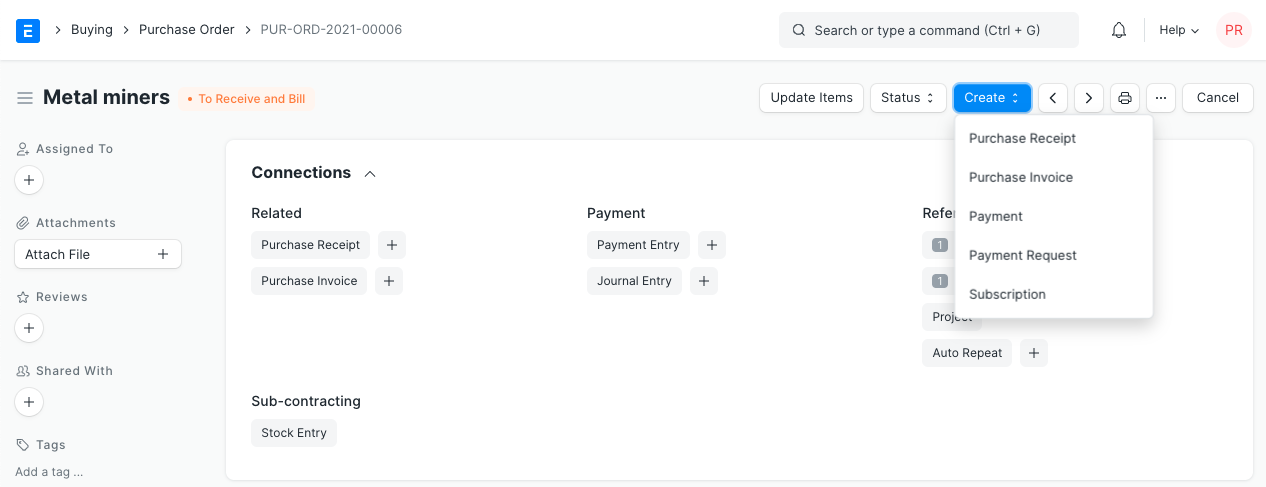
- Create: From a submitted Purchase Order, you can create the following:
- Purchase Receipt – A receipt indicating you’ve received the items.
- Purchase Invoice – An invoice/bill for the purchase order.
- Payment Entry – A payment entry indicates that payment has been made against a purchase order.
- Journal Entry – A Journal Entry is recorded in the general ledger.
Purchase Taxes and Charges Template
Purchase Taxes and Charges may be applied to any item you buy.
The Purchase Taxes and Charges Template is similar to the Sales Taxes and Charges Template. The templates created from this form can be used in Purchase Orders and Purchase Invoices for internal records.
For Tax Accounts that you want to use in the tax templates, you must set the Account Type field as ‘Tax’ for that particular account.
To access Purchase Taxes and Charges Template, go to:
Home > Buying > Settings > Purchase Taxes and Charges Template
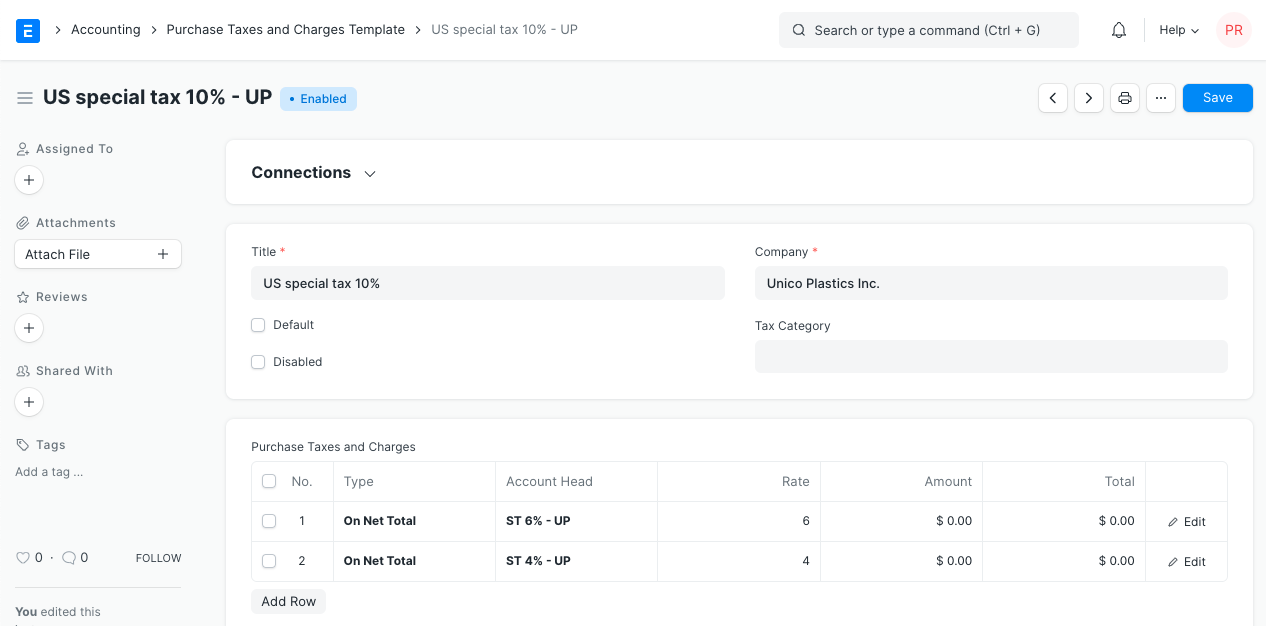
1. How to add Purchase Taxes/Charges via a template
Before creating a new template, note that templates are already created for many of the commonly used taxes.
- Click on New.
- Enter a title name for the Tax.
- Under type, set on what the tax will be calculated and the tax rate. There are five options under type for which tax will be calculated.
- Actual: On the actual amount of each item.
- On Net Total: On the grand total of all the items.
- On Previous Row Amount: This is for compounding the charges. For example, cess charges over the amount to which tax was already applied in the previous row.
- On Previous Row Total: Same as above but applied on the total bill and not just the amount of an item.
- Select an account head which has pre set tax rates or create your own.
- Selecting default will apply this template by default for new Purchase transactions.
- Save.
Is Inter State: For India. On selection of a customer in Sales Invoice or Delivery Note, if the GST codes of place of supply and customer shipping address don’t match, the template with ‘Is Inter State’ ticked will be set as the taxes template. If the place of supply and shipping address are the same, the default taxes template will be applied. This also applies to Purchase Invoice, on selection of Supplier, the templates are set depending on the addresses. For example, IGST.
2. Features
2.1 Purchase Taxes and Charges table
- Consider Tax or Charge for: Total – for the total of all items. Valuation – for each item. Valuation and total – apply tax/charge to both.
- Add or Deduct: Whether you want to add or deduct the tax from the item.
- Reference Row #: If tax is based on “Previous Row Total” you can select the row number which will be taken as a base for this calculation (default is the previous row).
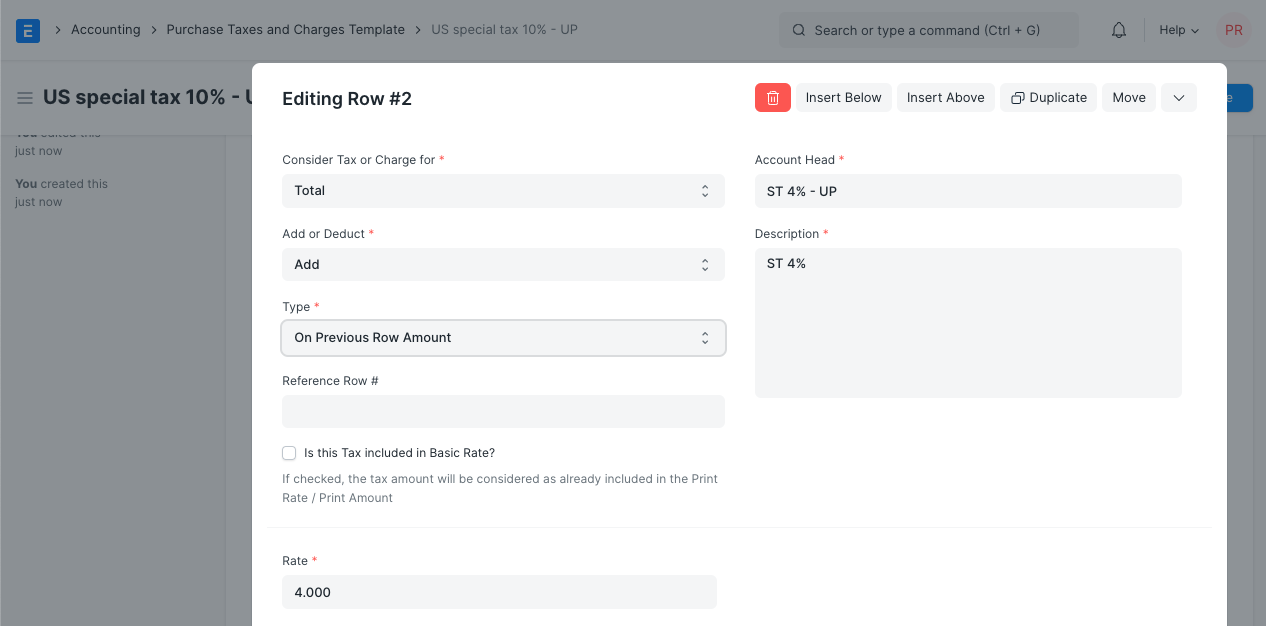
- Is this Tax included in Basic Rate?: If checked, the tax amount will be considered as already included in the Print Rate / Print Amount.
- Account Head: The Account ledger under which this tax will be booked. If you select VAT or any other preset heads, the rate will be automatically filled.
- Cost Center: If the tax/charge is an income (like shipping) or expense it needs to be booked against a Cost Center.
- Description: Description of the tax (that will be printed in invoices/quotes).
- Rate: The Tax rate, eg: 14 = 14% tax.
- Amount: The Tax amount to be applied, eg: 100.00 = ₹100 tax.
Supplier
Suppliers are companies or individuals who provide you with products or services.
To access the Supplier list, go to:
Home > Buying > Supplier > Supplier
1. How to create a Supplier
- Go to the Supplier list and click on New.
- Enter a name for the supplier.
- Select the supplier group whether Pharmaceutical, Hardware etc.
- Save.
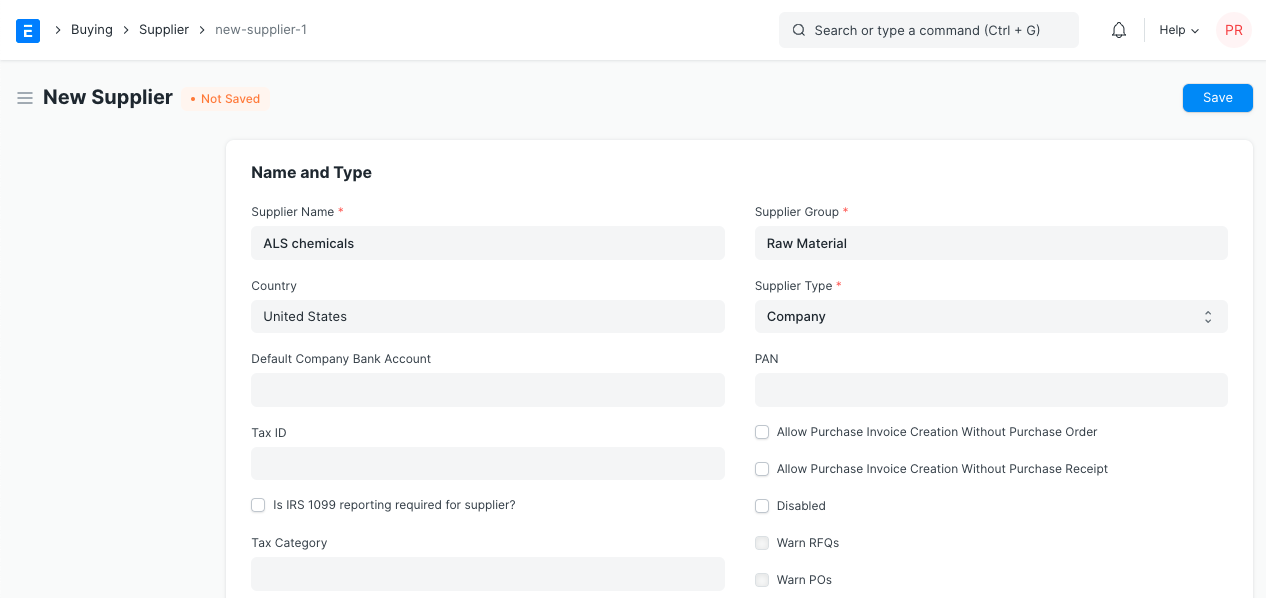
The options to Warn RFQs, POs, Prevent RFQs, POs will be available once you create a Supplier Scorecard and transactions are made.
2. Features
Fields in future transactions will be auto-populated if the ‘Default’ fields like Default Bank Account, Default Payment Terms Template etc., are set in Supplier.
2.1 Tax details
- Country: If the supplier is from another country, you can change it here.
- Tax ID: Tax identification number of the supplier.
- Tax Category: This is linked to Tax Rule. If a Tax Category is set here, when you select this supplier, the respective Purchase Tax and Charges template will be applied. This template is linked to the Tax Rule and the Tax Rule is linked with a Tax Category. Tax Category can be used to group suppliers to whom same tax will be applied. For example: Government, commercial, etc,.
- Print Language: The language in which the document will be printed.
- Tax Withholding Category: For India, TDS category for the Supplier. On setting a category here, it will be fetched into the Purchase Invoice. For more information, visit the Tax Withholding Category page.
- Disabled: Disables the Supplier and they won’t be shown in the Supplier List.
- Is Transporter: If the supplier is selling your transport services, tick this box. ‘GST Transporter ID’ field will be visible if this field is ticked.
- Internal Supplier: If the supplier is from a sister or parent/child company, tick this field and select the company which they represent.
For India:
- GST Category: Select a GST Category of the supplier.
- PAN: For India, PAN (Permanent Account Number) card details of the Supplier.
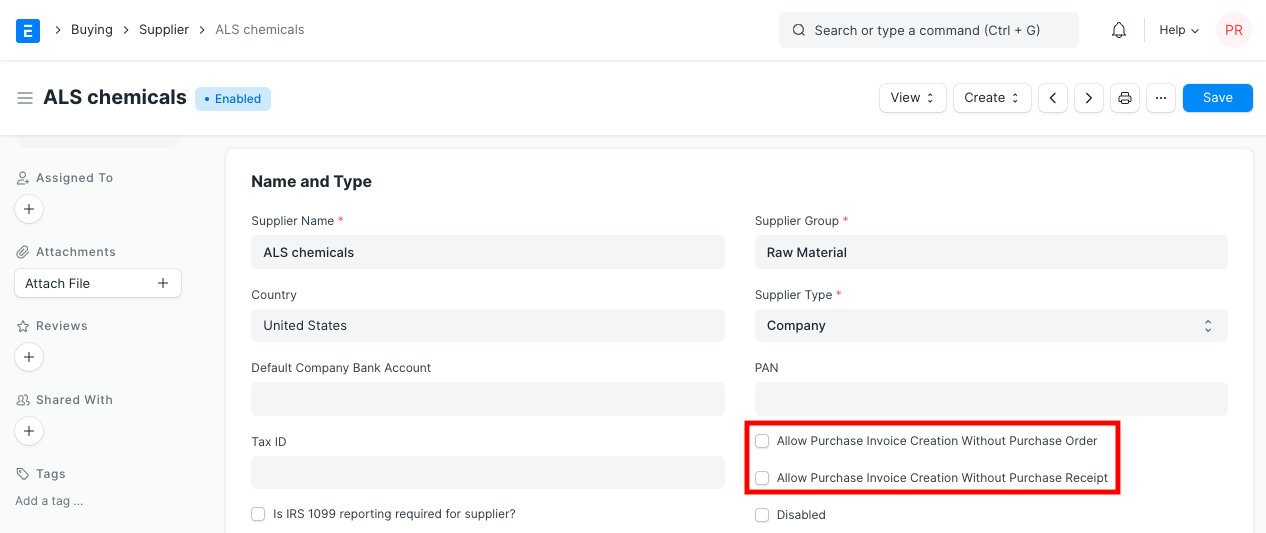
2.2 Allow creation of Purchase Invoice without Purchase Order and Purchase Receipt
If the “Purchase Order Required” or “Purchase Receipt Required” option is configured as “Yes” in Buying Settings, it can be overridden for a particular supplier by enabling the “Allow Purchase Invoice Creation Without Purchase Order” or “Allow Purchase Invoice Creation Without Purchase Receipt” in the Supplier Master.
2.3 Currency and Price List
Billing Currency: Your supplier’s currency can be different from your company currency. If you choose JPY for a supplier, then the currency will be filled as JPY and the exchange rate shown for future purchase transactions.
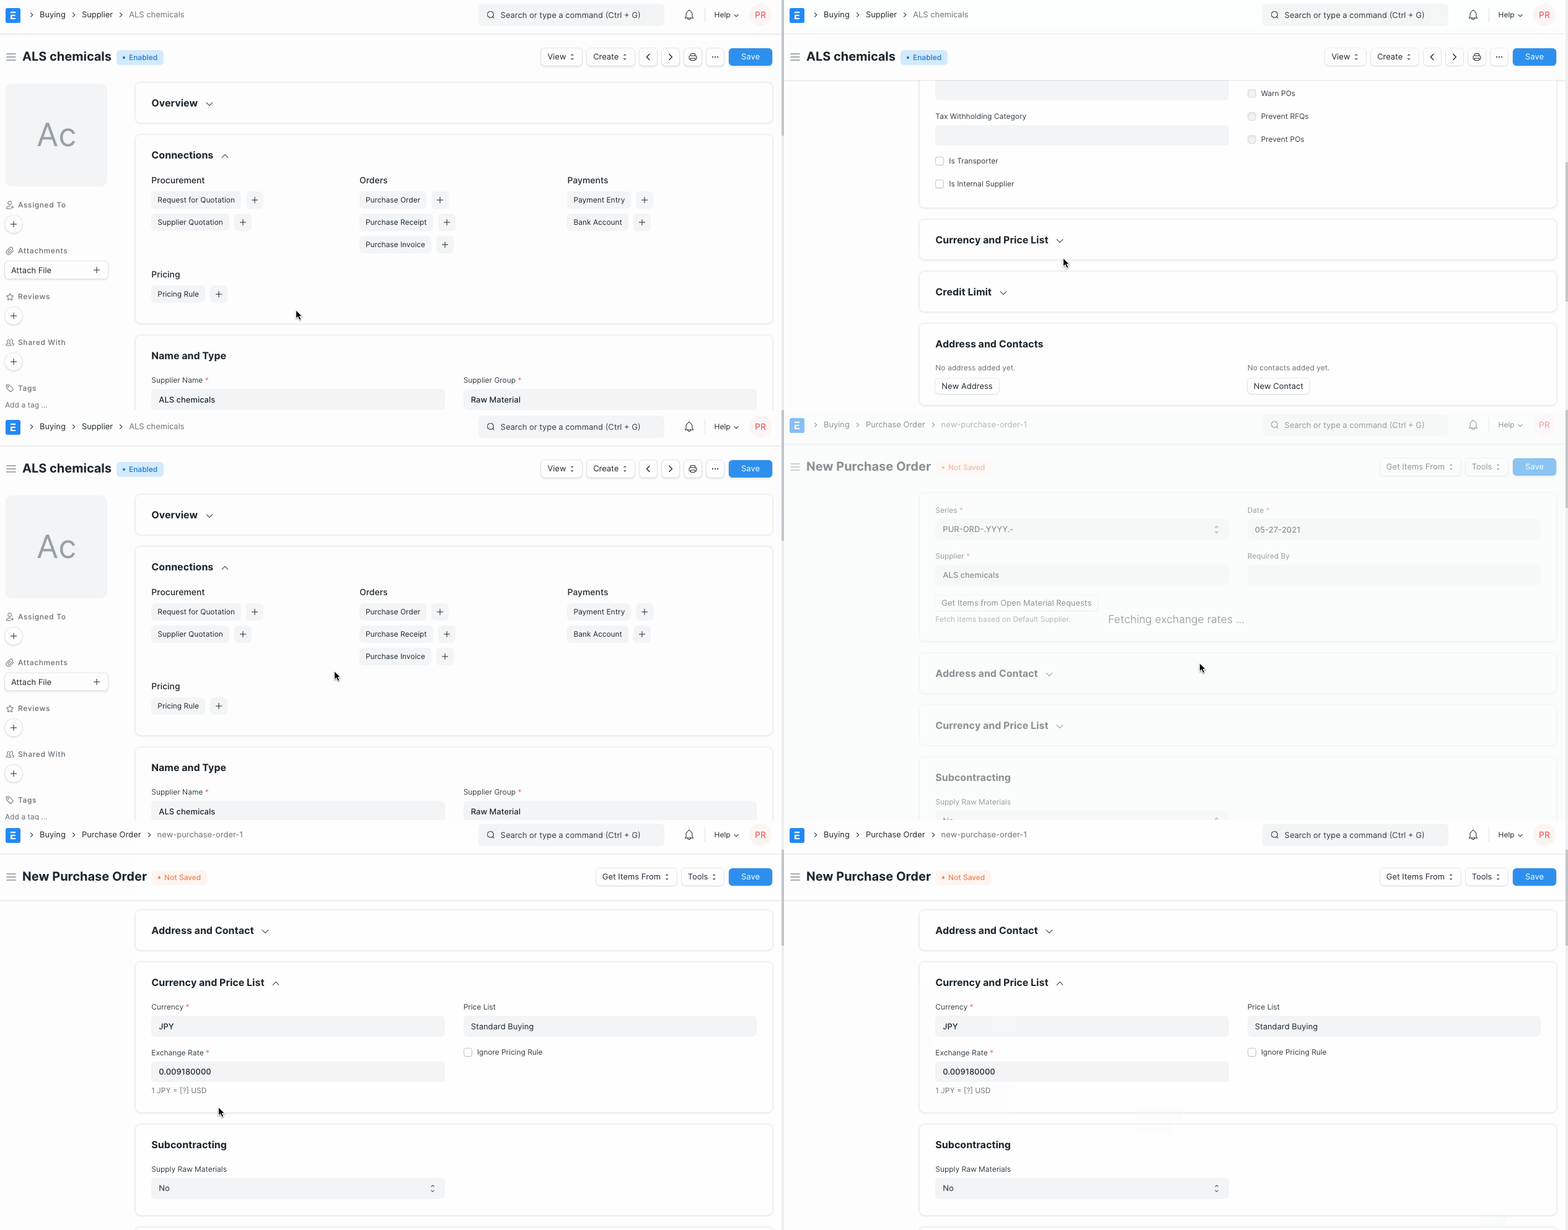
Each Supplier can have a default Price List so that every time you buy a new item from this supplier for different prices, the price list associated with the supplier would be updated as well. Under the price list comes item price, you can see the prices in Buying > Items and Pricing > Item Price.
If you select this particular supplier, then the associated Price List will be fetched in Purchase transactions.
2.4 Credit Limit
- Default Payment Terms Template: If a Payment Terms template is set here, it’ll be automatically selected for future purchase transactions.
- Block Supplier: You can block invoices, payments or both from a supplier till specific date. Choose ‘Hold Type’, if you do not select a hold type, IONIC ERP will set it to “All”. When a supplier is blocked, their status will be shown as ‘On Hold’.The hold types are as follows:
- Invoices: IONIC ERP will not allow Purchase Invoices or Purchase Orders to be created for the supplier
- Payments: IONIC ERP will not allow Payment Entries to be created for the Supplier
- All: IONIC ERP will apply both hold types above
If you do not set a release date, IONIC ERP will hold the Supplier indefinitely.
2.5 Default Payable Accounts
Add the default account from which invoices against this supplier will be paid. Add additional rows for more companies, you can select only one account per company.
You can integrate a supplier with an account. For all Suppliers, “Creditor” account is set as the default payable Account. When Purchase Invoice is created, payable towards the supplier is booked against “Creditors” account.
If you want to customize payable account for the Supplier, you should first add a payable Account in the Chart of Account, and then select that Payable Account in the Supplier master.
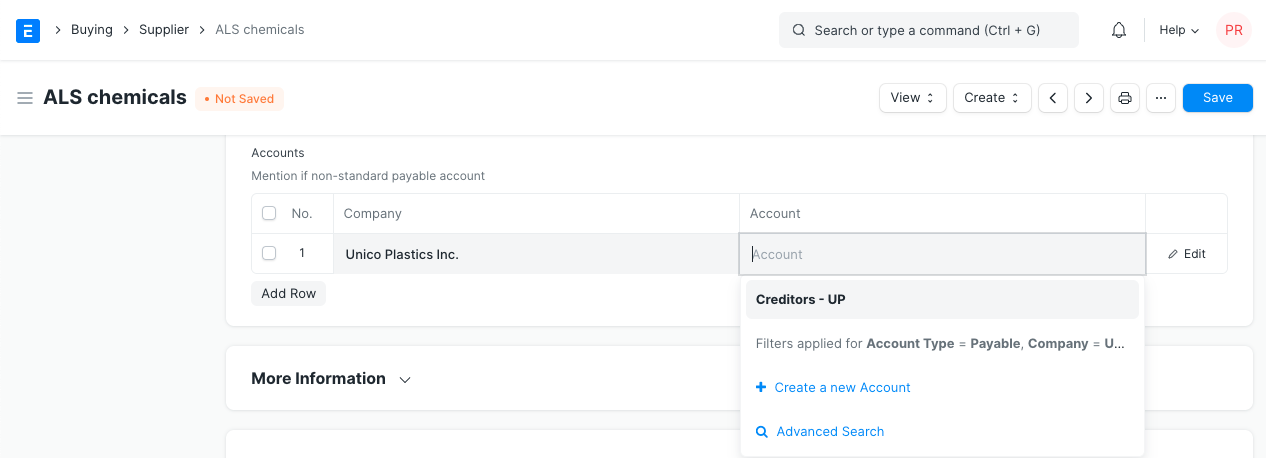
If you don’t want to customize payable account, and proceed with default payable account “Creditor”, then do not update any value in the Default Supplier Account’s table.
Tip: Default Payable Account is set in the Company master. If you want to set another account as Account as default for payable instead of Creditors Account, go to Company master, and set that account as “Default Payable Account”.
Depending on your plan, you can add multiple companies in your IONIC ERP instance. One Supplier can be used across multiple companies. In this case, you should define Company-wise Payable Account for the Supplier in the “Default Payable Accounts” table, i.e, add multiple rows.
2.6 More Information
You can add the supplier’s website and any additional details about your supplier in this section. If you freeze a supplier with the ‘Is Frozen’ option, accounting entries for the supplier will be frozen. In this case the only user whose entries will surpass the ‘freeze’ is the role assigned in ‘Role Allowed to Set Frozen Accounts & Edit Frozen Entries’ in Accounting > Settings > Accounts Settings. This is useful when the supplier’s name or bank details are being amended.
2.7 Address and Contacts
Contacts and Addresses in IONIC ERP are stored separately so that you can create multiple Contacts and Addresses for one Supplier. Once Supplier is saved, you will find the option to create Contact and Address for that Supplier.

Tip: When you select a Supplier in any transaction, Contact for which “Is Primary” field id checked, it will auto-fetch with the Supplier details.
2.8 After saving
Once all the necessary details are filled, save the document. On saving, options to create the following will be seen in the Dashboard:
- Request for Quotation: An RFQ against this supplier.
- Supplier Quotation: Any quotations that the supplier has sent you and you have submitted into the system.
- Purchase Order: Purchase Orders you’ve made against this supplier.
- Purchase Receipt: Purchase receipts given by this supplier that you’ve saved in the system.
- Purchase Invoice: Purchase Invoices you’ve made against this supplier.
- Payment Entry: Payment Entries for the Purchase Invoices against this supplier.
- Pricing Rule: Any Pricing Rules linked with this supplier. See section 2.2 Currency and Price List to know how it works.

By clicking on the View button, you can view the Accounting Ledger or Accounts Payable directly for this supplier.
There’s a button to ‘Send GST Update Reminder’ to the supplier. You need to have a default email account setup first.
Supplier Quotation
A Supplier Quotation is document by a potential supplier specifying the cost of goods or services they’ll provide within a specified period.
A Supplier Quotation may also contain terms of sale, terms of payment, and warranties. Acceptance of quotation by the buyer can be considered as an agreement binding on both parties.
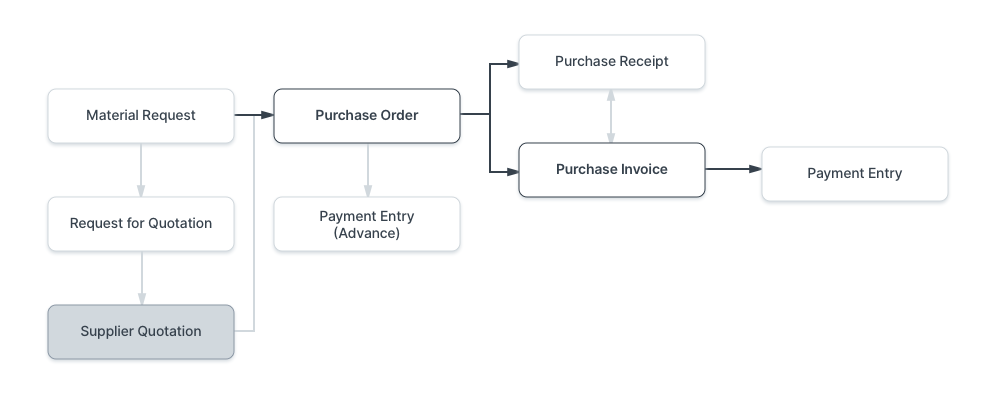
To access Supplier Quotation, go to:
Home > Buying > Purchasing > Supplier Quotation
1. Prerequisites
Before creating and using a Supplier Quotation, it is advised that you create the following first:
- Supplier
- Item
2. How to create a Supplier Quotation
2.1 Supplier Quotation from Material Request
You can make a supplier quotation from a Material Request: 
Or:
A Supplier Quotation can be created from a Supplier master.
Or:
The supplier can submit you a quotation himself via ERPNext. To know more about this, see section visit the Request for Quotation page.
2.2 Creating a Supplier Quotation manually
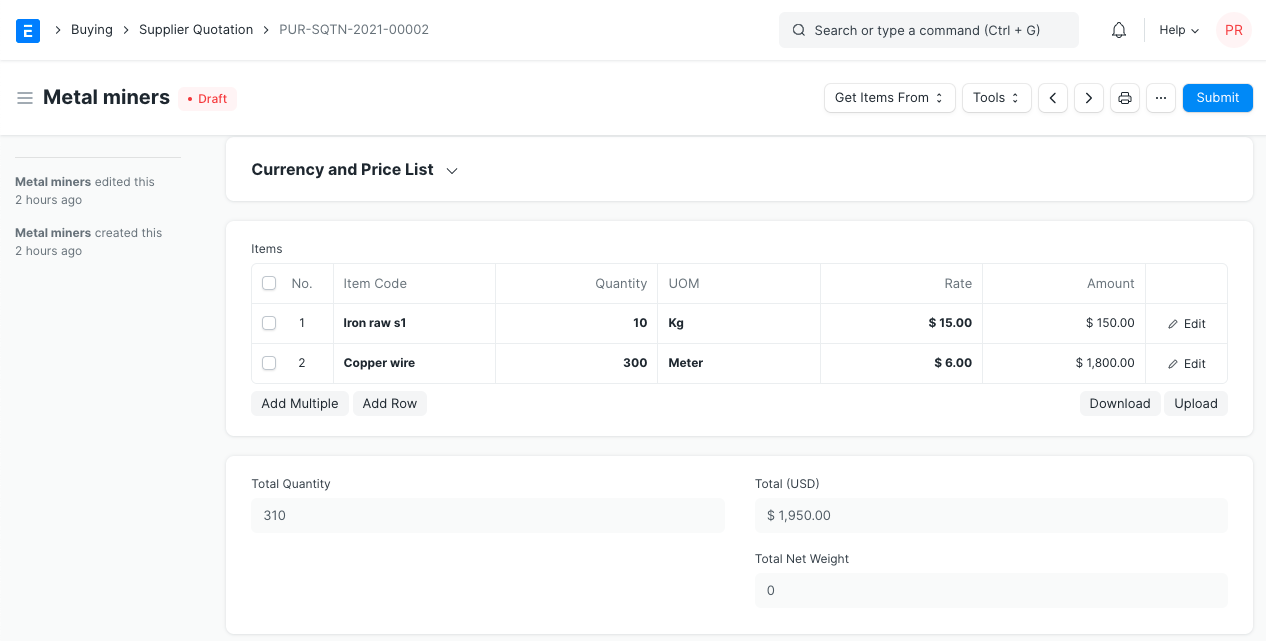
- You can also make a Supplier Quotation directly from:Buying > Purchasing > Supplier Quotation > New.
- Select the Supplier who sent you the quotation.
- The Address and Contact will be fetched if you’ve saved it in the supplier master.
- Enter the Item code, select the quantity. Rate will be fetched if you’ve set the Standard Buying rate for the item in Item Price.
If you have multiple Suppliers who supply you with the same Item, you usually send out a Request for Quotation to various Suppliers. In many cases, especially if you have centralized buying, you may want to record all the quotes so that:
- You can easily compare prices in the future
- Audit whether all Suppliers were given the opportunity to quote.
Supplier Quotations are not necessary for most small businesses. Always evaluate the cost of collecting information to the value it really provides! As a recommendation, you can do this only for high value items.
3. Features
3.1 Taxes and Charges
If your Supplier is going to charge you additional taxes or charge like a shipping or insurance charge, you can add it here. This will help you accurately track your costs. Also, if some of these charges add to the value of the product you will have to mention them in the Taxes table. You can also use templates for your taxes. For more information on setting up your taxes see the Purchase Taxes and Charges Template.
3.2 More
There are fields for Tax Category, Shipping Rule, Purchase Taxes and Charges Template, Discount, Terms and Conditions, Quotation Number, Printing Settings. You can fill these fields for your record. Visit the Quotation page to know more about these sections. Note that the details like Shipping Rule, taxes, Discount, Terms and Conditions, Quotation Number, etc., are from your supplier and can be recorded for accurate tracking.
Note:
- Tax Category will be fetched from supplier master if set
- Print settings is for making changes to the supplier quotation print
- The Terms and Conditions here are your supplier’s
- The Supplier Quotation can be linked to a Material Request using the ‘Link to material requests’ button
3.3 After Submitting
The following records can be created after submitting a Supplier Quotation:
- Purchase Order – A Purchase Order if you agree with the supplier’s quotation.
- Quotation – A quotation to your customer.
- Auto Repeat – Auto Repeat the supplier quotation at specified intervals.
Supplier Scorecard
A Supplier Scorecard is an evaluation tool used to assess the performance of suppliers.
Supplier scorecards can be used to keep track of item quality, delivery, and responsiveness of suppliers across long periods of time. This data is typically used to help in purchasing decisions. A Supplier Scorecard is manually created for each supplier.
To access Supplier Scorecard, go to:
Home > Buying > Supplier Scorecard > Supplier Scorecard
1. Prerequisites
Before creating and using a Supplier Scorecard, it is advised that you create the following first:
- Supplier
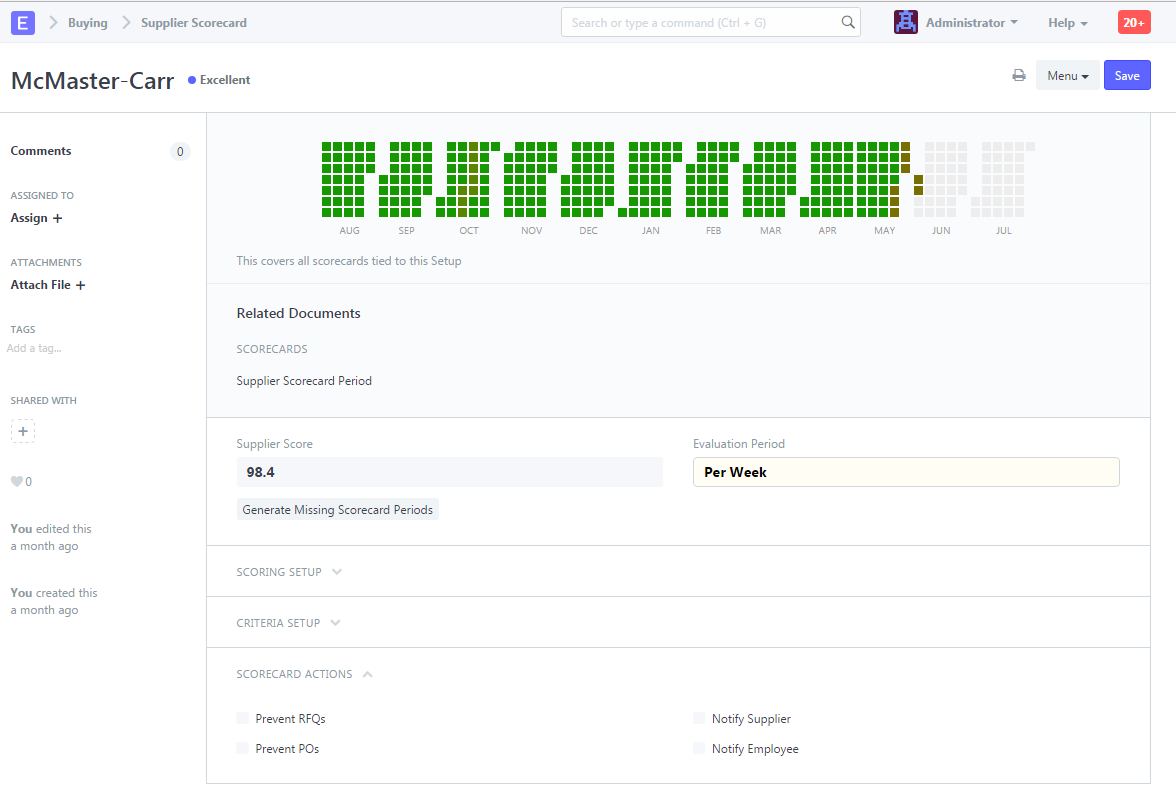
1. How to create Supplier Scorecard
- Go to the Supplier Scorecard list, click on New.
- Select a Supplier to score.
- Select the evaluating period whether weekly, monthly, or yearly.
- Setup the scoring function (details in next section).
- A supplier scorecard is created for each supplier individually. Only one supplier scorecard can be created for each supplier.
2. Features
2.1 Scoring Setup
The supplier scorecard consists of a set evaluation periods, during which the performance of a supplier is evaluated. This period can be weekly, monthly or yearly. The current score is calculated from the score of each evaluation period based on the weighting function. The default formula is linearly weighed over the previous 12 scoring periods. 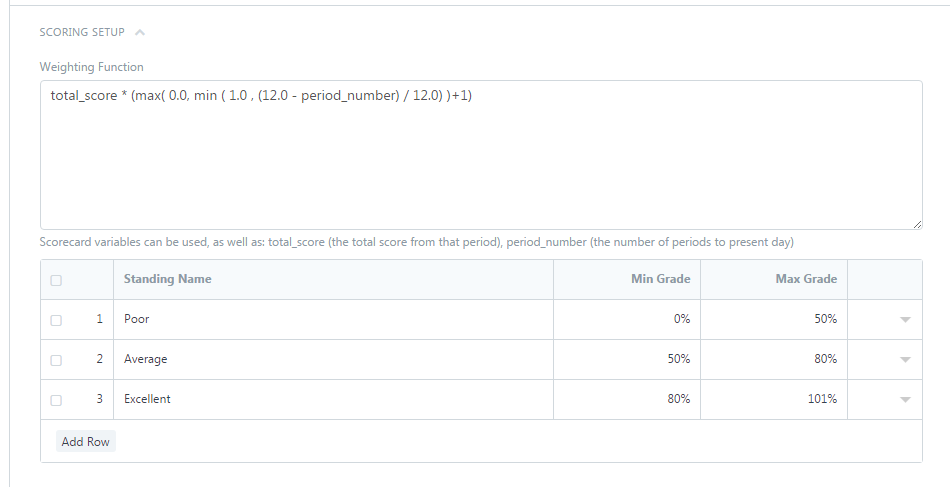 This formula is customizable.
Supplier Standings
The supplier standing is used to quickly sort suppliers based on their performance. These are customizable for each supplier.
The scorecard standing of a supplier can also be used to restrict suppliers from being included in Request for Quotations or being issued Purchase Orders. The following screen can be seen on expanding a row in the ‘Scoring Standings’ table, click on the downward facing arrow. 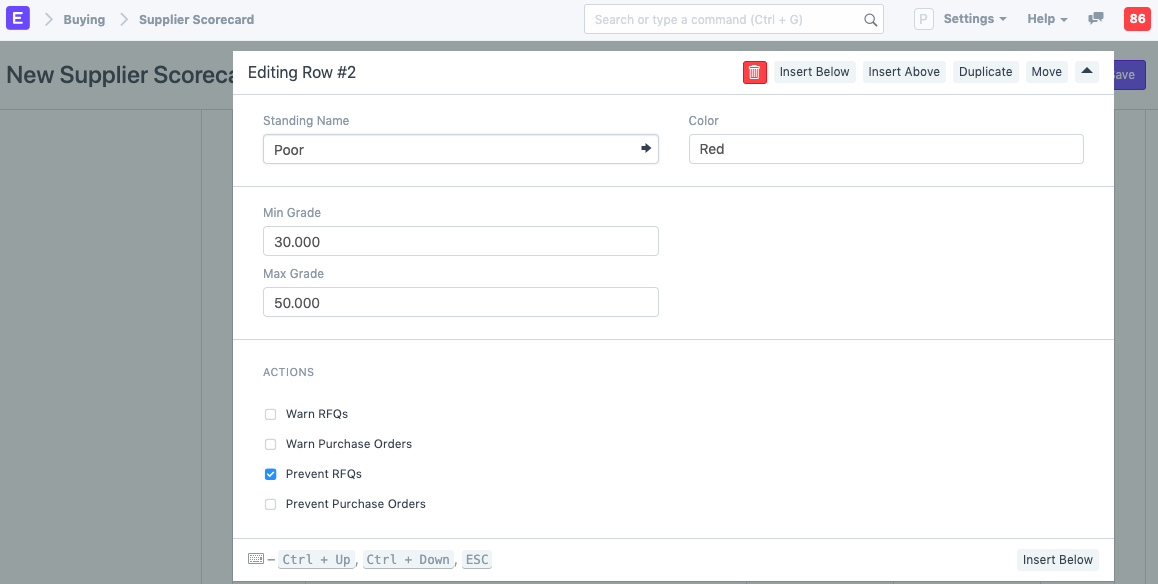
2.2 Criteria Setup
A supplier can be evaluated on several individual evaluation criteria, including (but not limited to) quotation response time, delivered item quality, and delivery timeliness. These criteria are weighed to determine the final period score.
To create a new Criteria, go to Buying > Supplier Scorecard > Supplier Scorecard Criteria: 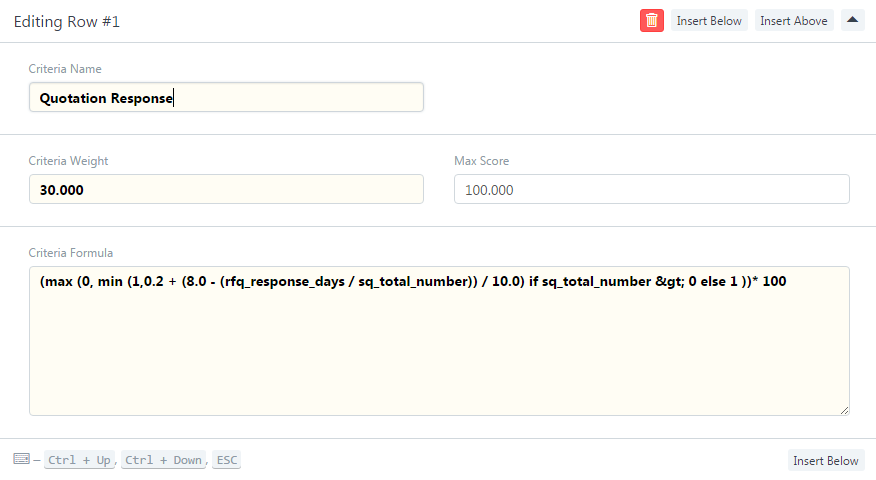
Note: Criteria weights for a scorecard should add up to 100.
2.3 Supplier Scorecard Variables
The method for calculating each criteria is determined through the Criteria Formula field, which can use a number of pre-established variables. This can be seen in the preceding screenshot.
The value of each of these variables is calculated over the scoring period for each supplier. Examples of such variables include:
- The total number of items received from the supplier
- The total number of accepted items from the supplier
- The total number of rejected items from the supplier
- The total number of deliveries from the supplier
- The total amount (in dollars) received from a supplier

Variables are pre-set, additional variables can be added through server-side customizations. Tick the Custom checkbox if the variable you’re creating is for a custom field.
The criteria formula should be customized to evaluate the suppliers in each criteria in a way that best fits the company requirements.
2.4 Evaluation Formulas
The evaluation formula uses the pre-established or custom variables to evaluate an aspect of supplier performance over the scoring period. Formulas can use the following mathematical functions:
- addition: +
- subtraction: –
- multiplication: *
- division: /
- min: min(x,y)
- max: max(x,y)
- if/else: (x) if (formula) else (y)
- less than: <
- greater than: >
- variables: {variable_name}
It is crucial that the formula be solvable for all variable values. This is most often an issue if the value resolves to 0. For example:
{total_accepted_items} / {total_received_items}
This example would resolve to 0 / 0 in periods where there are no received items, and therefore should have a check to protect in this case:
({total_accepted_items} / {total_received_items})
if {total_received_items} > 0
else 1.
2.5 Evaluating the Supplier
An evaluation is generated for each Supplier Scorecard Period by clicking the “Generate Missing Scorecard Periods” button. The supplier’s current score can be seen, as well as a visual graphic showing the performance of the supplier over time. Any actions against the supplier are also noted here, including warnings when creating RFQs and POs or preventing these features for this supplier altogether.
Buying Reports
Data pertaining to purchases made by an organization can be analyzed and visualized through various reports available in the buying modules. Normally, each report has three sections: Filter toolbar, a chart, and data. Changes in the filters and selections are immediately reflected in the chart.
Purchase Analytics
To access the report, go to:
Home > Buying > Key Reports > Purchase Analytics
Through the Purchase Analytics report, the purchase-related data against the supplier, supplier groups, items and item group can be analyzed over a given period and frequency.
Purchase Order Analysis
To access the report, go to:
Home > Buying > Key Reports > Purchase Order Analysis
This report is helpful in analyzing the items and their billing status in a purchase order over a given period.
Supplier-Wise Sales Analytics
To access the report, go to:
Home > Buying > Key Reports > Sales-Wise Sales Analytics
This report provides extensive data on different items purchased from the suppliers.
Items to Order and Receive
To access the report, go to:
Home > Buying > Key Reports > Items to Order and Receive
This report visualizes and shows data for the purchase requests created.
Purchase Order Trends
To access the report, go to:
Home > Buying > Key Reports > Purchase Order Trends
Through this report, the trends for purchase orders for a given financial year can be visualized. The trend can be grouped based on Suppliers, Supplier Group, Item, Item Group, and Project.
Procurement Tracker
To access the report, go to:
Home > Buying > Key Reports > Purchase Order Trends
This report presents extensive purchase-related data including material requests, purchase orders created for the items.
Other Reports
To access, go to:
Home > Buying > Other Reports
In other reports section, the following reports can be accessed:
- Items To Be Requested
- Item-Wise Purchase History
- Purchase Receipt Trends
- Purchase Invoice Trends
- Subcontracted Item To Be Received
- Supplier Quotation
