IONIC ERP Tutorial
CRM Management
Customer
A customer, who is sometimes known as a client, buyer, or purchaser is the one who receives goods, services, products, or ideas, from a seller for a monetary consideration.
Every customer needs to be assigned a unique id. Customer name itself can be the id or you can set a naming series for ids to be generated in Selling Settings.
To access the Customer list, go to:
Home > CRM > Sales Pipeline
Or
Home > Selling > Customers
1. How to create a Customer
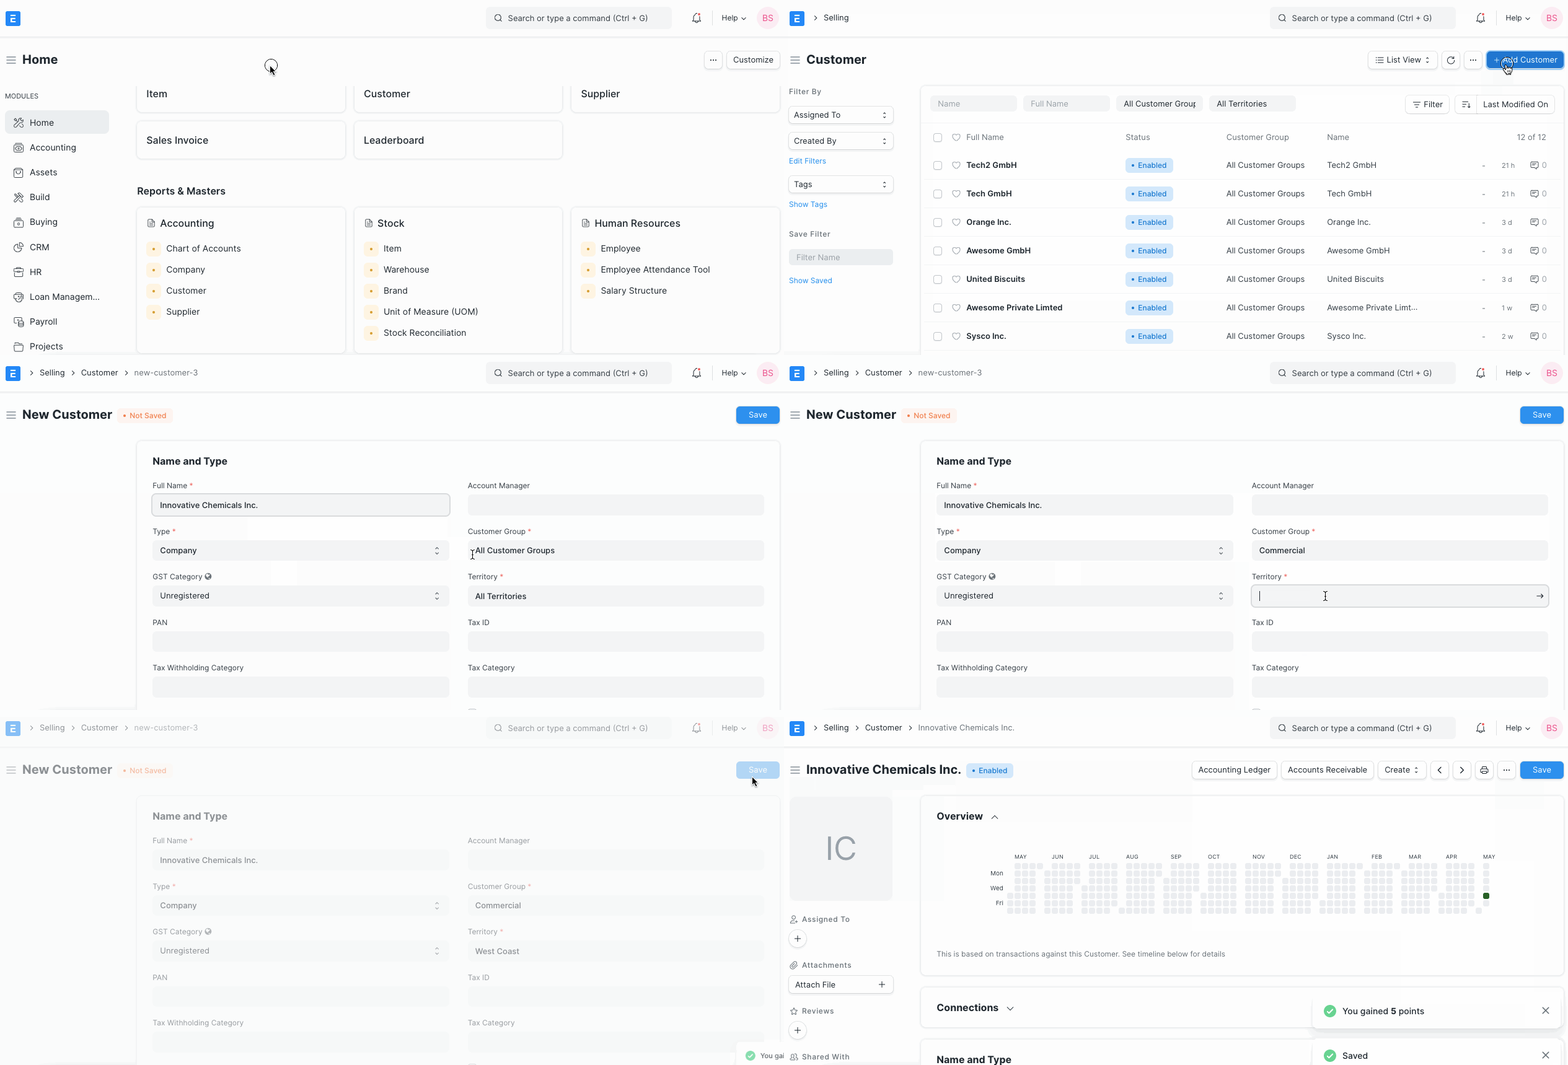
- Go to the Customer list and click on New.
- Enter Full Name of the customer.
- Select Individual if the customer represents an individual or Company if the customer represents a company in Type field.
- Select a Customer Group. Individual, Commercial, Non Profit and Government are available by default. You can create additional groups if you need.
- Select the Territory.
- If the customer is being created against a lead, you can select the same in From Lead field.
- Save.
You can disallow sales orders and sales invoices against a customer by clicking on ‘Disabled’.
Advanced Tip: If the customer represents one of your own companies then check ‘Is Internal Customer’. Check Inter Company Invoices for more details.
You can also upload customer details via the Data Import Tool.
2. Features
General flow of transactions for a customer is as following:
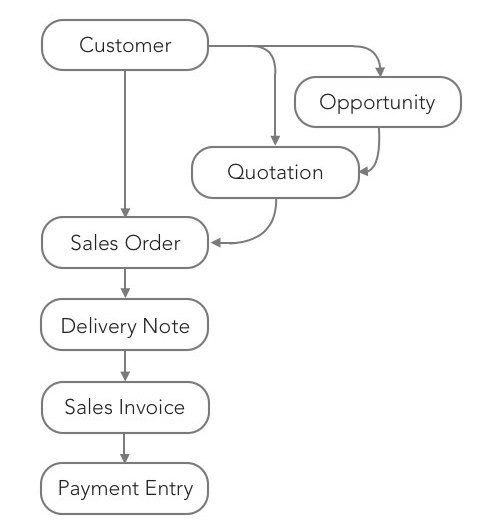
Note: Customers are separate from Contacts and Addresses. A Customer can have multiple Contacts and Addresses.
2.1 Multiple Contacts and Addresses
Contacts and Addresses are stored separately so that you can attach multiple Contacts or Addresses to the customer.
2.2 Allow creation of Sales Invoice without Sales Order and Delivery Note
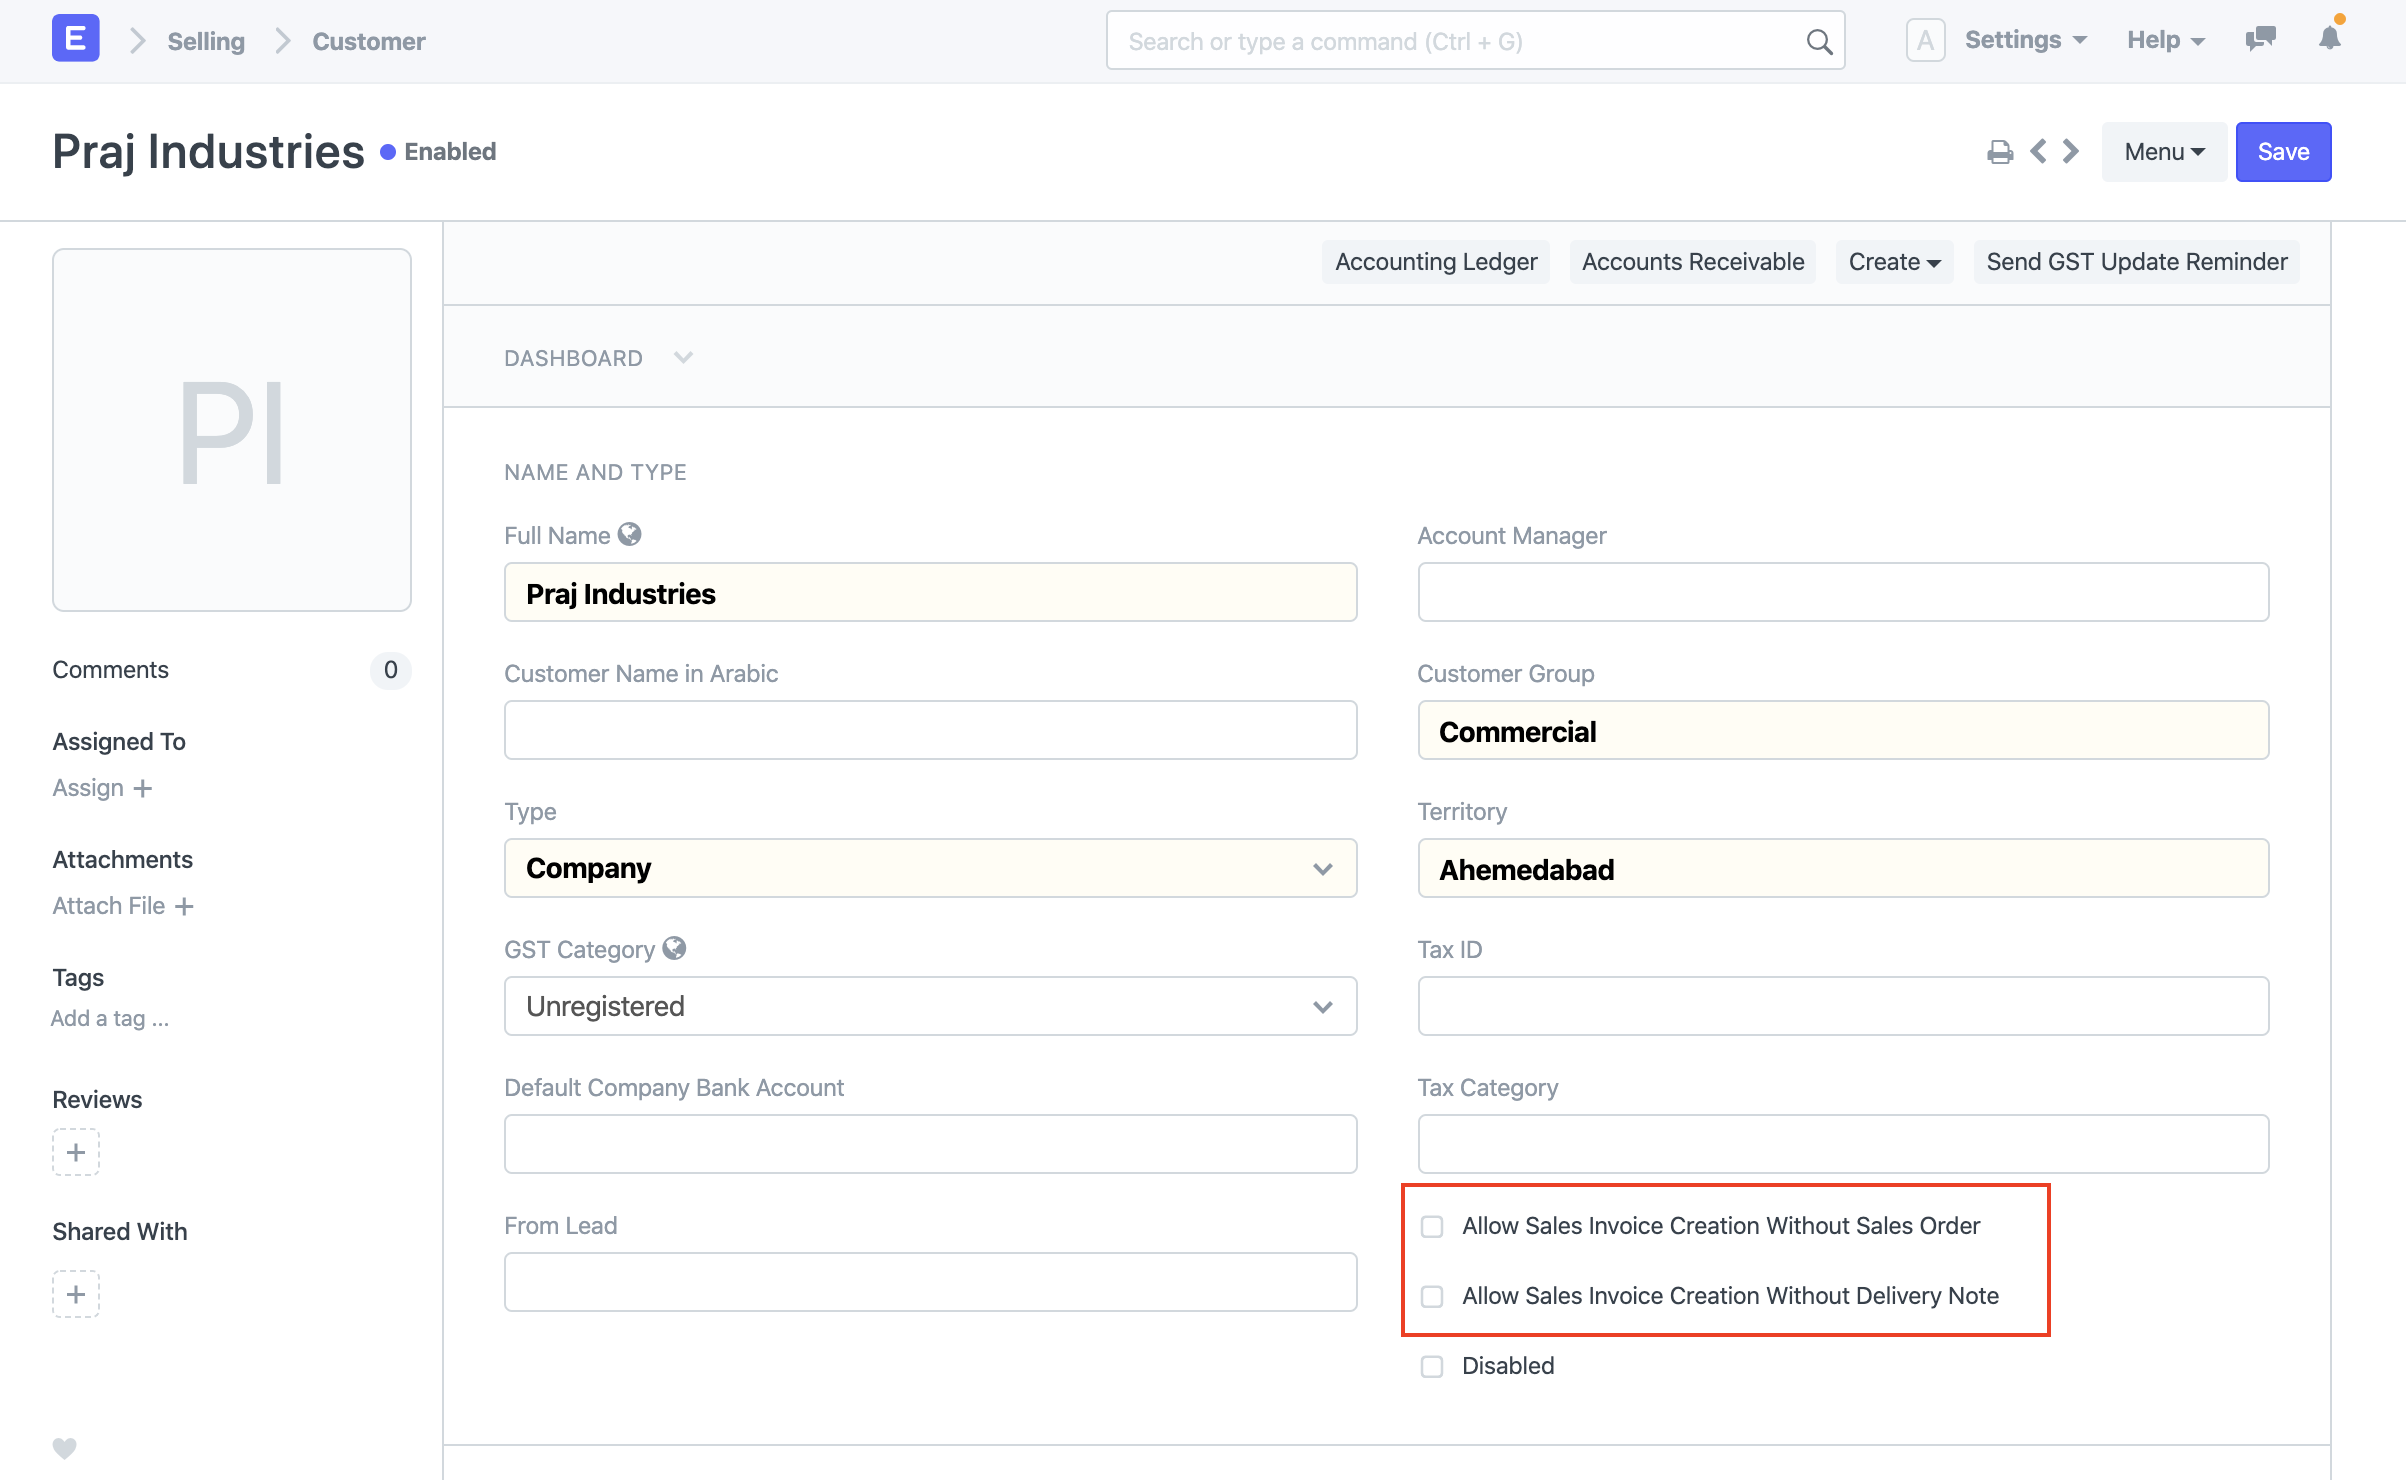
If the “Delivery Note Required” or “Sales Order Required” option is configured as “Yes” in Selling Settings, it can be overridden for a particular customer by enabling the “Allow Sales Invoice Creation Without Sales Order” or “Allow Sales Invoice Creation Without Delivery Note” in the Customer Master.
2.3 Set Tax Withholding Category
You can set the Tax Withholding Category to set up TCS against eligible customers. For more information, visit the Tax Withholding Category page.
2.4 Default Currency and Price List
IONIC ERP supports Multiple Currencies and Price Lists.
You can set the default currency to be used for this customer in sales orders and sales invoices by selecting the appropriate currency in Billing Currency.
Similarly, you can set the default price list to be used for this customer in sales orders and sales invoices by selecting the appropriate currency in Default Price List.
2.5 Integration with Accounts
Unlike many accounting software, you need not create a separate accounting ledger for each customer. By default a unified ledger named Debtors is created.
However if you specifically need a separate ledger for a customer, first create the ledger under Accounts Receivable in the Chart of Accounts and then add it in ACCOUNTING section of the customer.
Advanced Tip: IONIC ERP supports Multi-company Accounting. You can use the same customer records in multiple companies. Since an accounting ledger is company specific, you need to select the company and the corresponding ledger in ACCOUNTING section if you decide have separate accounting ledger for a customer.
2.6 Credit Limit and Payment Terms
You can set the credit limit by entering the amount in ‘Credit Limit’ field. Read Credit Limit for more details.
You can select the default Payment Terms to be applied in sales orders and sales invoices in ‘Default Payment Terms Template’ field.
2.7 Sales Team and Sales Partner
If you have one or more Sales Person to manage the sales to the customer, you can add them in SALES TEAM section. If multiple sales person are involved you can split the contribution among them. Make sure that the sum of all sales persons contribution equals to 100%.
Check Sales Persons in Sales Transaction for more details.
A Sales Partner is a third party distributor / dealer / commission agent / affiliate / reseller who facilitates your products/services sales, for a commission. If you sell your products/services to the customer through a sales partner you can set it in ‘Sales Partner’ field and mention the ‘Commission Rate’ for calculation of commission.
2.8 Loyalty Program
If you would like offer a Loyalty Program to the customer, select the same in Loyalty Program field.
2.9 View Accounting Ledger and Accounts Receivable
Click on Accounting Ledger button to view all accounting transactions with the customer.
Click on Accounts Receivable button to view the details of all outstanding invoices.
2.10 Set Customer Id, Default Customer Group, Territory, and Price List
You can set how a unique id should be generated each the customer in Selling Settings.
- Naming Series: If you would like a unique id to be generated for each customer based on the naming series select ‘Naming Series’ in Customer Naming By.
- Customer Name: If customer name itself should be used as an id then select ‘Customer Name’ in Customer Naming By. In this case, if you create two customers with identical names, – 1 will be suffixed to the second customer.
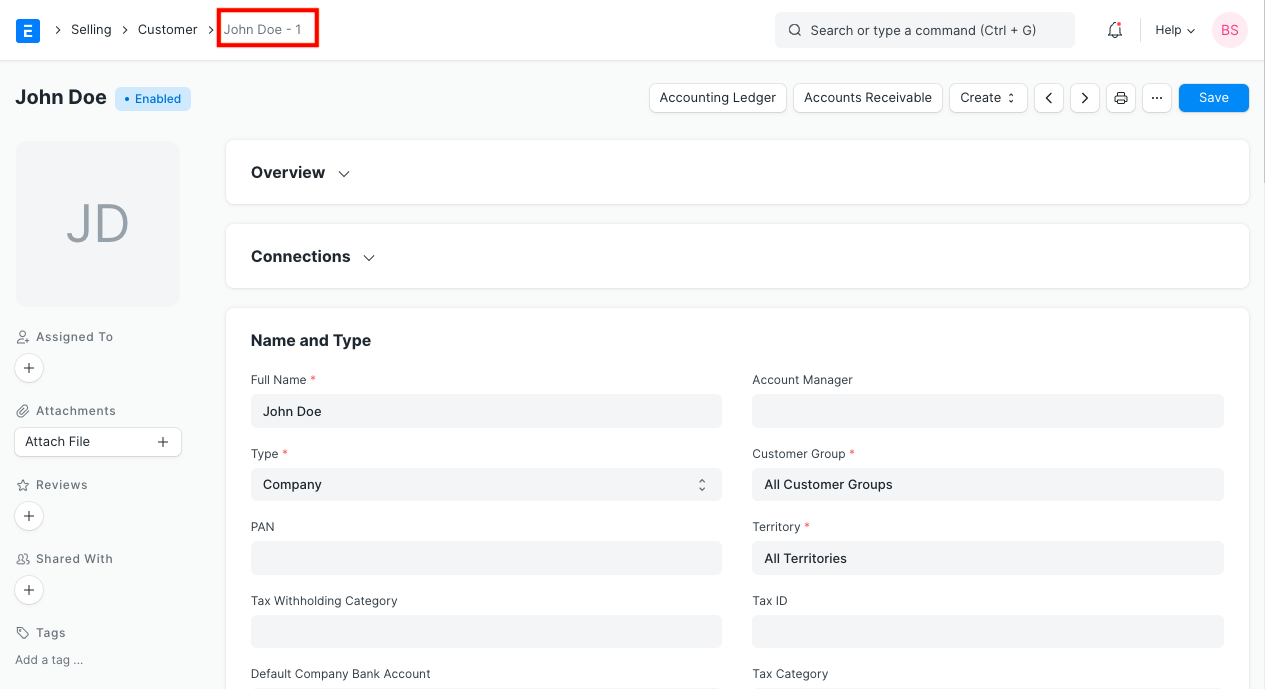
You can set the default customer group, territory and price list in Selling Settings.
You can customize the Customer DocType using Customize Form tool.
Contact
Contact represents a person.
A contact may be associated with a Lead, Customer, Supplier, Shareholder, Sales Partner or a User.
You can also add contact as a standalone record without linking it to any of the entities listed above.
To access the Contact list, go to:
Home > CRM > Sales Pipeline > Contact
1. How to create a Contact
- Go to the Contact list and click on New.
- Enter First Name and Last Name.
- Choose the status if the contact is passive, is open to contact or has replied.
- Enter contact details like email, phone, etc.
- Save.

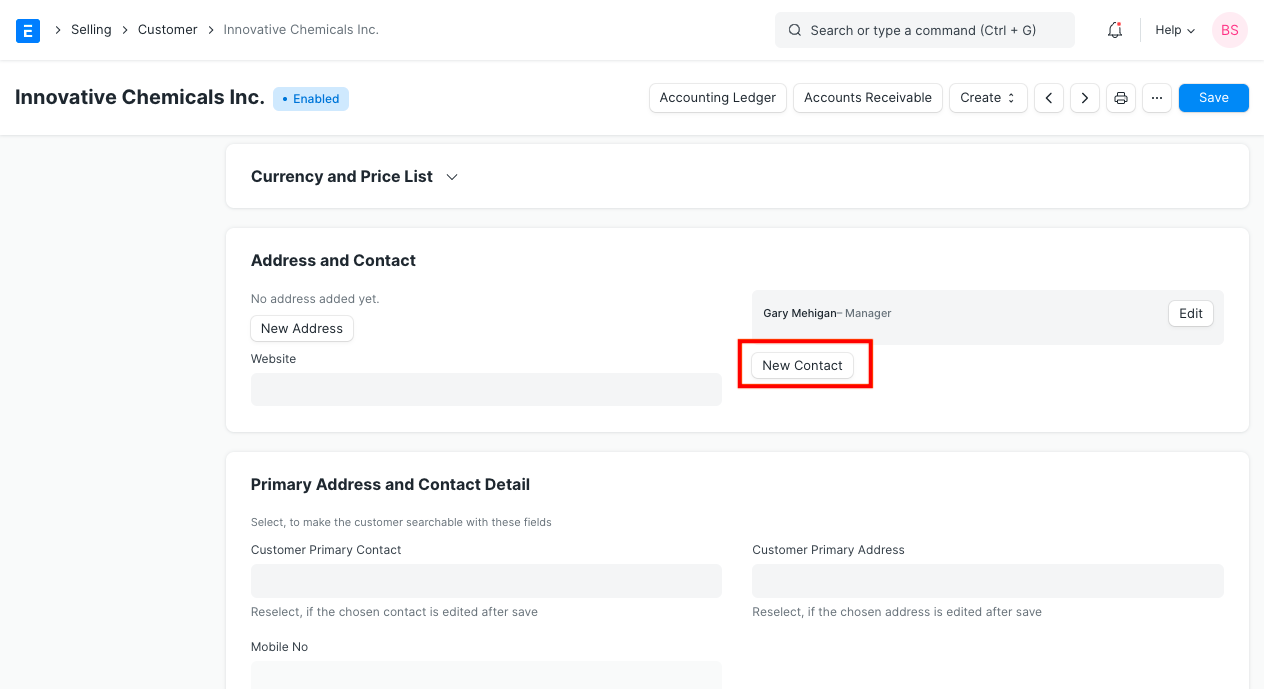
You can also add a Contact from the Customer or Supplier record by clicking on “New Contact” button as shown below.
When you have multiple contacts against an entity like customer/supplier, you can check ‘Is Primary Contact’ to indicate the preferred contact. The primary contact will be chosen automatically in transactions like sales order and sales invoice.
To Import multiple contacts from a spreadsheet, use the Data Import Tool.
2. Features
2.1 Link a Contact to Multiple Entities
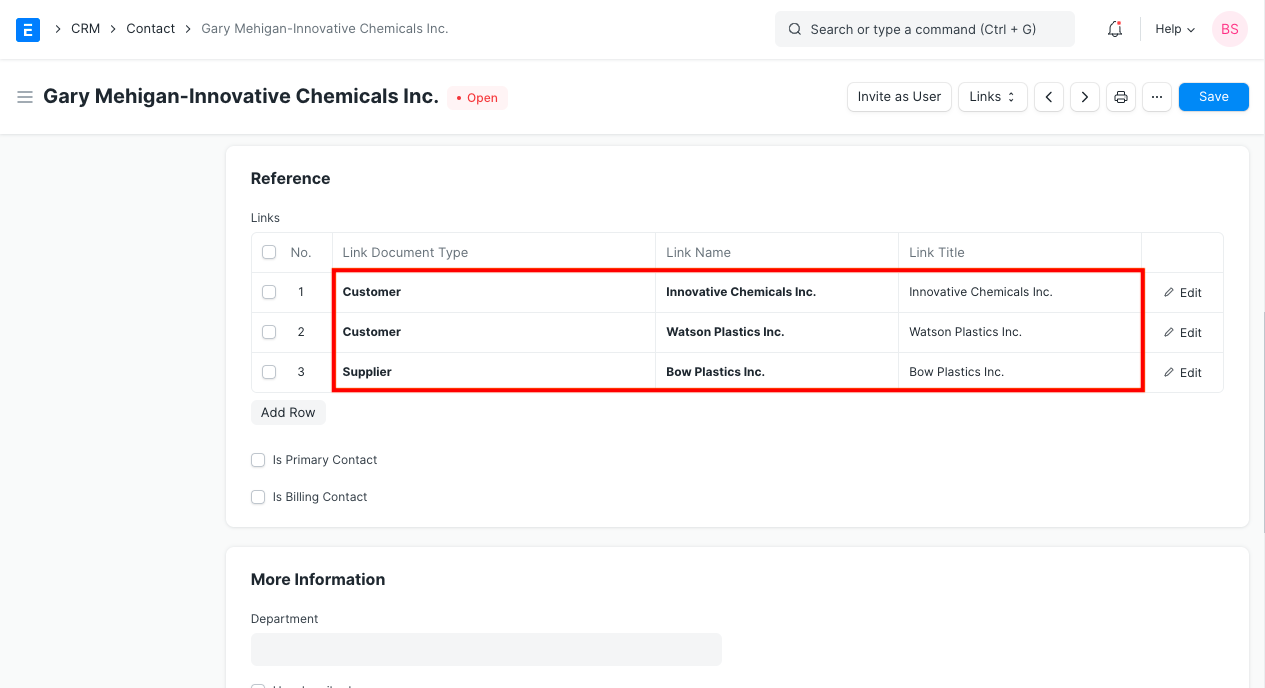
A contact may be linked to multiple customers or multiple suppliers.
A contact can also be linked to customers and suppliers at the same time.
2.2 Invite the Contact as a User
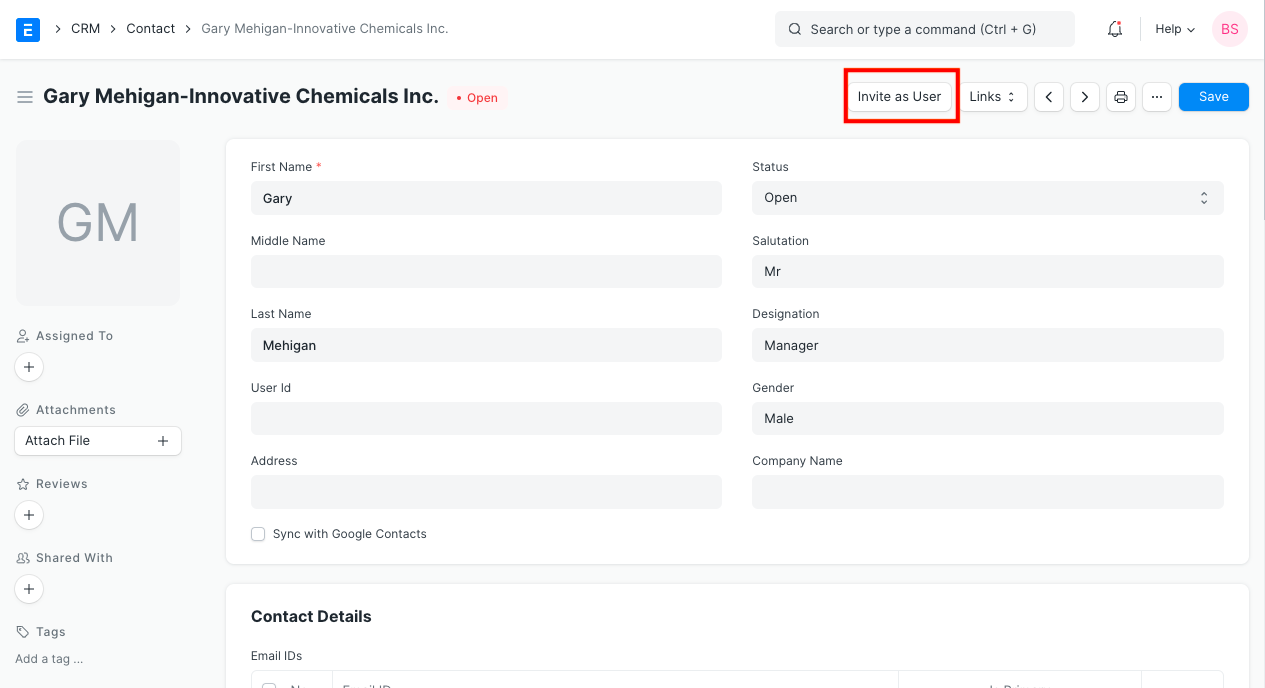
You can allow contacts of your customers and suppliers to log into your IONIC ERP system and view data relevant to them. Check Customer Portal for more details on this. You can send an email invitation to a contact by clicking on ‘Invite as User’ button.
Address
You can record the addresses associated with a Lead, Customer, Supplier, Shareholder, Sales Partner or a Warehouse.
You can also add an Address as a standalone record without linking it to any of the entities listed above.
To access the Address list, go to:
Home > CRM > Address
1. How to create an Address
- Go to the Address list and click on New.
- Select Address Type.
- Enter details in Address Line 1, Address Line 2, City/Town, County, State, Country.
- Enter Email Address, Phone and Fax.
- Enter Link DocType and Link Name to link this address to customer, supplier etc.
- Save.

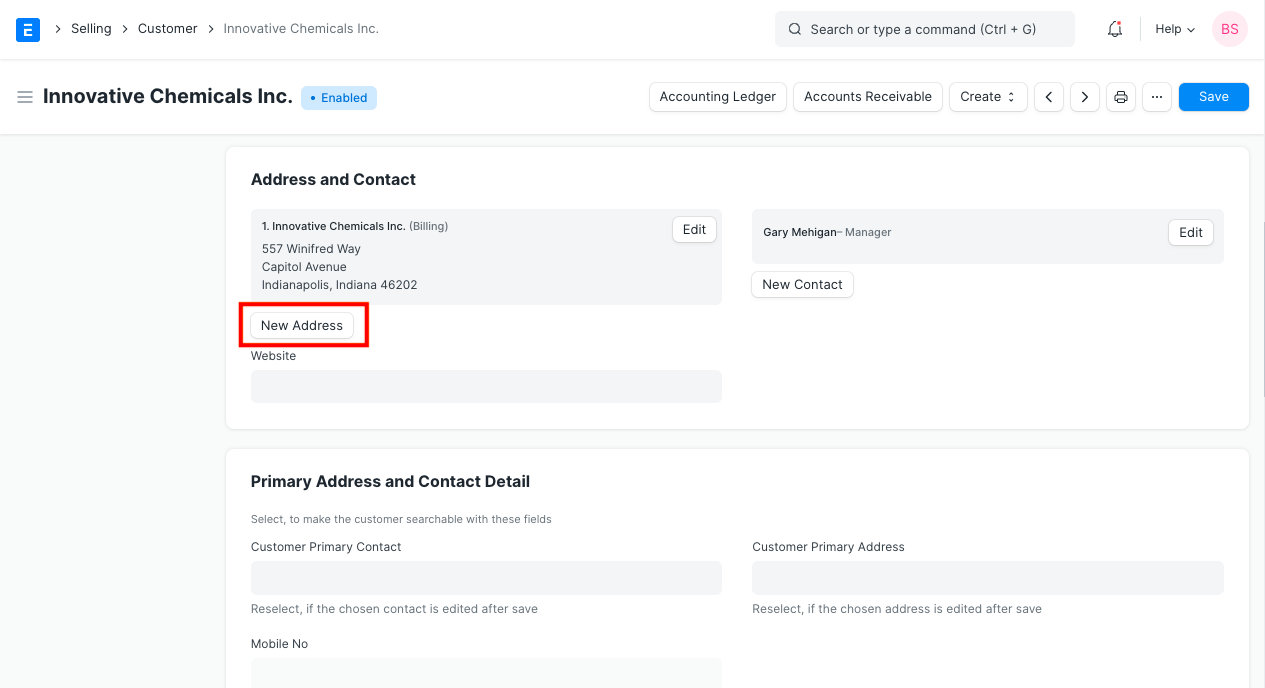
You can also add an Address from the Customer or Supplier record by clicking on “New Address” button as shown below.
To Import multiple addresses from a spreadsheet, use the Data Import Tool.
2. Features
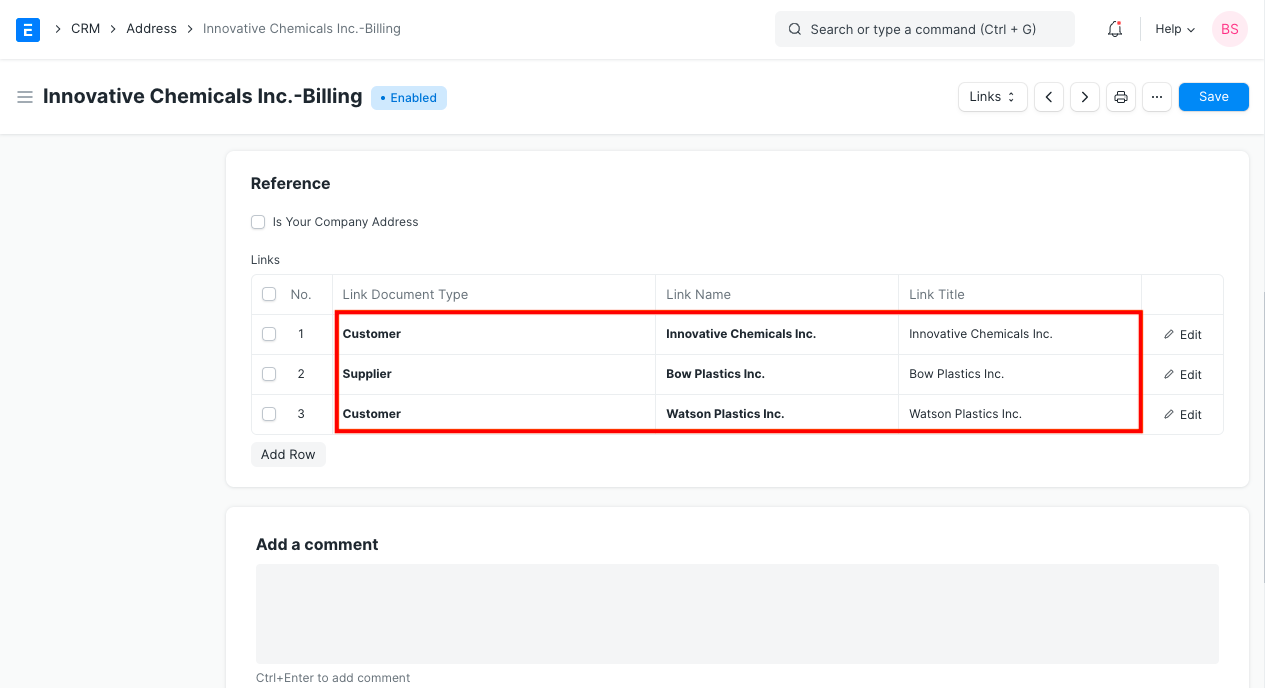
2.1 Link an Address to Multiple Entities
An address may be linked to multiple customers or multiple suppliers.
An address can also be linked to customers and suppliers at the same time.
2.2 Address Title
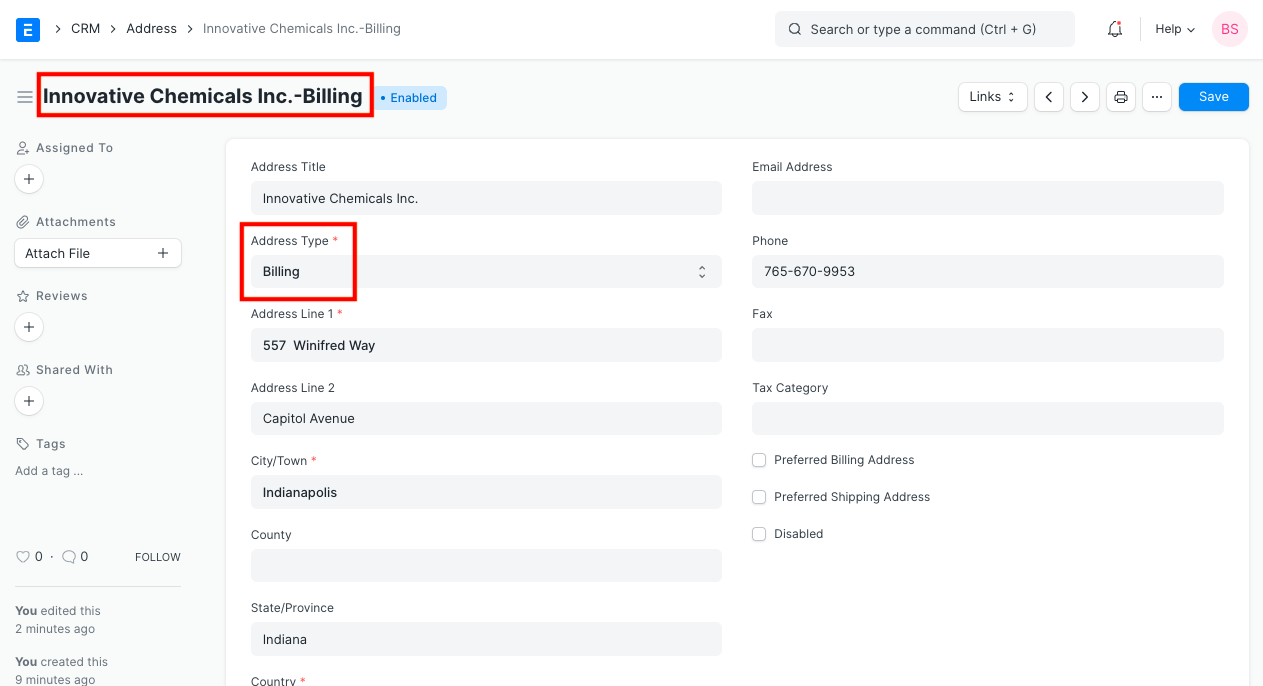
If the address is not linked to any entity you need to manually add a title.
If the address is linked to an entity like a customer or supplier, the title is generated automatically in ‘Entity Name-Address Type’ format.
2.3 Preferred Billing Address and Shipping Address
If you check ‘Preferred Shipping Address’, the address would be automatically added in the Shipping Address in Sales Order, Sales Invoice and Delivery Note transactions.
Similarly, if you check ‘Preferred Billing Address’, the address would be automatically added in the Billing Address in Sales Order, Sales Invoice and Delivery Note transactions.
2.4 GST Localization for India
If the customer or supplier has registered under GST, you can enter GSTIN and GST State in Address. Make sure GSTIN entered is in valid format. 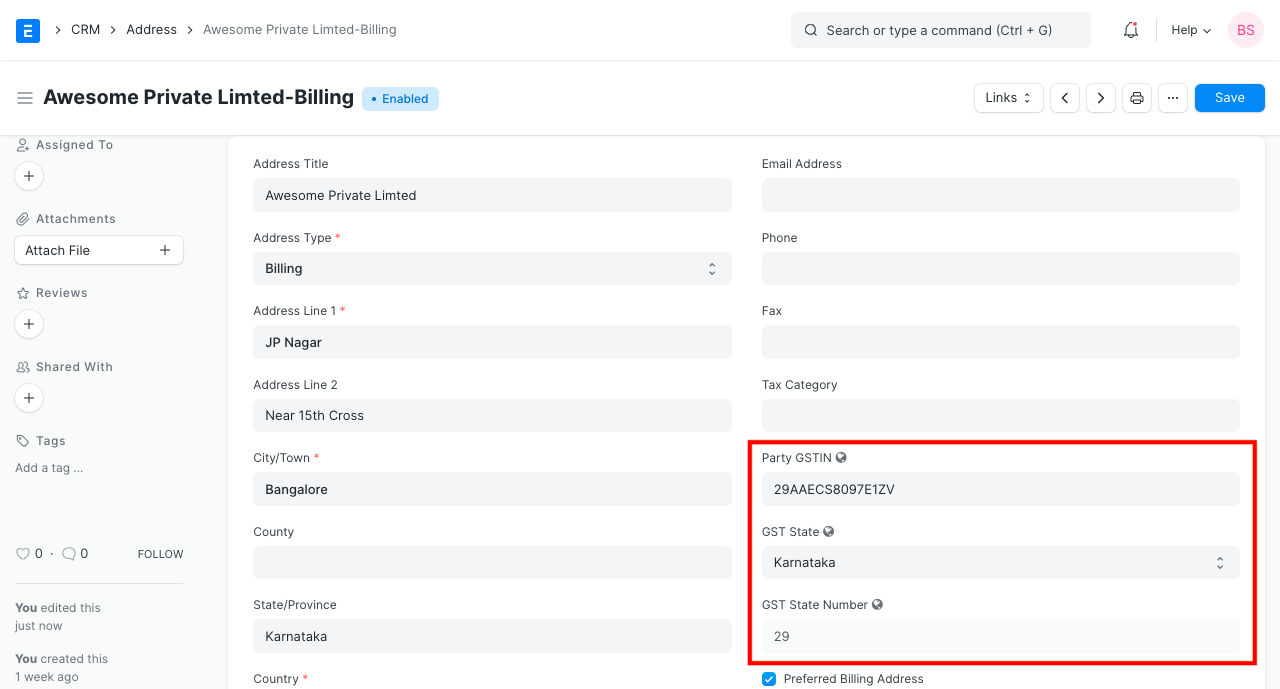
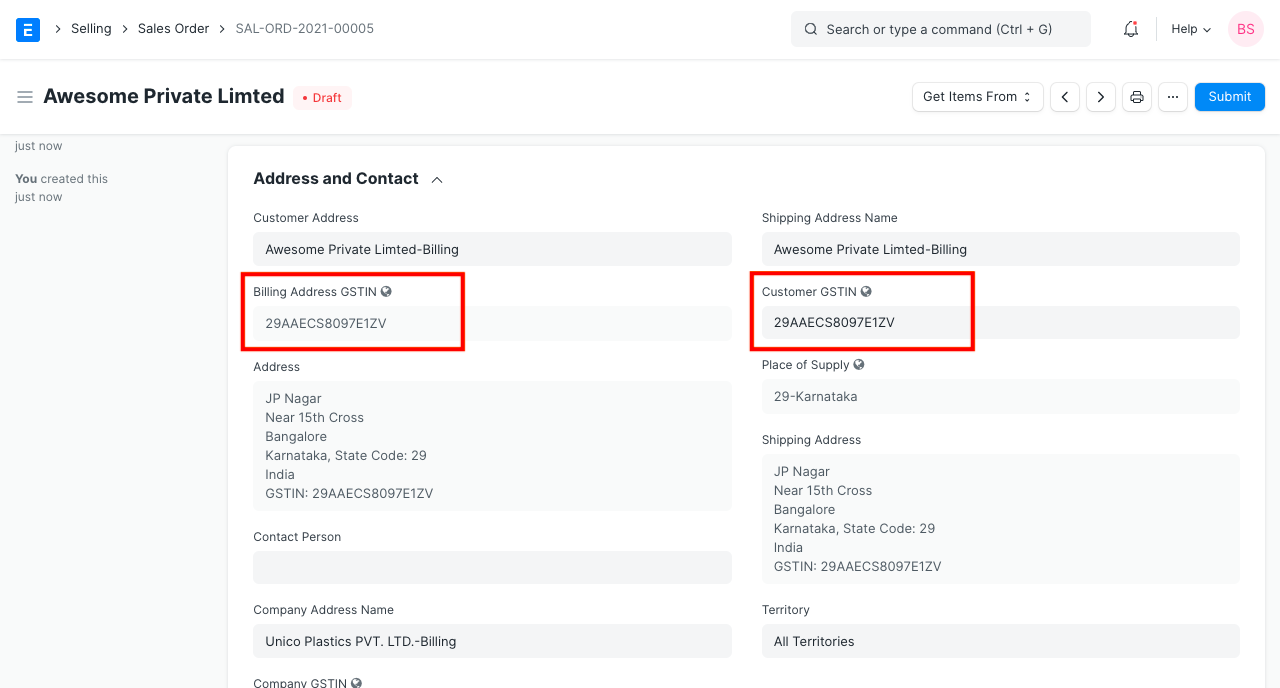
In sales transactions along with address, GSTIN is also fetched.
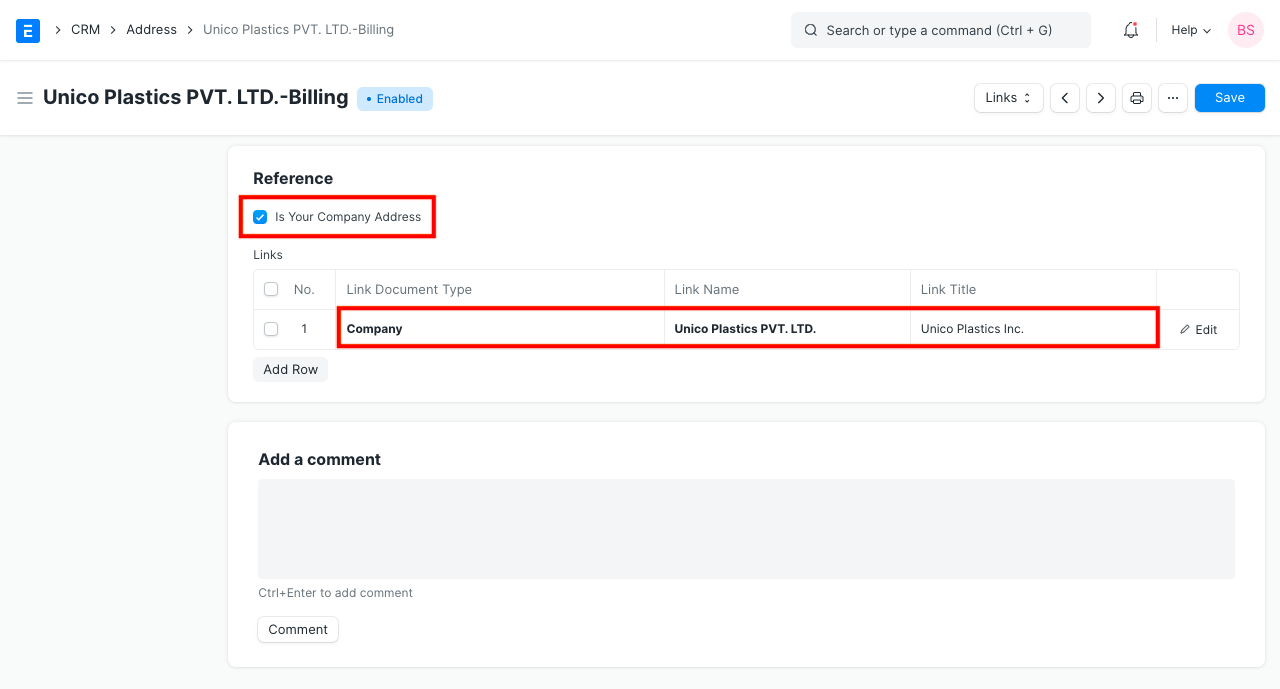
You can also add addresses of your own company’s facilities. Check ‘Is Your Company Address’, select Company in Link DocType, and Company Name in Link Name for such addresses and you can select them in GST Sales Invoice to print your own address.
GSTIN is to be added in Address and not in Customer/Supplier, as one Customer/Supplier may have multiple GSTIN (one for each state where he conducts his business).
Lead
A lead is a potential customer who might be interested in your products or services.
To get the customer through the door, you may be doing all or any of the following:
- Listing your product on directories.
- Maintaining an updated and searchable website.
- Meeting people at trade events.
- Advertising your products or services.
When you send out the word that you are around and have something valuable to offer, people will come in to check out your products. These are your Leads.
They are called Leads because they may lead you to a sale. Sales executives usually work on leads by calling them, building a relationship and sending information about products or services. It is important to track all this conversation to enable another person who may have to follow-up on that contact. The new person is then able to know the history of that particular Lead.
To access the Lead list, go to:
Home > CRM > Sales Pipeline > Lead
1. How to Create a Lead
- Go to the Lead list and click on New.
- If the person represents an organization, check the ‘Lead is an Organization’ checkbox. Notice that when you check, the ‘Company Name ‘ field becomes mandatory. Enter the Company Name.
- If the person is an individual, leave the checkbox unchecked and enter Person Name and Gender.
- Enter the ‘Email Address’.
- Status is the important field in the Lead. You can set the status manually and also it will be updated automatically based on your actions against the lead.
- Lead: This is the default status assigned when a Lead is created and it indicates an action is needed against this Lead.
- Open: Sales executive needs to contact the Lead.
- Replied: A sales executive has provided the information needed and response from Lead is awaited.
- Opportunity: If an Opportunity is created against the Lead, the status is set to Opportunity. It indicates that the Lead is qualified and may lead to sales.
- Quotation: If a quotation is created against a Lead, then the status is set to Quotation.
- Lost Quotation: If the quotation given to the lead has been marked as lost, then the status is set to ‘Lost Quotation’.
- Interested: The lead is interested in the products or services.
- Converted: If the quotation given to the Lead has resulted in confirmation of an order and if the Sales Order has been created against the quotation, then the status is set to Converted.
- Do Not Contact: Lead is not interested and no further communication is needed.
- You can set the Lead Source in Source field.
- Enter email ID for communication.
- Click on ‘Save’.
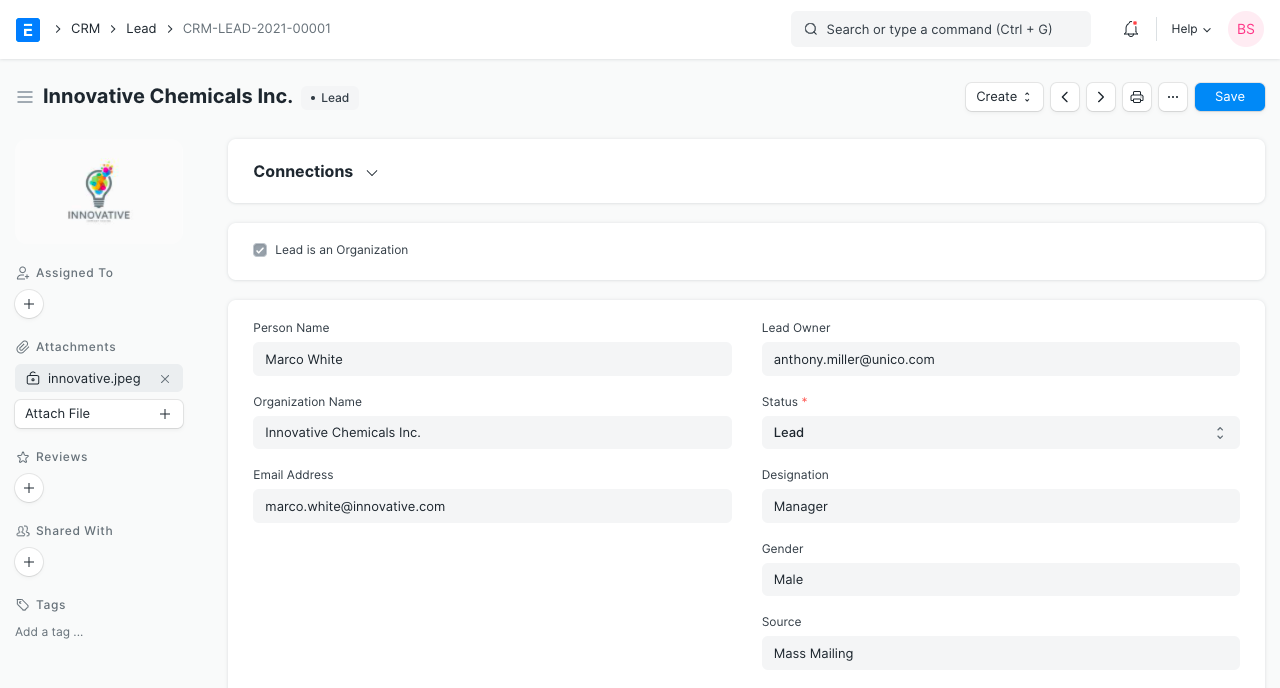
You can also record the details of the conversation in the NOTES section.
Further details like Lead Type, Market Segment, Industry can be added in the ‘MORE INFORMATION’ section.
If you have a healthy number of leads, all this information will help you prioritize the leads you can pursue.
You can assign the Lead to a user by clicking on ‘Assign’ button on left bar. You can also attach files/images by clicking on ‘Attach File’ button.
2. Features
2.1 Reminders to Follow Up on the Leads
It is important to reach out to leads from time to time and build the relationship. You can set the ‘Next Contact Date’ and ‘Next Contact By’ fields and a calendar event will be added for the user chosen in ‘Next Contact By’ field and a notification is shown on that Date.
2.2 Adding Multiple Contacts and Addresses
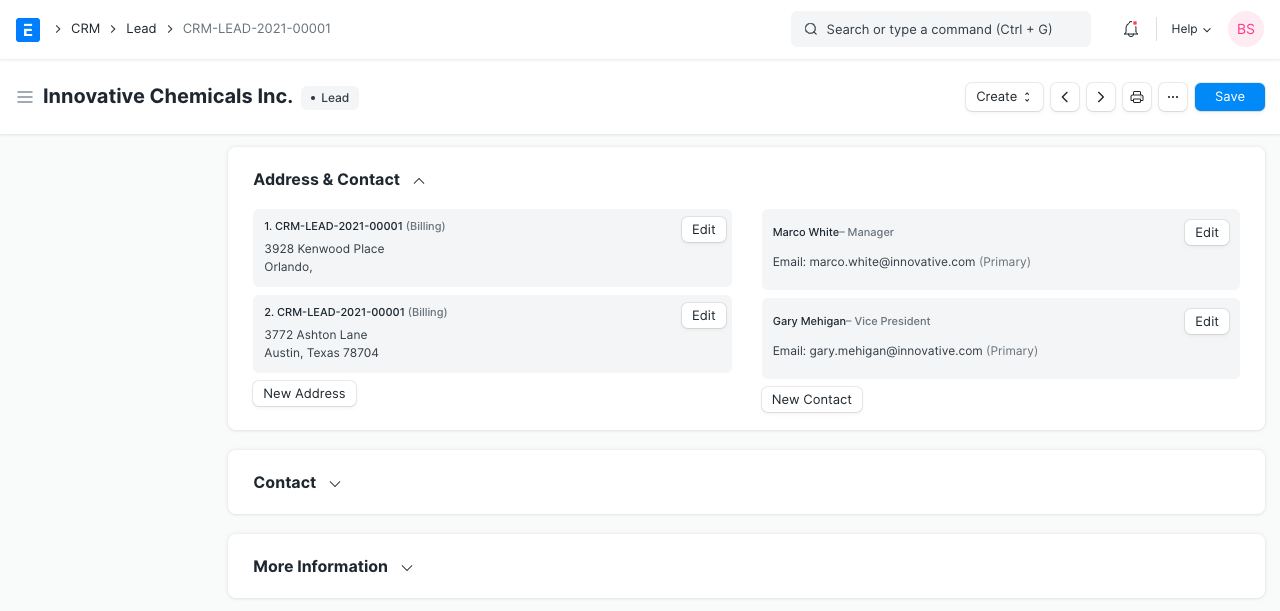
In Busines-to-business(B2B) scenario, in order to close a sales deal, you will have to contact multiple people working in the prospective company. You can add the details of all such people in the same lead. Once you save a Lead, you will get the option to add Contact details by clicking on ‘New Contact’ button. Similarly, you can add the Address details by clicking on ‘New Address’.
2.3 Recording Comments, Emails and Events
- Comments: You can write your comment in ‘Add a comment’ box and click on ‘Comment’.
- Emails: You can send an email to the lead by clicking on the ‘New Email’ button and when the lead responds to your email, it will be appended to your email creating an email thread.
- Events: You can also records the Meetings, Calls etc you have had with the Lead by clicking on ‘New Event’
2.4 Creating Opportunity, Customer and Quotation
You can create an Opportunity, Customer or a Quotation from the Make dropdown. Relevant field values will be copied over.
2.5 Auto-assigning the Leads to Sales Executives
Introduced in Version 12
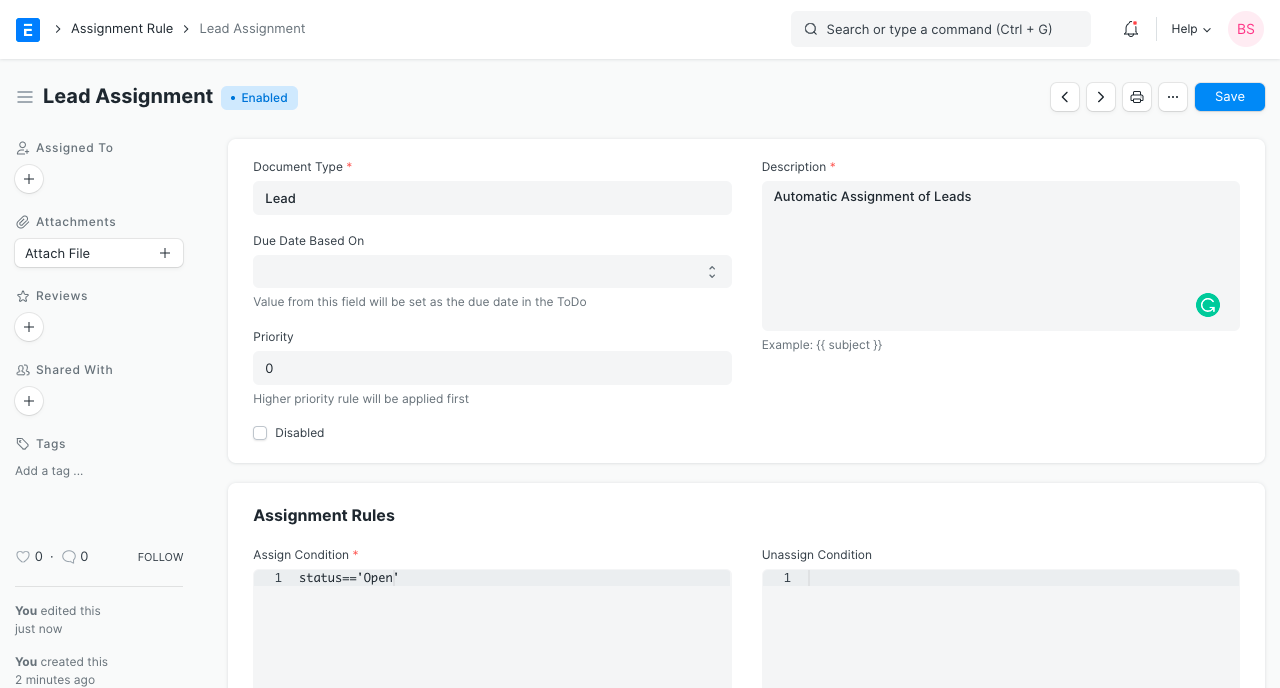
You can define Assignment Rules to automatically assign the leads to sales executives.
3. Adding Custom Fields
You may need to add custom fields to capture additional details as per your needs.
You can customize the Lead DocType using Customize Form tool.
Opportunity
Opportunity is a qualified lead.
When you get a hint that lead is looking for a product/service that you offer, you can convert that lead into an opportunity. You can also create an opportunity against an existing customer. Multiple Opportunities can be collected against a lead or a customer.
To access the Opportunity list, go to:
Home > CRM > Sales Pipeline > Opportunity
1. How to Create an Opportunity
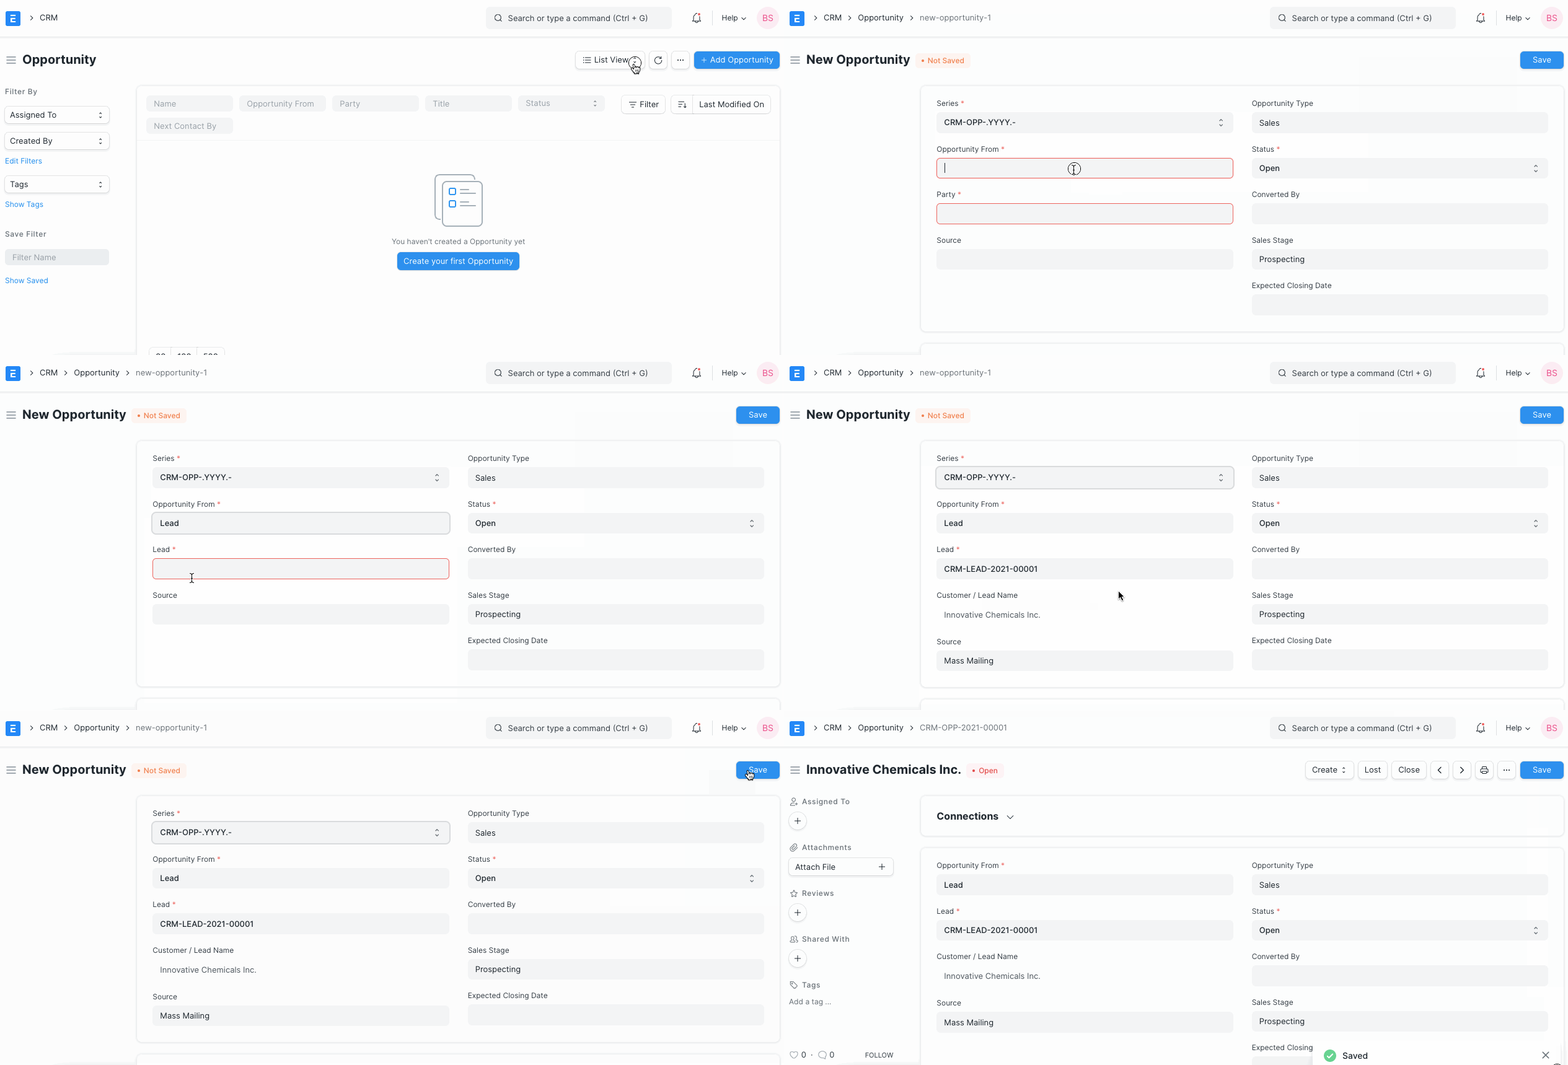
- Go to the Opportunity list and click on ‘Add Opportunity’.
- In ‘Opportunity From’, select Lead if opportunity is from a lead.
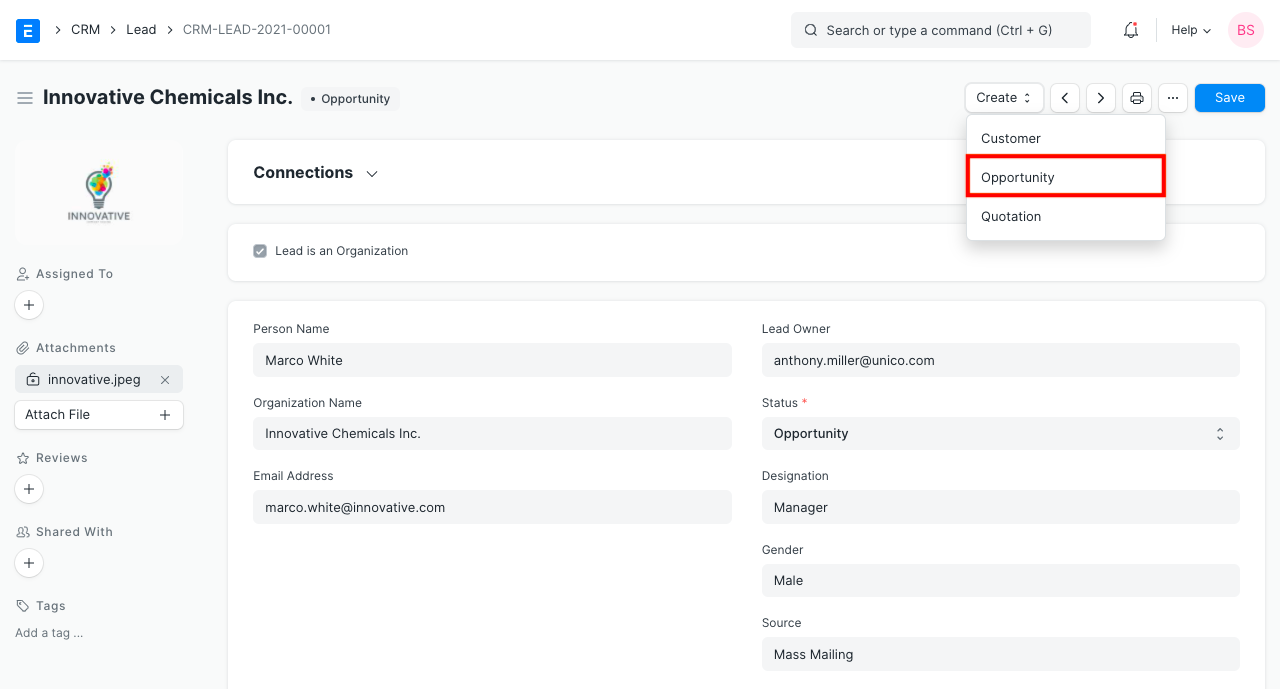
- You can also go to a Lead with ‘Open’ status and select “Opportunity” under Create dropdown as shown below.
- In ‘Opportunity From’, select Customer if opportunity is from a customer.
- Select Opportunity Type. This indicates the broad category of opportunity like Sales, Support, Maintenance etc.
- You can add more details like Opportunity Amount, Probability (of conversion), Currency in ‘SALES’ section.
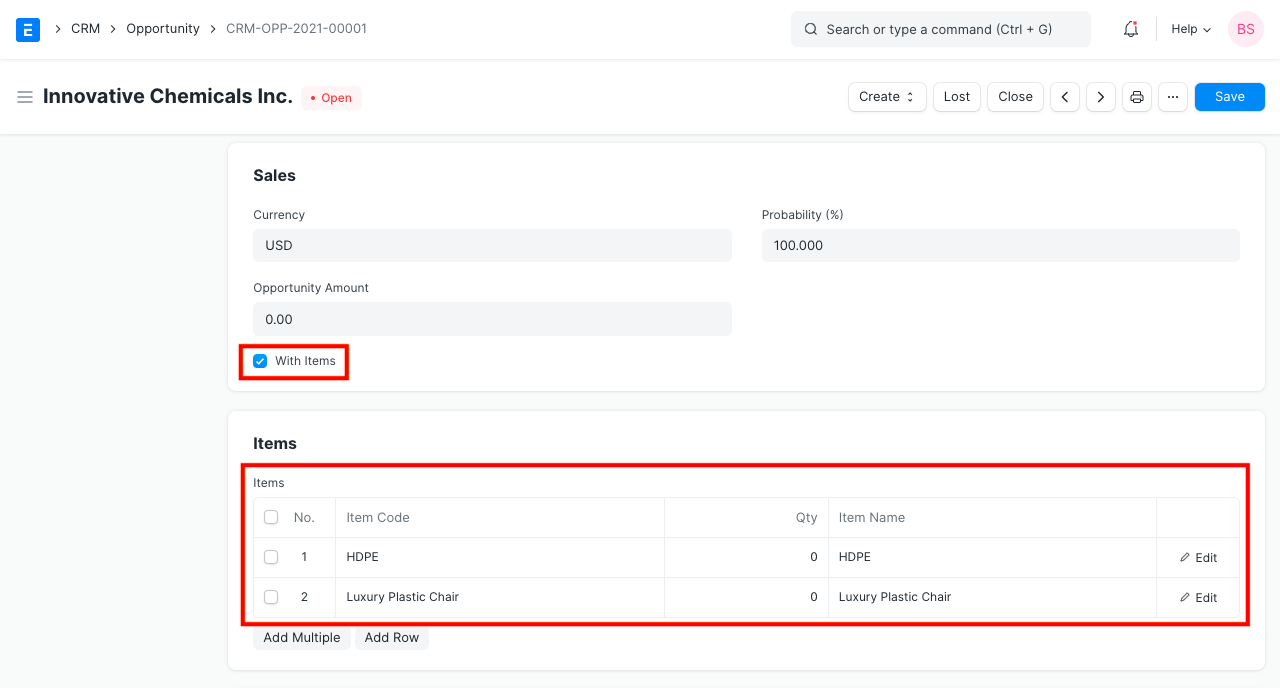
- You can capture the details of the products/services needed by clicking on ‘With Items’ checkbox and adding the item and quantity details in ‘Items’ section.
- Enter the Source of the opportunity in the SOURCE section.
2. Features
2.1 Reminders to Follow Up on Opportunities
It is important to reach out to opportunities from time to time and build the relationship. You can set the ‘Next Contact Date’ and ‘Next Contact By’ fields and a calendar event will be added for the user chosen in ‘Next Contact By’ field and a notification is shown on the that Date.
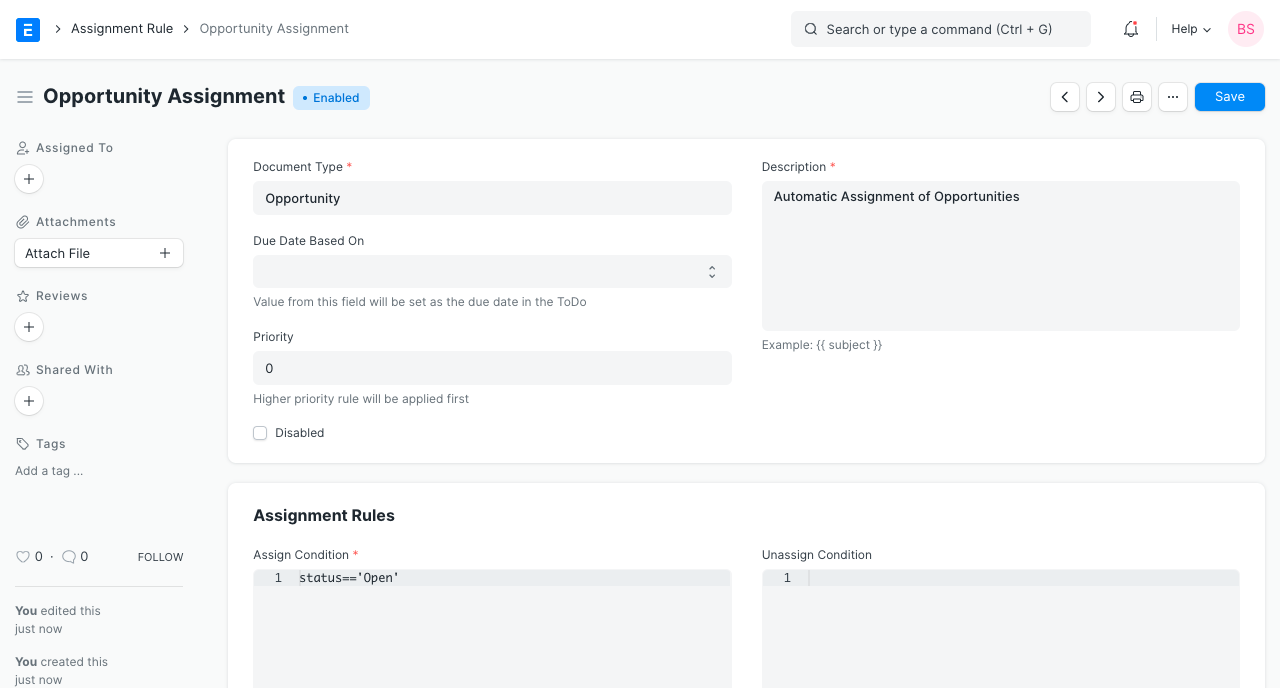
2.2 Auto-assign Opportunities to Sales Executives
Introduced in Version 12
You can define Assignment Rules to automatically assign the opportunities to sales executives.
2.3 Auto-close Opportunities
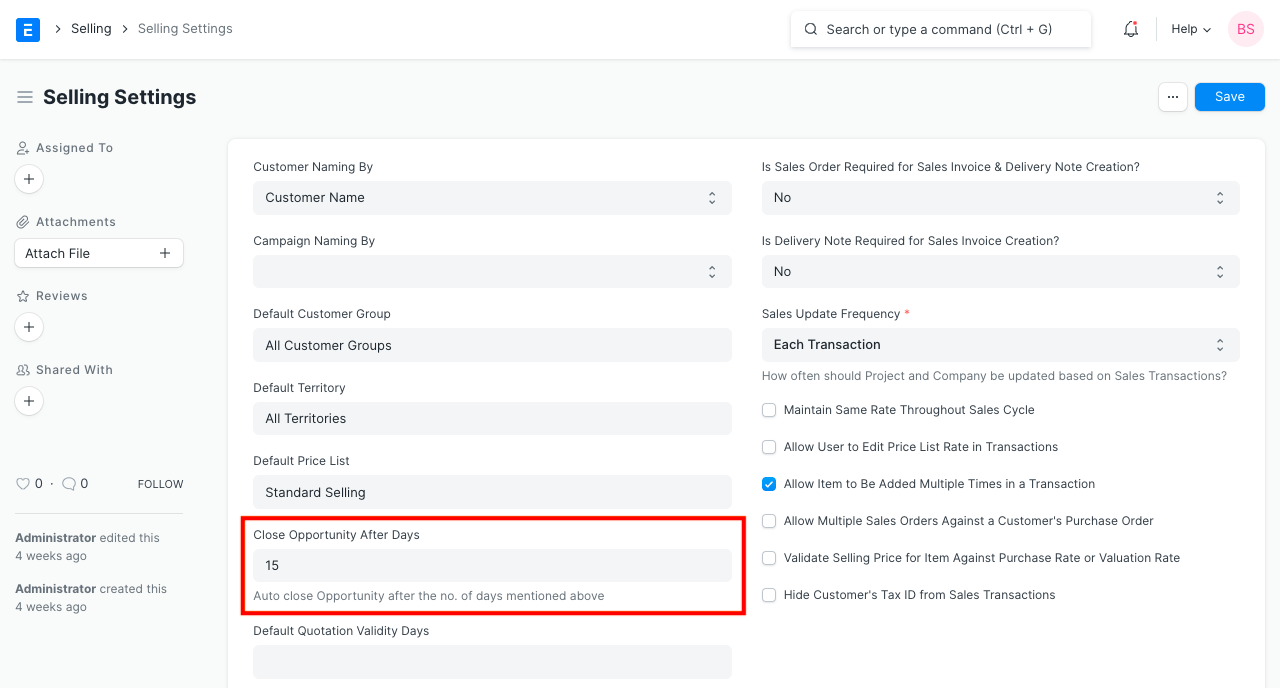
If you do not receive a response from an opportunity for a certain number of days, you may want that opportunity to be closed automatically.
You can set the number of days in Selling Settings.
2.4 Create a Quotation
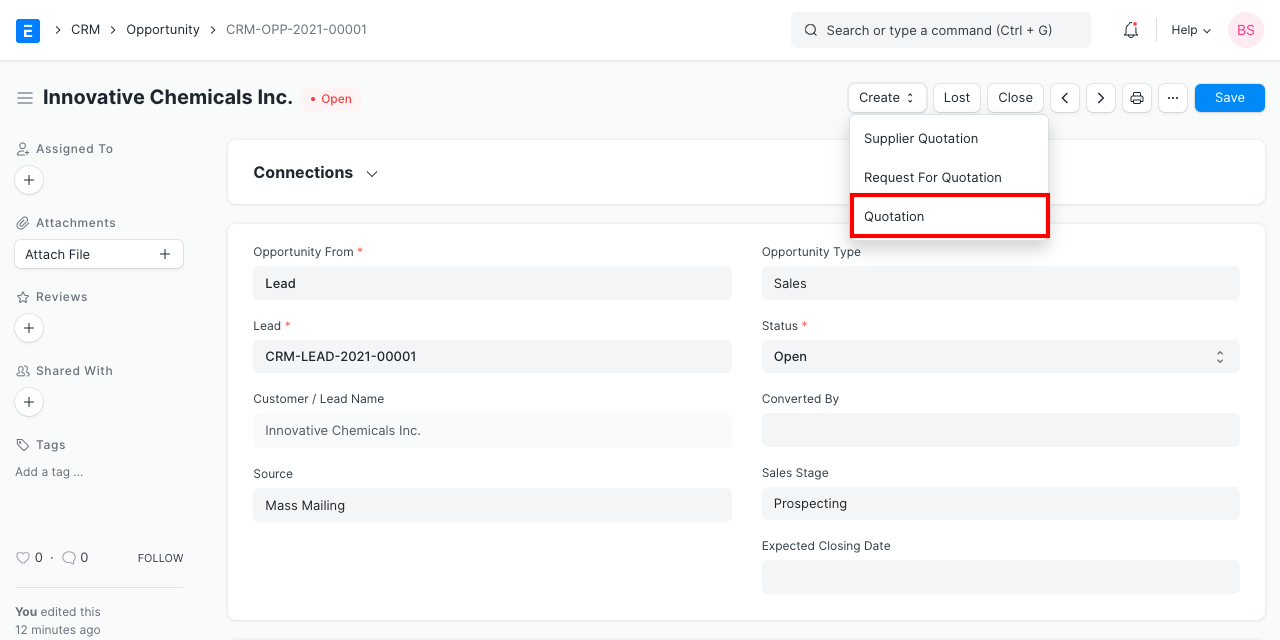
You can create a Quotation from the Make dropdown. Relevant field values will be copied over.
2.5 Create a Supplier Quotation
You may need to get a quotation from your supplier against the customer requirement and based on that, prepare the quotation for your customer. With IONIC ERP, you can make a Supplier Quotation from the opportunity itself.
Best Practice: Leads and Opportunities are often referred as your “Sales Pipeline” this is what you need to track if you want to be able to predict how much business you are going to get in the future. Its always a good idea to be able to track what is coming in order to adjust your resources.
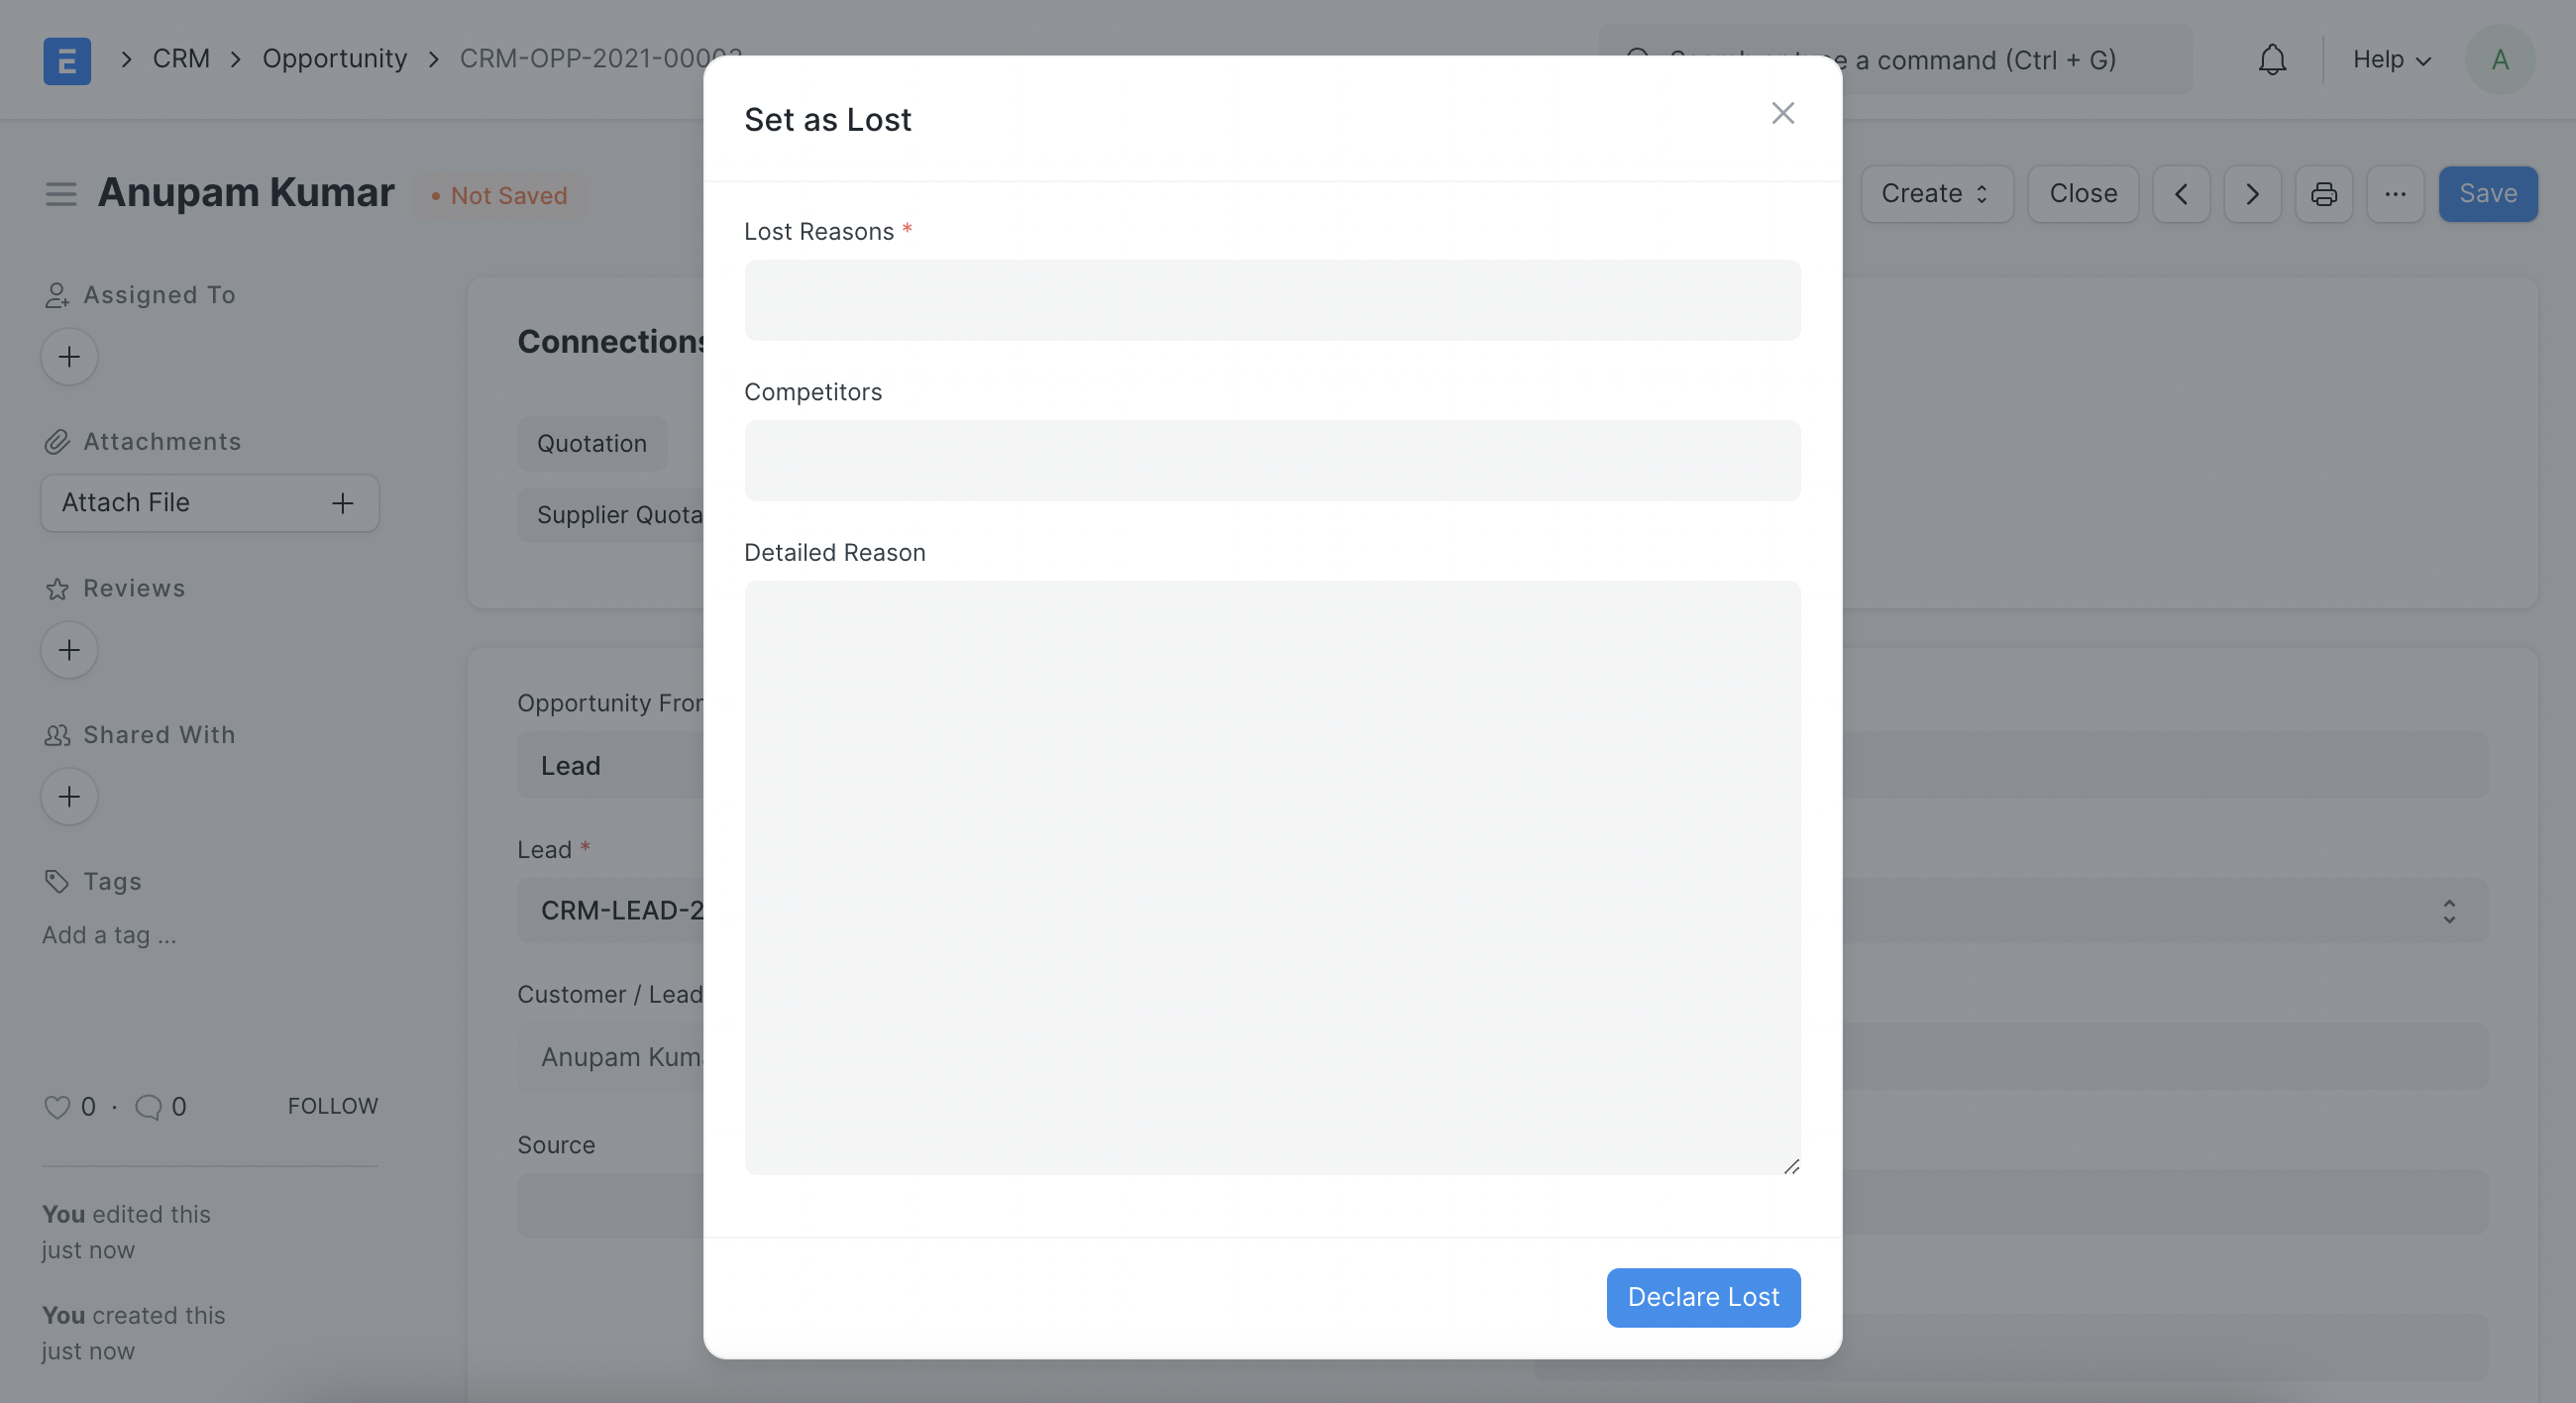
2.6 Capture the Reasons and Competitors for Lost Opportunities
When an opportunity is lost, you can capture the reasons, competitors and detail reason for losing. This will help you to analyse the trends over a long period of time and identify the insights needed for improvements at various areas in the organisation.
2.7 Minutes to First Response
When you send the first reply(email) to an Opportunity, it calculates Mins to First Response and is displayed in a field.
A report is generated called ‘Minutes to First Response for Opportunity’. Read CRM Reports for more details.
Appointment
An appointment is a prearranged meeting between a Lead and an Employee of your Company.
Appointment document type can be used to schedule and manage interaction with a Lead or an Opportunity.
To access Appointment list, go to:
Home > CRM > Sales Pipeline > Appointment
1. Prerequisites
- Appointment Booking Settings
- Holiday List
- Employee
- Lead
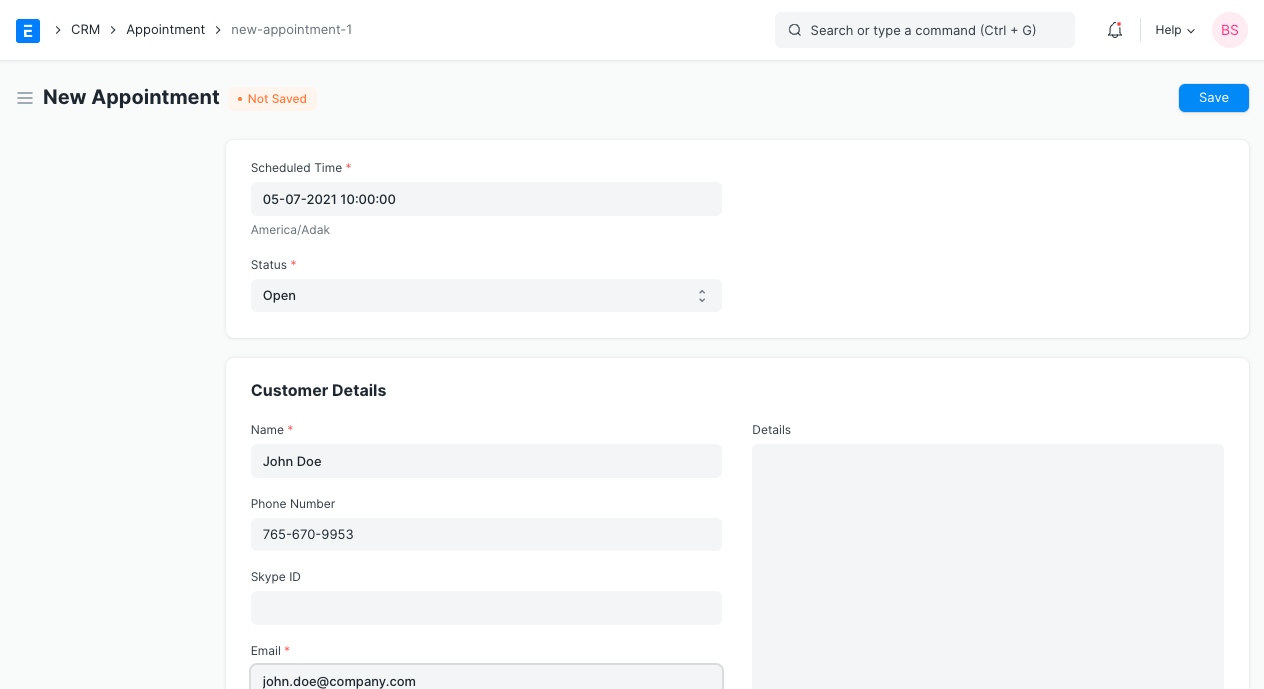
2. How to create an Appointment
- Go to Appointment list, click on New
- Select scheduled time of the appointment
- Enter customer details
- In linked documents, if you have already created a Lead for the Customer you can set it here. Otherwise the system will automatically create a new lead with the customer details from previous step.
- Save.
2.1 Creating appointments via website
Your Customers/Leads can create appointment using the webpage yoursitename.com/book_appointment.
First they need to set a date, time. 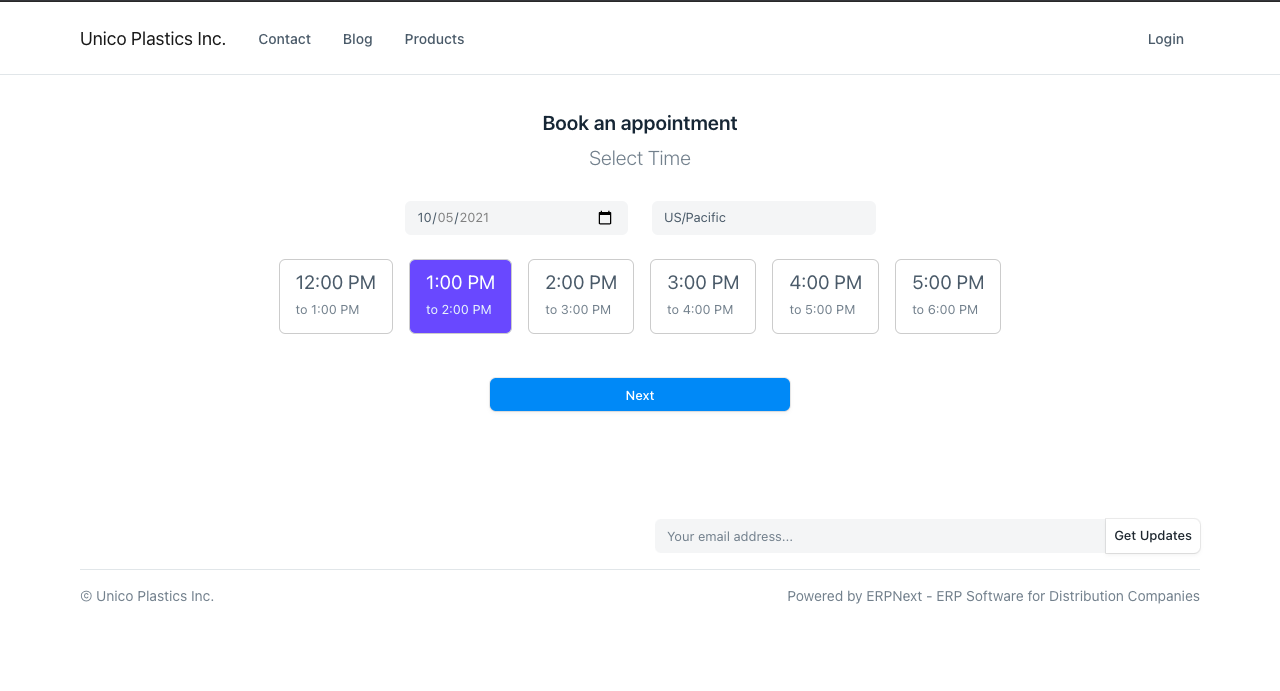
Then, add more details: 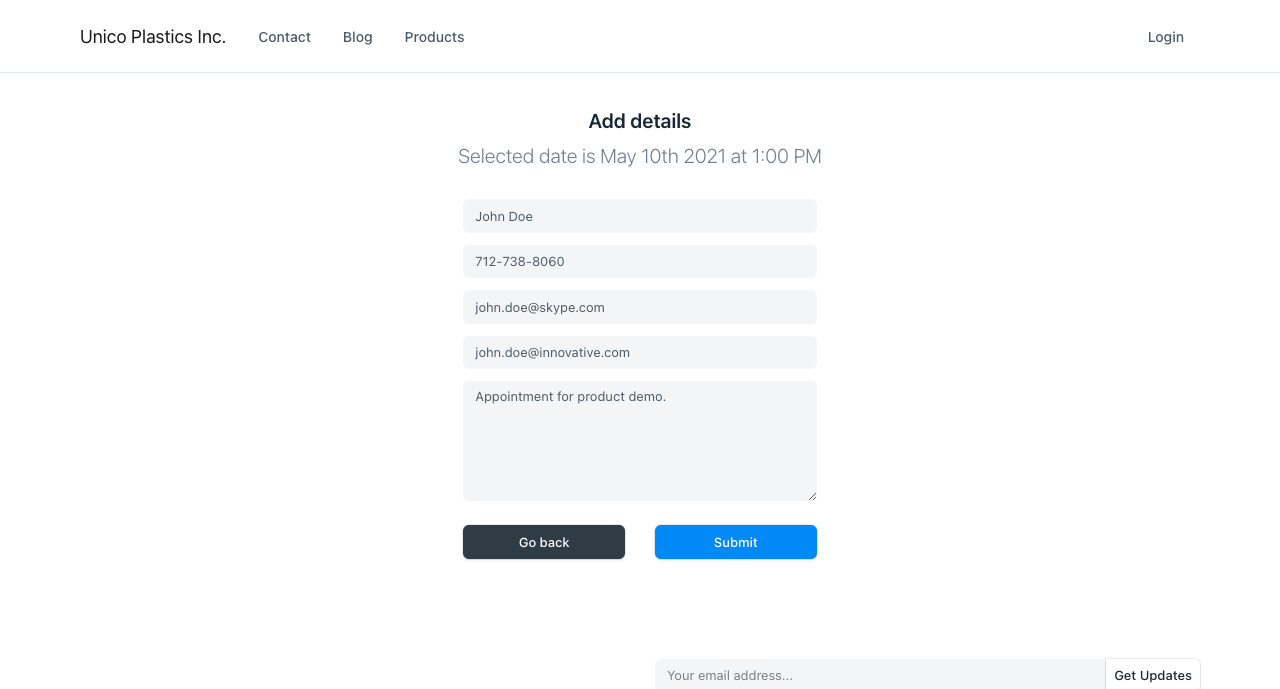
It’ll match the customer email with leads in the system and if one is found, it is linked with the document. If no lead is found, the appointment is marked as “Unverified” and an email is sent to the customer to confirm their email
3. Features
3.1 Autoassign
Appointments are automatically assigned to employees as per the Agents list in Appointment Booking Settings. The agent with the least number of assignments for the day of the appointment and who is free in the scheduled time is assigned to the appointment.
3.2 Email confirmation
If there is no matching lead in your system, an email will be sent to the email address in the appointment to confirm if the email address is valid. Upon confirmation, a new Lead will also be created in the system along with the Appointment.
CRM Reports
CRM module’s reports feature helps users get the information about the prospects. Using the following reports, an IONIC ERP user can analyze the data about a prospect’s history with a company and will help users build strong relationships with the prospects. These are a collection of reports under CRM > Reports.
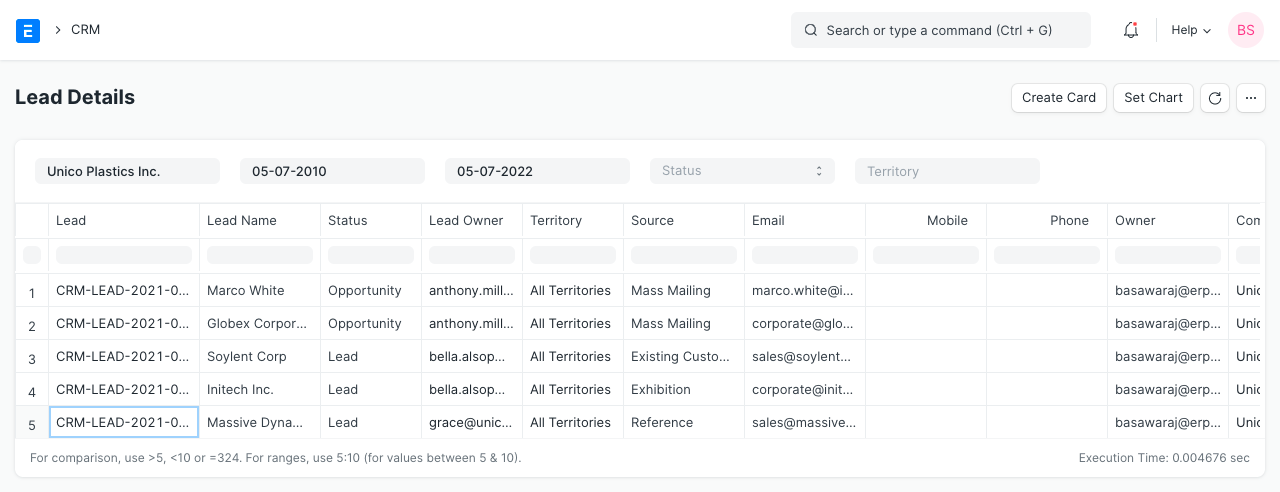
1. Lead Details
This report provides lead name, address, contact details, lead source, territory, and other details.
2. Sales Funnel
By using the sales funnel report, and by quantifying the number of prospects at each stage of the process, you can get an idea of your potential customers.
For more details check Sales Funnel.
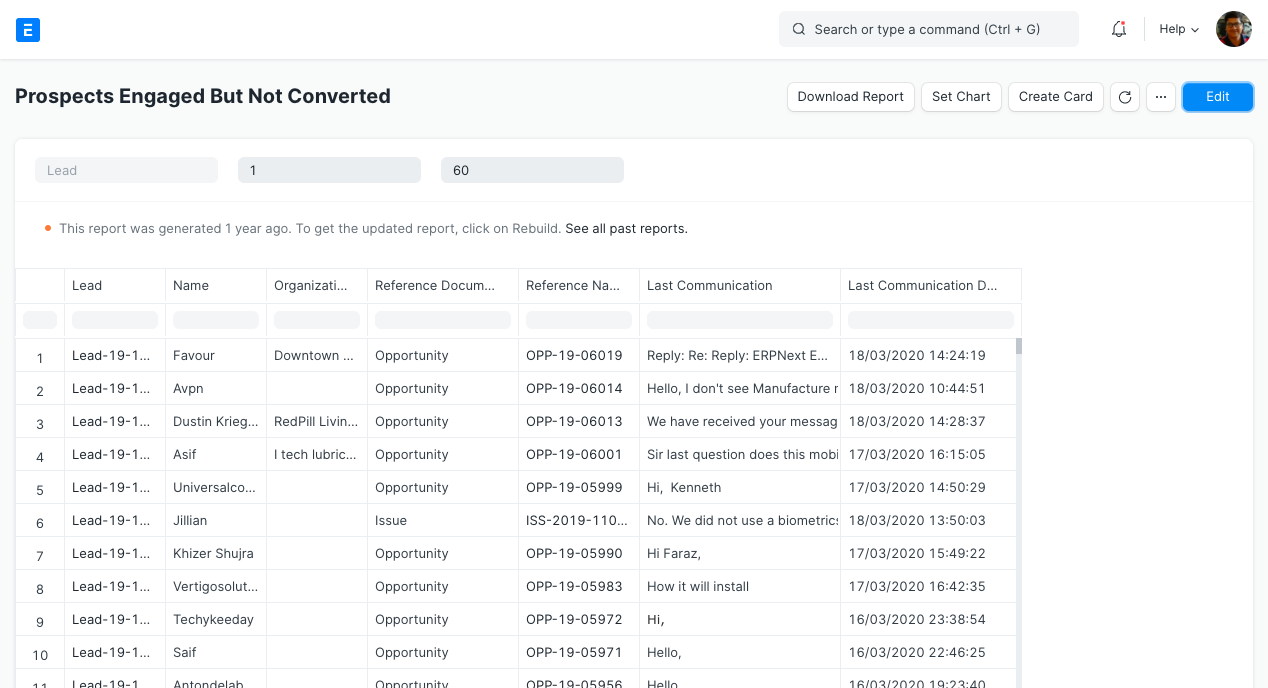
3. Prospects Engaged But Not Converted
Using this report, user gets the information about the leads who have shown interest in the business with you but due to some reason they were not converted into the customers.
4. Minutes to First Response for Opportunity
In this internet era, we all expect a quicker response time to any of our queries. This report gives you the details about time taken by sales executives for response to an opportunity. Lesser the average time for first response the better.
You can input the date range for which you would like to analyse the minutes to first response. The line graph is shown on the top and date wise details at the bottom.

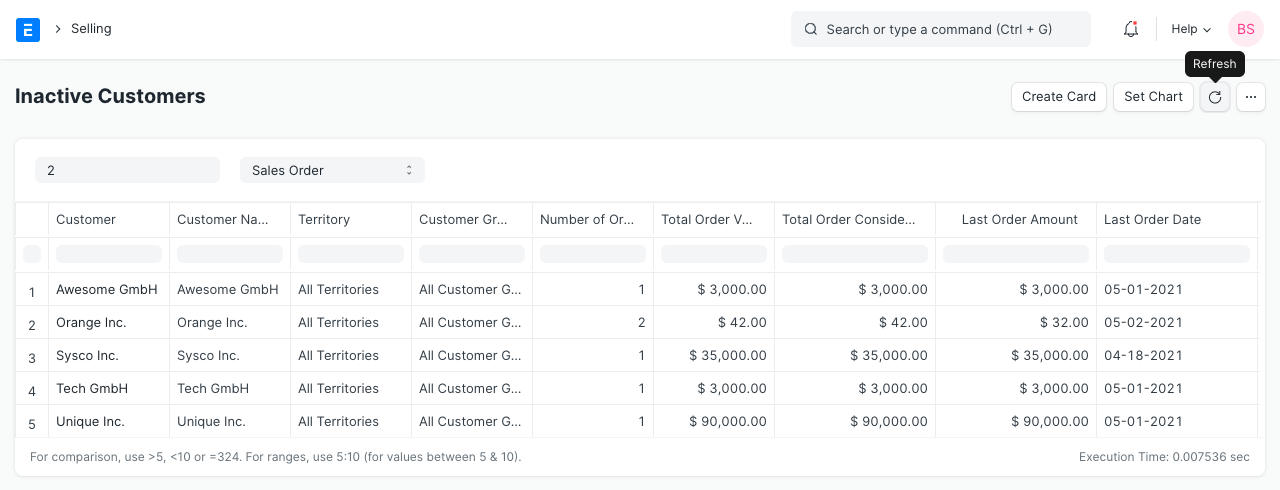
5. Inactive Customers
This report shows the list of customers who have not purchased since specific number of days. You can mention the number of days in ‘Days Since Last Order’ filter. Also you can mention if Sales Order or Sales Invoice is to be considered in DocType filter.
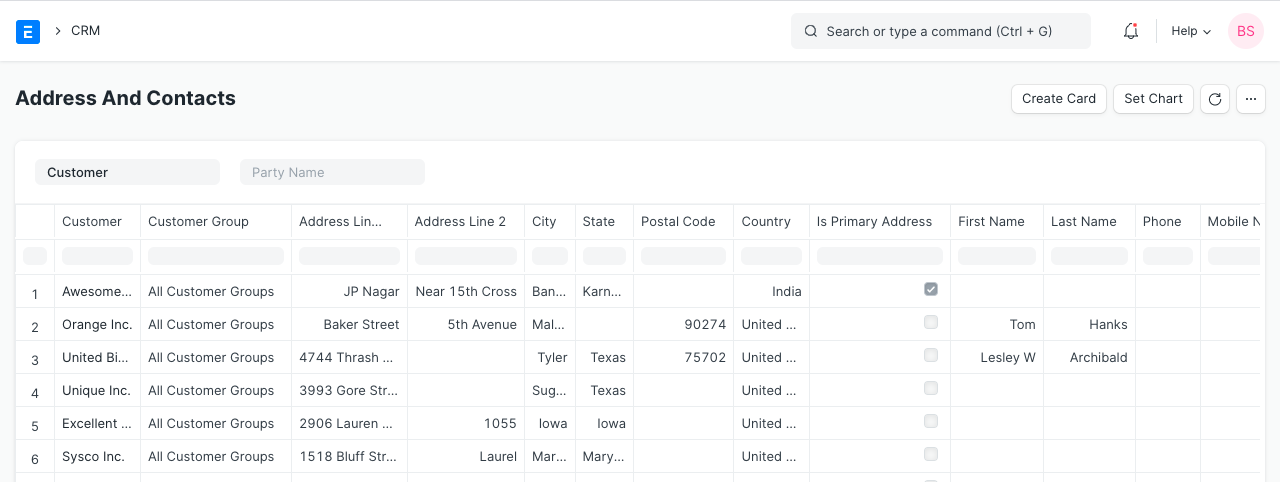
6. Address And Contacts
Select Customer in ‘Party Type’, the report will show address and contact details of all customers.
You can also select specific customer in ‘Party Name’ and report will show address and contact detail of that specific customer.
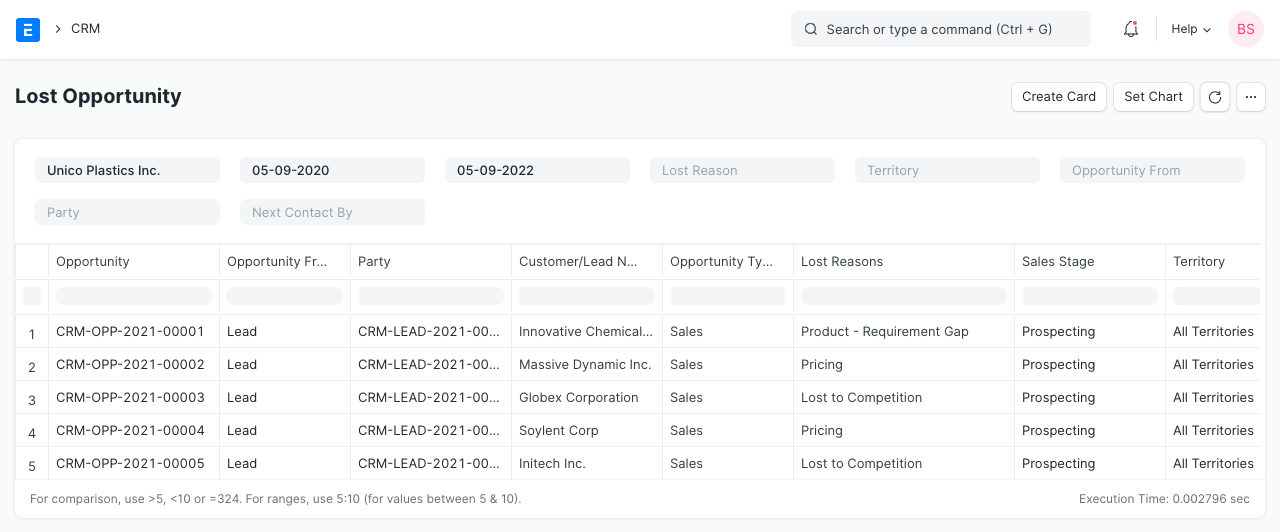
7. Lost Opportunity
This report provides Lost Opportunity details like opportunity from, party, customer name, lost reasons, sales stage, territory, and other details.
CRM Analytics
For example, if you notice that very few communications with the prospects have taken place in a month which may have led to decrease in the sales. You can make sure that the sales executives reach out and followup on the leads and opportunities on regular basis.
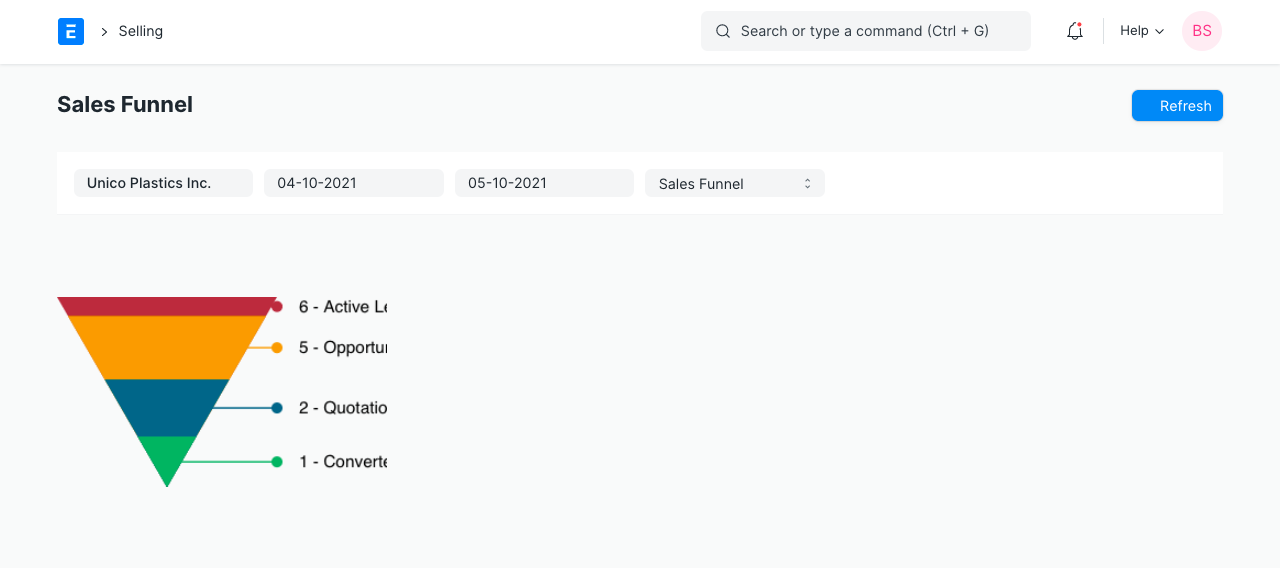
1. Sales Funnel
By using the sales funnel report, you can quantify the number of prospects at each stage of the process and you can get an idea of your potential customers.
More than this, by looking at the way these numbers change over time, you can identify problems in the sales pipeline and take any corrective action at an early stage.
Select the Company, select the From Date, To Date and select Sales Funnel in Chart.
2. Sales Pipeline
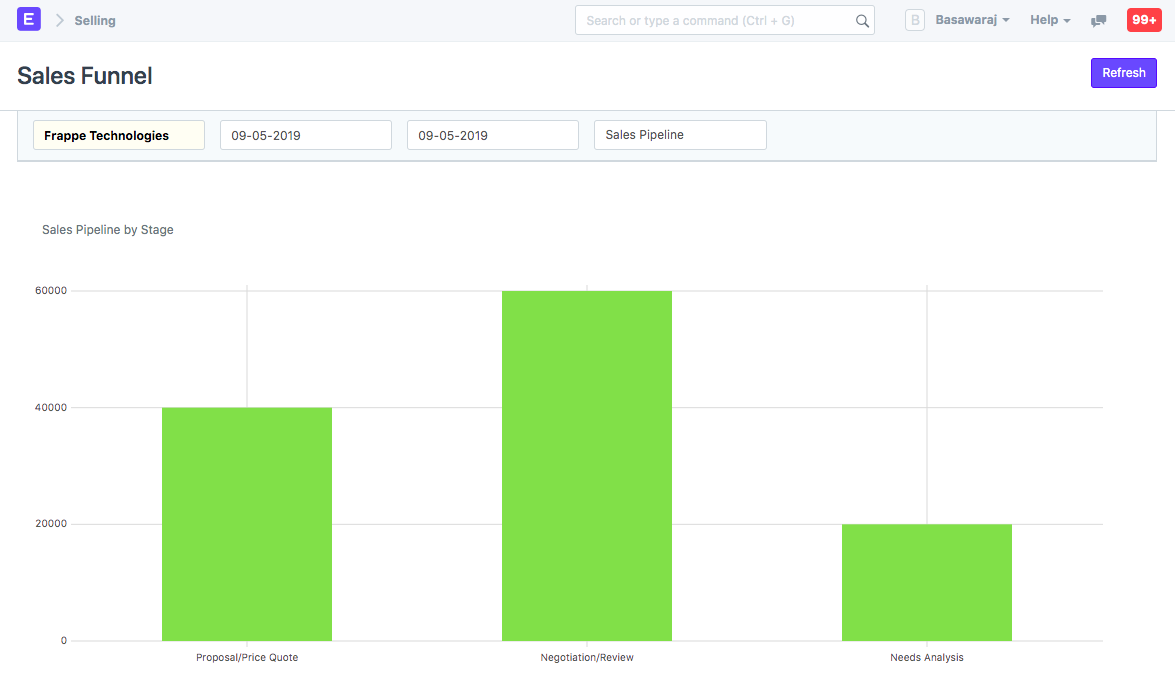
An opportunity will pass through many sales stages before it yields any business. Using this report you can visualise the total amount of business the opportunities have and compare them across the stages.
Select the Company, select the From Date, To Date and select Sales Pipeline in Chart.
3. Opportunities by Lead Source
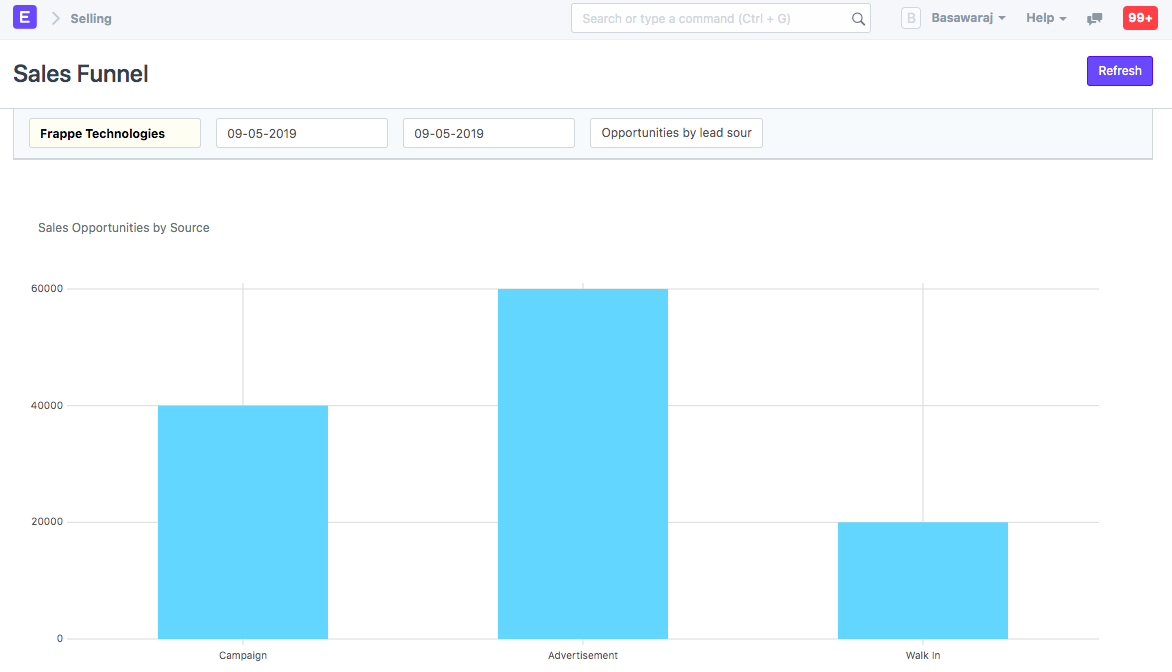
This report helps you visualise the business potential of opportunities based on the Lead Sources.
Select the Company, select the From Date, To Date and select ‘Opportunities by Lead Source’ in Chart.
Automate Lead Creation
Leads come from many different sources. It is important that all leads are recorded, assigned to sales executives and followed up.
1. Create Leads From Emails
You may have an email address like ‘sales@yourcompany.com’ which is probably displayed on your website. People may send emails asking information about your products and services. You can enable Email Account to pull these emails and create a lead for each email.
2. Create Leads From Webforms
You can also map the Lead form to a Web Form and publish it on your website. When visitors of your website fill the form, it will be automatically added as a Lead.
3. Create Leads From Incomplete Orders in E-Commerce Module
You can publish an e-commerce website and allow users to place an order for your products. If a user selects items but doesn’t complete the process you can pursue that user as a lead.
4. Create Leads By Importing Spreadsheet
If you have a spreadsheet with details of the leads, you can use the Data Import feature to import the leads.
Difference between Lead, Contact, and Customer
- Lead: is a potential Customer, someone who can give you business.
- Customer: is an individual or organization who has given you business.
- Contact: is a person who belongs to the Customer. This is applicable in business-to-business scenario, where you may contact multiple individuals belonging to the same customer.
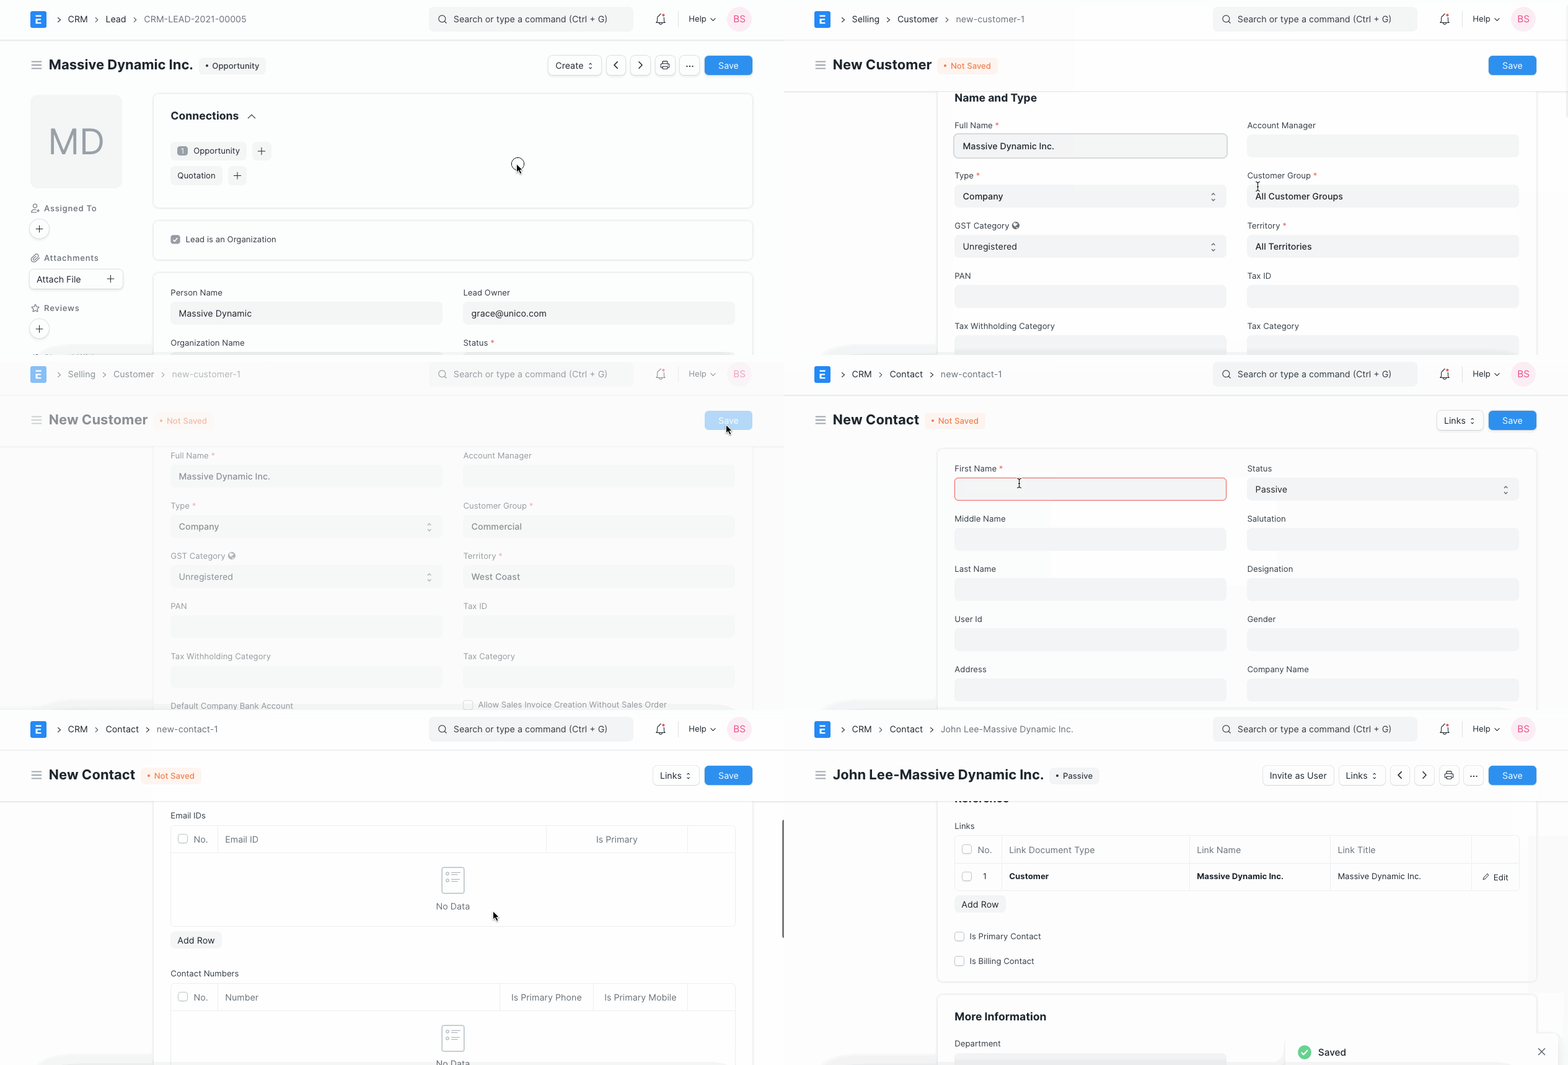
A Lead can be converted to a Customer by selecting “Customer” from the Make dropdown. Once the Customer is created, the Lead becomes “Converted” and any further Opportunities from the same source can be created against this Customer.
Campaign
A Campaign is a full-scale implementation of a sales strategy to promote a product or service.
This is done in a market segment of a particular geographical area to achieve specified objectives.
To access Campaign, go to:
Home > CRM > Campaign > Campaign
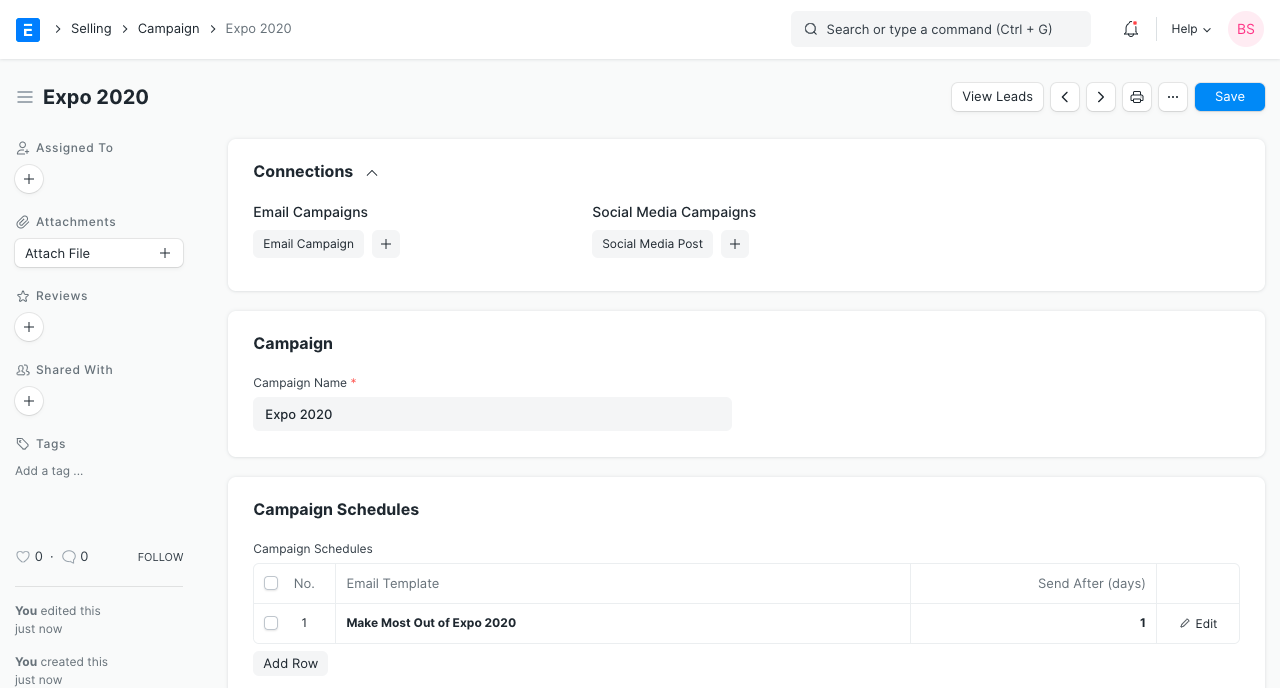
1. How to Create a Campaign
- Go to the Campaign list, click on new.
- Enter a name for the campaign.
- Enter a description to describe what the campaign is about.
- Save.
2. Features
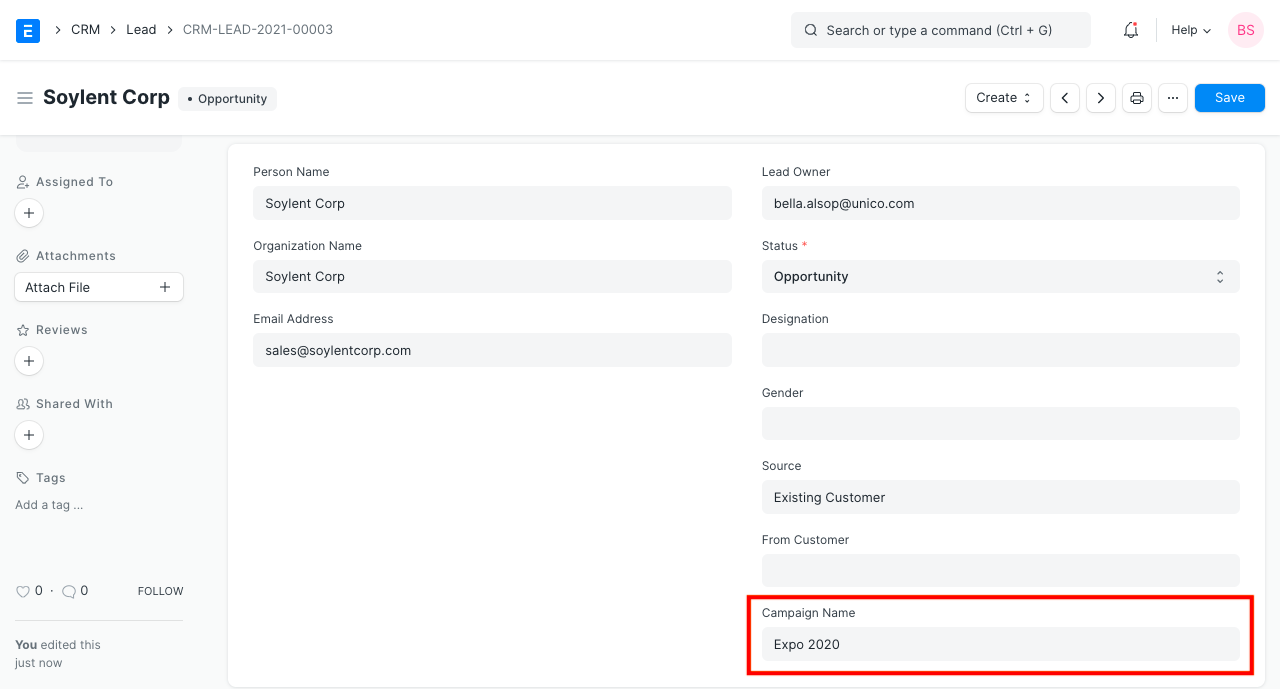
2.1 Tag Campaign in Lead, Opportunity, and Quotation
When a marketing campaign generates a lead or an opportunity, you can tag the campaign while creating the Lead or Opportunity. You can also tag the campaign in Quotation.
This helps in assessing the effectiveness of a marketing campaign by calculating the return on investment.
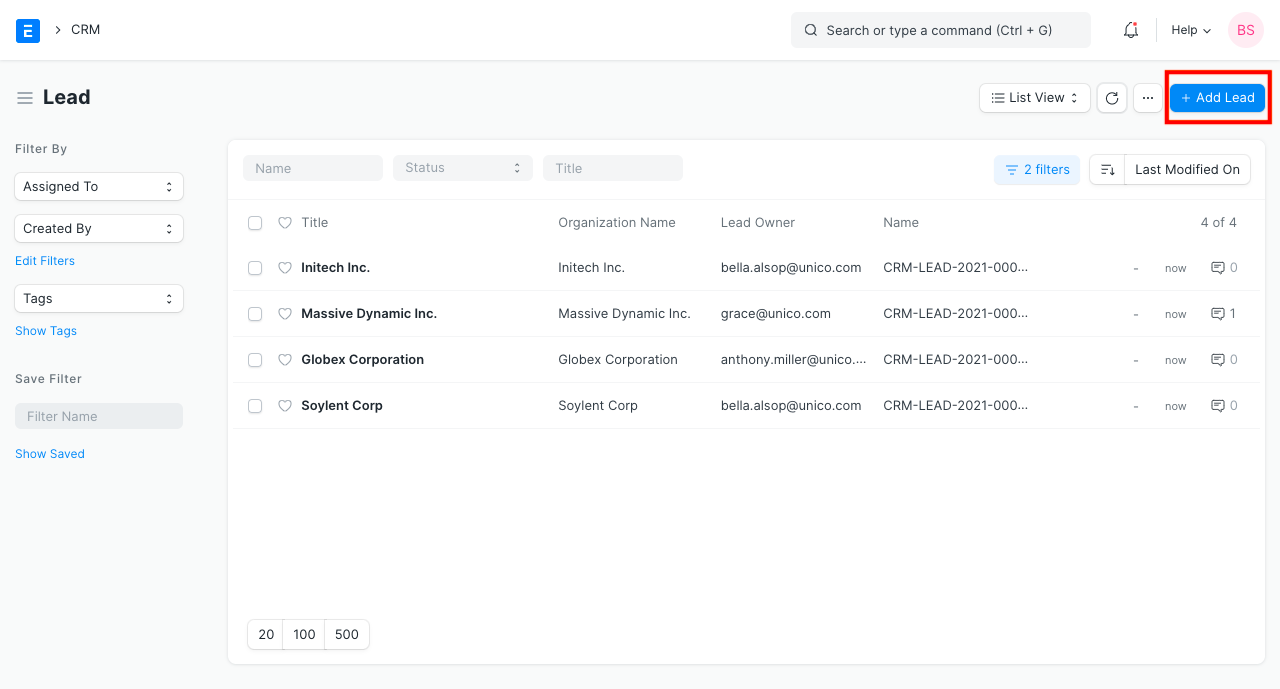
2.2 View Leads Generated by a Campaign
- Click on ‘View Leads’ button in the campaign.
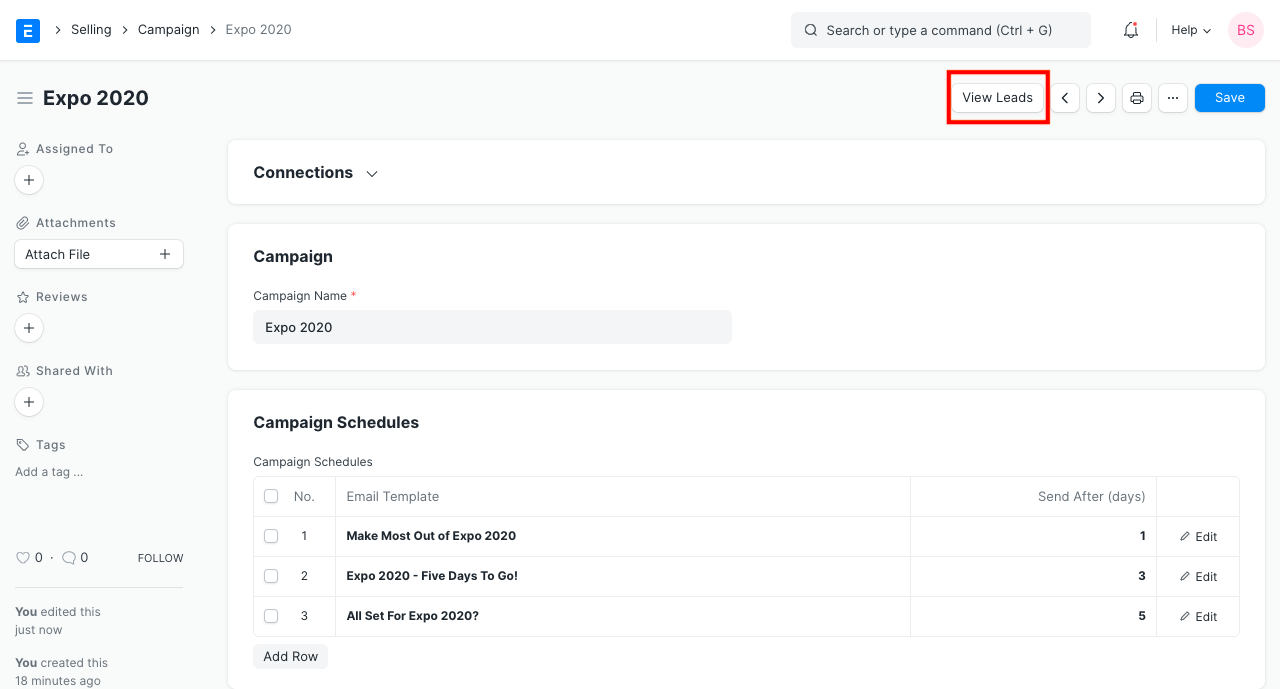
- You will see a filtered list of leads made against the campaign.
- You can also create new leads against the campaign by clicking on ‘New’
2.3 Set up email schedules for Email Campaigns
If you want to carry out a campaign using emails for your leads or contacts, Email Campaign serves the purpose.
You will have to set up a schedule for the campaign. Click on ‘Add Row’ to add an entry to the campaign schedule.
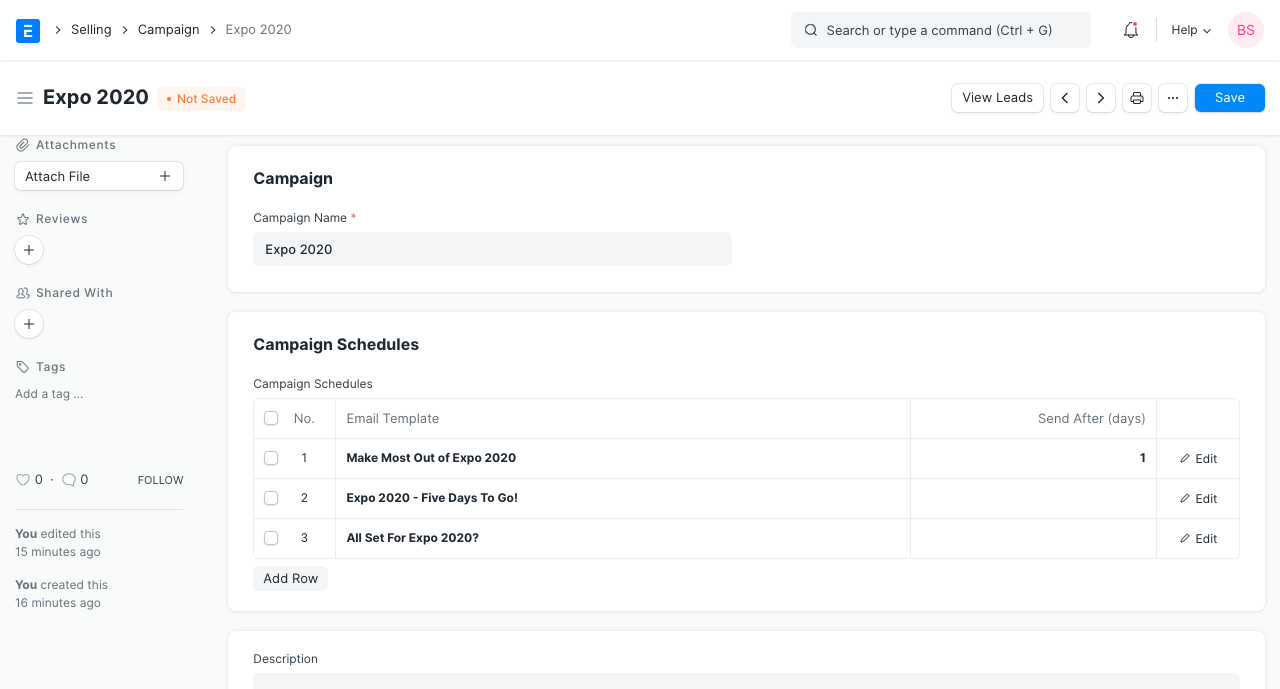
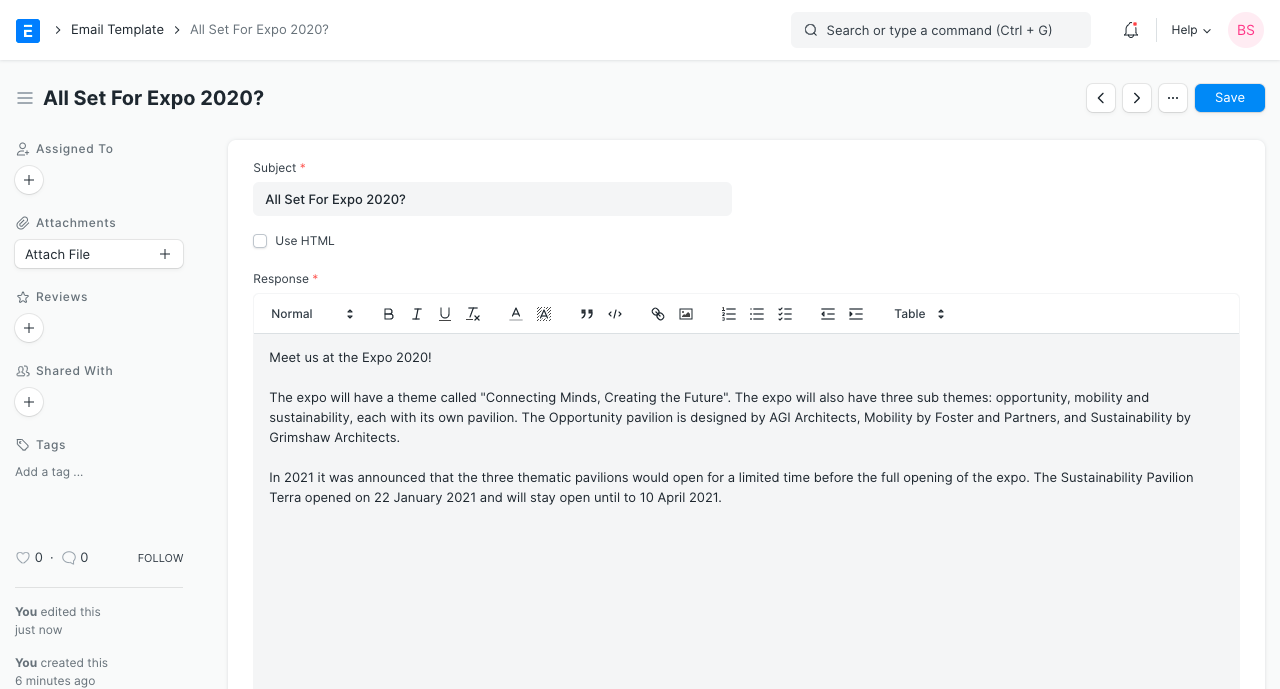
- In Email Template, select an ‘Email Template’ which you would like to send via email to the lead or contact. You can create one as follows:
- In Send After (days), specify the number of days after which the respective email should be sent. Using this field, the day on which email is to be sent is calculated relative to the Start Date of Email Campaign.
2.4 Dashboard
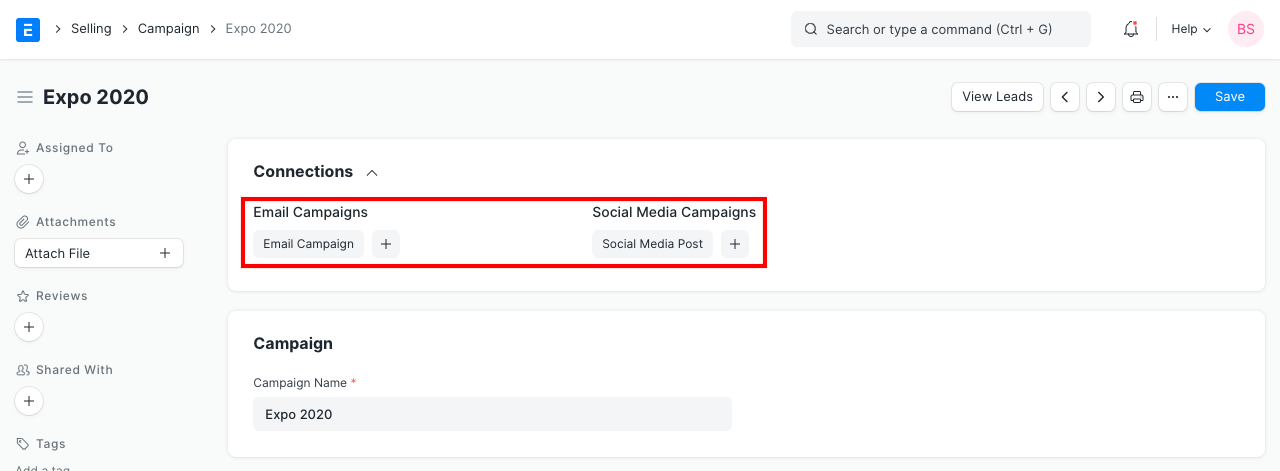
The Campaign dashboard shows you all the Email Campaigns and Social Media Post linked to the Campaign. You can also create a new Email Campaign and Social Media Post from here.
Email Campaign
An Email Campaign is a coordinated set of emails sent to leads or contacts according to a particular schedule.
Email Campaigns are still one of the most effective ways to reach your Customers, Contacts or Leads and keep them engaged. For example, you could set up Email Campaigns for introducing your product to the customers, with every email revealing an interesting feature of your product.
To create an Email Campaign, go to:
Home > CRM > Campaign > Email Campaign
1. Prerequisites
Before creating and using Email Campaign, these need to be created first:
- Campaign
- Lead or Contact or Email Group
2. How to Create an Email Campaign
- Go to the Email Campaign list, click on New.
- Select the Campaign for which you want to set up an Email Campaign.
- Set the ‘Start Date’ for the Email Campaign.
- In ‘Email Campaign For’, select whether you want to set up Email Campaign for a Lead or a Contact or for an Email Group to send to multiple email contacts.
- In ‘Recipient’, select the respective Lead or Contact or Email Group for whom you want to start the Email Campaign.
- In ‘Sender’, select the user of the system who should be the sender of the emails.
- Save
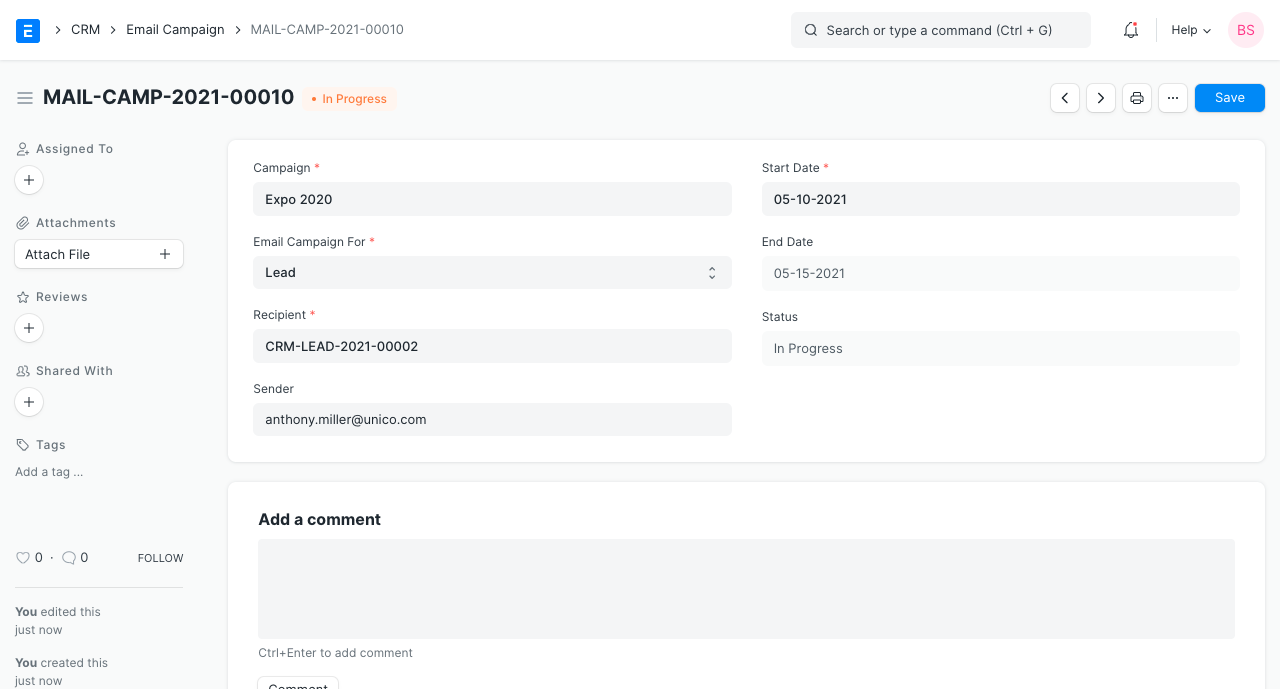 The above Email Campaign is for the following Campaign:
 Note: The Send After (days) field in Campaign specifies the day on which email is to be sent relative to the Start Date of Email Campaign. Notice the ‘End Date’ in the above Email Campaign. It is ’26-07-2019′, which is 4 days after the ‘Start Date’, ’22-07-2029′, as the Campaign Schedule ends on day 4.
2.1 Create multiple Email Campaigns for a Campaign
You can also create new Email Campaigns for different Leads or Contacts for the same Campaign though the Campaign Dashboard.
- Go to the Campaign for which you want to create Email Campaigns.
- Click on + in front of Email Campaigns to create a new Email Campaign for the Campaign.

3. Features
3.1 Linked Communication
When emails are sent to the respective leads or contacts, Communication is linked to the Email Campaign document. You can view all the emails sent in your document.
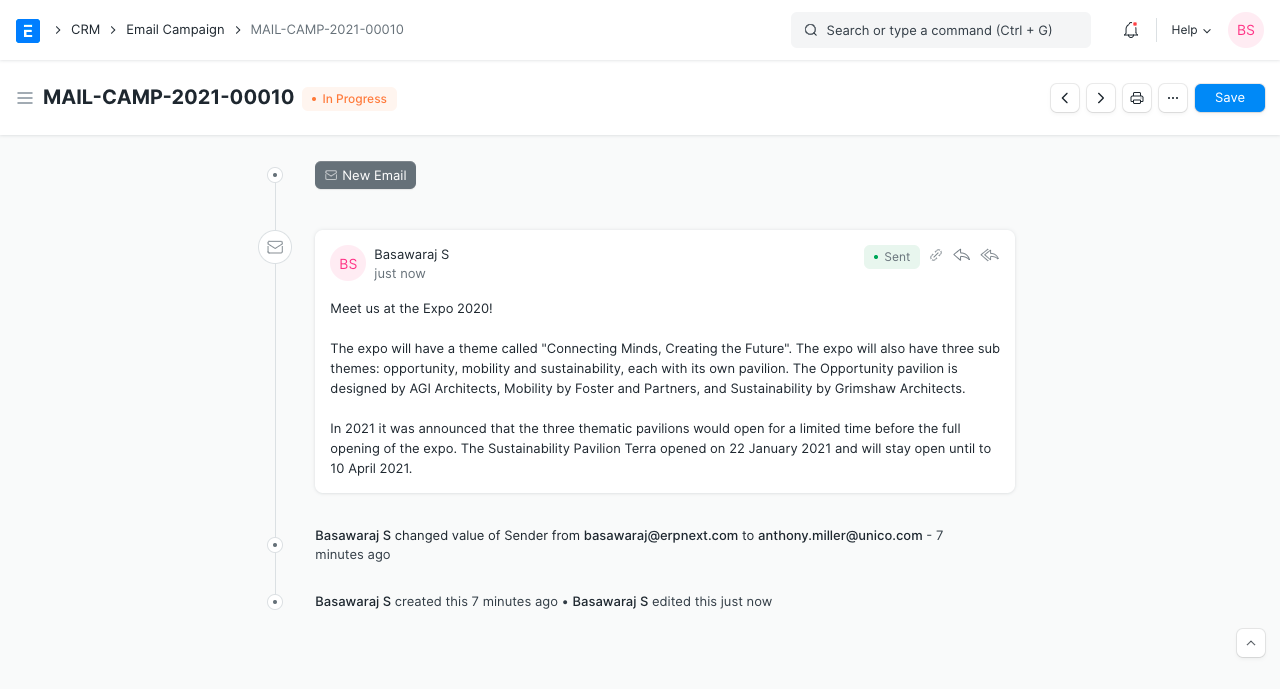
3.2 Unsubscribe from Email Campaign
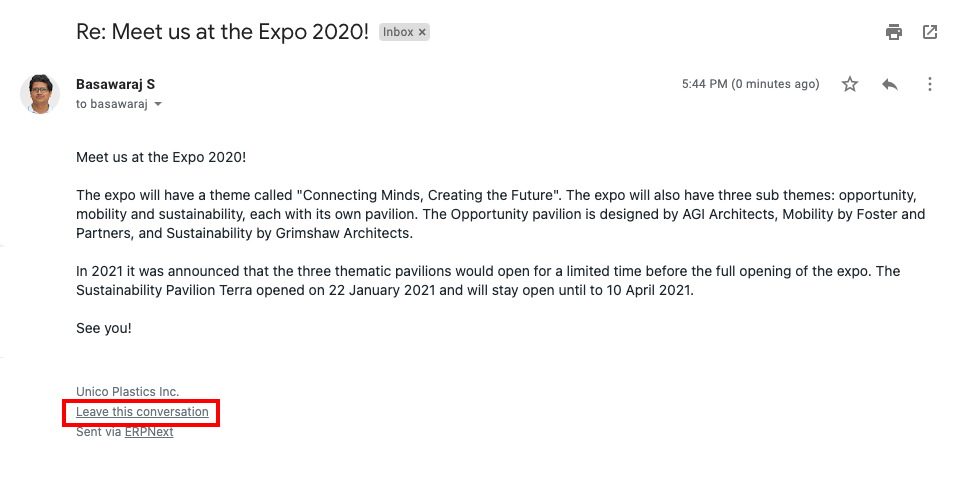
If a lead or contact does not want to continue getting emails regarding the campaign, he or she can unsubscribe from the Email Campaign via the unsubscribe link sent with the email.
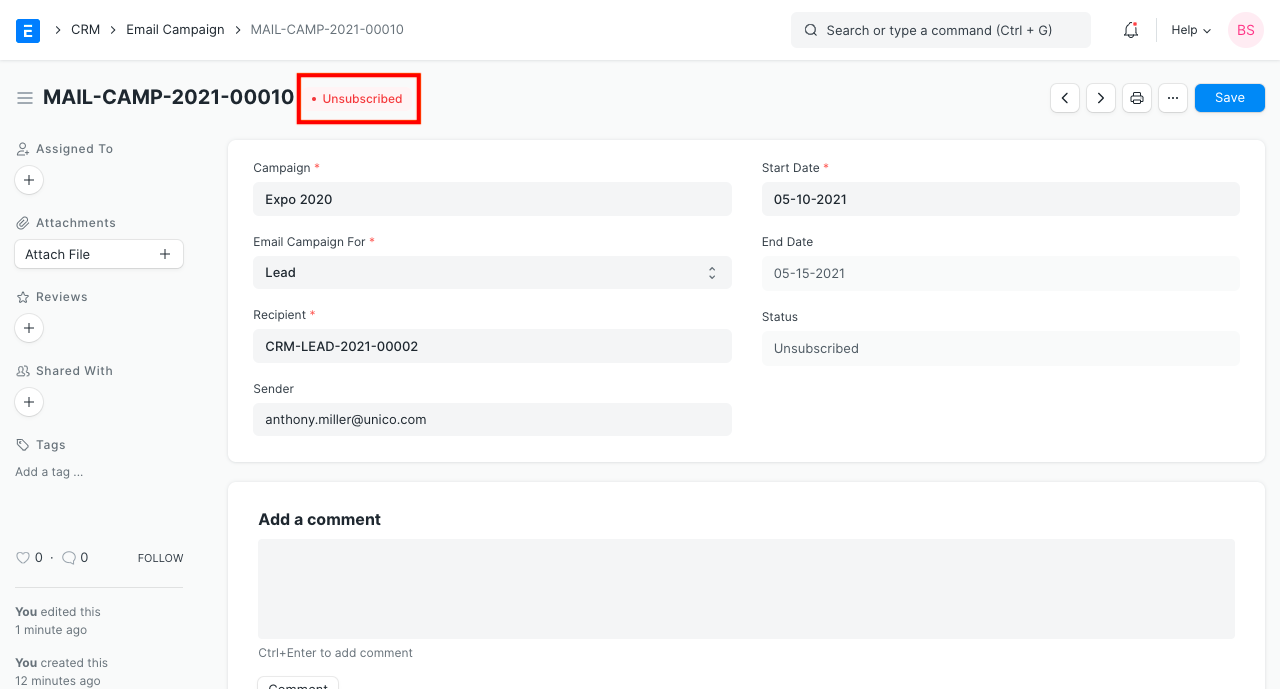
When the lead or contact unsubscribes, the status of the Email Campaign document changes to ‘Unsubscribed’.
3.3 Use Lead or Contact fields in Email Template
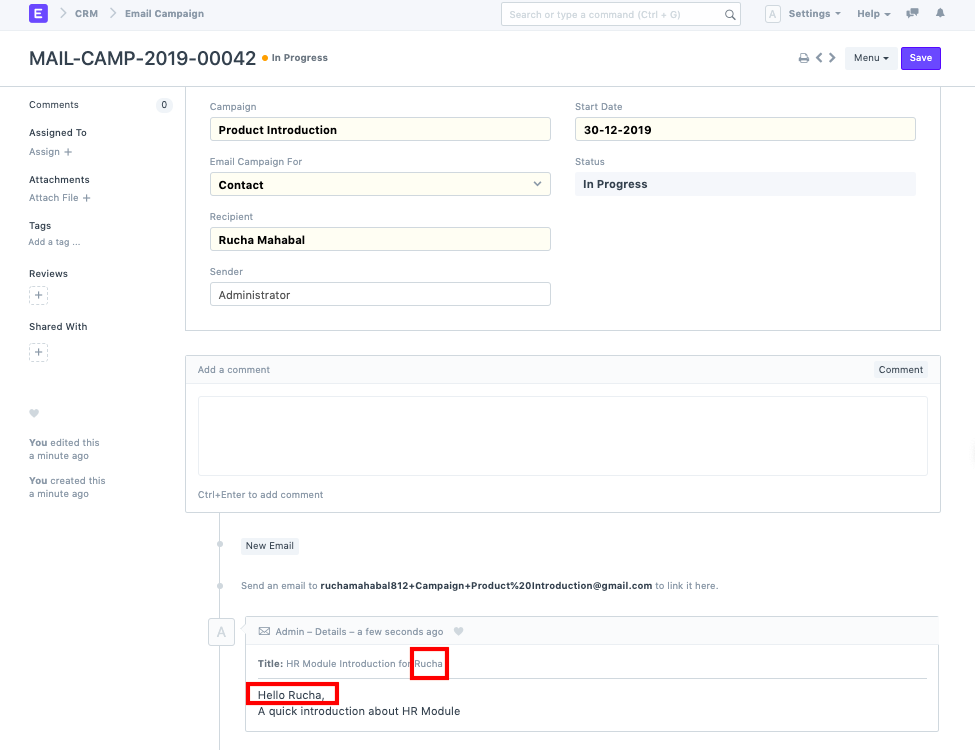
The Email Template has the context of the document you have specified in the ‘Email Campaign For’ field. If you want to display the fields from your Lead or Contact document in your Email Template you will have to use doc.fieldname for the same. For example, if ‘Email Campaign For’ is ‘Contact’, you can mention the ‘first name’ of your Contact as doc.first_name in the Email Template as shown below:

Then the emails sent would look like this:
3.4 Status indication
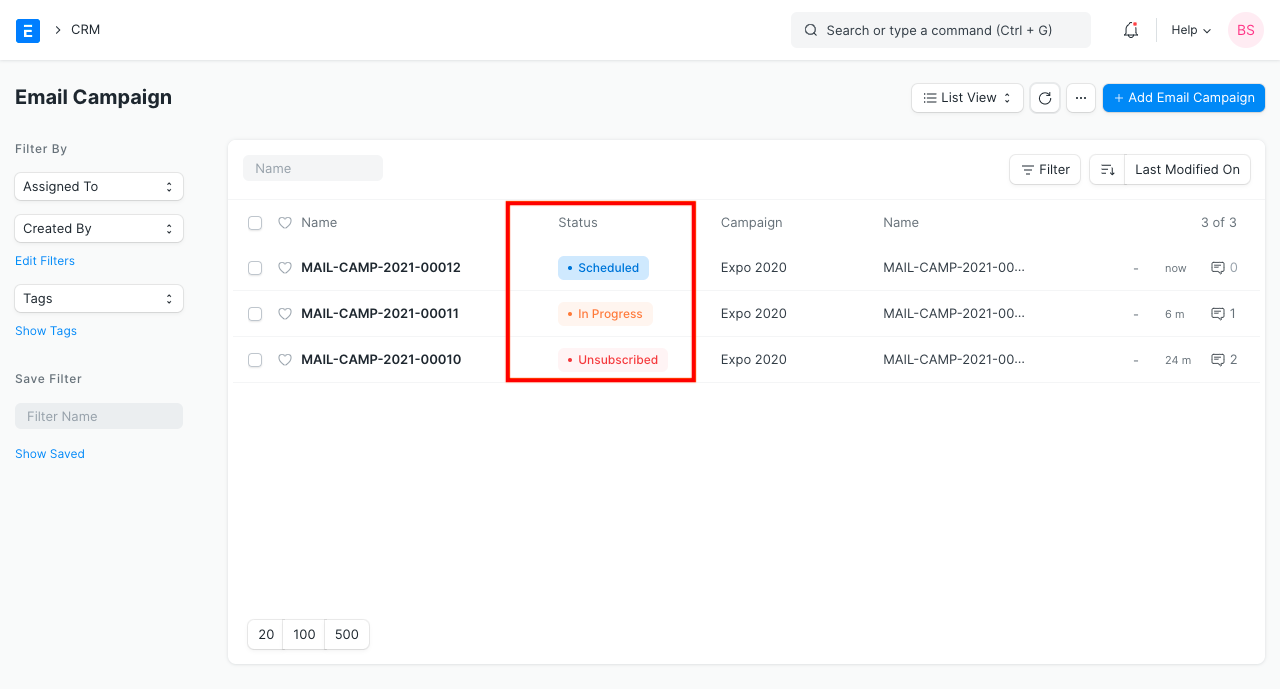
Status indicates the state of the Email Campaign, the various Statuses are:
- Scheduled: When the Email Campaign has not yet started but scheduled on a future ‘Start Date’.
- In Progress: The campaign would be marked as ‘In Progress’ between ‘Start Date’ and ‘End Date’ of the campaign.
- Completed: After the ‘End Date’ of the campaign, the status will be changed to ‘Completed’.
- Unsubscribed: When the Lead or Contact unsubscribes from the Campaign.
Newsletter
Newsletter is an email which is sent to a specific group of subscribers periodically.
In the context of CRM, its is an informational and product-focused email that is sent to existing and potential customers with an intention of softly pushing the subscriber to do required actions.
Newsletter can also be used to share information to employees, investors etc.
You need to create Email Groups before sending the newsletters.
To access the Newsletter list, go to:
Home > Settings > Email > Newsletter
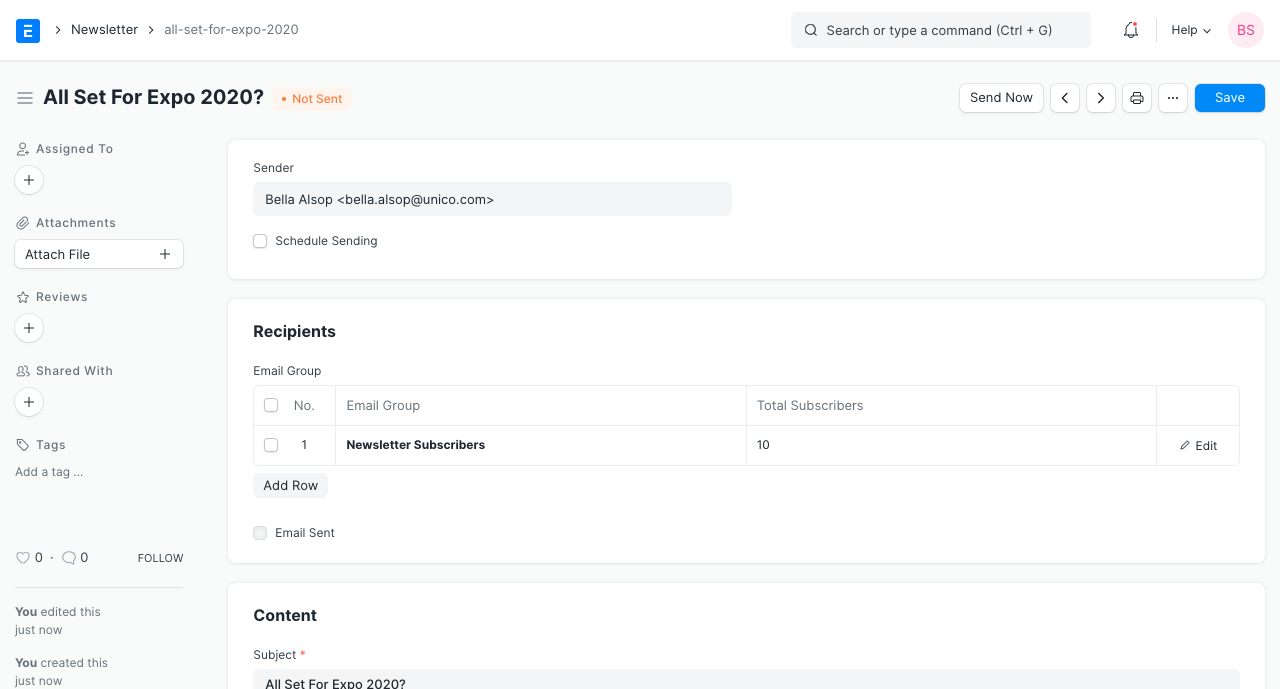
1. How to Create a Newsletter
- Go to the Newsletter list and click on New.
- Select the Email Group in RECIPIENT table.
- Enter ‘Subject’.
- Enter ‘Message’.
- ‘Publish’ the newsletter to make it available on the web.
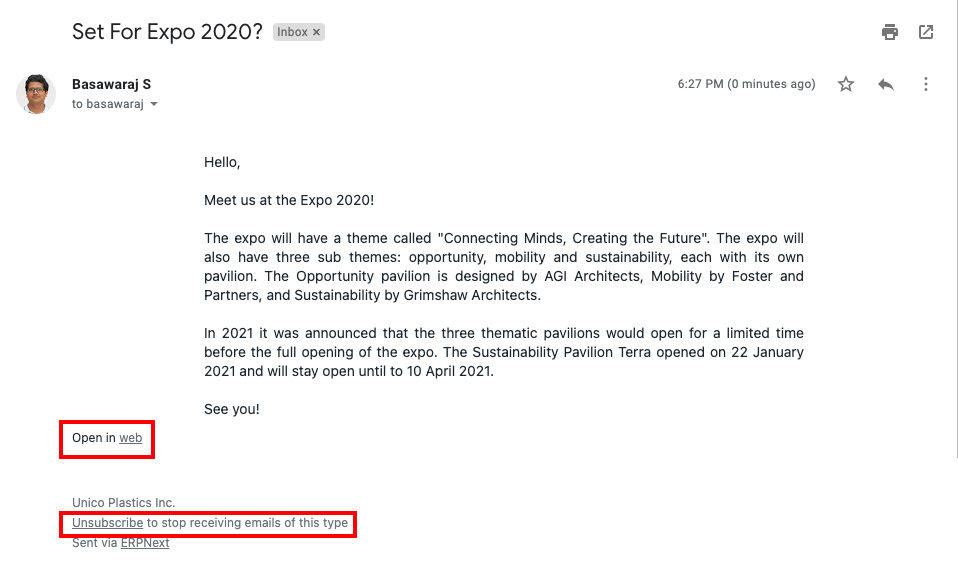
- Tick ‘Send Unsubscribe Link’ if you would like to include unsubscribe link in the email.
- ‘Send Web View Link’ will include a link in the email to open the newsletter on the web. This option is only visible when the newsletter is published.
Below is the screenshot of the email received with link to unsubscribe and a link to open the email on the web.
2. Features
2.1 Create Subscriber Groups
You can manage subscribers by grouping them into different Email Groups.
You can select multiple email groups in the ‘RECIPIENT’ tables in the newsletter.
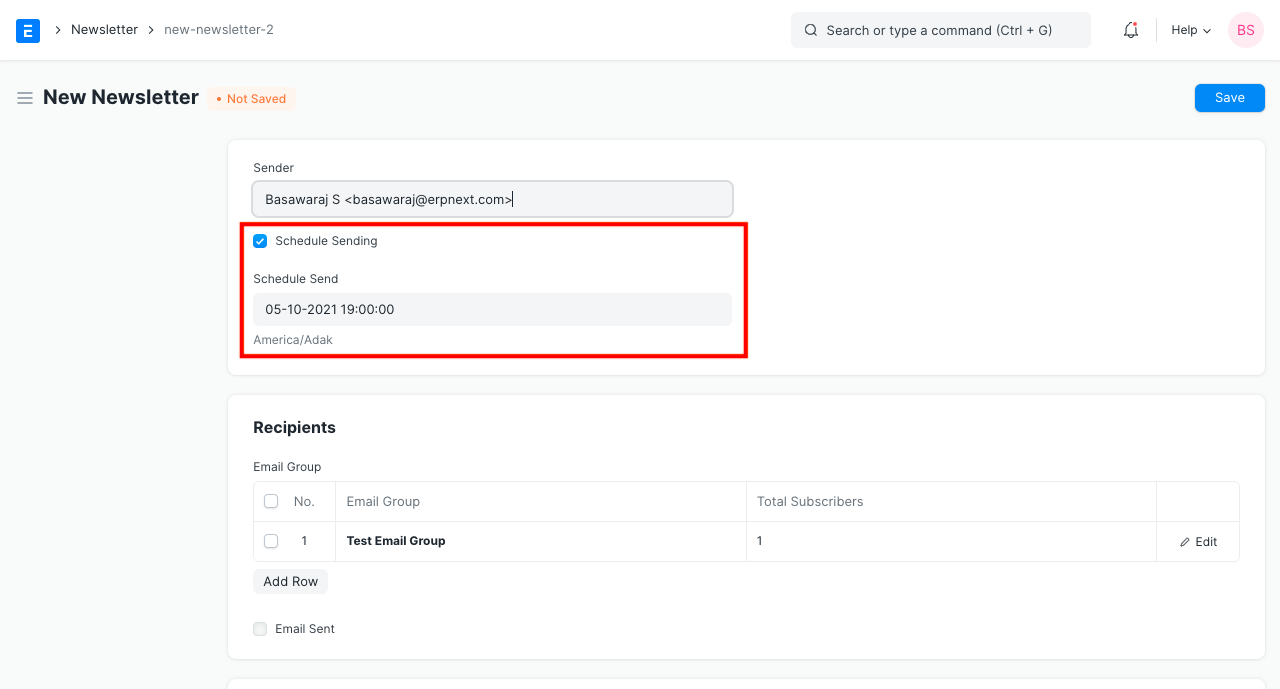
2.2 Schedule Send
You can choose to send your newsletter at any future datetime by specifying time in hourly steps.
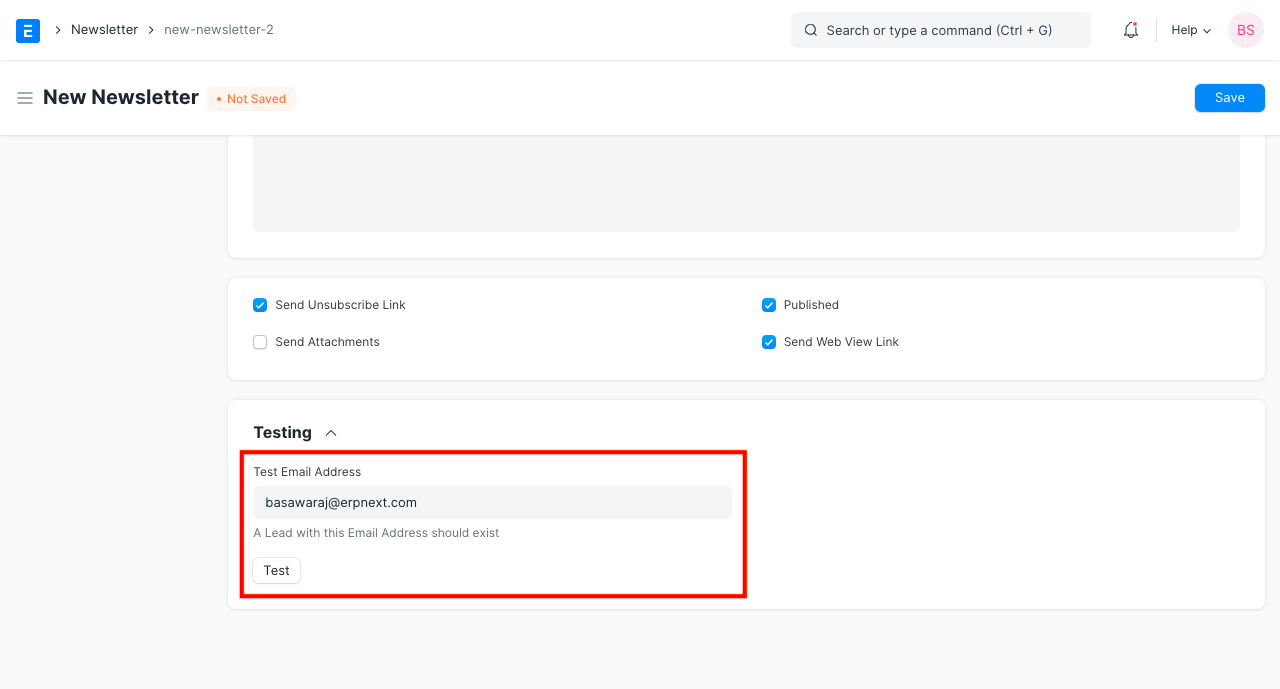
2.3 Test Newsletter Before Sending to Subscribers
Once the newsletter is ready you can provide a ‘Test Email Address’ and click on ‘Test’.
You can review the newsletter received in the test email, verify it and then send it to all subscribers by clicking on ‘Send’.
LinkedIn Settings
LinkedIn related settings like OAuth can be configured here. IONIC ERP needs access to the API through which the post is shared and achieved using OAuth 2.0 Authentication Protocol.
1. How to set up LinkedIn Developer App
You must have LinkedIn Developer App for your company. IONIC ERP interacts with this App for sharing the post.
1.1 Create LinkedIn Developer App
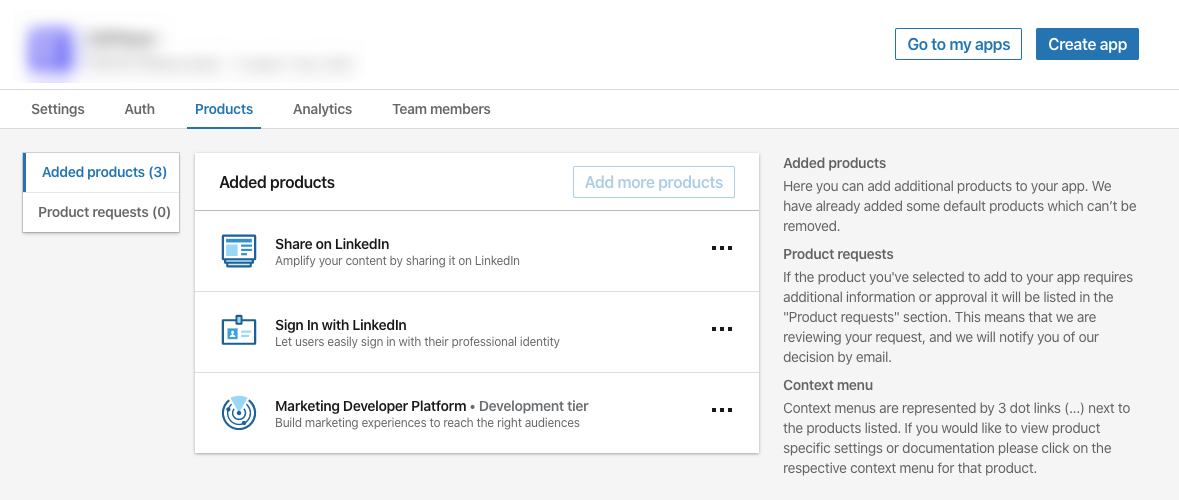
Create App by link https://www.linkedin.com/developers fill all the details and verify it. And that App has the following products.
- Share on LinkedIn
- Sign In with LinkedIn
- Marketing Developer Platform
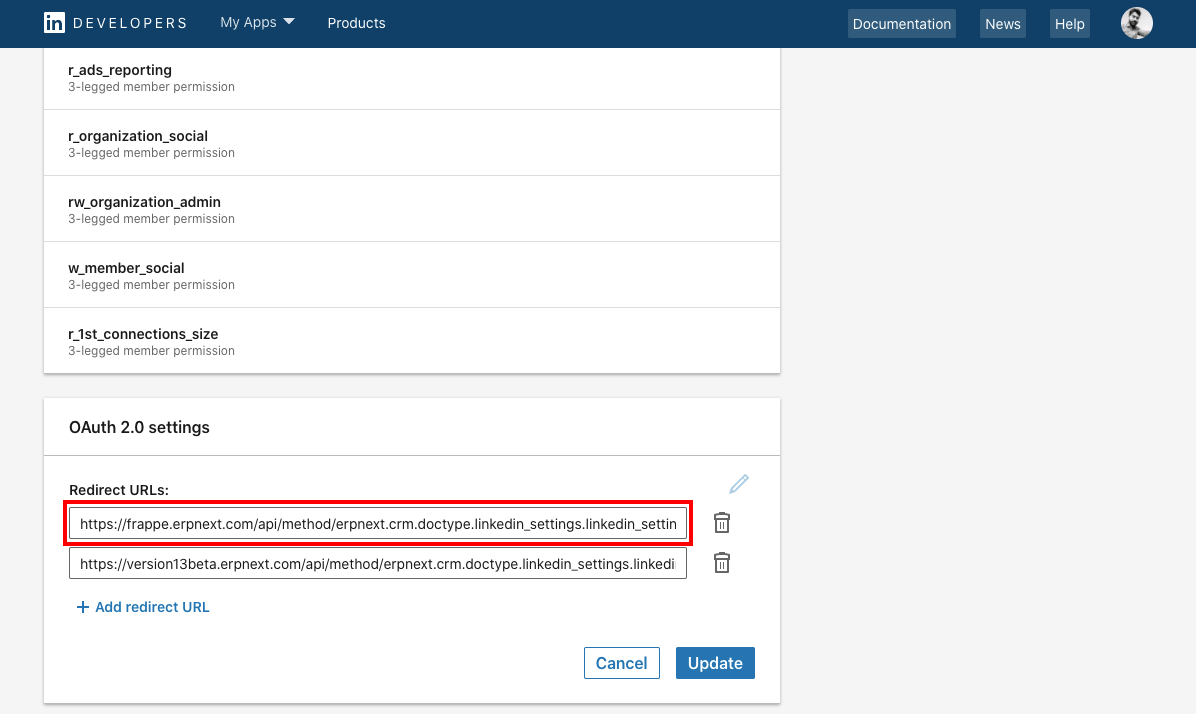
1.2 Configure Redirect URLs:
- Goto your LinkedIn Developers App then Auth tab.
- In OAuth 2.0 settings section add Redirect URLs:
https://{yoursite}/api/method/erpnext.crm.doctype.linkedin_settings.linkedin_settings.callback - Click Update to make changes.
2. How to set up LinkedIn Settings
To access LinkedIn Settings, go to:
Home > CRM > Settings > LinkedIn Settings
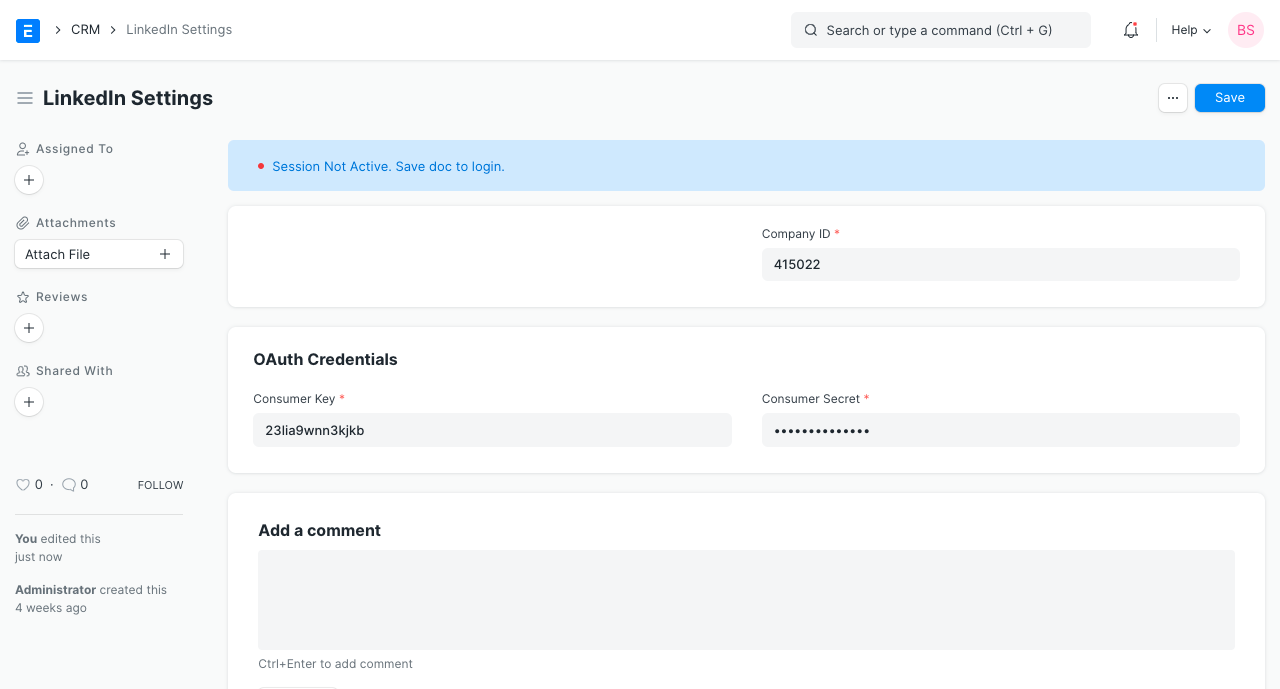
Company ID
You get the Company ID from your LinkedIn Company URL. 
Consumer Key and Consumer Secret
You get Consumer Key and Consumer Secret from your LinkedIn Developer account go to:
https://www.linkedin.com/developers/> My Apps >{Your App}> Auth
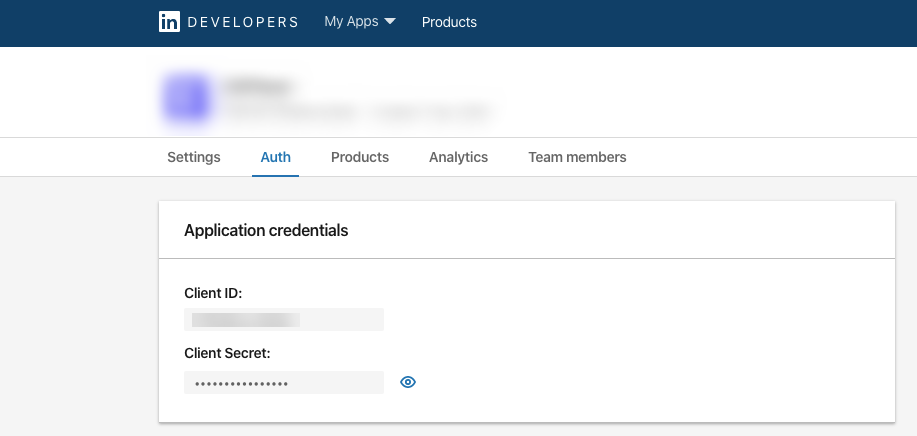
Once you save the doc by filling Company ID, Consumer Key, and Consumer Secret it will redirect to LinkedIn’s sign-in page by providing valid LinkedIn credentials and clicking Allow, the member approves your application’s request to access their member data and interact with LinkedIn on their behalf. 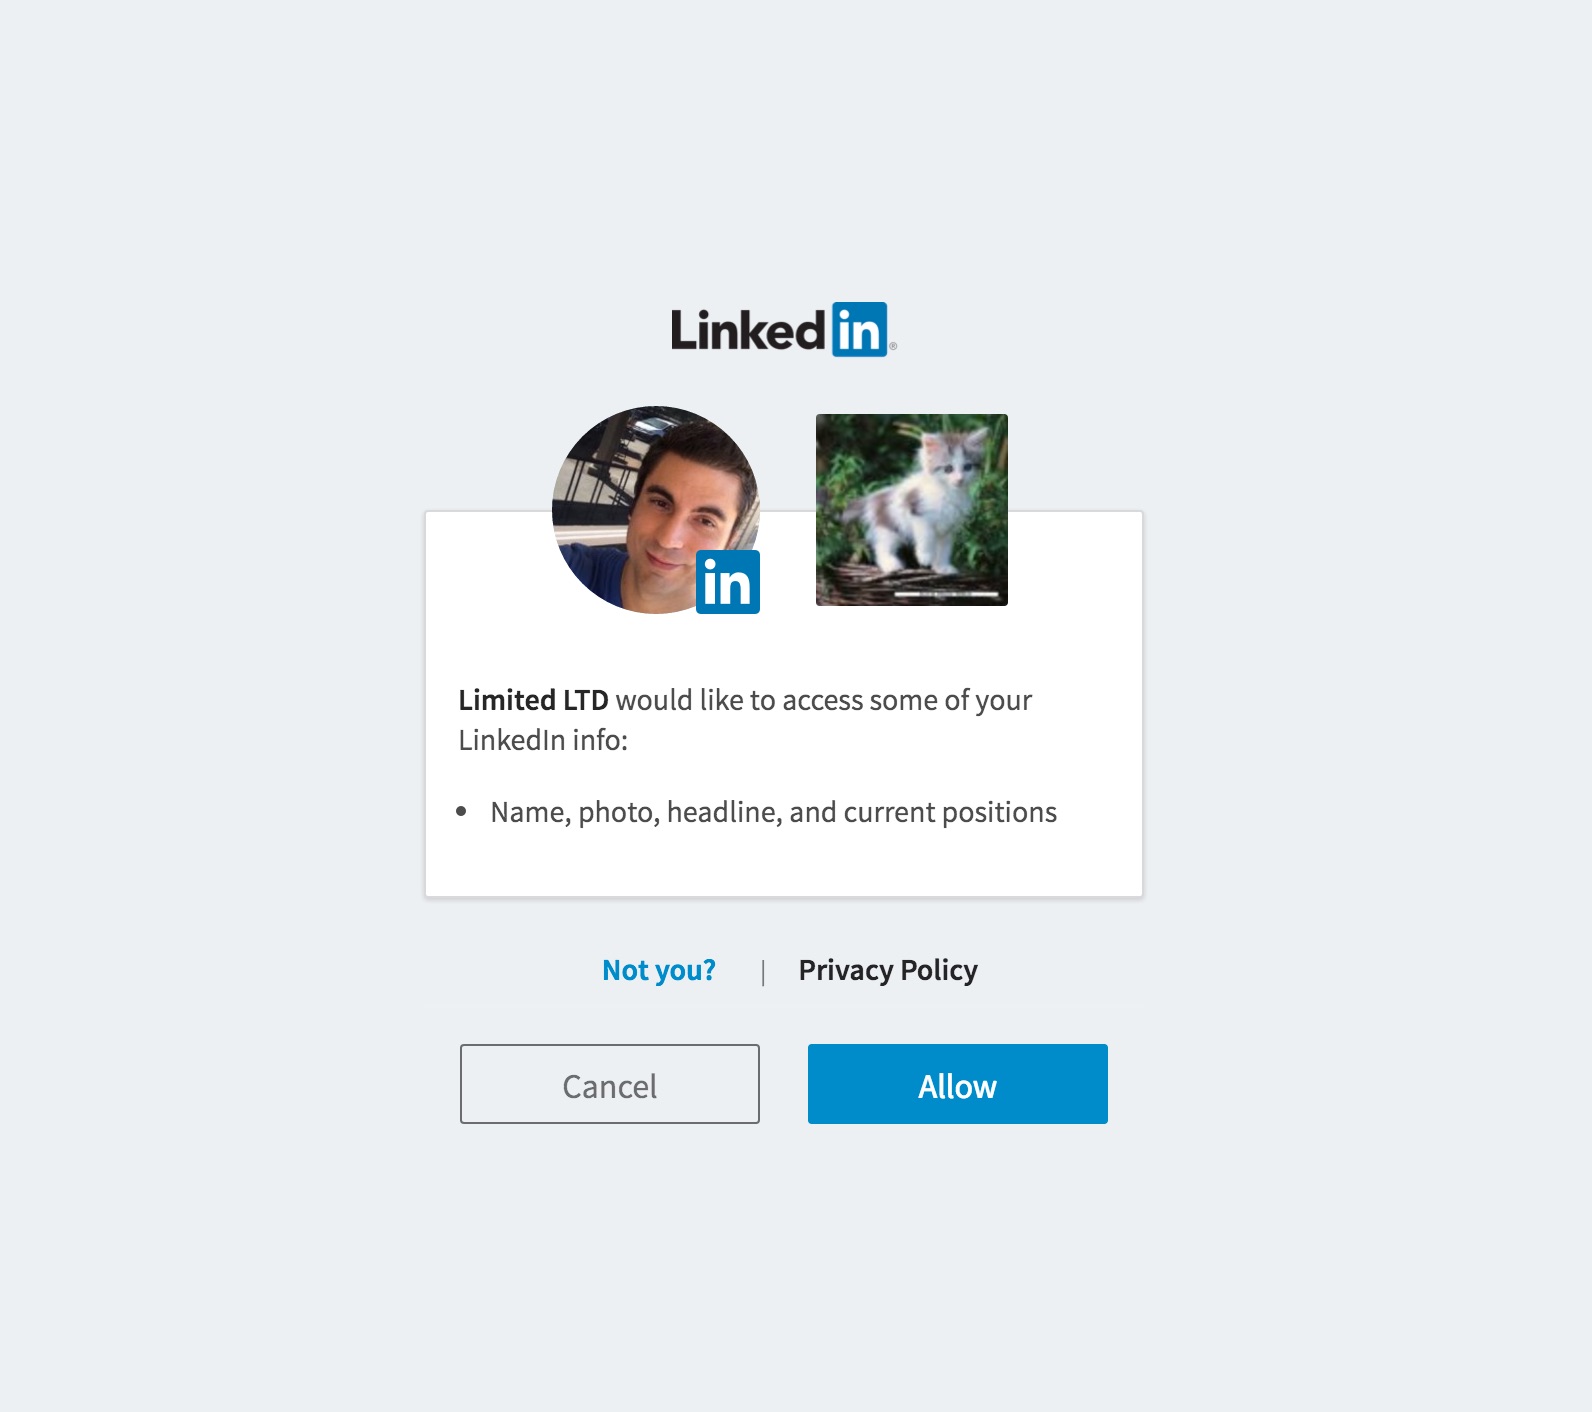
Twitter Settings
Twitter related settings like OAuth can be configured here. IONIC ERP needs access to the API through which the post is shared and achieved using OAuth 2.0 Authentication Protocol.
1. How to set up Twitter App
You must have Twitter App for your company. IONIC ERP interacts with this App for sharing Tweet.
1.1 Create Twitter Developer App
Create App by link https://developer.twitter.com/ and check that the App has Read and write Access permission. 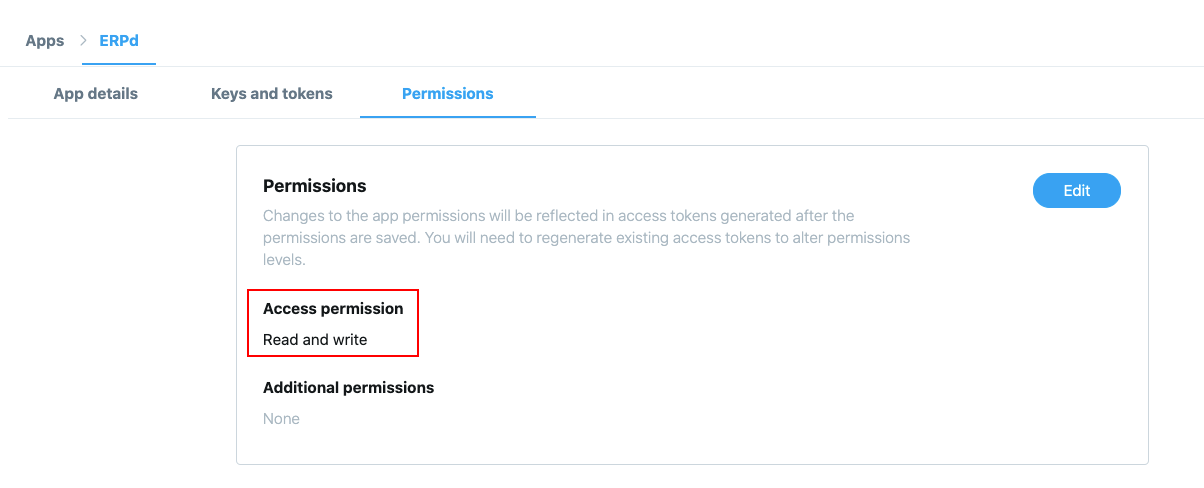
1.2. Configure Callback URL
- Select your App and go to App Details.
- Then go to Edit and click Edit Details.
- Add your website URL in Callback URLs like:
https://{yoursite}/api/method/erpnext.crm.doctype.twitter_settings.twitter_settings.callback - Click Save to make changes.

2. How to set up Twitter Settings
To access Twitter Settings, go to:
Home > CRM > Settings > Twitter Settings
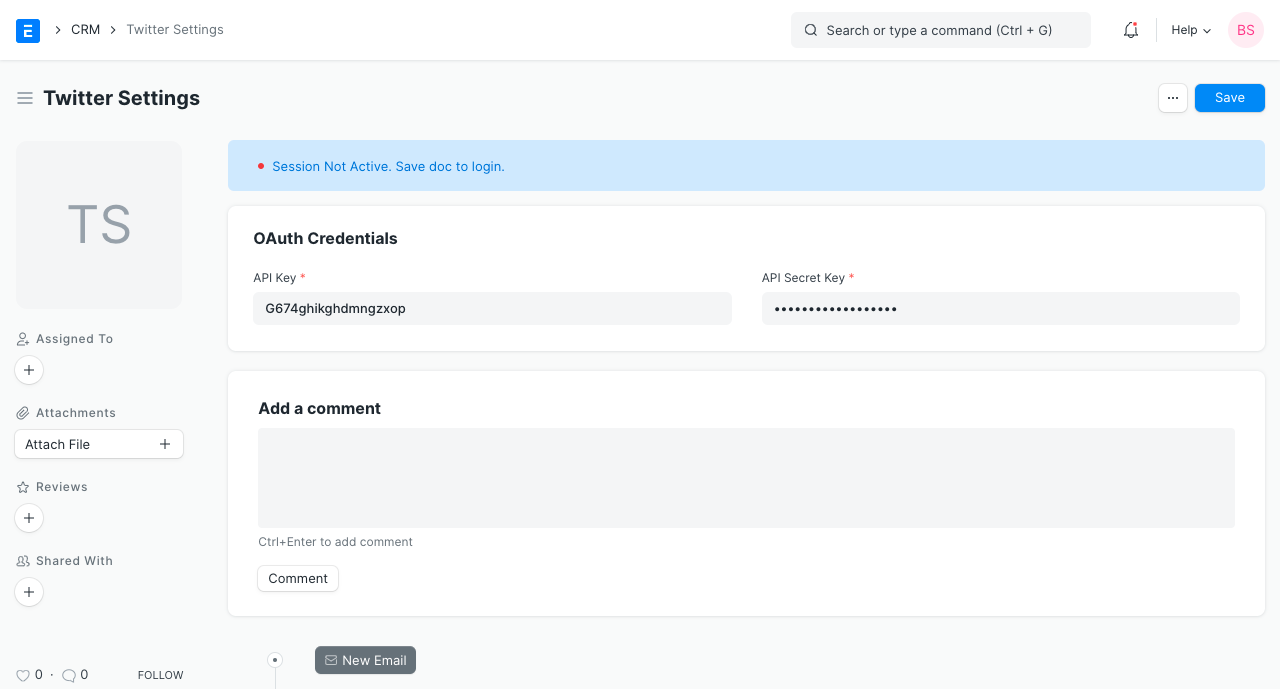
2.1 API Key and API Key Secret
You get API Key and API Key Secret from your Twitter Developer account go to:
https://developer.twitter.com/> My Apps >{Your App}> Keys and tokens
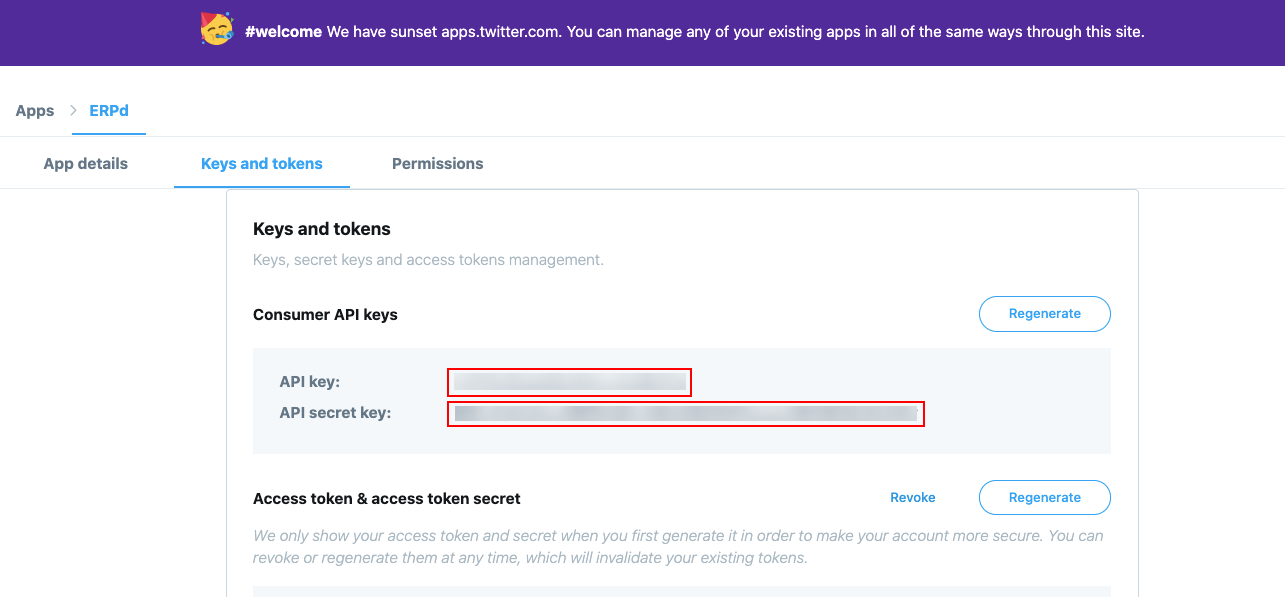
Once you save the doc by filling API Key and API Key Secret it will redirect to Twitter’s sign-in page by providing valid Twitter credentials and clicking Authorize app, the member approves your application’s request to access their member data and interact with Twitter. 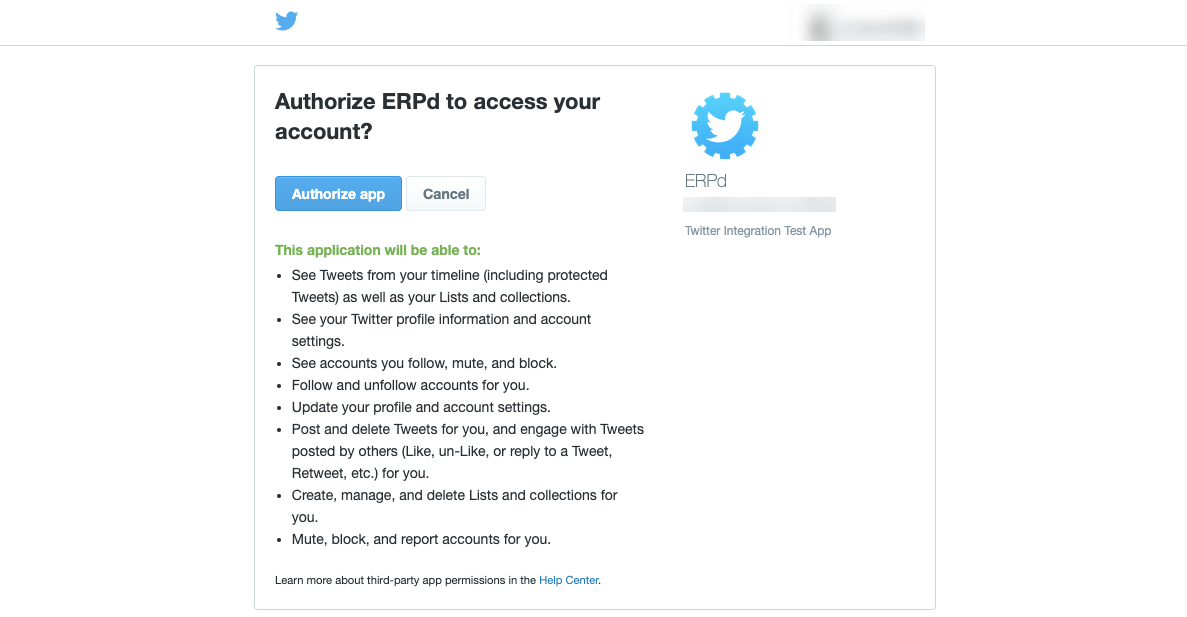
Social Media Post
Introduced in Version 13
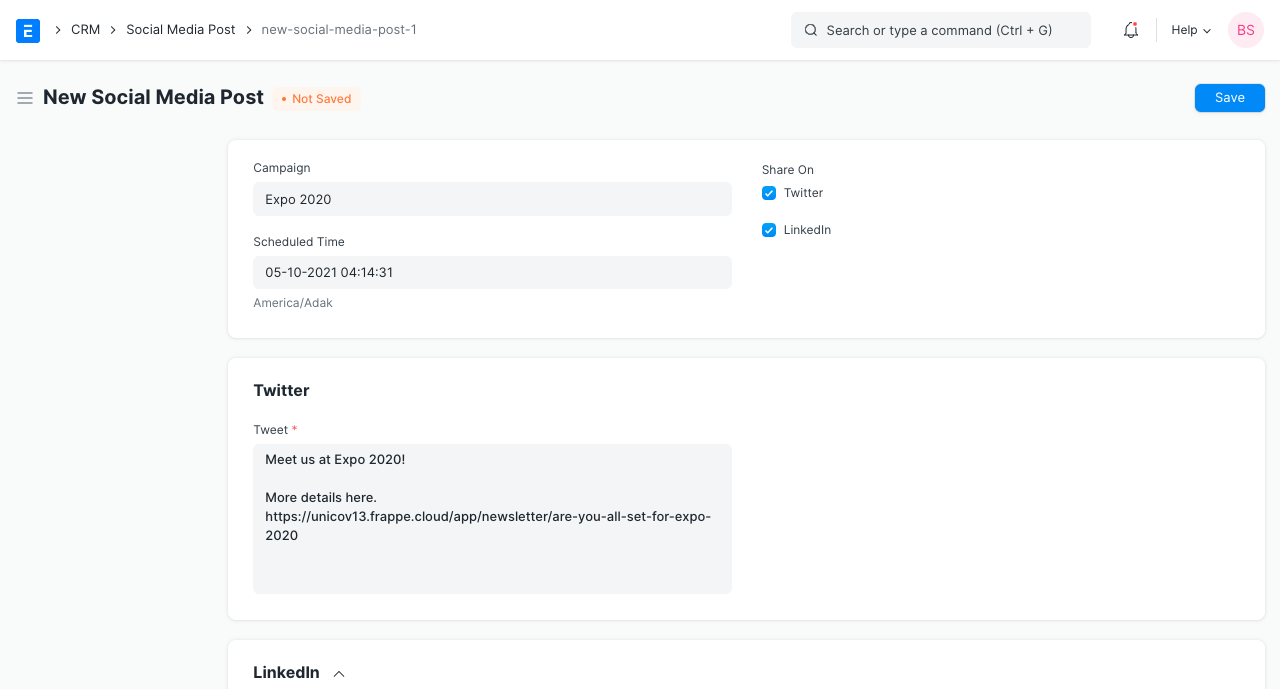
Social Media Post is used to create and schedule the post for LinkedIn and Twitter, it can be also linked with a Campaign.
To access Social Media Post, go to:
Home > CRM > Campaign > Social Media Post
1. Prerequisites
- LinkedIn Settings
- Twitter Settings
2. How to create a Social Media Post
- Go to Social Media Post list, click on New.
- Select Campaign if any otherwise leave it blank.
- Choose the Scheduled Time of the post to be published.
- Select the social media platforms to which post has to be published.
- Enter content for Twitter and LinkedIn.
- Attach image(Optional).
- Save and Submit.
3. Features
3.1 Immediate Post
Users can also immediately post just after submitting a Social Media Post by clicking the ‘Post Now‘ button. 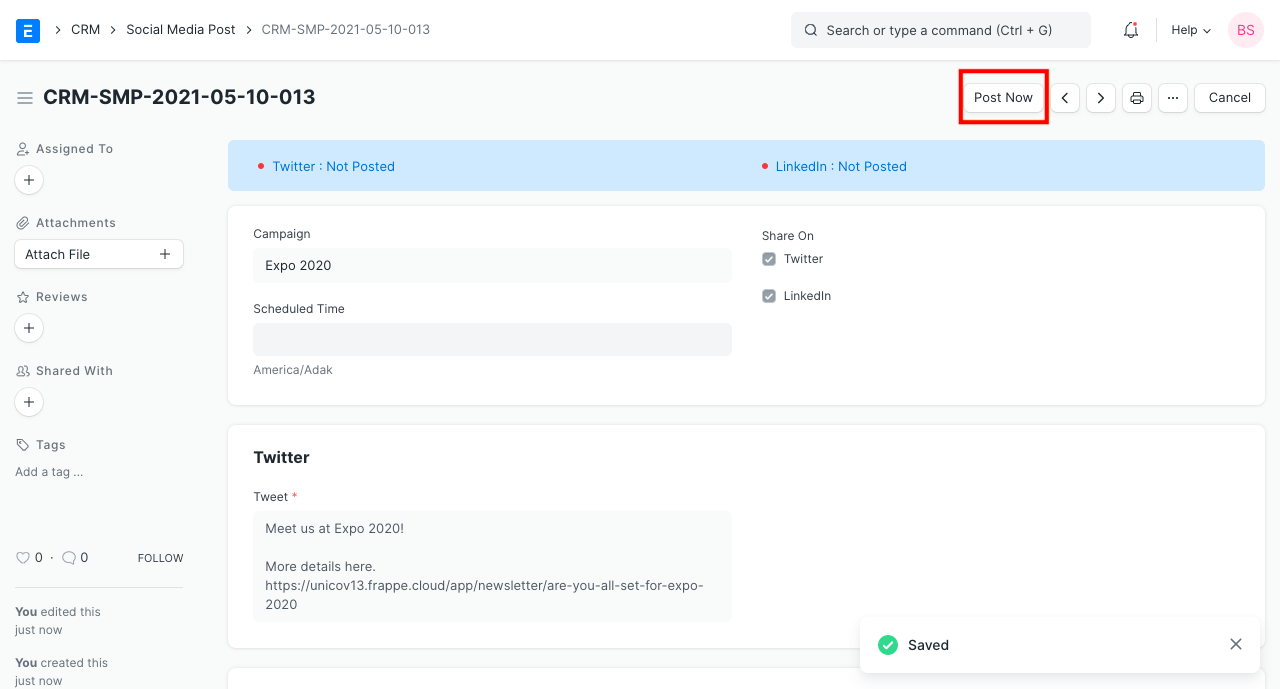
3.2 Reschedule
Users can change the Scheduled Time of the post. In case there is an error, users can reschedule the post by changing the ‘Scheduled Time‘ of the Social Media Post document. 