IONIC ERP Tutorial
Printing
Printing and Branding
Documents that you send to your customers carry your brand and image and they must be tailored to your requirements. IONIC ERP gives you many options so that you can set your oraganization’s branding in your documents.
IONIC ERP also gives you the option to print barcode labels, POS receipts and send other raw commands to printers using the Raw Printing feature.
Topics
- print-settings
- print-format-builder
- print-style
- print-headings
- letter-head
- address-template
- terms-and-conditions
- cheque-print-template
- custom-translations
- raw-printing
Print Settings
In Print Settings you can set your printing preferences like Paper Size, default text size, whether you want to output as PDF or HTML, etc.
Since ERPNext is a browser-based application, the actual print command is executed by the browser you’re using.
To edit Print Settings, go to:
Home > Settings > Print Settings
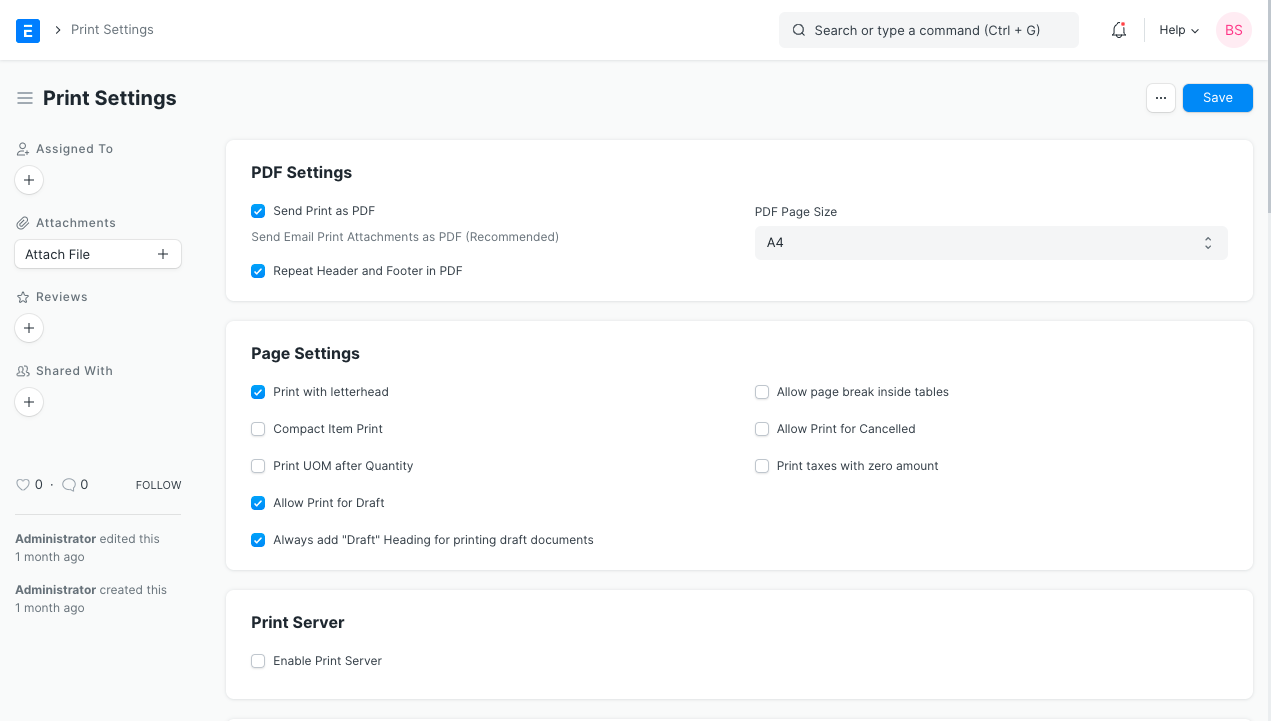
There are various configurations available in the Print Settings. Let’s learn about them.
1. PDF Settings
1.1 PDF or HTML
When you email any document (like Sales Order/Invoice) from IONIC ERP, it is sent in the PDF or HTML format. The file is sent in PDF by default. If you wish to send a document in the HTML format, just uncheck the option “Send Print as PDF”.
1.2 Repeat Header and Footer in PDF
The letterhead is a master where you can define the standard Header and Footer which is appended to the document’s Print Format. If this property is enabled, then Header and Footer are added to each page. If you don’t want header and footer repeat on each page, just disable this setting.
1.3 PDF Page Size
The default size for printing PDF pages is A4, and you can choose any size from the options defined here, including custom dimensions defined in millimeters.
2. Page Settings
2.1 Print With Letterhead
Enabling this property will automatically tick the Letter Head option when printing a document. Note that you need to either set Letter Head as default or select one in the transaction for it to appear in the print view.
2.2 Compact Item Print
Transactions like sales orders/invoices have a table detailing items bought or sold. It has multiple columns like Item Name, Description, UoM, Rate Amount, etc. If there are many columns in the Item table, then Print Format looks bit cluttered. You can improve the view of the table by enabling Compact Item Print.
As per this setting, there will be only four columns in the Print Format, namely: Description, Qty, Rate, and Amount.
The values of other columns (like name, description, image, serial nos. etc.) are concatenated in the Description column.
When the checkbox is unticked, the print format looks like this: 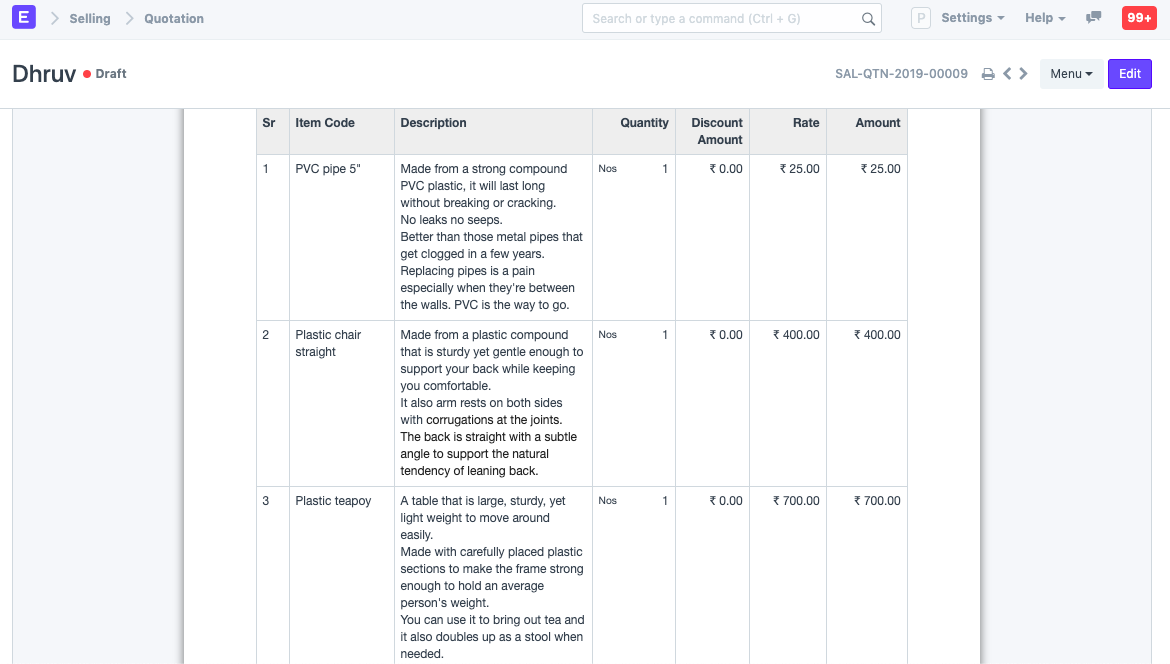
This is what the Compact Print Format looks like: 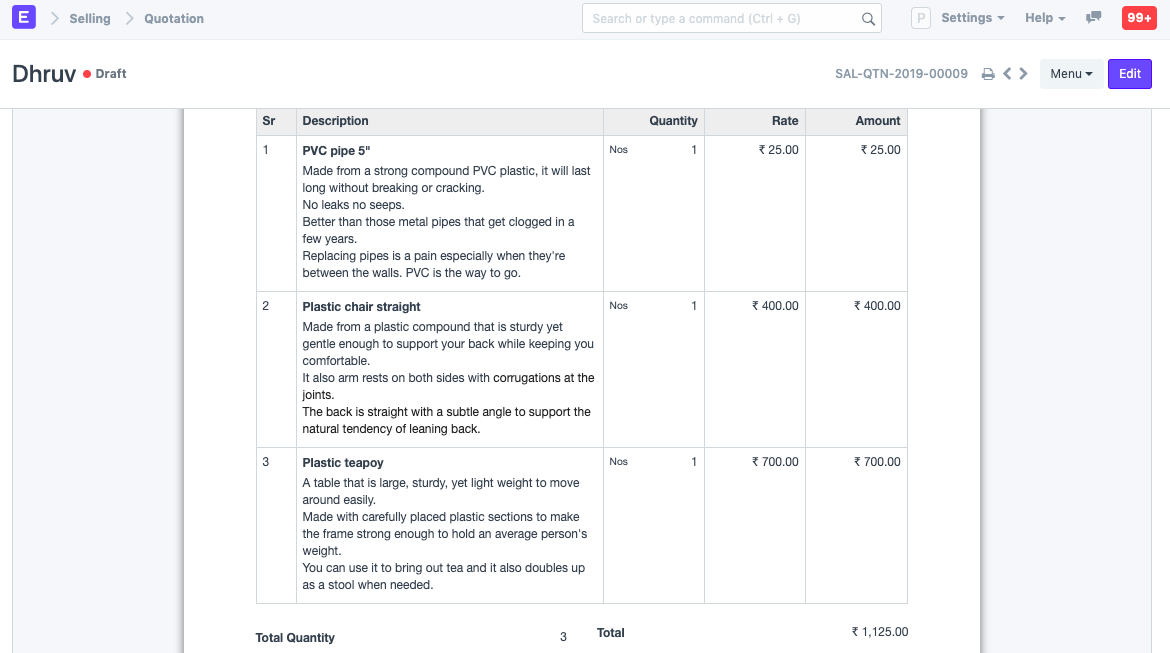
2.3 Allow Print for Draft
The documents (mostly transactions) have two stages of authentication, Save and Submit. The saved documents are the first draft and not submitted to the system. Hence printing is restricted for the documents at this stage. However, if you wish to permit users to print documents at the Draft stage as well, enable this checkbox.
2.4 Always add “Draft” Heading for printing draft documents
Enabling this setting also print “Draft” in the Print Format, thus indicating that document shared is not completely authenticated yet.
2.5 Allow Page Break Inside Table
If an item’s description captures more than usual space of a page, then enabling this setting will split the item’s details to the next page. Hence, a page break will be inserted between the Item Description, and the rest of the details will be pushed to the next page.
2.6 Allow Print for Canceled
Canceled transactions are the ones which don’t have any impact on the reports. If you wish to allow printing for the canceled transactions, then enable this setting. A transaction can be canceled only once it is submitted.
2.7 Print Taxes with Zero Amount
In the sales and purchase transactions, you can add apply multiple taxes on the item. By default, in the print format, only taxes which have some amount calculated are visible. If you wish to also print the tax which was not applied and has zero tax amount, enable this setting.
3. Network Printer / Print Server
You can enable print server by filling the print server IP and port. Then chose the default printer.
Before enabling this feature you have to install the pycups library.
You may need first to install cups library if is not already on your system
For Debian OS Family:
sudo apt-get install libcups2-dev
For Red Hat OS Family:
sudo yum install cups-libs
After that, install pycups in the env using the command:
./env/bin/pip install pycups
This is executed from the frappe-bench directory.
4. Raw Printing
You can enable raw printing and print to many supported thermal printers. Read Raw Printing to know more.
Print Format
With Print Format, you can set how document types look when printing.
Every transaction has a default Print Format called ‘Standard’. You can change Print Formats by:
- Using the Print Format form
- Using Jinja/JS scripting under Print Format
- Using the Print Format Builder to create print formats with UI
- Using Customize Form to hide/unhide fields
To access Print Format, go to:
Home > Settings > Print Format
1. How to create a Print Format
- Go to the Print Format List, click on New.
- Enter a name and select a DocType for which the Print Format is to be used.
- The module for which it should apply will be selected automatically.
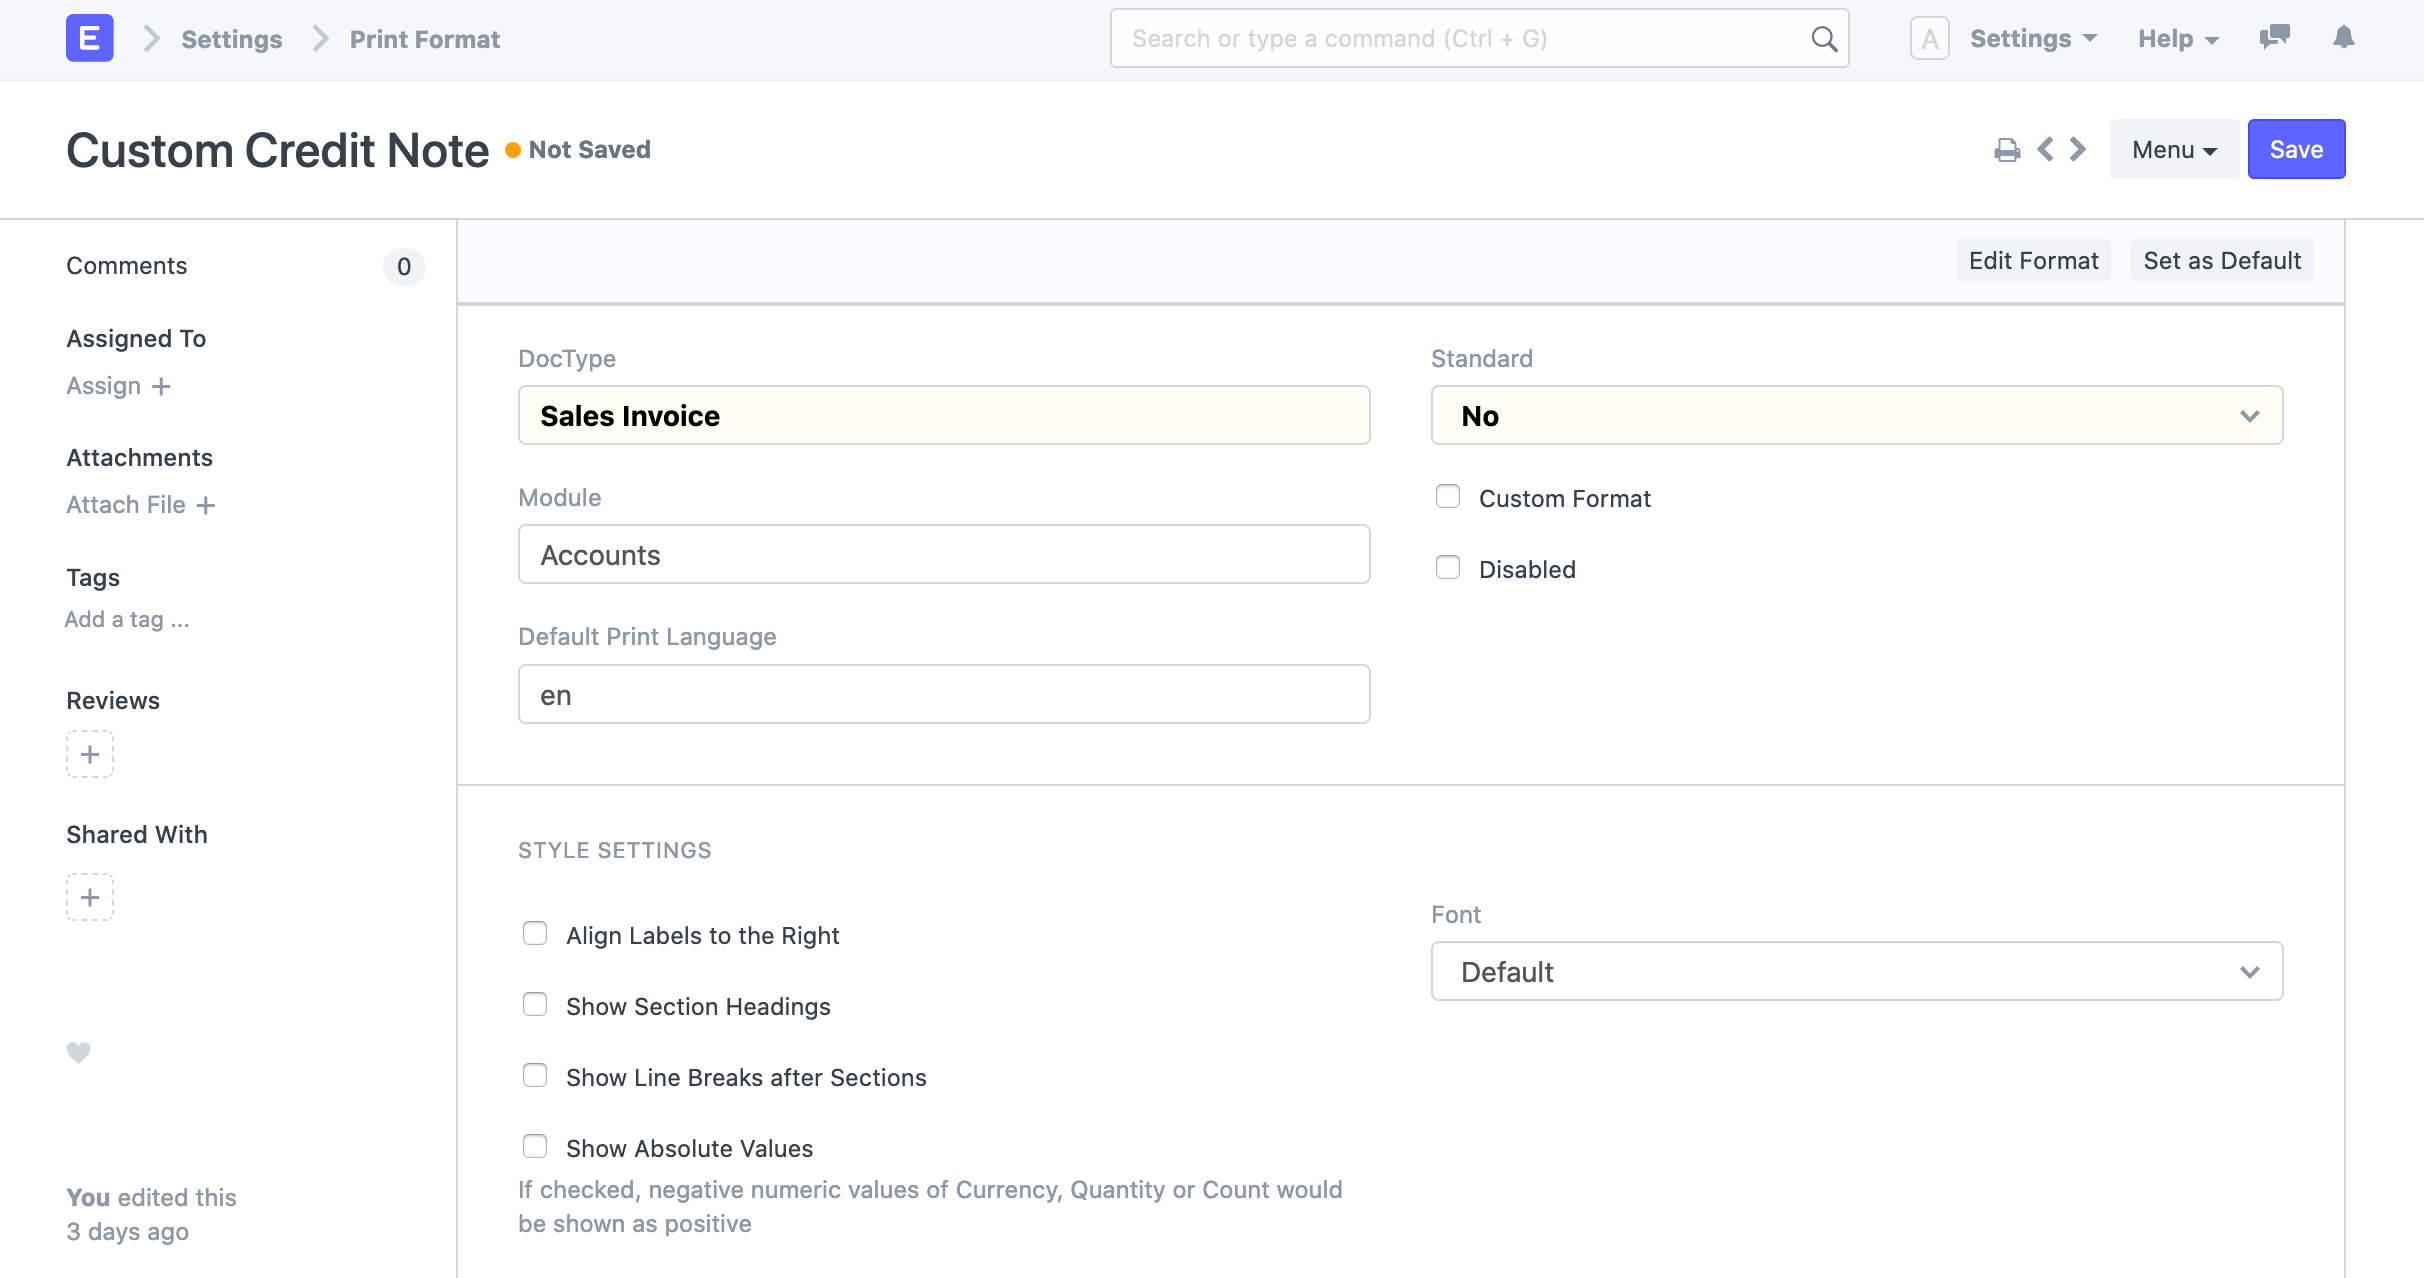
- Save.
Under Style Settings, there are options to change the styling options. With those options, you can change the font, align the labels together on the left or right, add headings for sections, etc.
To style the Print Format using custom Jinja/JS, click on Custom Format. If you select this option, there’ll be a checkbox for raw printing. To know more about raw printing, click here.
If developer mode is enabled, you can select Standard as yes to contribute a print format as a standard (preset) print format in the system.
1.1 Using Customize form to change the Print Format items
Fields in the transactions and their child tables can be hidden/shown using Customize Form. For example, if you want to hide the ‘Item Code’ when printing a Quotation, click on the print icon to enter the print screen.
Go to Menu > Customize, select Quotation Item in the ‘Enter Form Type’ field. 
To know more, visit the Customize Print Format page.
In the fields table, expand the ‘Item Code’ row, scroll down and tick the ‘Print Hide’ checkbox. 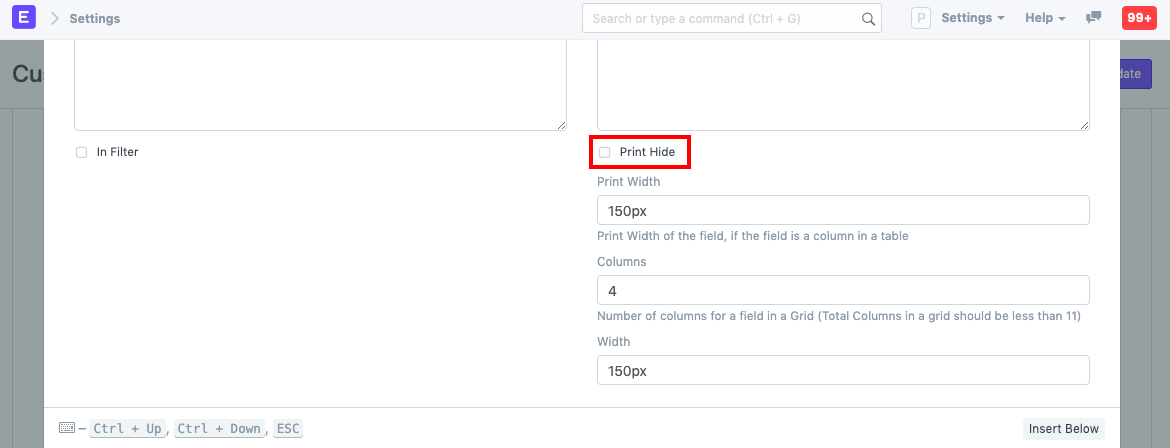
A newly created Print Format can be selected on the print screen of a transaction. From there you can see how it looks and proceed to print. 
Print Format Builder
The Print Format builder helps you quickly make a simple customized Print Format by dragging and dropping data fields and adding custom text or HTML.
The ‘Standard’ Print Format is created by default, it cannot be edited.
To access the Print Format Builder, go to:
Home > Settings > Print Format Builder
Or via a document.
1. Using the Print Format Builder
1.1 Via the menu navigation
- Go to the Print Format Builder.
- Here you can edit an existing print format or create a new Print Format for a document type like Item, Quotation, etc.
- Let’s see how to edit an existing Print Format in this section. To know about creating a new Print Format, see the next section.
- Select the Print Format to edit.
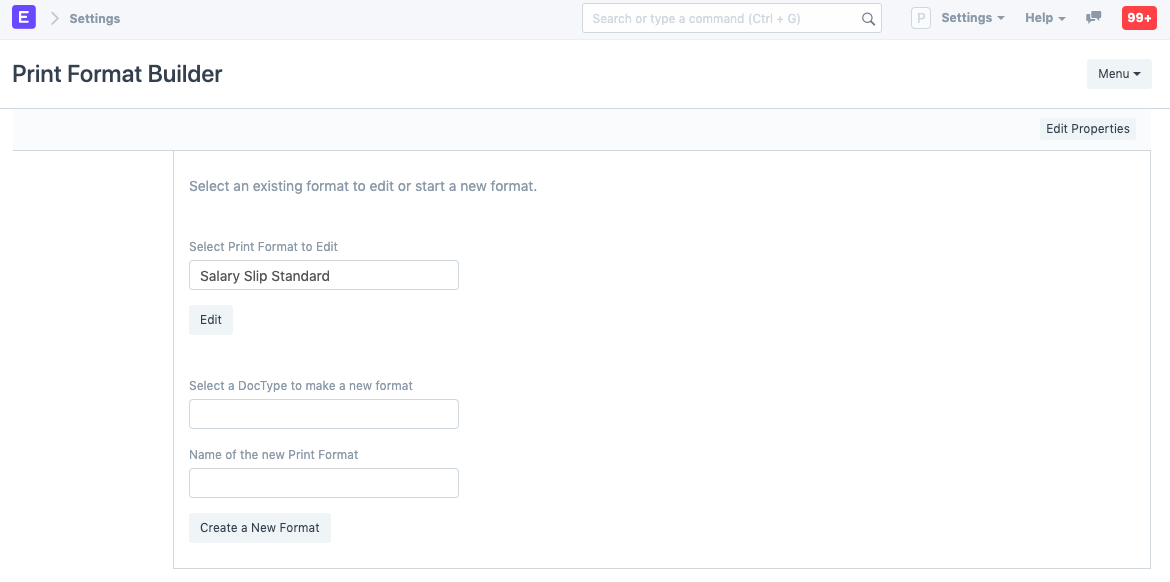
- Click on the Edit button, you will be taken to the Print Format Builder UI.
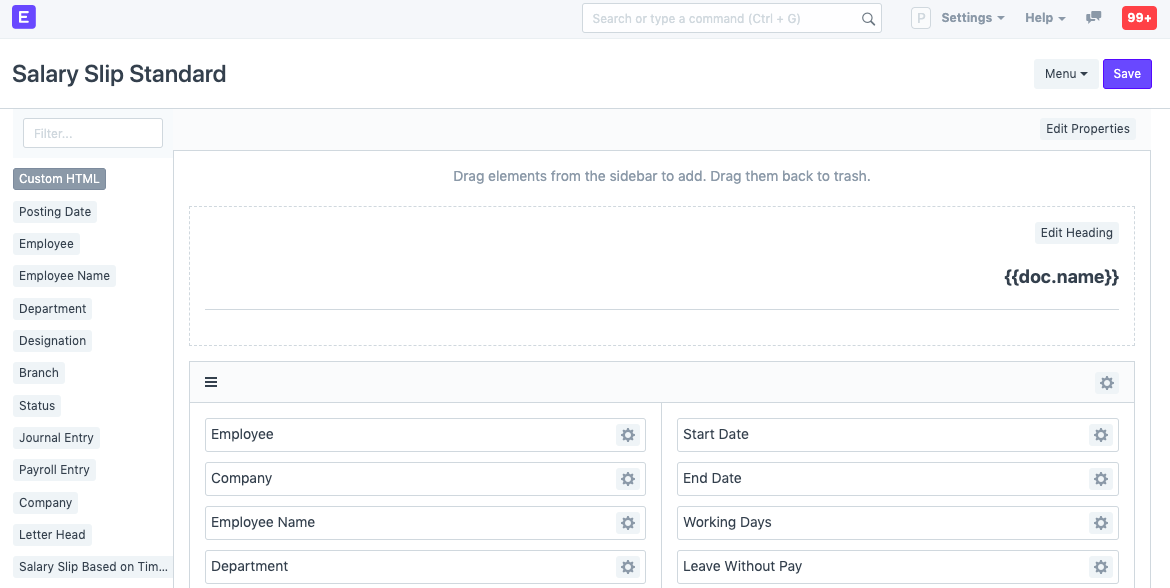
- Here you can drag and drop fields from the sidebar to the page and vice versa.
- After making the changes, click on Save.
1.2 Via a document
- Open the document for which you want to make a Print Format. Click the Printer icon, or go to Menu > Print and click on the Customize… button. Note: You must have System Manager permission to do this.
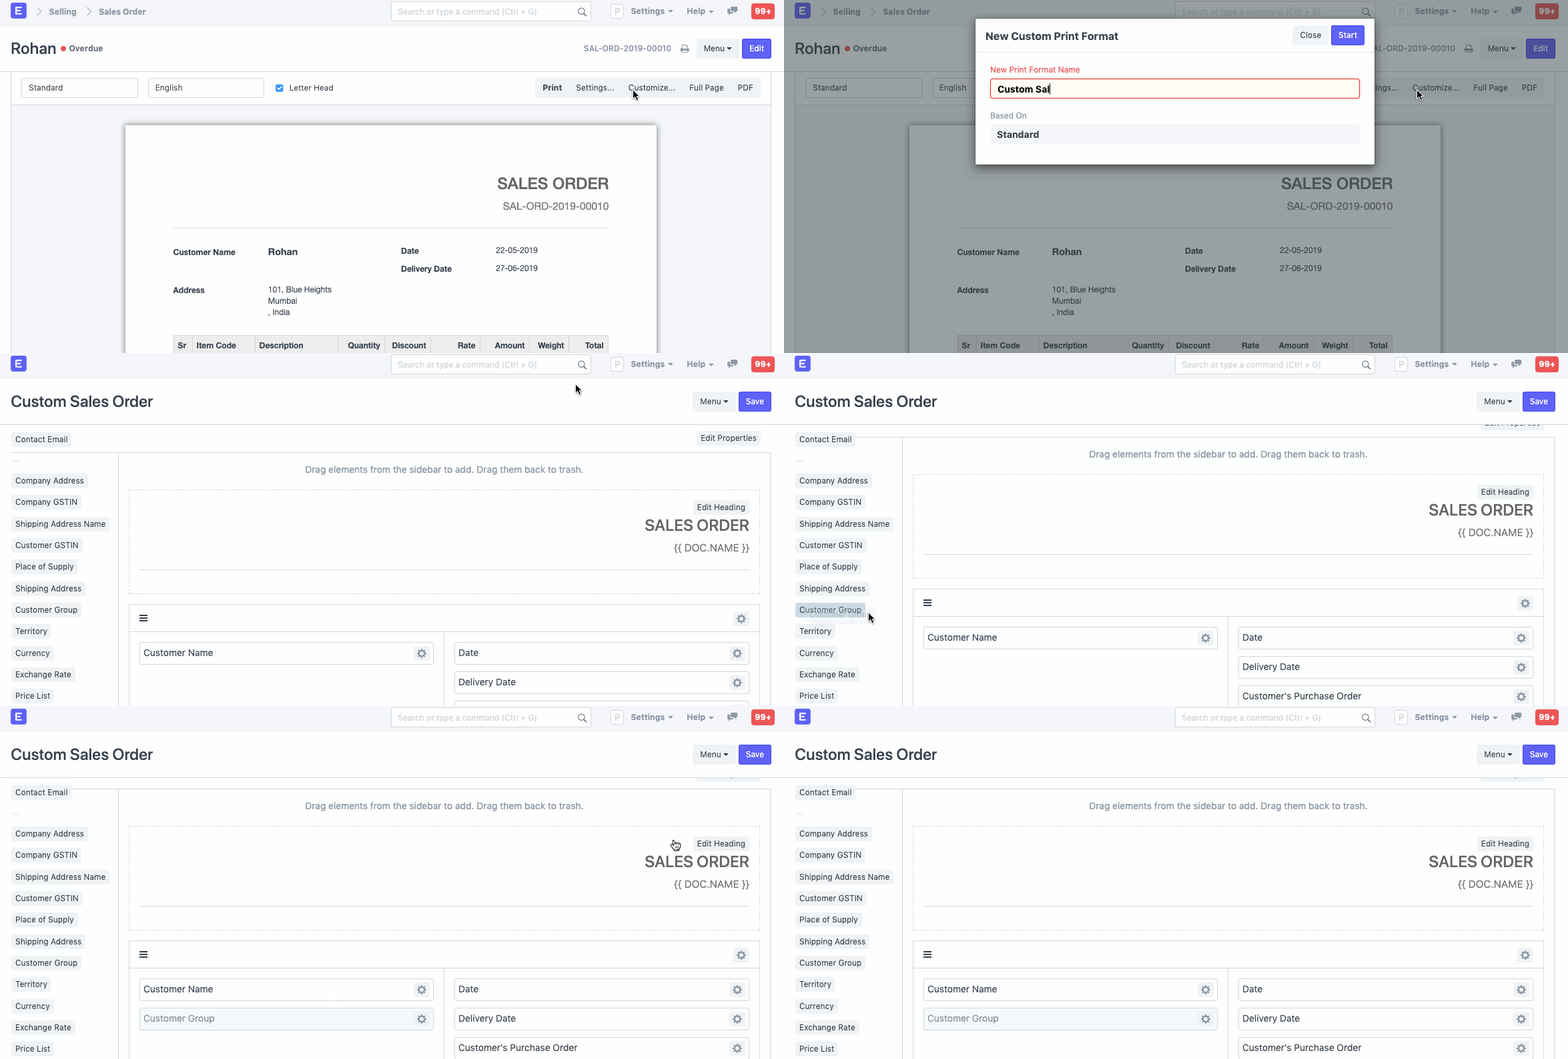
- To add a field, just drag it from the left sidebar and add it in your layout. You can edit the layouts in sections or individual fields by clicking on the settings icon.
- To remove a field, just drag it back into the fields sidebar.
- Save.
You can add customized text, HTML in your print format, just drag and drop the Custom HTML field (in dark color) and add it to the place where you want to add the Custom HTML content.
Then click on Edit HTML to edit your content.
Print Style
In Print Style you can define custom CSS styles applied to Print Formats.
ERPNext comes with preset styles for printing documents. You can also create new styles using CSS that can be applied to all your print formats.
The standard print Styles in ERPNext are: Monochrome, Modern, and Classic. To create a new Print Style go to:
Home > Settings > Print Style
1. How to create a new Print Style
- Go to the Print Style list, click on New.
- Enter a name for the Print Style.
- Enter the CSS that’ll define how the style will look like.
- Save.
The styles you create here apply to both standard and custom print formats. To find out the various CSS classes available, you can make a standard print format, open in a new page and see the source.
A default Print Style, can be set from Print Settings.
All Print Format styles are based on Bootstrap (Version 3) CSS Framework.
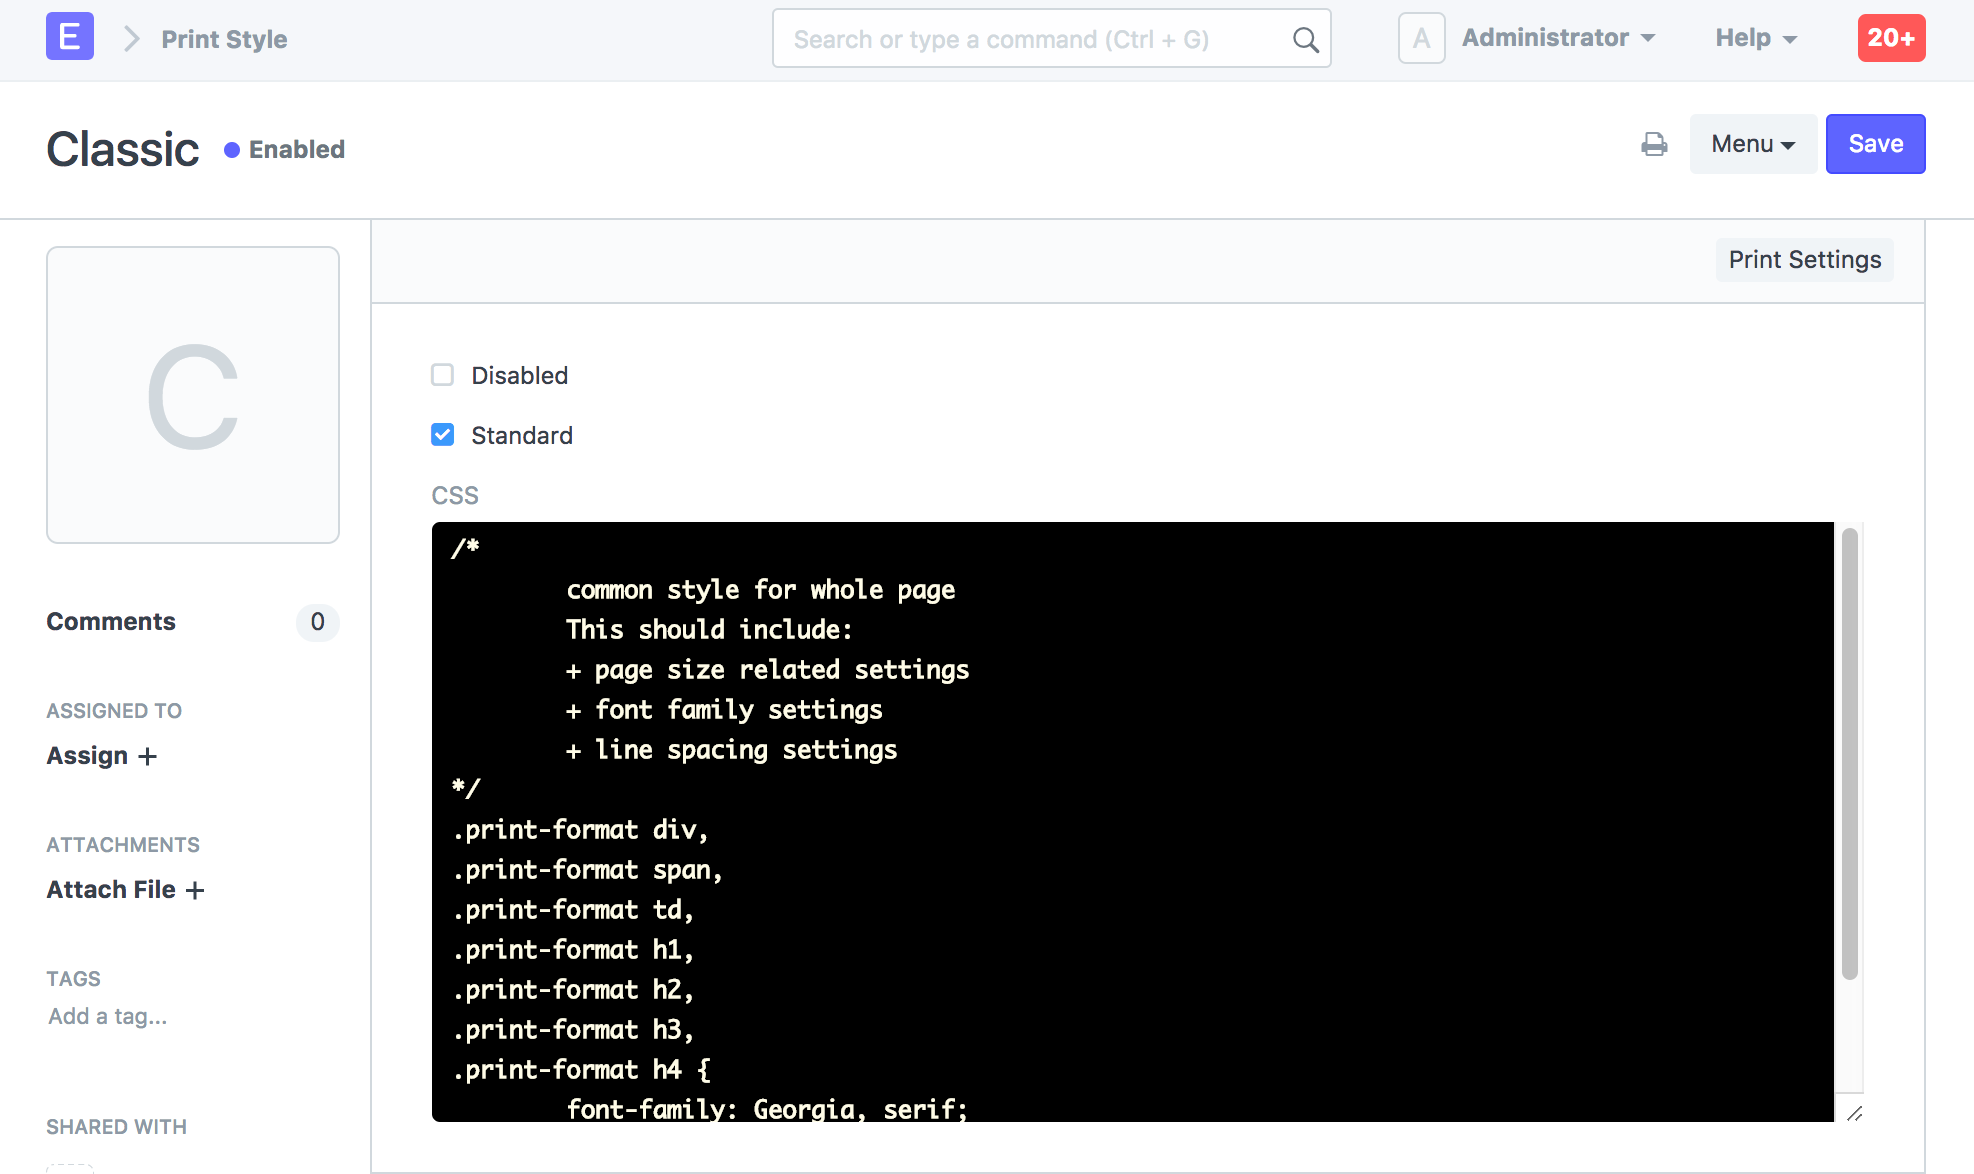
If you have enabled developer mode and tick on Standard then system will generate the JSON file for the Print Style. You can contribute a default print style with this.
Print Headings
Print Headings are the names/titles you can give your transactions.
These transactions include Sales Invoices, Supplier Quotations, etc. You can create a list of names for different business communications.
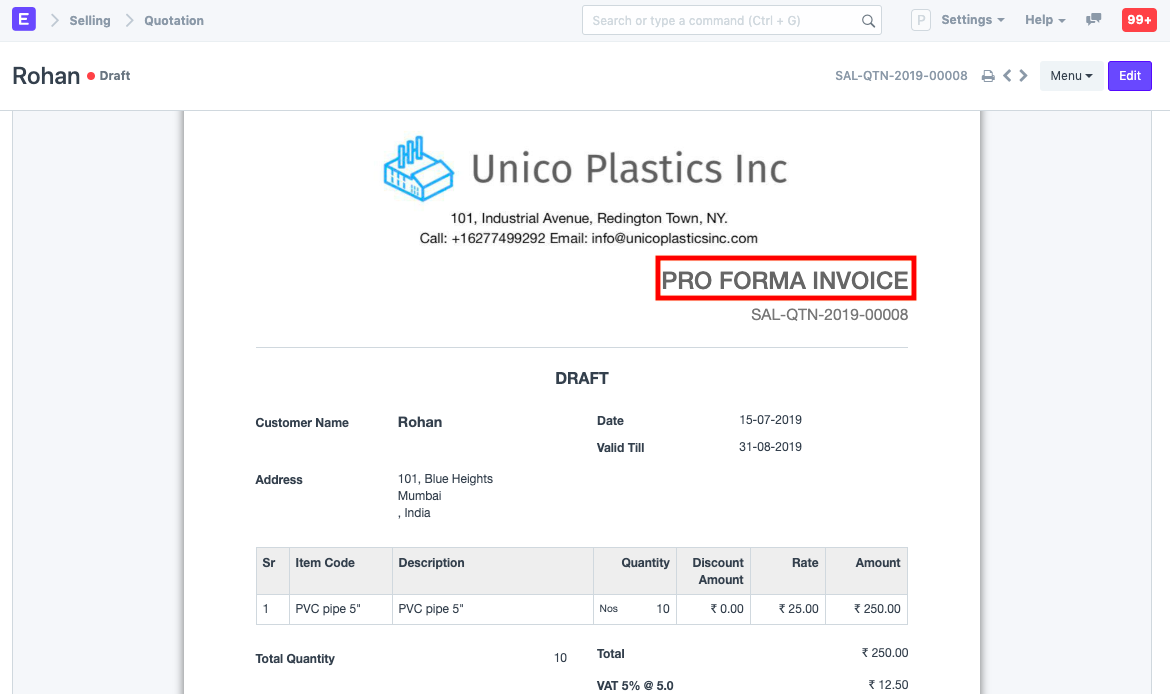
If you want to rename a transaction on how it appears when printing, you can do so via Print Headings. For example, a Quotation is also called a “Proposal”, Estimate”, or “Pro Forma Invoice”.
To access Print Headings go to:
Home > Settings > Print Heading
1. How to create a Print Heading
- Go to the Print Heading list, click on New.
- Enter the heading that will appear on the document.
- Save.

To use the print heading, select the created print heading in the ‘Print Heading’ field transaction, shown as follows:
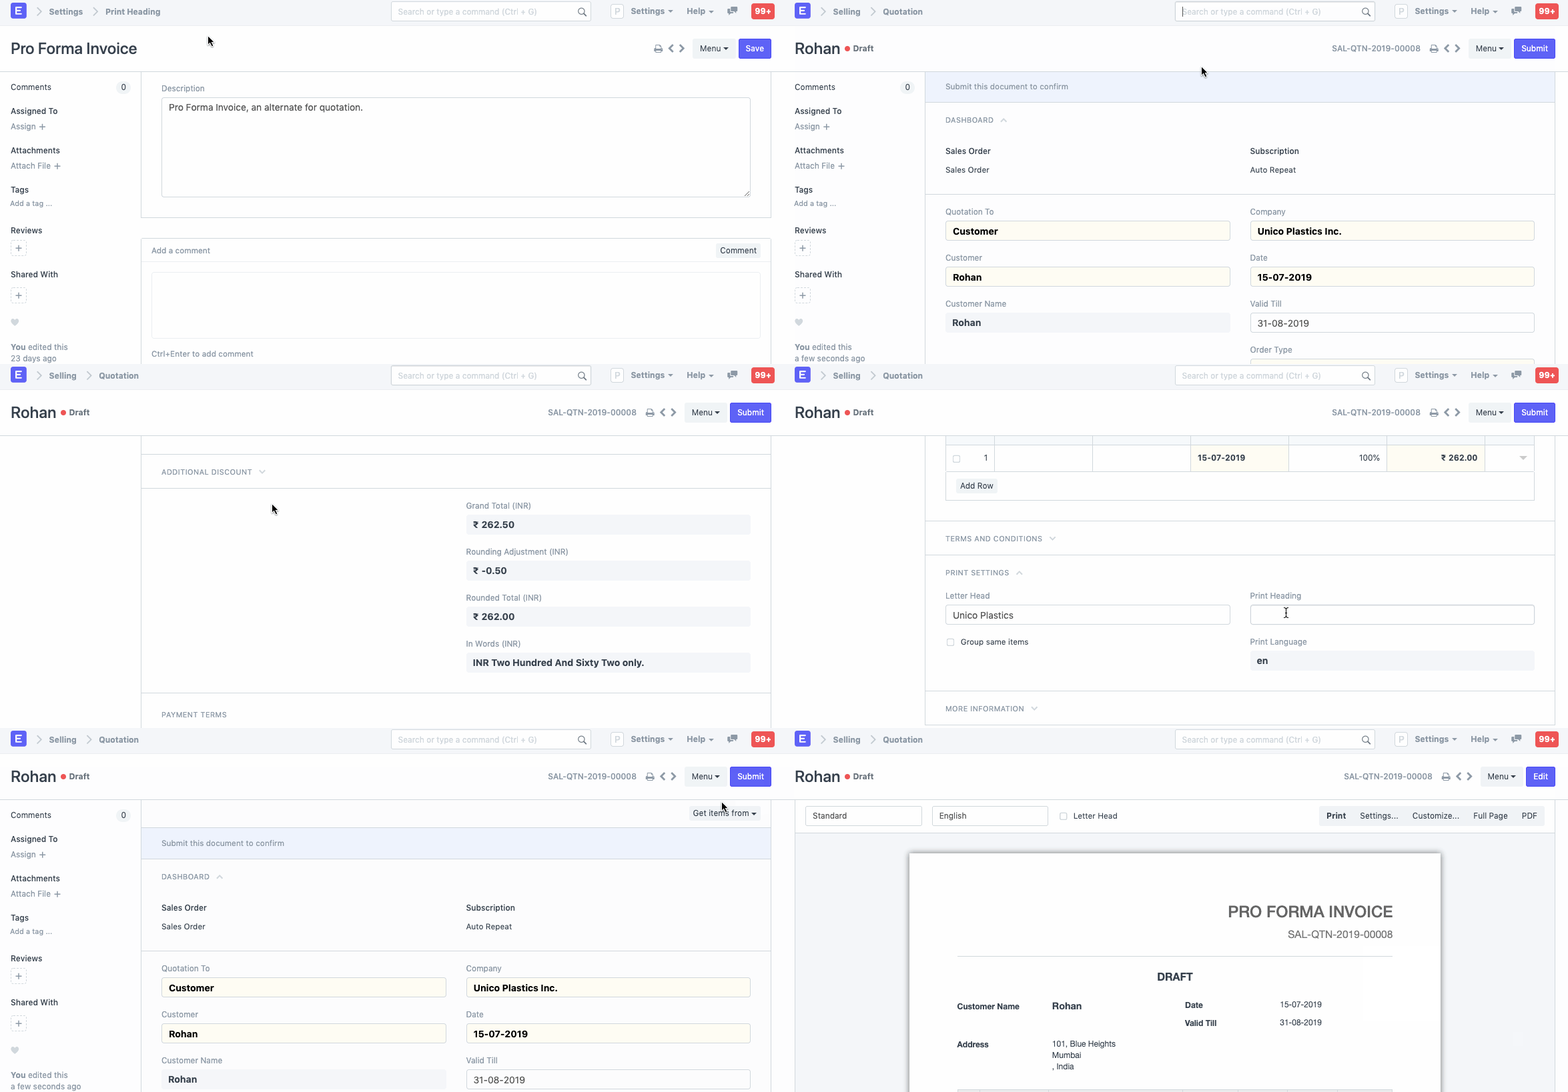
Example of a change in print heading is shown as follows:
Address Template
Address template can store different formats of addresses based on the region.
Each region has its way of defining addresses. To manage multiple address formats for your Documents (like Quotations, Purchase Invoices, etc.), you can create country-wise Address Templates.
To access address template, go to:
Home > Settings > Address Template
A default Address Template is created when you set up the system. You can either edit it or create a new template. This default template will apply to all countries not having a specific template.
Consider a customer from the United States where ‘County’ is a part of the address. If you set county in the address template for United States, then it’ll show up in the address field and hence in the print preview. Fields like PIN code can be changed to be displayed as ZIP code and fields like county can be added by using Address Templates.
The Address Template checks the ‘Country’ field in the Address master to apply different address templates to transactions.
1. How to create an Address Template
- Go to the Address Template list, click on New.
- Select a country.
- Change the CSS and Jinja if required.
- Save.
1.1 Jinja Templating
The templating engine is based on HTML and the Jinja Templating system. All the fields (including Custom Fields) will be available for creating the template.
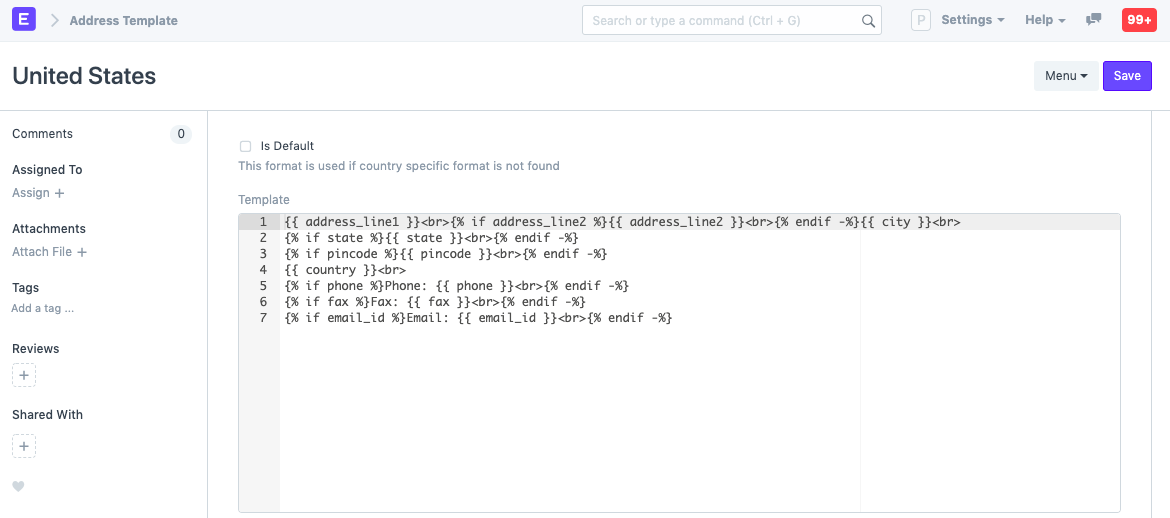
Here is the default Jinja template:
{% raw %}{{ address_line1 }}<br>
{% if address_line2 %}{{ address_line2 }}<br>{% endif -%}
{{ city }}<br>
{% if state %}{{ state }}<br>{% endif -%}
{% if pincode %}PIN:  {{ pincode }}<br>{% endif -%}
{{ country }}<br>
{% if phone %}Phone: {{ phone }}<br>{% endif -%}
{% if fax %}Fax: {{ fax }}<br>{% endif -%}
{% if email_id %}Email: {{ email_id }}<br>{% endif -%}{% endraw %}
Here is an example:
Terms And Conditions
Terms and conditions contain the terms and conditions of a service/product offered by a seller to a buyer.
Each Quotation/Sales Order must ideally contain a set of terms of your contract. Terms and conditions are usually included to define terms of service, conditions for using any service or to even limit responsibilities of the seller in case any harm is caused to the buyer due to using the provided goods or services. It is usually a good idea to make template(s) of your Terms and Conditions so that you have a standard set of terms.
To access Terms and Conditions template go to:
Home > Selling > Terms and Conditions Template
1. How to create Terms and Conditions Template
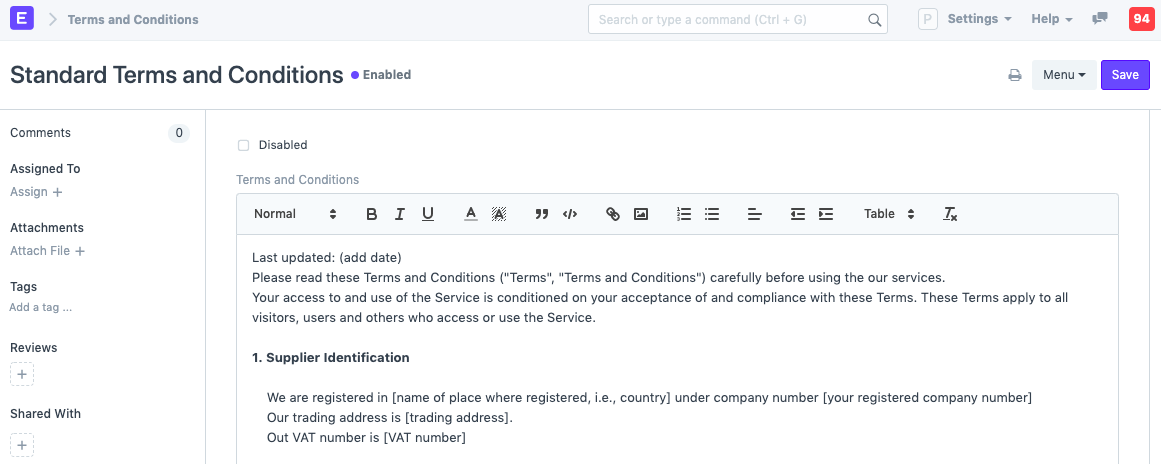
- Go to the Terms and Conditions Template list, click on New.
- Add the Terms and Conditions.
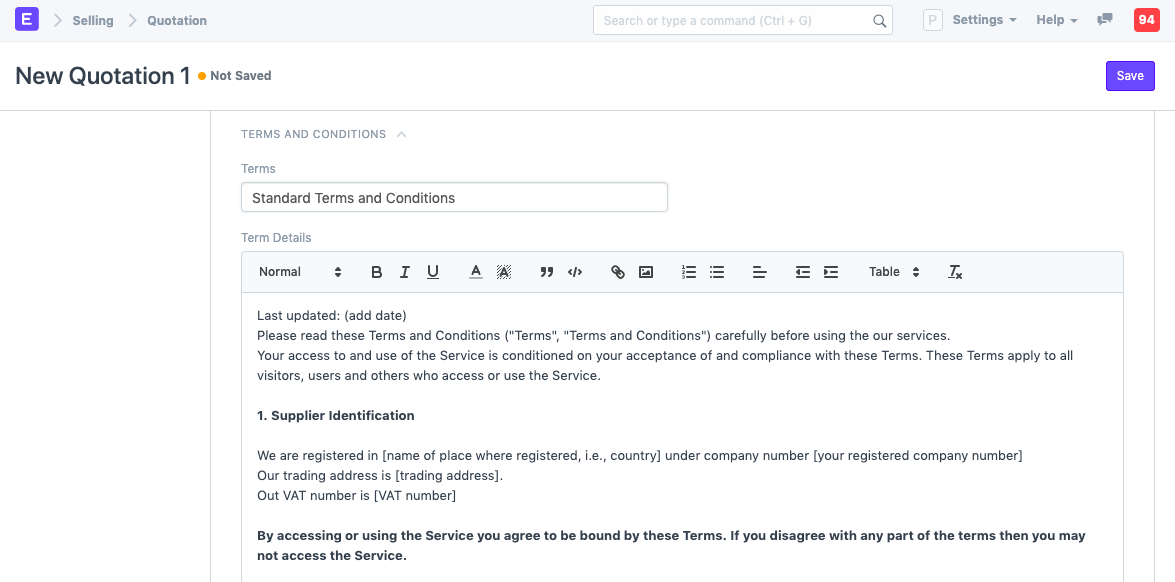
1.1. Select in Transaction
In transactions, you will find a section of Terms and Conditions where you will be able to search and fetch the required Terms and Condition master.
1.2 Terms and Conditions when printing
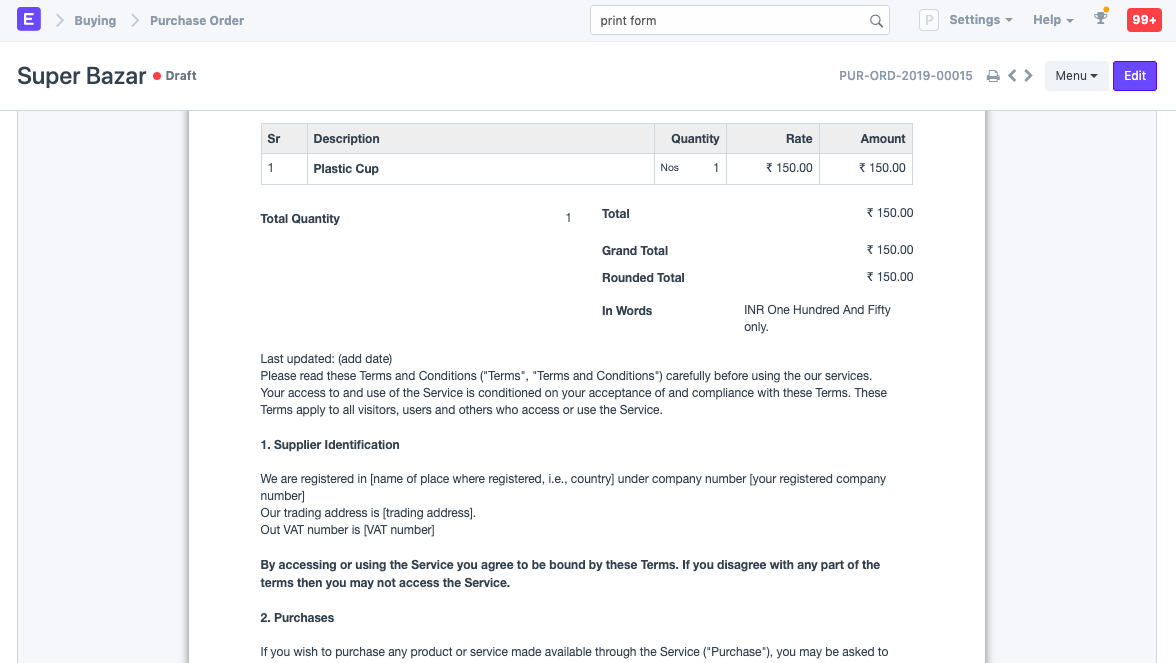
Once the Terms and Conditions are set in a Sales/Purchase transaction, it will appear when printing:
1.3 What should Terms and Conditions contain?
Here are some common topics that Terms and Conditions should contain:
- Validity of the offer.
- Payment Terms (In Advance, On Credit, part advance, etc).
- What is extra (or payable by the Customer).
- Safety/usage warning.
- Warranty if any.
- Return Policy.
- Terms of shipping, if applicable.
- Ways of addressing disputes, indemnity, liability, etc.
- Address and Contact of your Company.
Terms and conditions are the general and special arrangements, provisions, requirements, rules, specifications, and standards that a company follows. These specifications are an integral part of an agreement or contract that the company gets into with its customers, suppliers or partners.
Cheque Print Template
Cheque Print Template allows defining templates for bank cheques.
Business involves making payment to various parties like suppliers and employees. Payment can be made in various modes like cash, NEFT or cheque. If you are making a payment via a cheque, you can also create a Print Format for printing Cheques from ERPNext based on the Payment Entry.
To access Cheque Print Template, go to:
Home > Accounting > Cheque Print Template
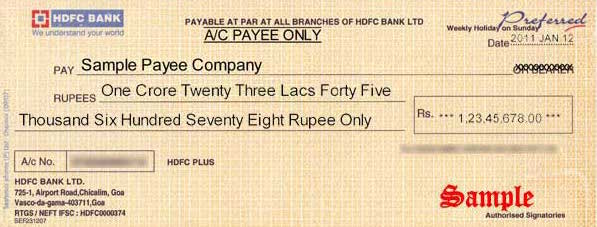
Using the Cheque Print Template you can generate a new Print Format for cheques. It will be created based on the cheque format provided by your bank.
A sample cheque:
1. How to create a Cheque Print Template
- Go to the Cheque Print Template list, click on New.
- You can set the position of various items in the cheque.
- Save.
In the Cheque Print Template, for each value (say Payee, Date), exact coordinates are provided based on where that value should be printed on a cheque. Co-ordinates are provided in centimeters. Here is a representation the structure:

1.1 New Format by Scanning
To speed up the creation of a new cheque printing format, you can upload a scanned image of the cheque. Considering the scanned image for the cheque, the system automatically updates co-ordinates for each value like party name, amount, date, the amount in words, etc.
1.2 New Print Format manually
If the preview looks good, click on the Create Print Format button to create a new Print Format for printing the cheque. Based on the values provided in the Cheque Print Template, the system will auto-generate an HTML script for the cheque’s Print Format.
You can manually provide the co-ordinate for each value based on where you want it to be printed on the cheque and customize with HTML/CSS.
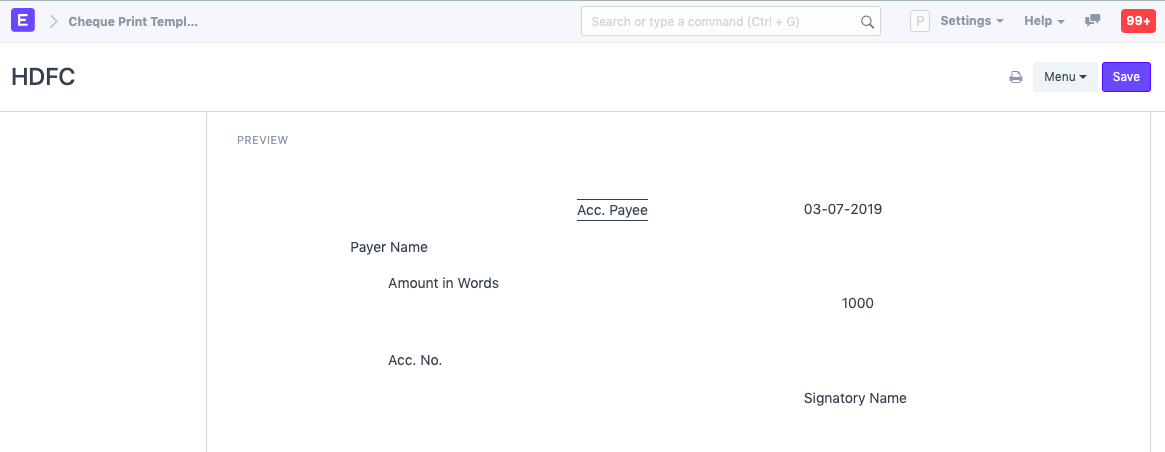
Preview
Based on coordinates provided for all the values, a preview will be shown as to how the values will be printed on the cheque.
1.3 Printing Cheques
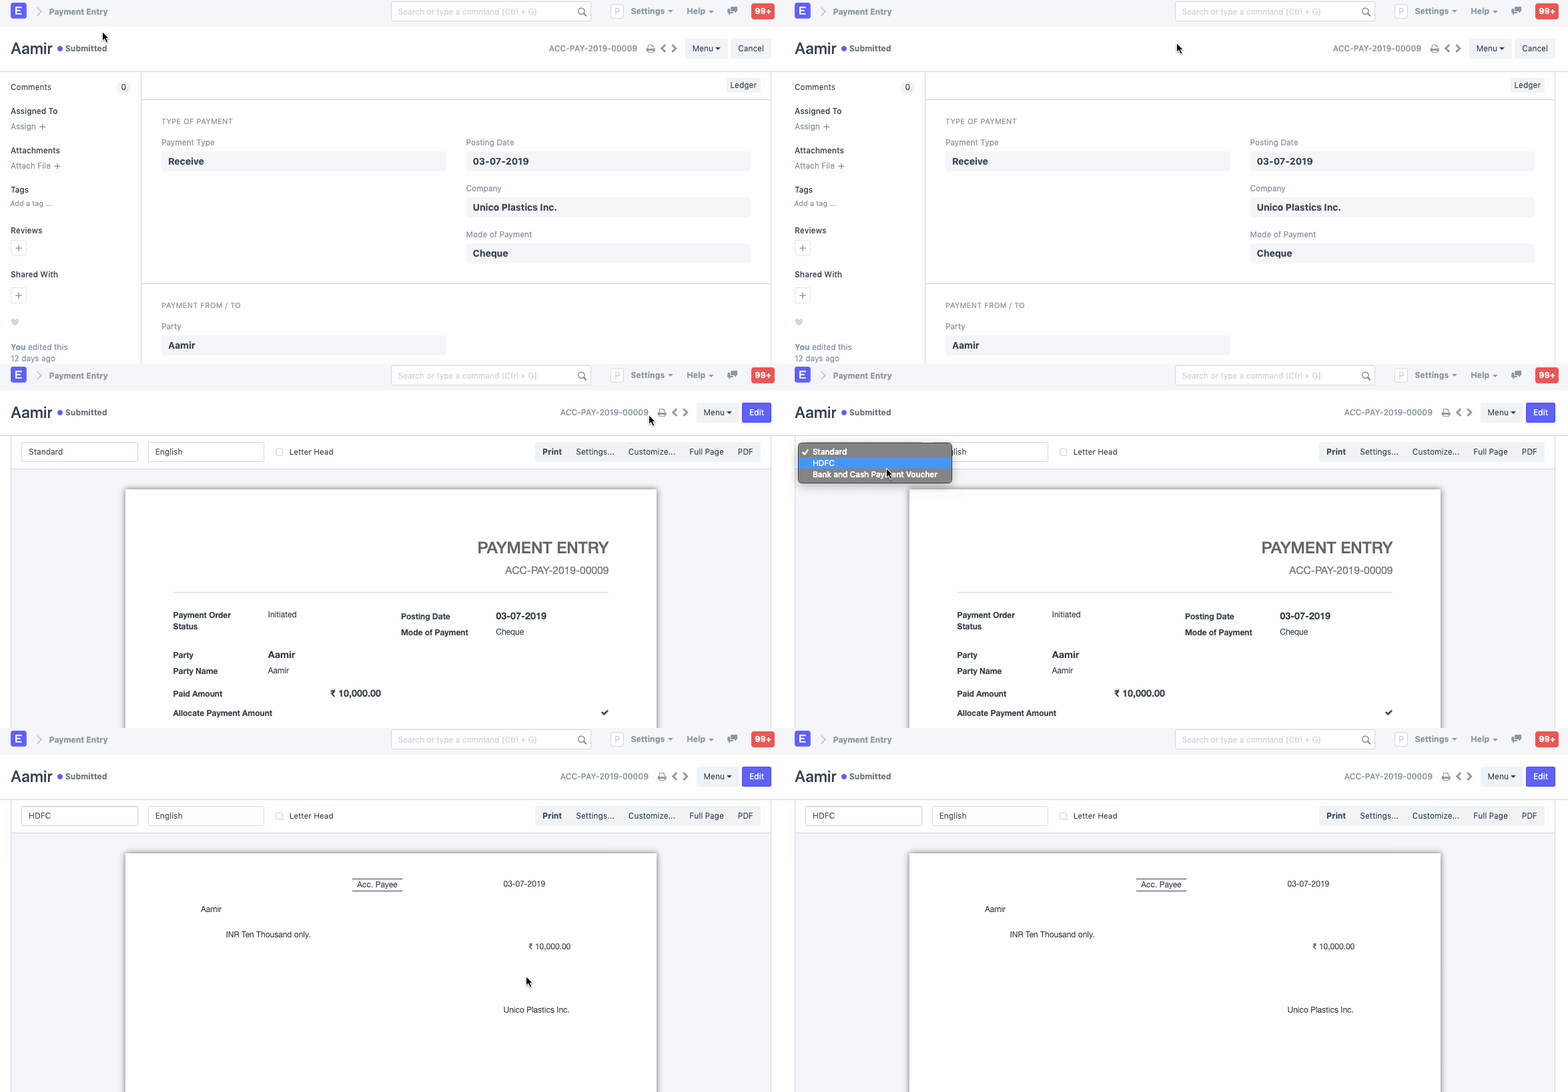
New print format generated for the cheque will be visible in the Payment Entry form. After creating the payment entry, you will be able to print transaction details on the cheque.
Custom Translations
With Custom Translations, user can print the customer’s and supplier’s document in their local language.
For example, if you have customers from Germany and France who want quotations in German and French, it’s possible using Custom Translations.
1. Set the Language
In the Customer master, select the default Language. Say, the default language for the Customer is Spanish.
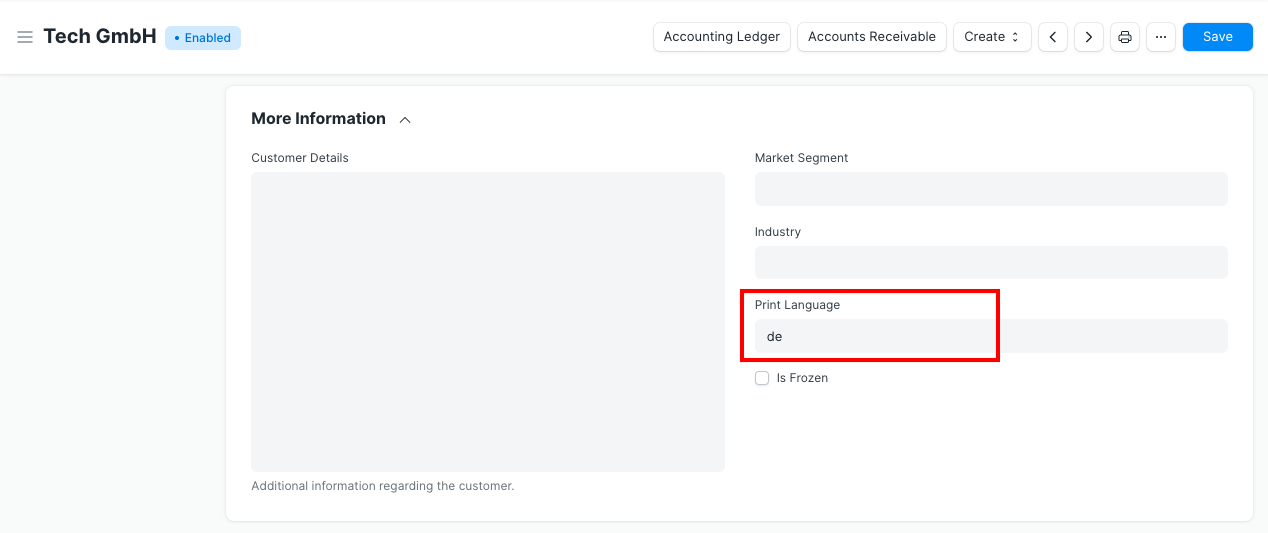
Same way, you can also set default language in the Supplier master.
1.1 Print Preview in the Party’s Language
In the Print Preview of a transaction, values will be translated into the party’s language.
Customer Quotation print preview in customer’s default language.
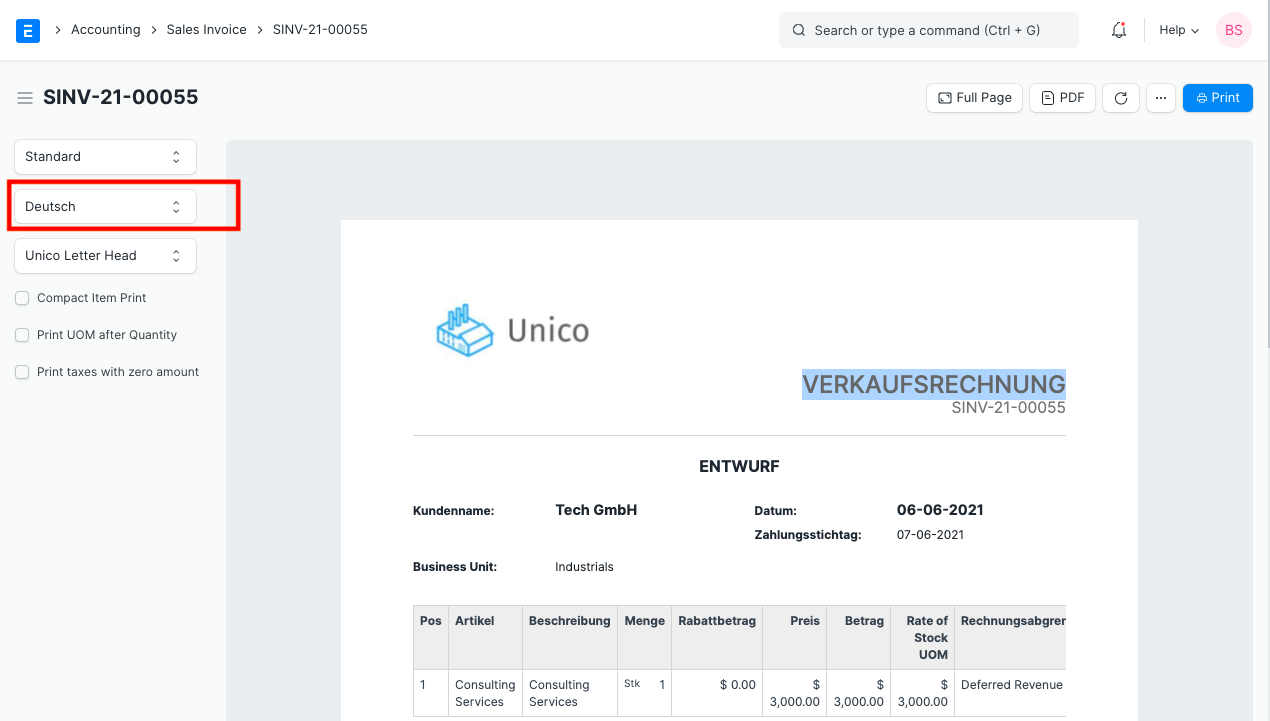
Supplier Quotation print preview in supplier’s default language.
1.2 Changing the print language in the preview
User has the option to select an alternate language on print view.
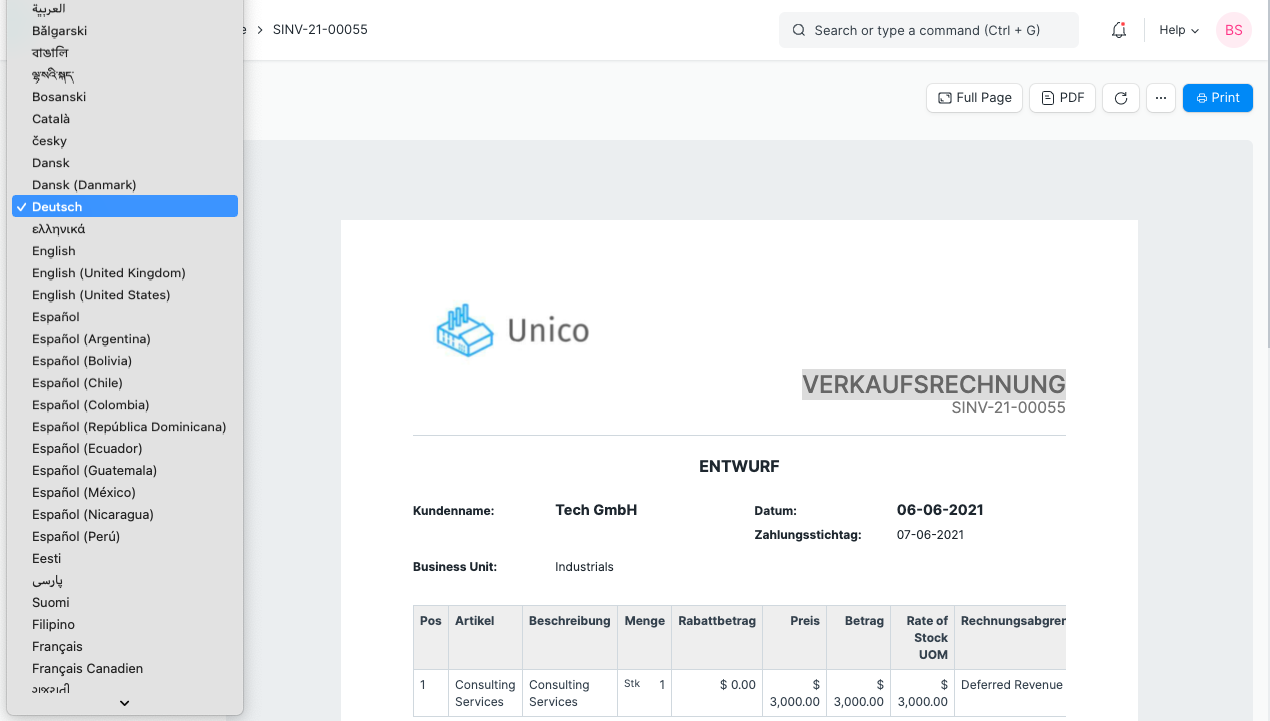
2. Custom Translation
Users can set their custom translations using Custom Translations form. For example, if a user wants to set a description of a product in the customer’s language (Spanish). For that, create a new translation with language as Spanish, enter source data and translated information.
Home > Customization > Other > Custom Translations > New
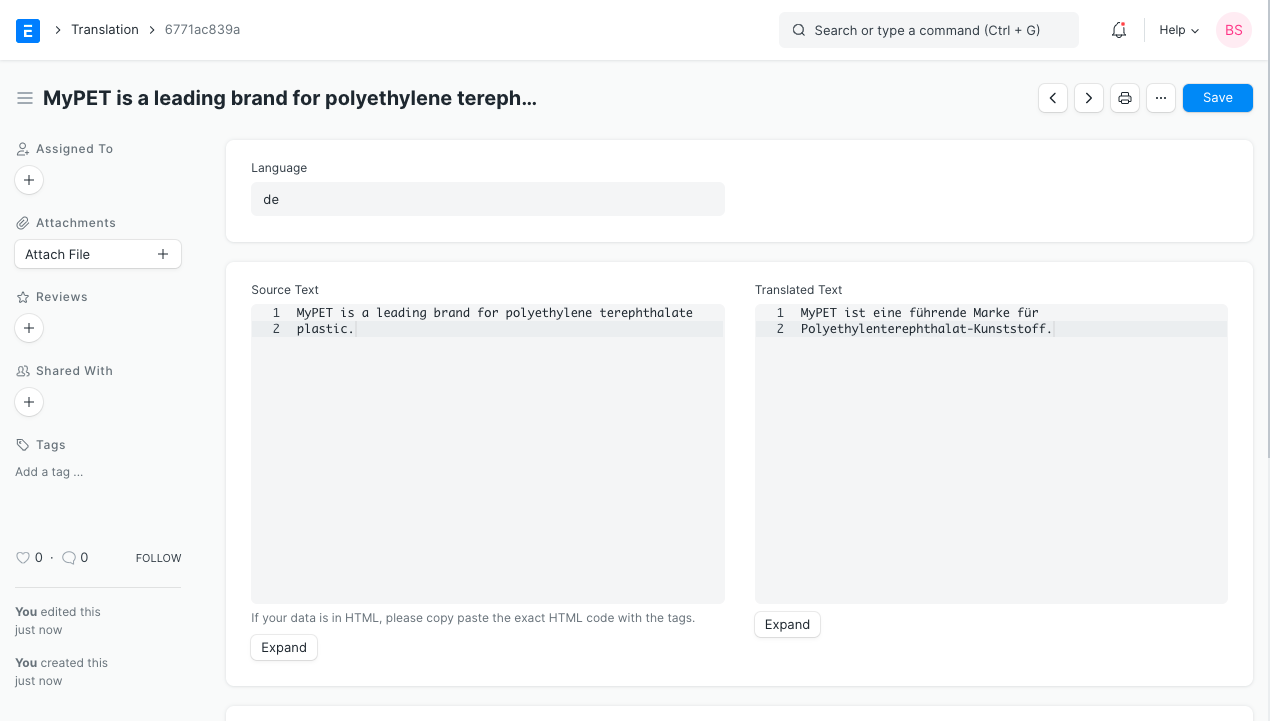
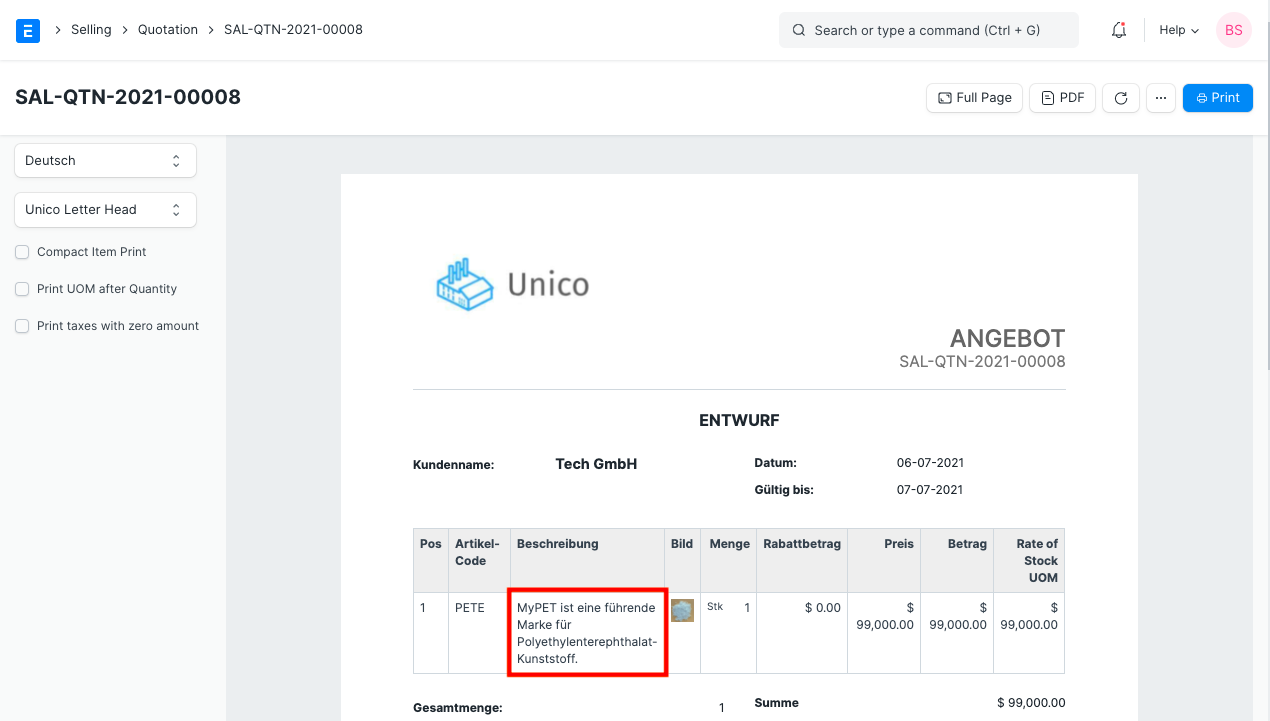
The translation is applied when the user selects the language as Spanish on supplier Quotation’s print preview. Note that no translation is applied for the second item’s description since it wasn’t created in the Translation list.
Raw Printing
Introduced in Version 12
Sending a string of commands to a printer directly in its native language is called Raw Printing.
Many thermal printers need these raw commands sent to them in order to perform functions like barcode printing, receipt printing, label printing, etc. Raw Printing bypasses the printer’s drivers in most cases, making them very fast and reliable. Raw Printing is also capable of doing some advanced features such as cutting receipt paper, kicking out cash drawers, etc.
1. Setting up Raw Printing in IONIC ERP
1.1 Installing QZ Tray application on the client computer
Download and install the QZ Tray application on the computer to which your thermal printer is connected. This application can be found at its official site. Currently, Windows, macOS, and Linux are supported by QZ Tray. During the installation you will be prompted to install Java if not already installed, please install Java to complete the installation.
Further instructions on installing the QZ Tray Application can be here.
1.2 Create Raw Commands Print Format
To be able to send raw commands to a printer you need to first create a print format in raw commands. Jinja Templating Language is used in raw commands just like in the HTML custom print format.
To create a new print format for Raw Printing:
- Go to print format list: Home > Settings > Printing > Print Format
- Click on New.
- Select the relevant DocType.
- Check the Custom format and Raw Printing options.
- Fill in the Raw Commands field with the required raw commands to be sent to the printer.
- Click Save.
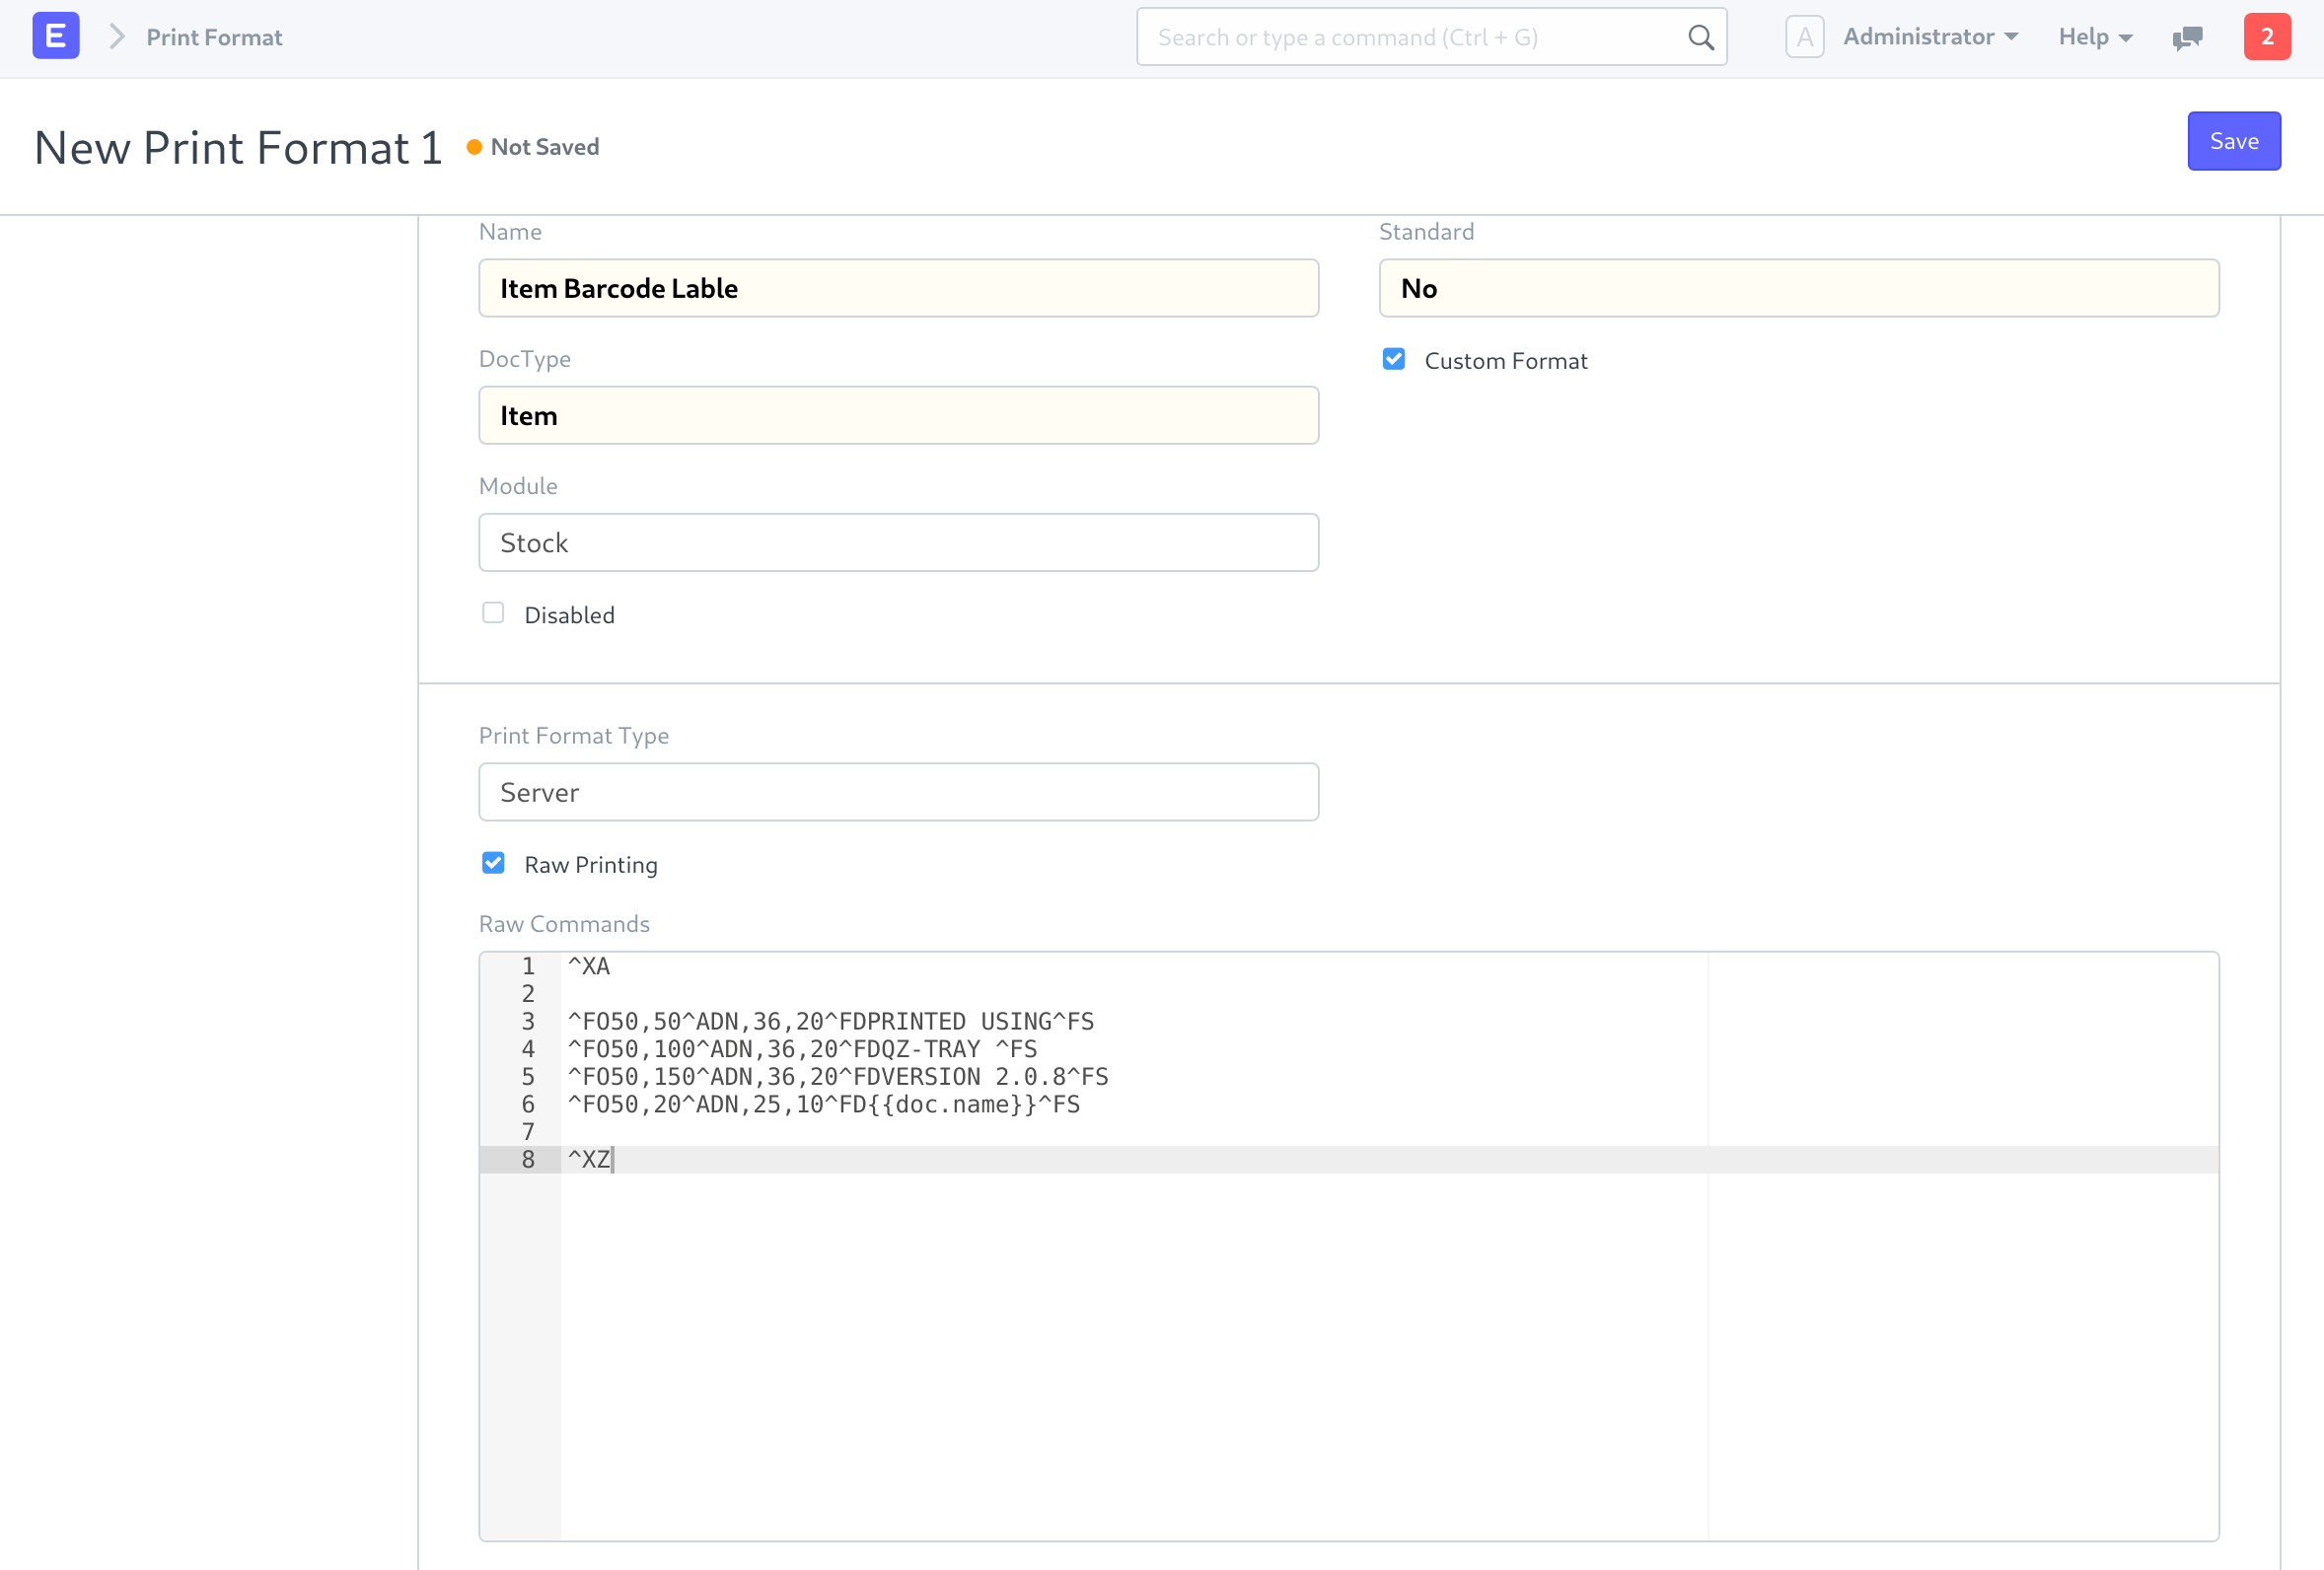
Currently, any string-based printer languages can be used in the Raw Commands field in the print format. Writing raw commands requires knowledge of the printer’s native language provided by the printer manufacturer. Please refer to the developer manual provided by the printer manufacturer on how to write their native commands.
1.3 Enable Raw Printing in the Print Setting
To enable Raw Printing:
- Go to: Home > Settings > Printing > Print Settings > Raw Printing.
- Check the Enable Raw Printing option.
- Save.
2. Methods to utilize raw printing in ERPNext
There are two ways to send Raw Printing commands to your printer.
2.1 Clicking print on the print view page
To print a raw command print format from the Document print view:
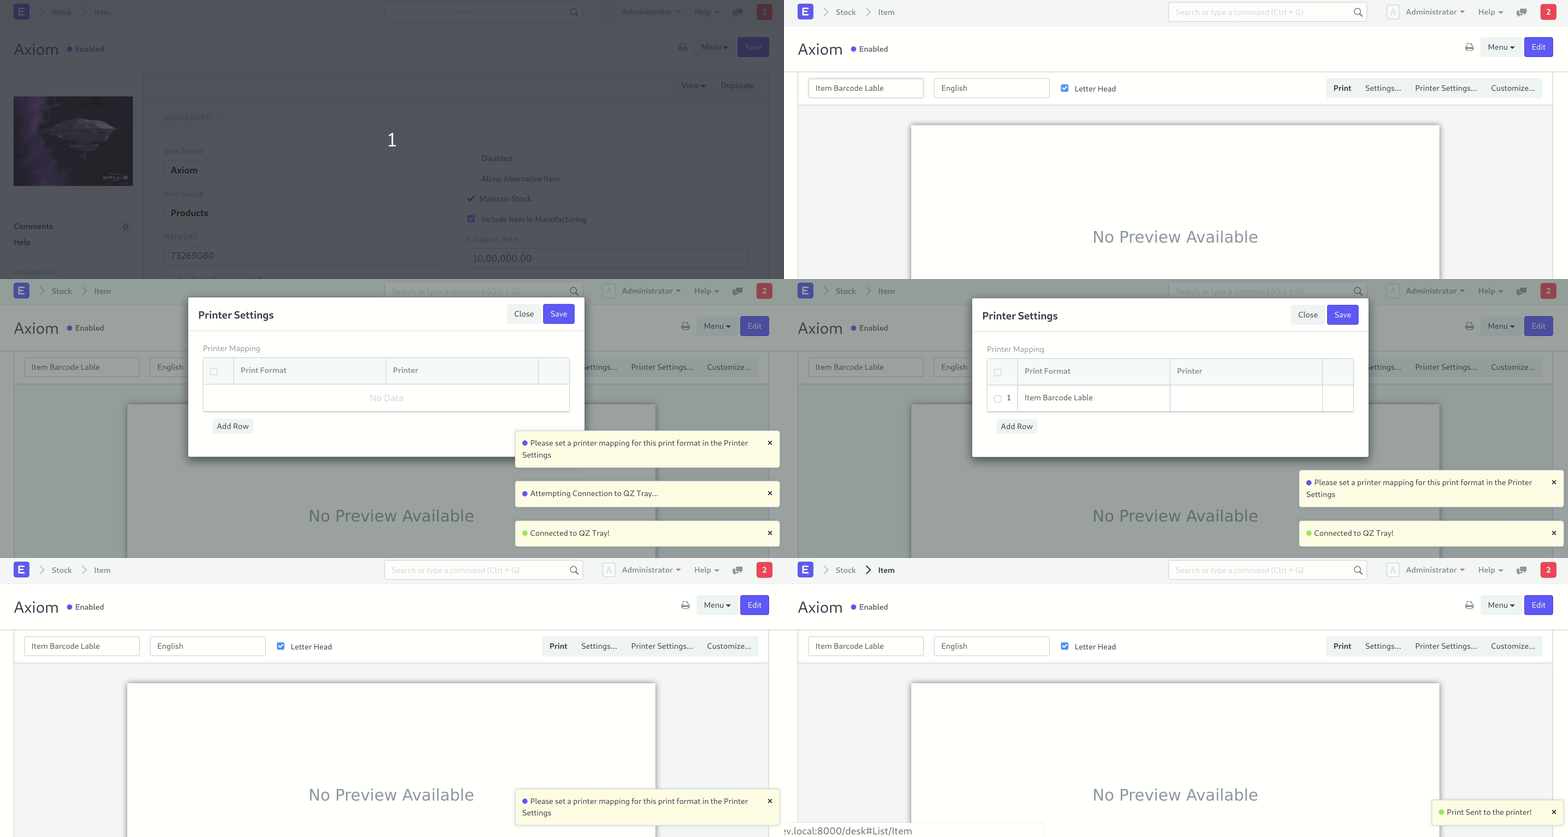
- Select appropriate print format. For print format in Raw Commands, “No Preview available” message is shown in place of the print preview.
- Click on the print button.
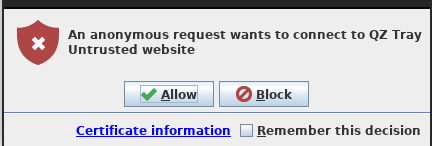
- Please allow the connection prompt from the QZ Tray for the actions that you initiated (Keyboard Shortcut: Alt + A).
- You may be asked to select the “print format – printer mapping”.
- This mapping is used to send the print commands to the appropriate printer.
- The printer needs to be installed on your computer to be able to map it to a print format.
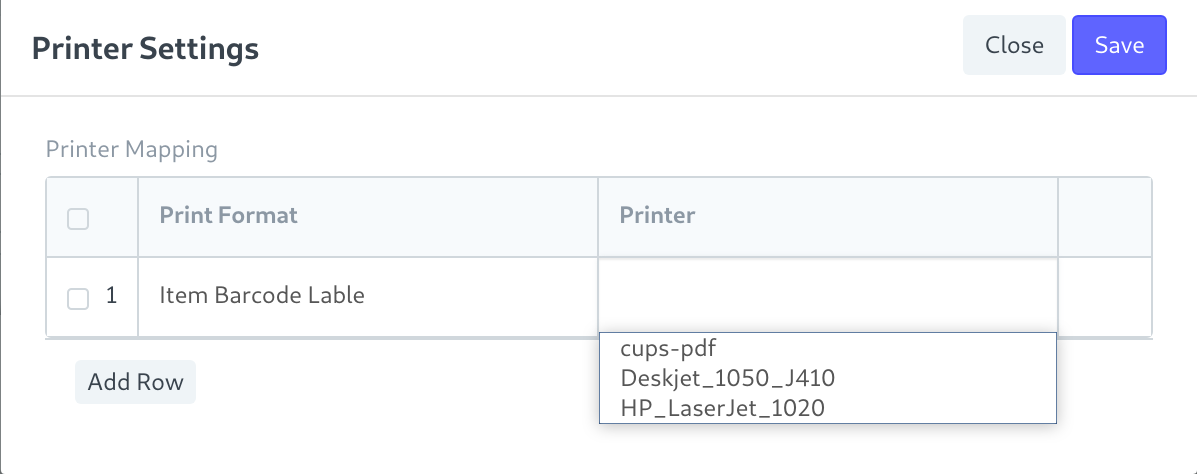
- This mapping is stored locally on the same computer and will have to be set on each client machine.
- You can also edit this by clicking on the Printer Settings button.
2.2 Calling Raw Print functions from a client script
It is often a requirement that a print command has to be issued on a certain event (like submit, save, amend, etc.). It is possible to write a client script to do this for you.
Following are the relevant Raw Print functions:
- function:
frappe.ui.form.qz_connect- A connection wrapper to establish a connection with the QZ Tray application.
- Returns a promise which resolves on successful establishment of a connection.
- Allows active and inactive connections to resolve regardless. Hence it can be called every time before sending a command.
- Usage example:
    frappe.ui.form.qz_connect()
    .then(function () {
        return qz.print(config, data);
    })
    .then(frappe.ui.form.qz_success)
    .catch(err => {
        frappe.ui.form.qz_fail(err);
    });
Here, qz is a global object provided by the qz-tray.js library.
- function:
frappe.ui.form.qz_get_printer_list- Gives you the list of printers available to the QZ Tray application
- Returns a promise which resolves to a list of printers
Usage example:
     frappe.ui.form.qz_get_printer_list().then(
           // Required action on getting the printer list.
           // Note: Printer list is a array of strings.
      );
- function:
frappe.ui.form.qz_success- Displays a “Print Sent to the printer!” alert to the user. Can be called after the print command is successful.
- function:
frappe.ui.form.qz_fail- Displays the error message to the user. Should be called on failure of QZ Tray connection.
You can also directly access the functions provided by the qz-tray.js library via the qz object. Click here for qz-tray.js library documentation. Note: The qz object is initialized only after calling the frappe.ui.form.qz_connect for the first time. In case you require the qz object before that you can use the frappe.ui.form.qz_init.
