IONIC ERP Tutorial
Configurations
- Manage Tree Structure Masters
- Set default values for any field
- Set Precision
- Set Language
- Edit Submitted Document
- Delete Submitted Document
- Disable Notification Emails
- Set Current Value for Naming Series
- Remove Link at the Bottom of the Print Page
- Remove Line Breaks in Print Formats
- Easy steps to setup Workflow
- To-Do Auto Creation
- Tree Master Renaming
- Letter Head in the Report
- Sync DocTypes with Events Calendar
- Merging Accounts
- Changing Parent Account
- Fiscal Year Creation
- Freeze an Account
- Freeze Accounting Entries
- Common Receivable Account
- Freeze Exchange Rate
- Linking stock warehouse and accounts
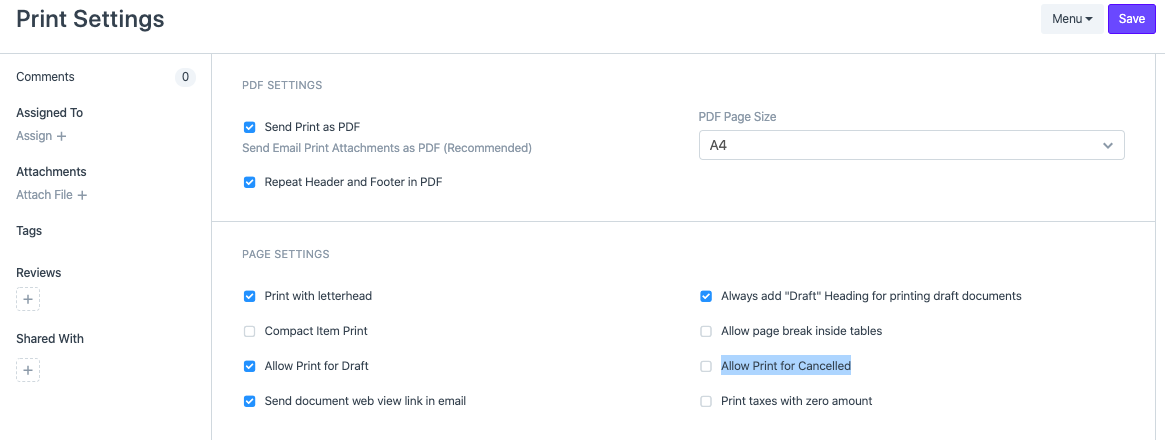
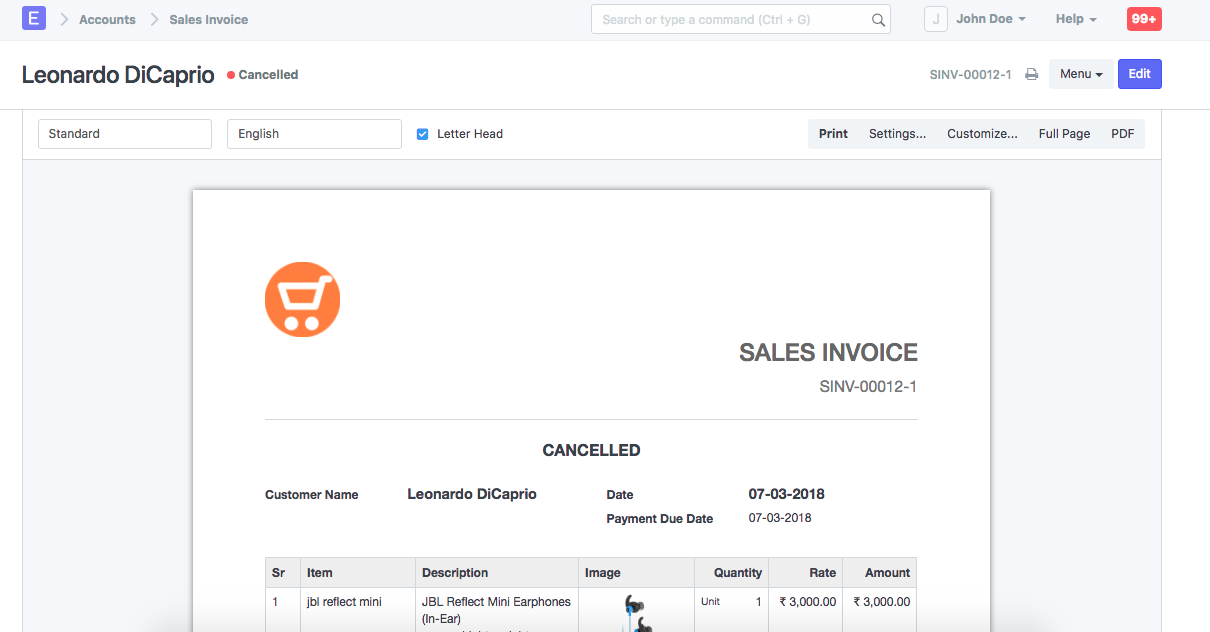
- Print Cancelled Invoice
- Default Receivable / Payable Account
- Mode of Payment
- Maintaining Supplier's Item Code In the Item master
- Purchasing in Different UOM
- Amending Purchase Order after Submit
- Setting Employee-wise Leave Approver
- Selling in Different UOM
- Shipping Rule
- Adding Margin
- Print Settings
- Change the Rate of Items in the Sales Cycle
- IONIC ERP for Service Organization
- Allow Over Delivery/Billing
- Auto Creation of Material Request
- Item Codification
- Serial Number Naming
- Track Items Using Barcode
- Managing Fractions in UOM
- Item Valuation Setup and Transactions
- FIFO and Moving Average calculation difference
- Serialised Item Valuation Rate calculation
- Raw material valuation
Manage Tree Structure Masters
Some of the masters in ERPNext are maintained in tree structure. Tree structured masters allow you to set Parent master, and Child masters under those Parents. Setting up this structure allows you creating intelligent report, and track growth at each level in the hierarchy.
Following is the partial list of masters which are maintained in the tree structure.
- Chart of Accounts
- Chart of Cost Centers
- Customer Group
- Territory
- Sales Person
- Item Group
Following are the steps to manage and create record in the tree structured master. Let’s consider Territory master to understand managing tree masters.
Step 1 : Go to Master
Selling > Setup > Territory
Step 2 : Parent Territory

When click on Parent territory, you will see option to add child territory under it. All default Territory groups will be listed under Parent group called “All Territories”. You can add further Parent or child Territory Groups under it.
Step 3: Add new Territory
When click on Add Child, a dialog box will provide two fields.
Territory Group Name
Territory will be saved with Territory Name provided here.
Group Node
If Group Node selected as Yes, then this Territory will be created as Parent, which means you can further create sub-territories under it. If select No, then it will become child Territory which you will be able to select in another masters.
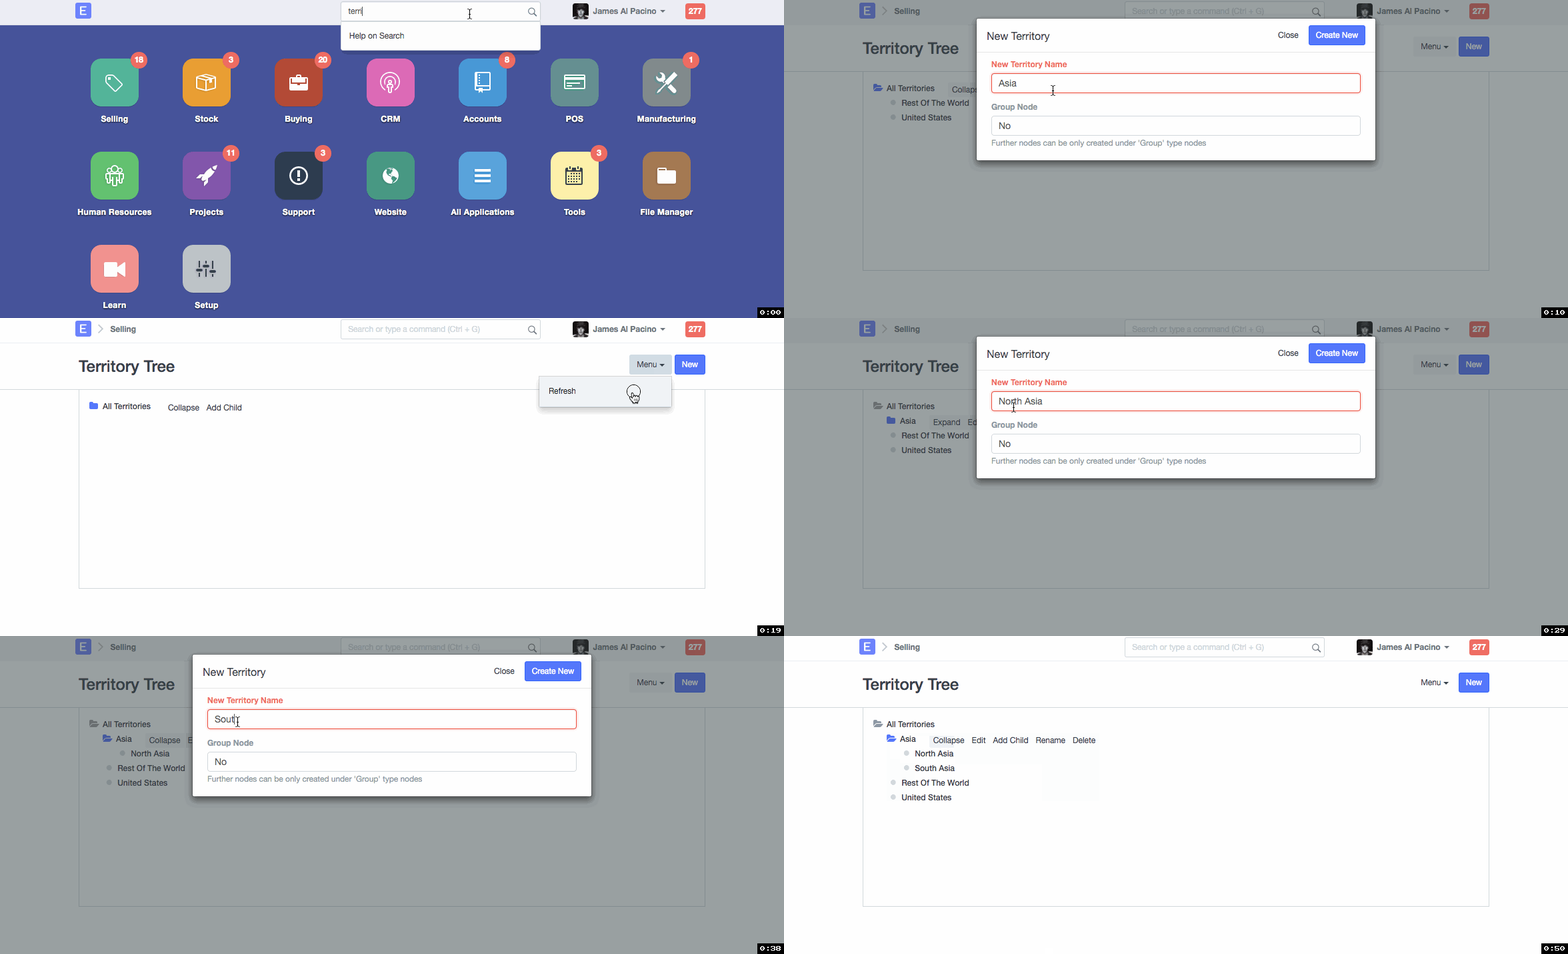
Following is how Child Territories will be listed under a Parent Territory.

Following this steps, you can manage other tree masters as well in IONIC ERP.
Set default values for any field
Using Customize Form, we can set a default value for any field of any Doctype in IONIC ERP.
Steps:
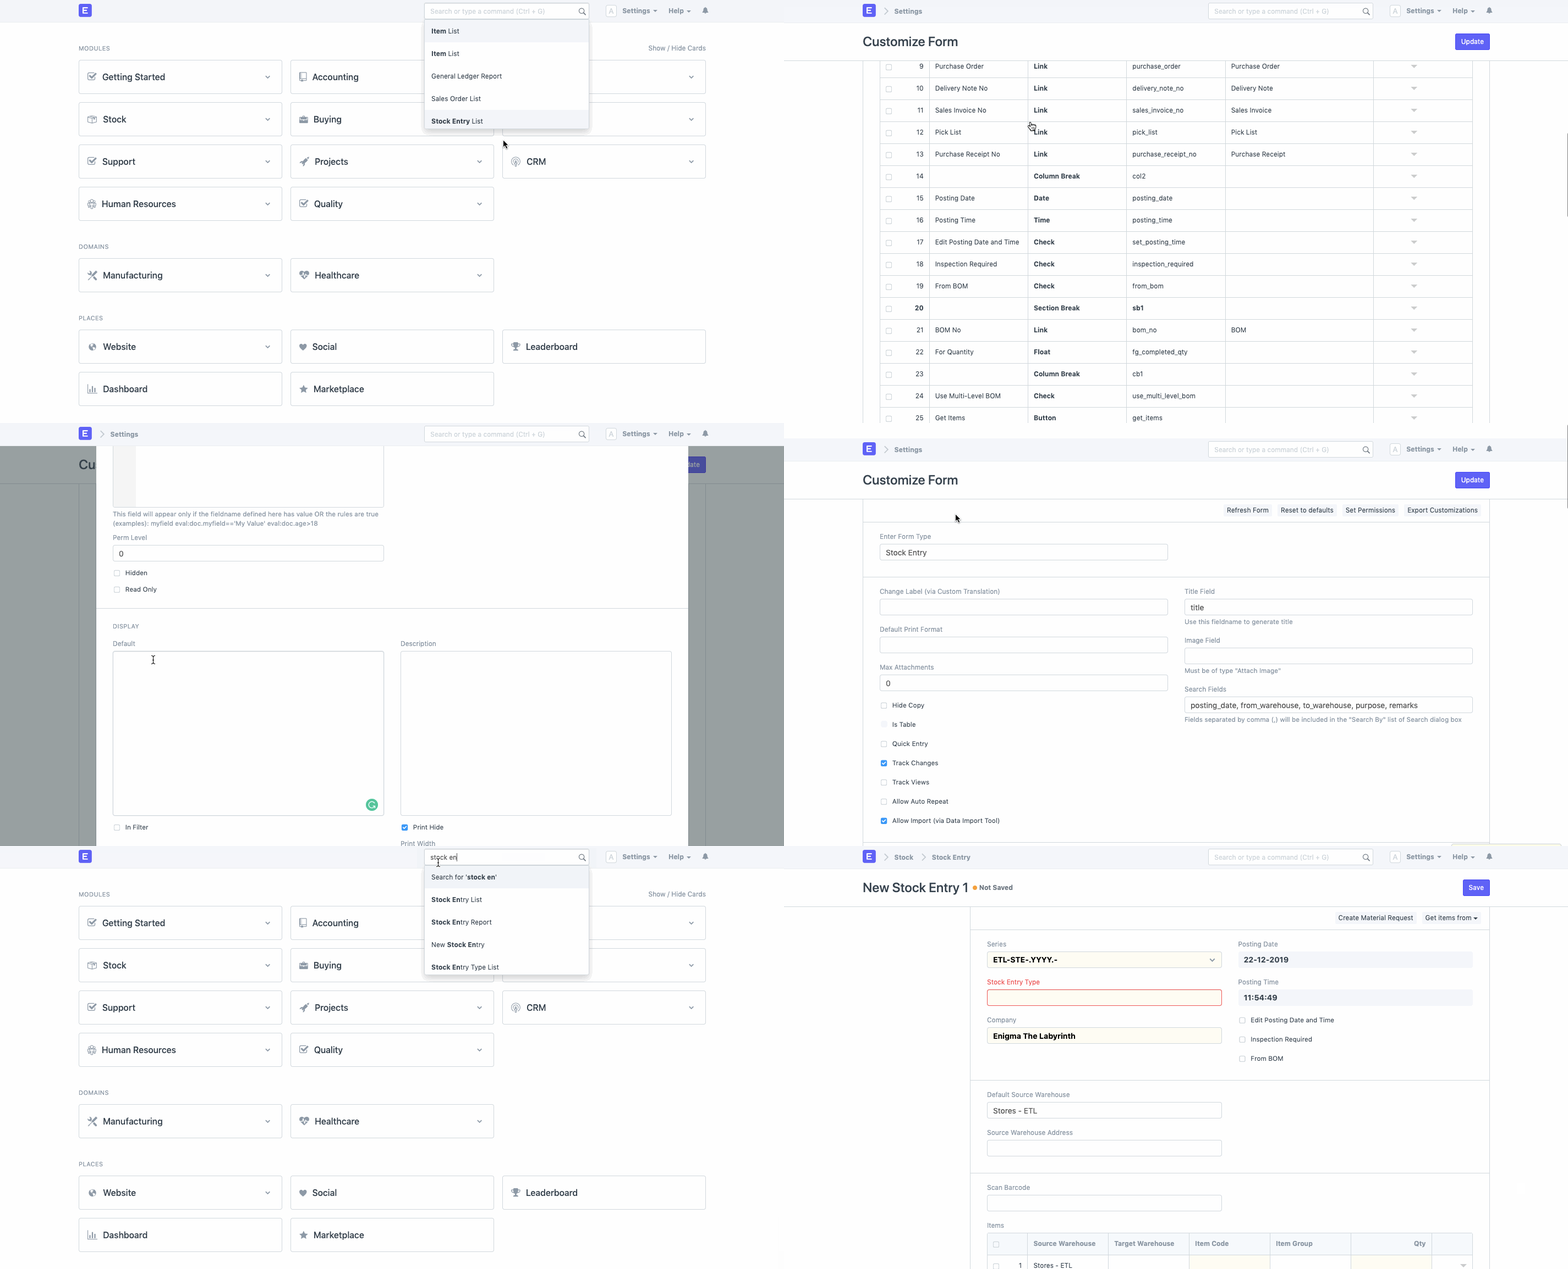
1. Open Customize Form using awesome search bar or via Menu options of any DocType. This will open a screen where you can view all the fields that comprise in this DocType.
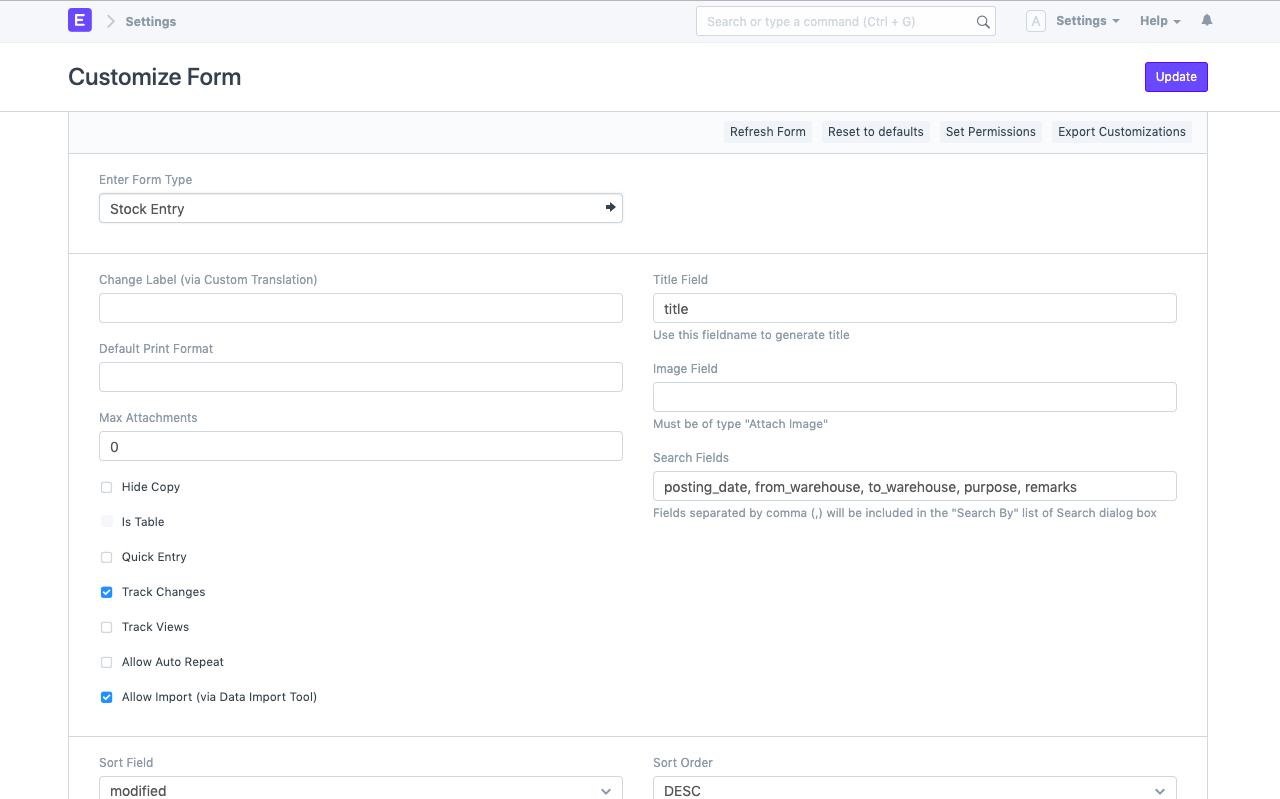
2. Expand the field for which you want to store a default value and enter it under Display -> Default
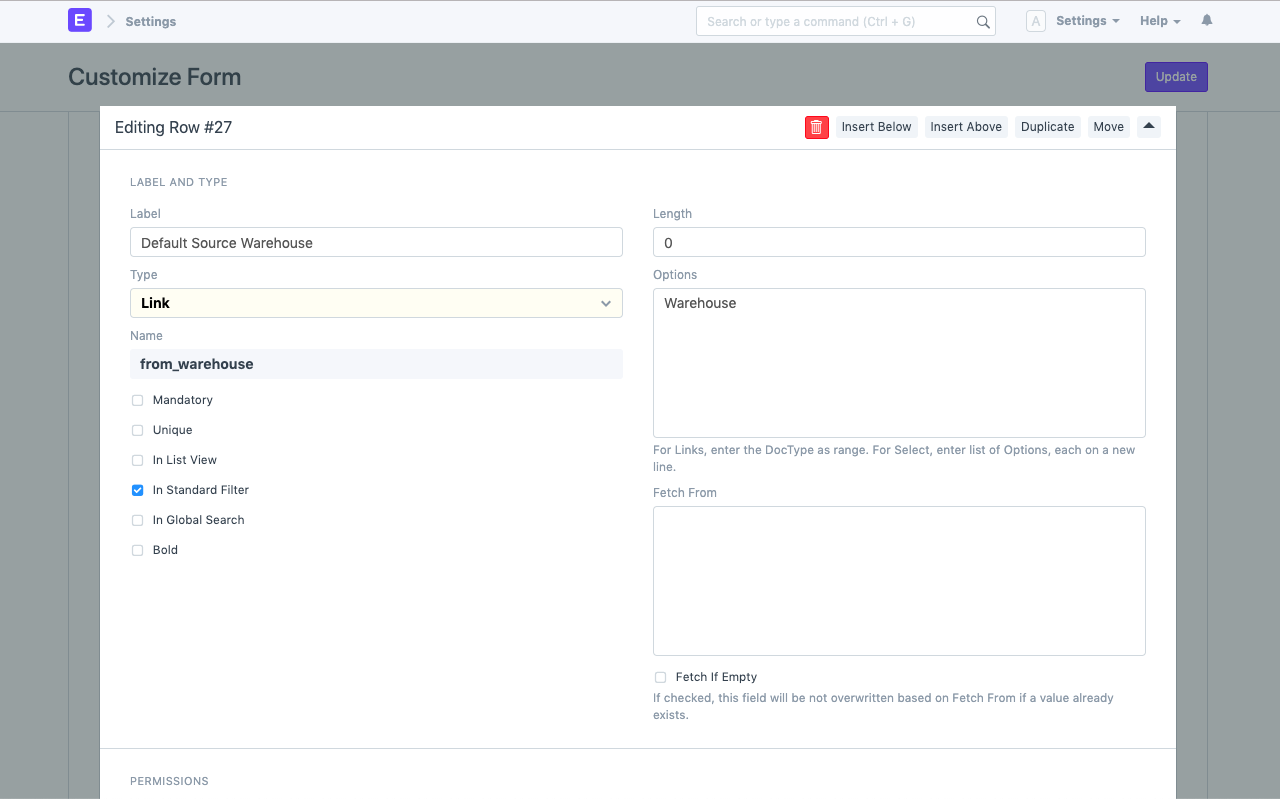
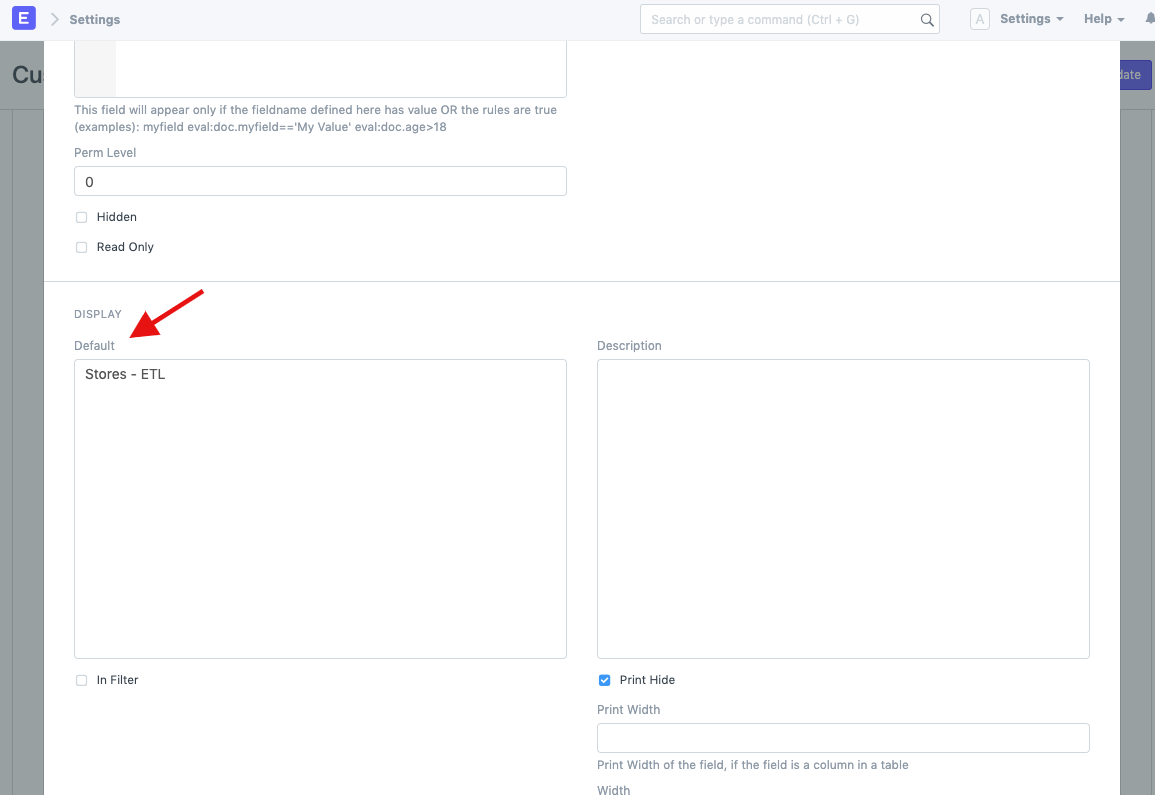
Check out the below GIF where we have set default value as Stores – ETL for field “Default Source Warehouse” in DocType Stock Entry:
To learn more about customisations in IONIC ERP, check out this link
Set Precision
In ERPNext, default precision for Float, Currency and Percent field is three. It allows you to enter value having value upto three decimal places.
You can also change/customize the precision settings globally or for a specific field.
To change the precision globally, go to:
Home > Settings > System Settings
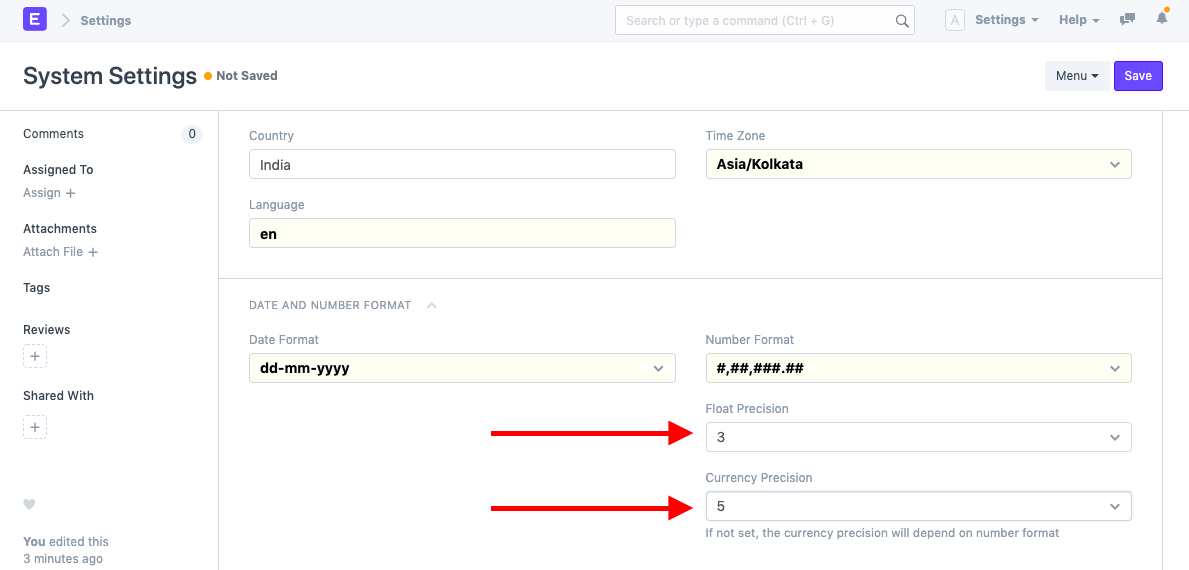
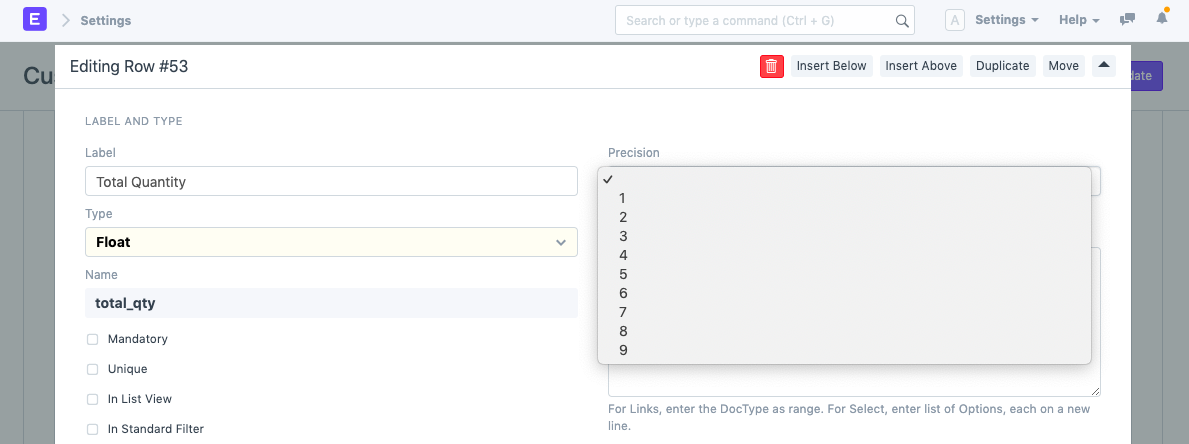
Alternatively, you can also set field specific precision. To do that go to Customize Form and select the DocType there. Then go to the specific field row and change precision. Precision field is only visible if field-type is one of the Float, Currency and Percent.
Set Language
IONIC ERP is an multi-lingual application. It allows each user to select preferred language.
Following the below steps to know a User can customize the language in their account.
1. Setting Language in User’s Account
Following are the steps to change language in your IONIC ERP account.
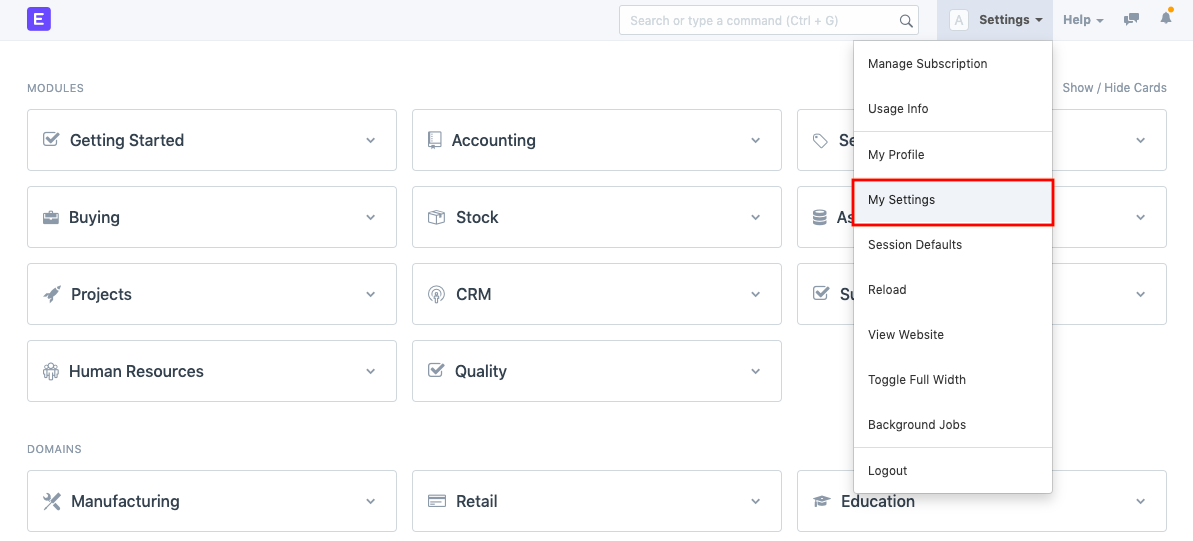
1.1 Go to My Setting
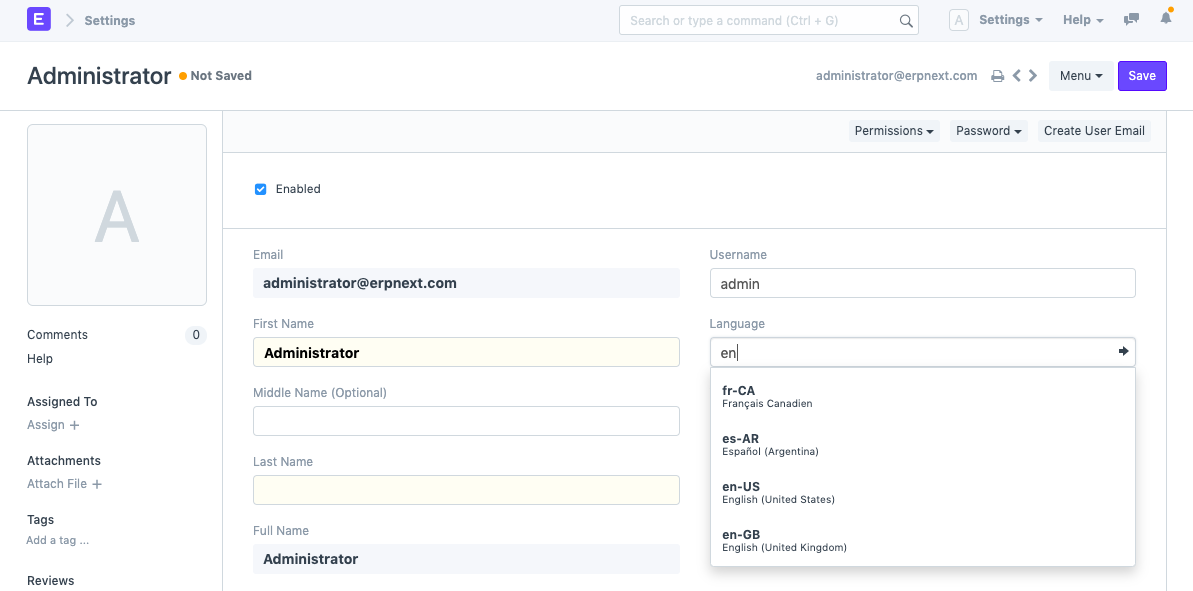
1.2 Select Language
1.3 Save User
On saving User after selecting the language, your ERPNext account will refresh automatically and will be translated to your preferred language.
If you are a System Manager, you will be able to change the language for other users as well.
2. Set Language Globally for an Account
2.1 Go to Setup
Home > Settings > System Settings
Set Language
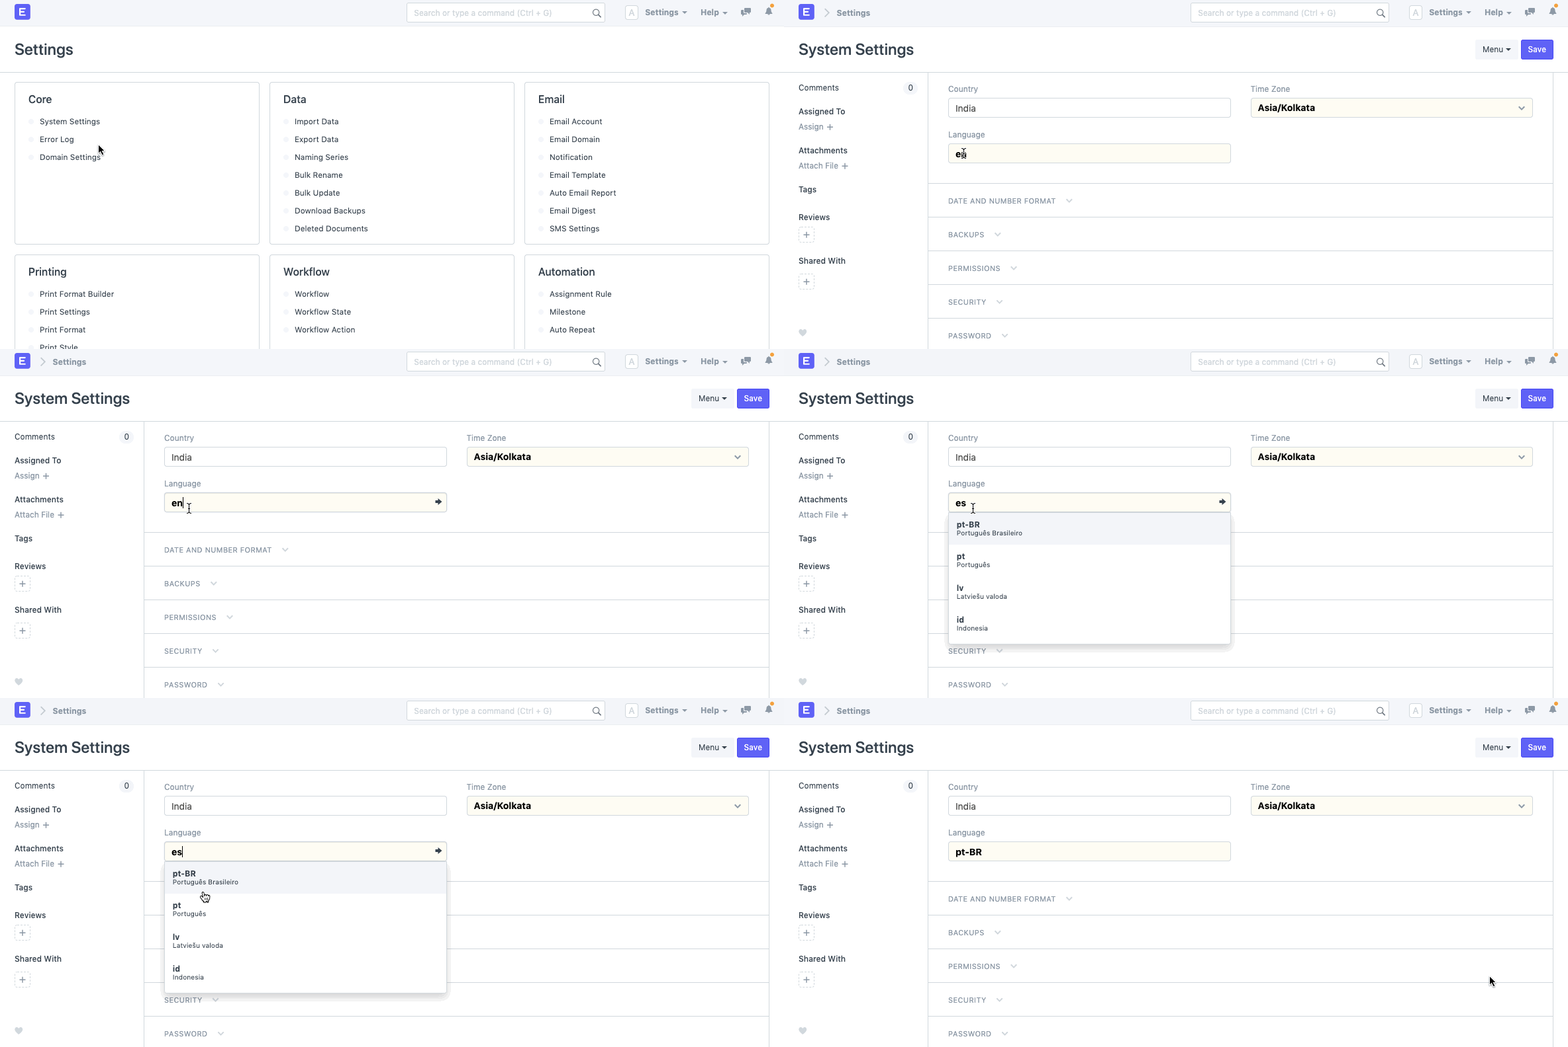
Save
Save System Settings, and refresh your ERPNext account. On refreshing, the language would be updated to your preferred language.
Note: For now, we have translation available only for few languages. You can contribute to make translation better, and add new languages from here.
Edit Submitted Document
To edit a submitted document, you need to cancel it first. Following are steps to edit submitted document. These steps assume you have the appropriate permissions for cancelling and editing a document.
Step 1: Cancel Submitted Document
You will find Cancel button on upper right corner of submitted document.

Step 2: Amend the document
On cancellation of submitted document, Amend button will be became visible.

Step 3: Save and Submit the document
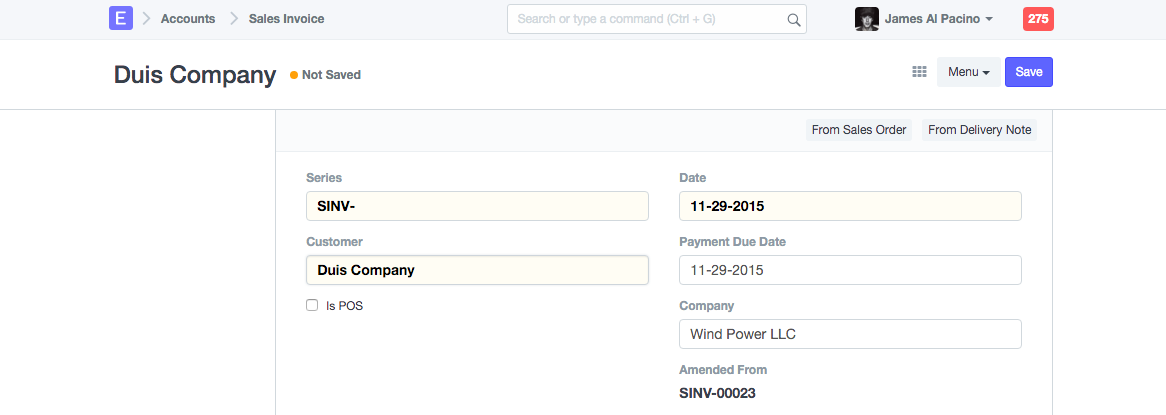
On clicking Amend button, same document will become editable again. After Making required changes, save and submit the document.
Delete Submitted Document
To delete a submitted document, you need to cancel it first. Following are the steps to delete a submitted document. These steps assume that you have the appropriate permissions on the document that you wish to cancel and delete.
Step 1: Cancel Submitted Document
You will find Cancel button on upper right corner of submitted document.

Step 2: Delete the document
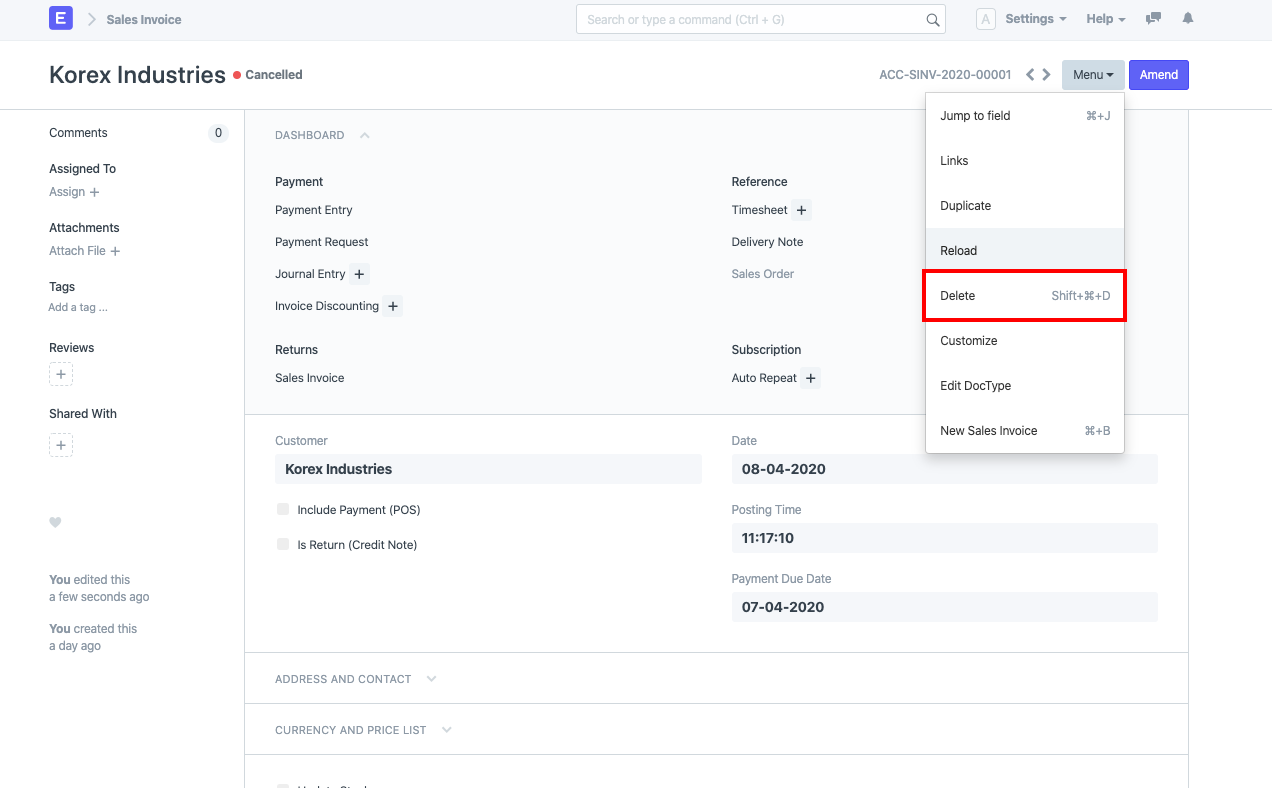
On cancellation of submitted document, Amend button becomes visible with the document status set to Cancelled. This means that the document has been cancelled successfully.
To delete the document, now click on Menu, then Delete. This will delete the selected document.
Note: To delete multiple submitted documents in one go, you can select them in the list view and proceed to cancel and delete. 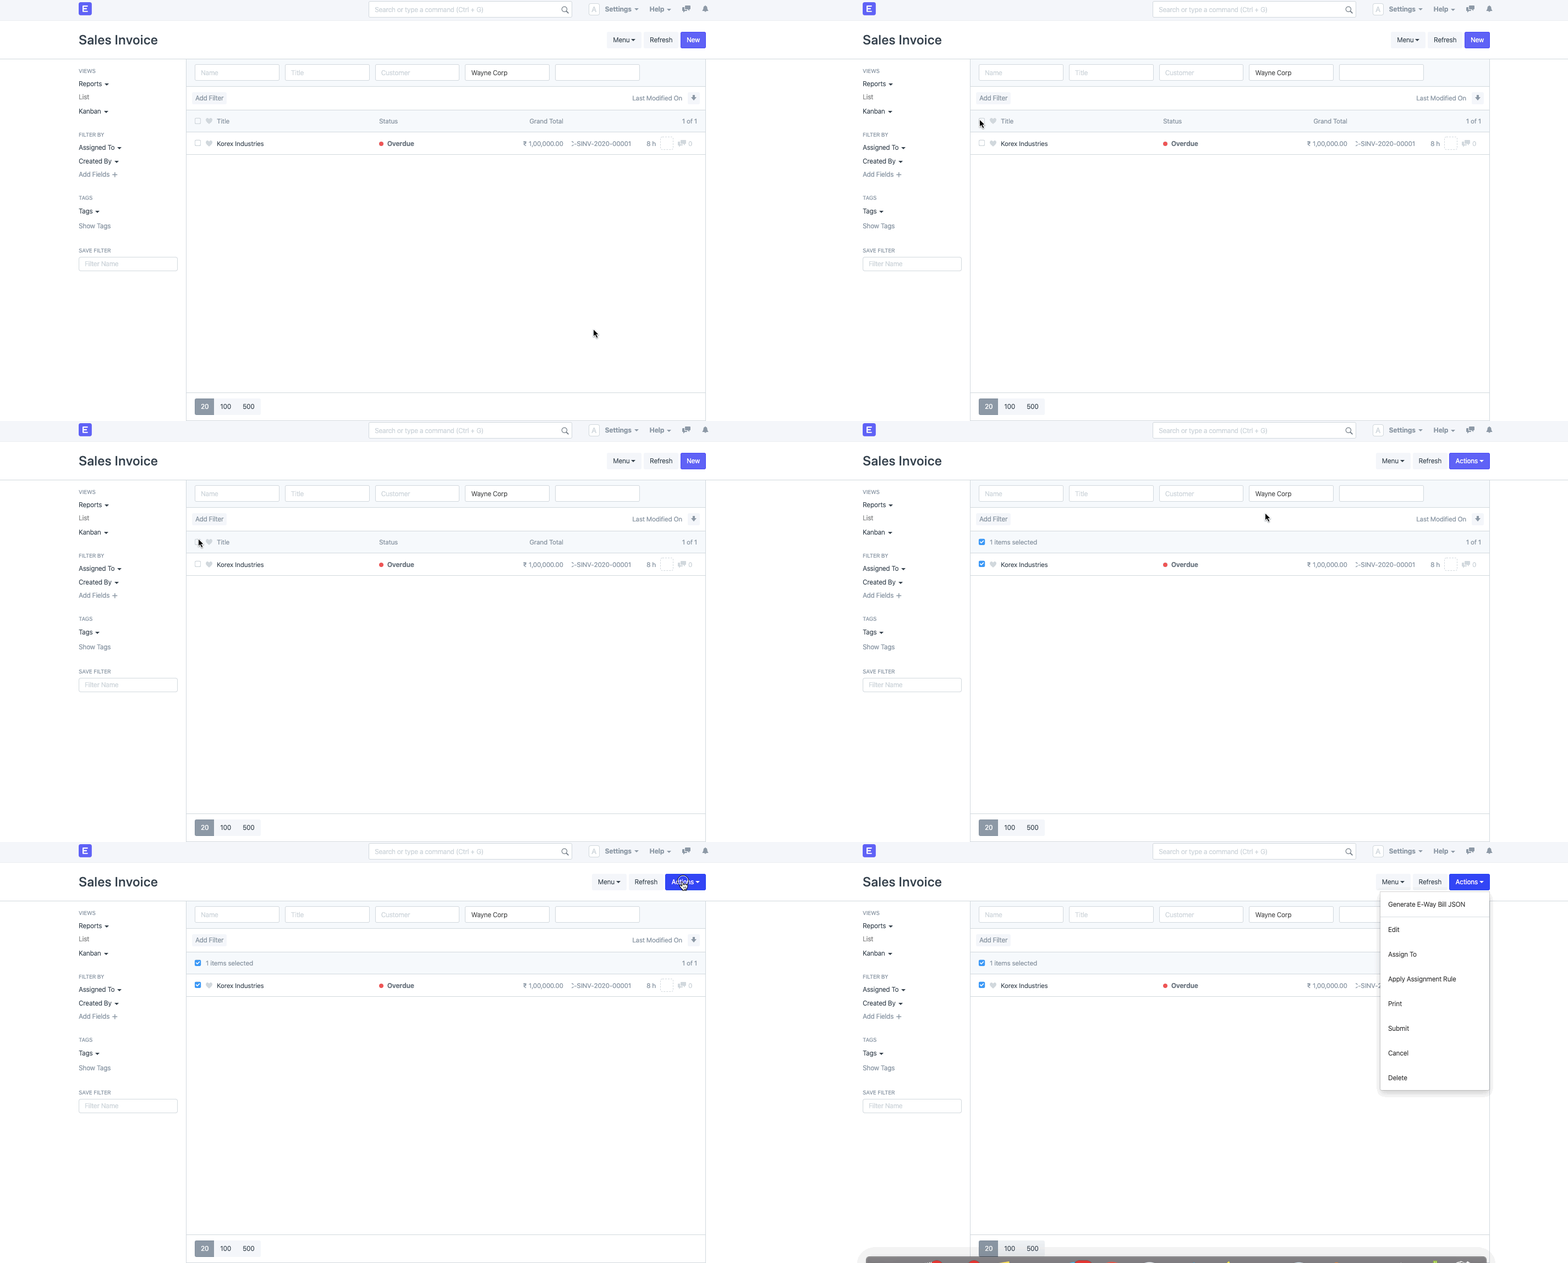 If your document is linked with other documents, then you will need to cancel dependent document before trying to delete the parent document.
Example: If you have created Delivery Note and Sales Invoice against Sales Order, which you need to amend, then you should first Cancel Delivery Note and Sales Invoice made for that Sales Order. Then amend Sales Order, re-save and re-submit it.
Disable Notification Emails
Question:
We are receiving email Notification after creation of each document. Can we disable the Email Notification for Energy Points allocation?
Answer:
You can disable the notification for Energy Points and other features like Document Follow, Assignment and Mentions. Here is the help on how to disable the Notifications for the Energy Points and other features in specific.
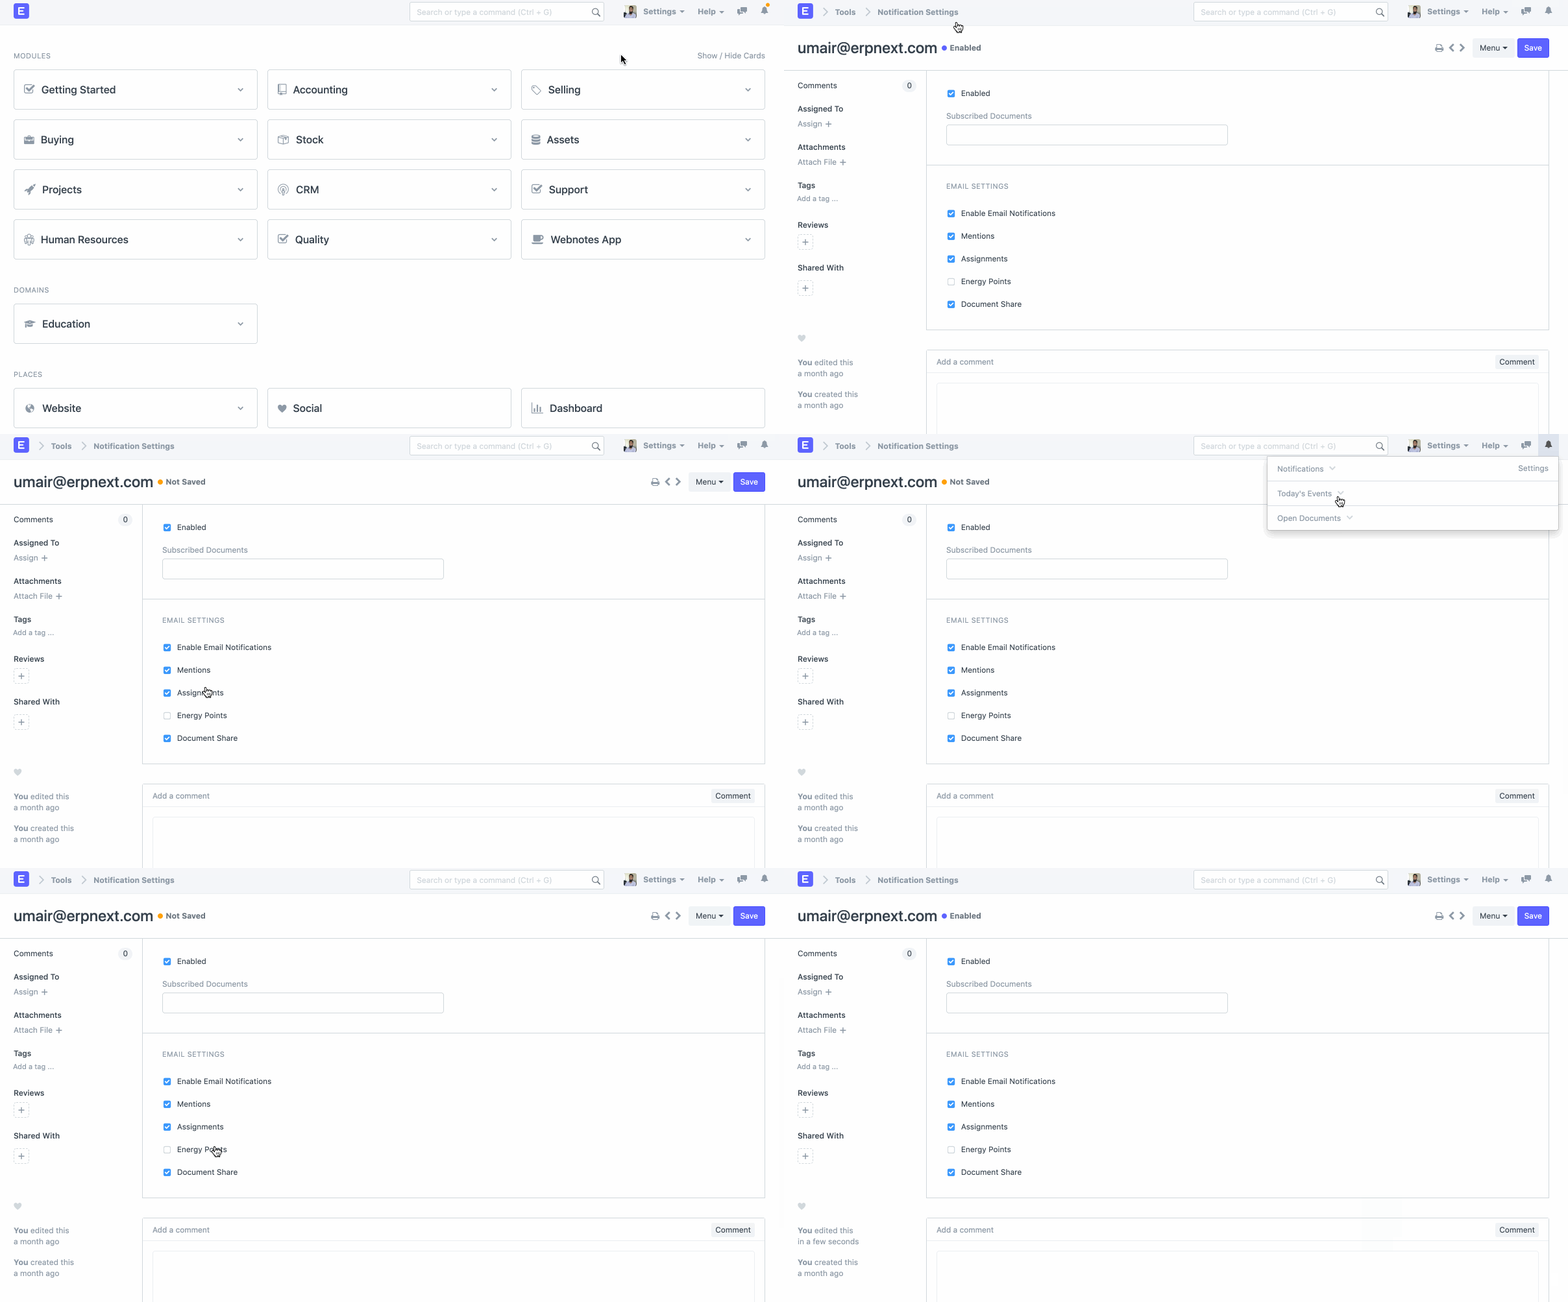
Set Current Value for Naming Series
Naming Series feature allows you to define prefix for naming of a documents. For example, if a Sales Order has prefix “SO”, then the series will be generated as SO-00001, SO-00002… and so on. Click here to learn how you can customize Number Series for a transaction/master in ERPNext.
1. Setting the Current Value
Naming Series feature also offers a tool where you can set Current Value for specific prefix. This is generally required if you have recently started using ERPNext, and have old transactions in the previous system, and you want the numbering series to start in from where it ended in the old system. Let’s consider a scenario to learn this better.
For example, you have 322 Sales Orders created in your old system with SO00322 as highest Sales Order Id. In ERPNext, you need the first Sales Order to pick up #323 when it is saved. To enable this, you should set Current Value for SO series in following steps.
Go to Naming Series Tool
Setup > System > Naming Series
Update Series Section
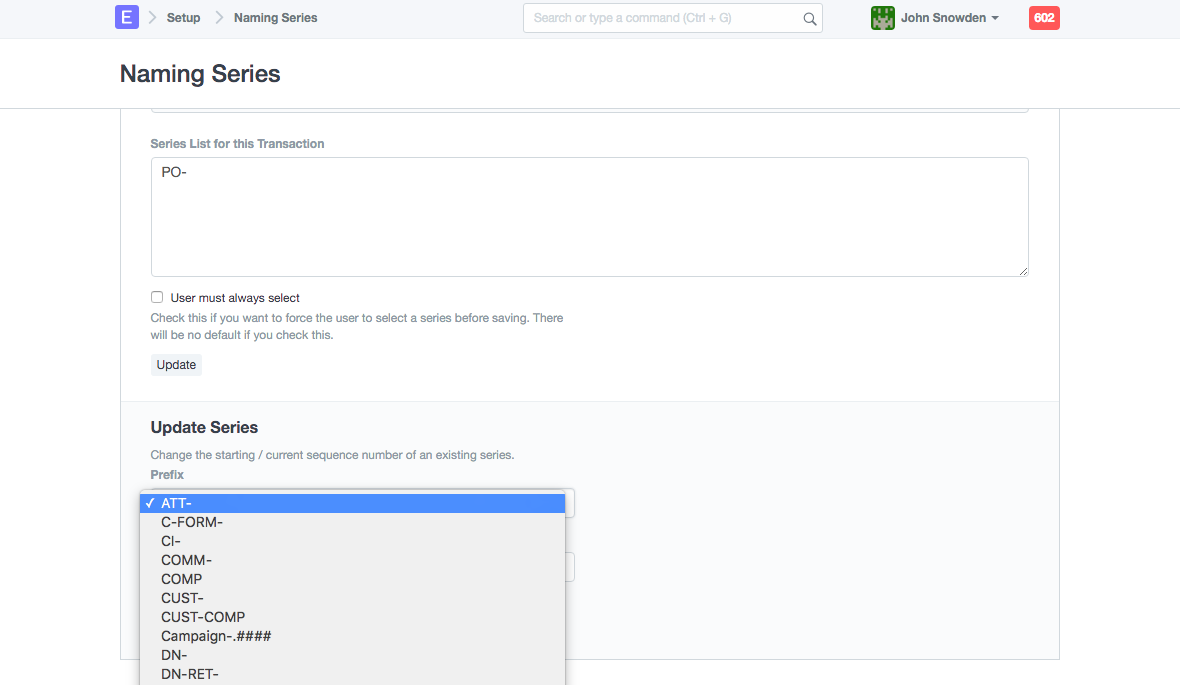
Select Prefix
Considering our scenario, prefix for Sales Order will be “SO”.

Current Value
If you have currently 12 Sales Orders created in your account, then current value updated will be 12. You can edit Current Value to 322, and then click on Update Series Number.
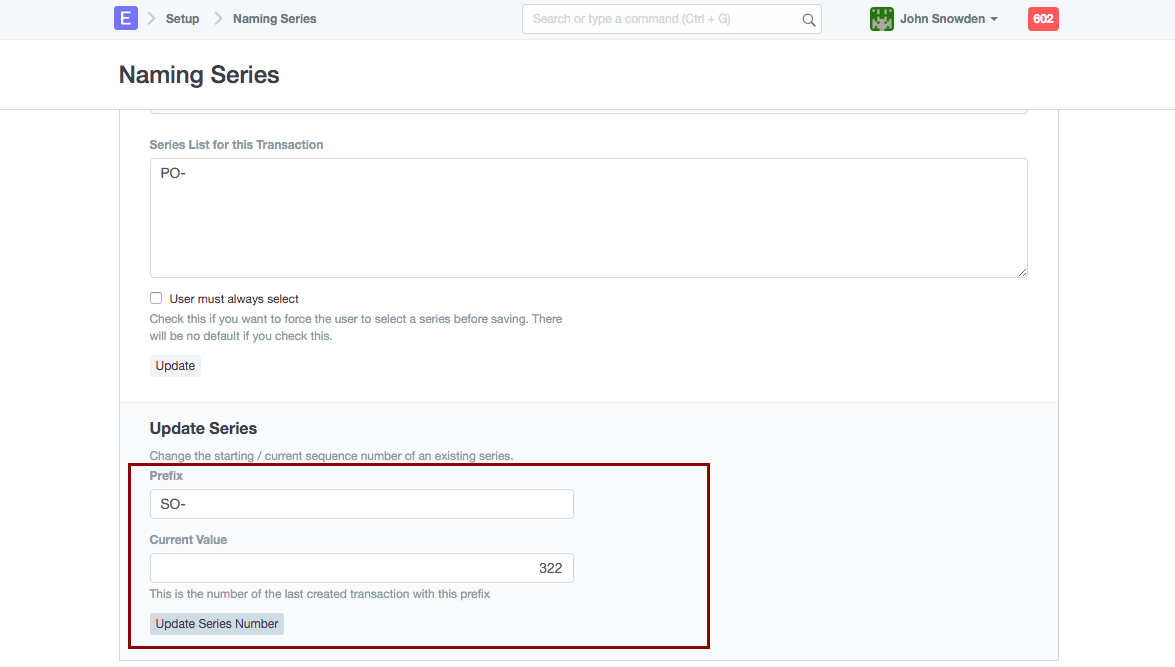
With this setting, you will have numbering for the New Sales Orders starting with #323.
2. Error Due Series Number
If you receive a Duplicate Name error while saving a transaction, for example, while saving Item Price, you receive an error saying:
Duplicate name Item Price RFD/00016
This error message indicates that when you are saving Item Price, system is trying to allocate “RFD/00016” to that Item Price record. But it is finding that Item Price with this ID is already existing in your system.
This error could arise because Current Value for Series/Prefix of Item Price is disturbed and not in sync with actual Current Value. While actual Current Value for Item Price could be 20 (or any number more than 16), someone has set Current Value for this series as 15.
To confirm actual Current Value for particular Series, you should check report for document in question (Item Price in this case), and check for the Item Price ID with highest value.
Let’s assume we find that actual Current Value for Item price is 22, then you go Naming Series, and set Current Value for the Prefix/Series of Item Price to 22, and Update Series Number.
These instructions is applicable for all the documents in ERPNext for which user can customize Series and its Current Value.
Let’s consider another scenario to learn this better. On assigning a document to another user, error message says:
Duplicate name ToDo TDI00014286
This indicate the Current Value for Series/Prefix of ToDo (TDI) has been disturbed. You should follow these steps to correct value for Current Value for TDI prefix.
- Check ToDo report for the highest ToDo id value.
- Setup >> Settings >> Naming Series
- Check section B of Update Series
- Select Prefix for ToDo “TDI”
- Ensure that highest number for ToDo is updated as Current Value in Naming Series. If not, correct Current Value, and click on “Update Series Numbering”.
Remove Link at the Bottom of the Print Page
Question:
How to remove the ERPNext link at the bottom of the page while printing it?
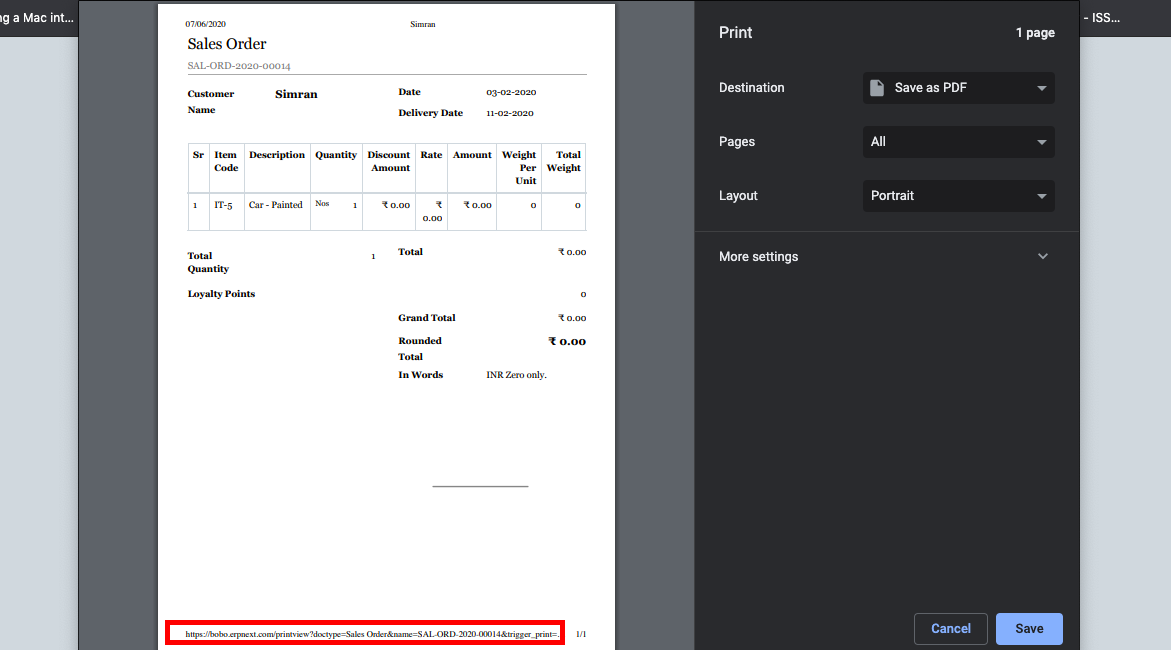
Solution:
To remove the url at the bottom of the print page, following the below steps:
1) Click on the Print button.
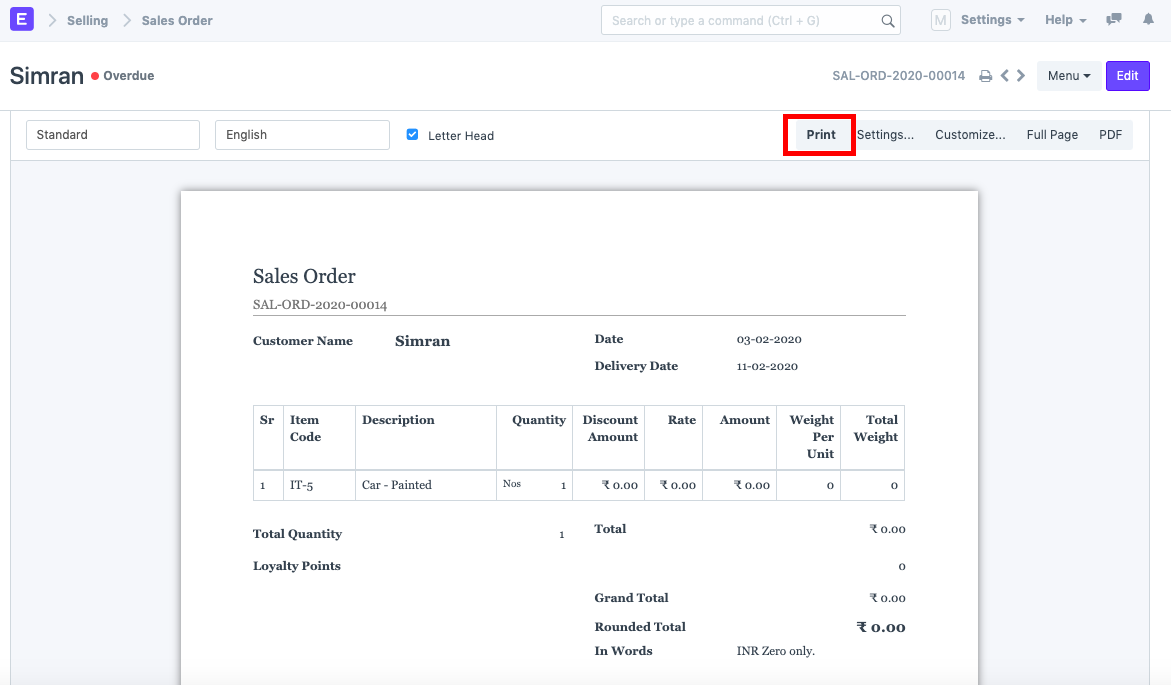
2) Click on “More Settings”
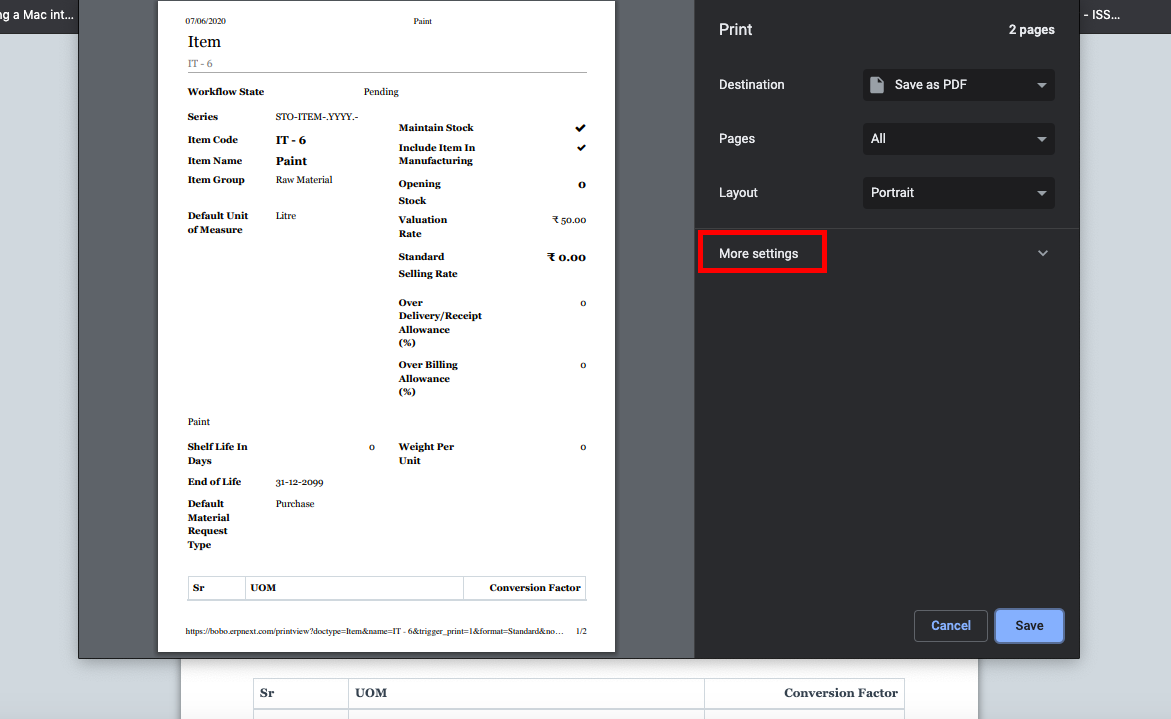
3) Uncheck the “Headers and Footers” checkbox.
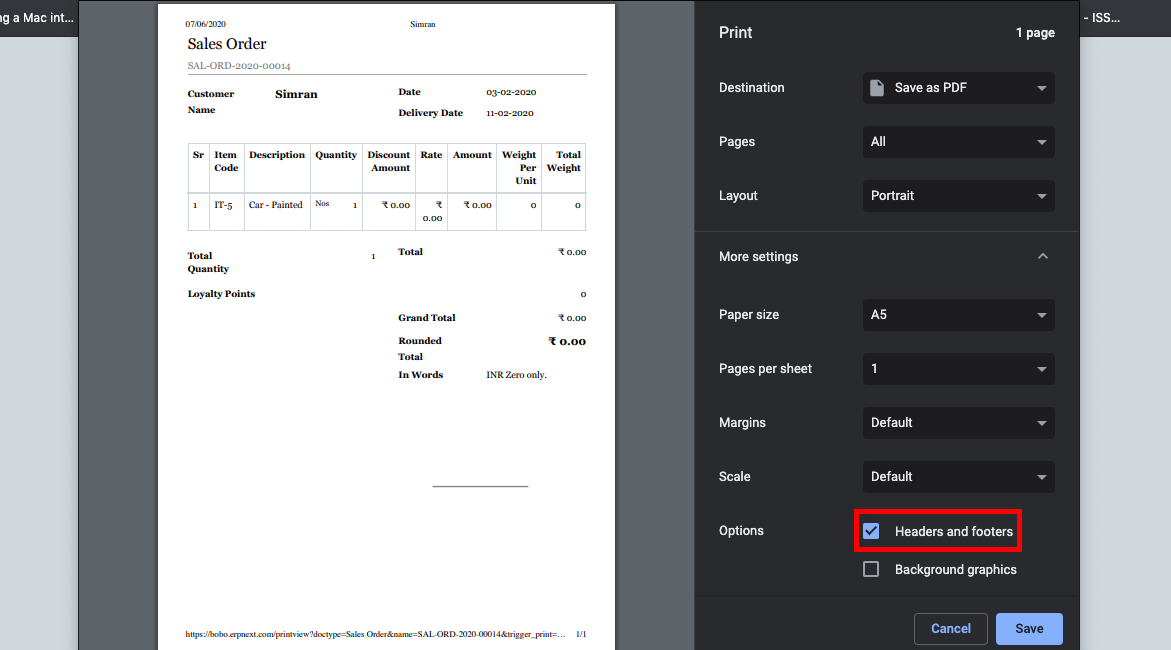
4) Click on Save.
Remove Line Breaks in Print Formats
Question:
In the Print Format, I am getting link breaks for each section. How can I disable it?
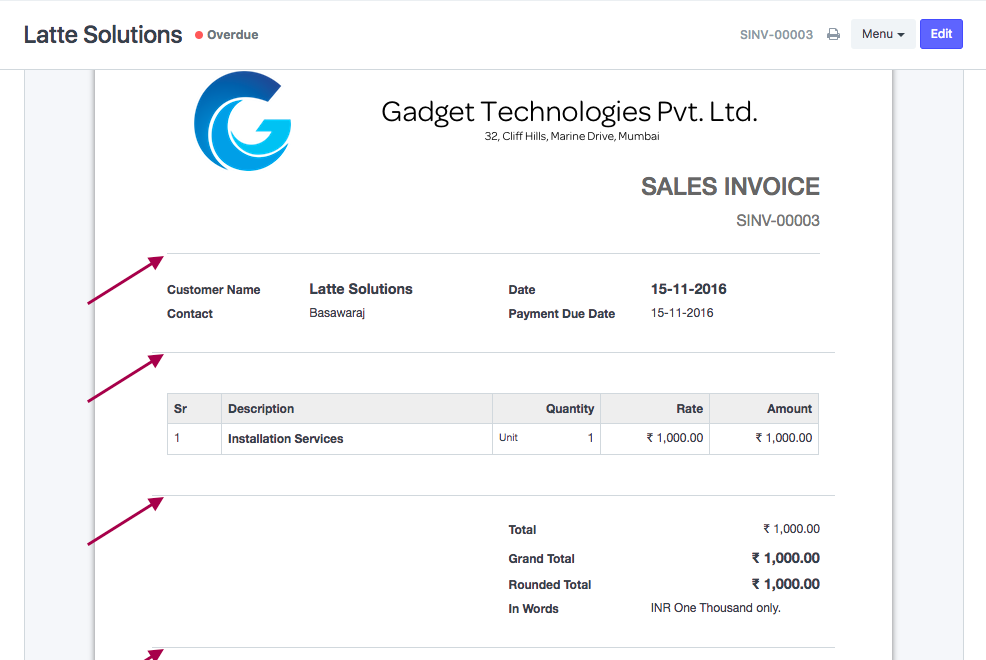
Answer:
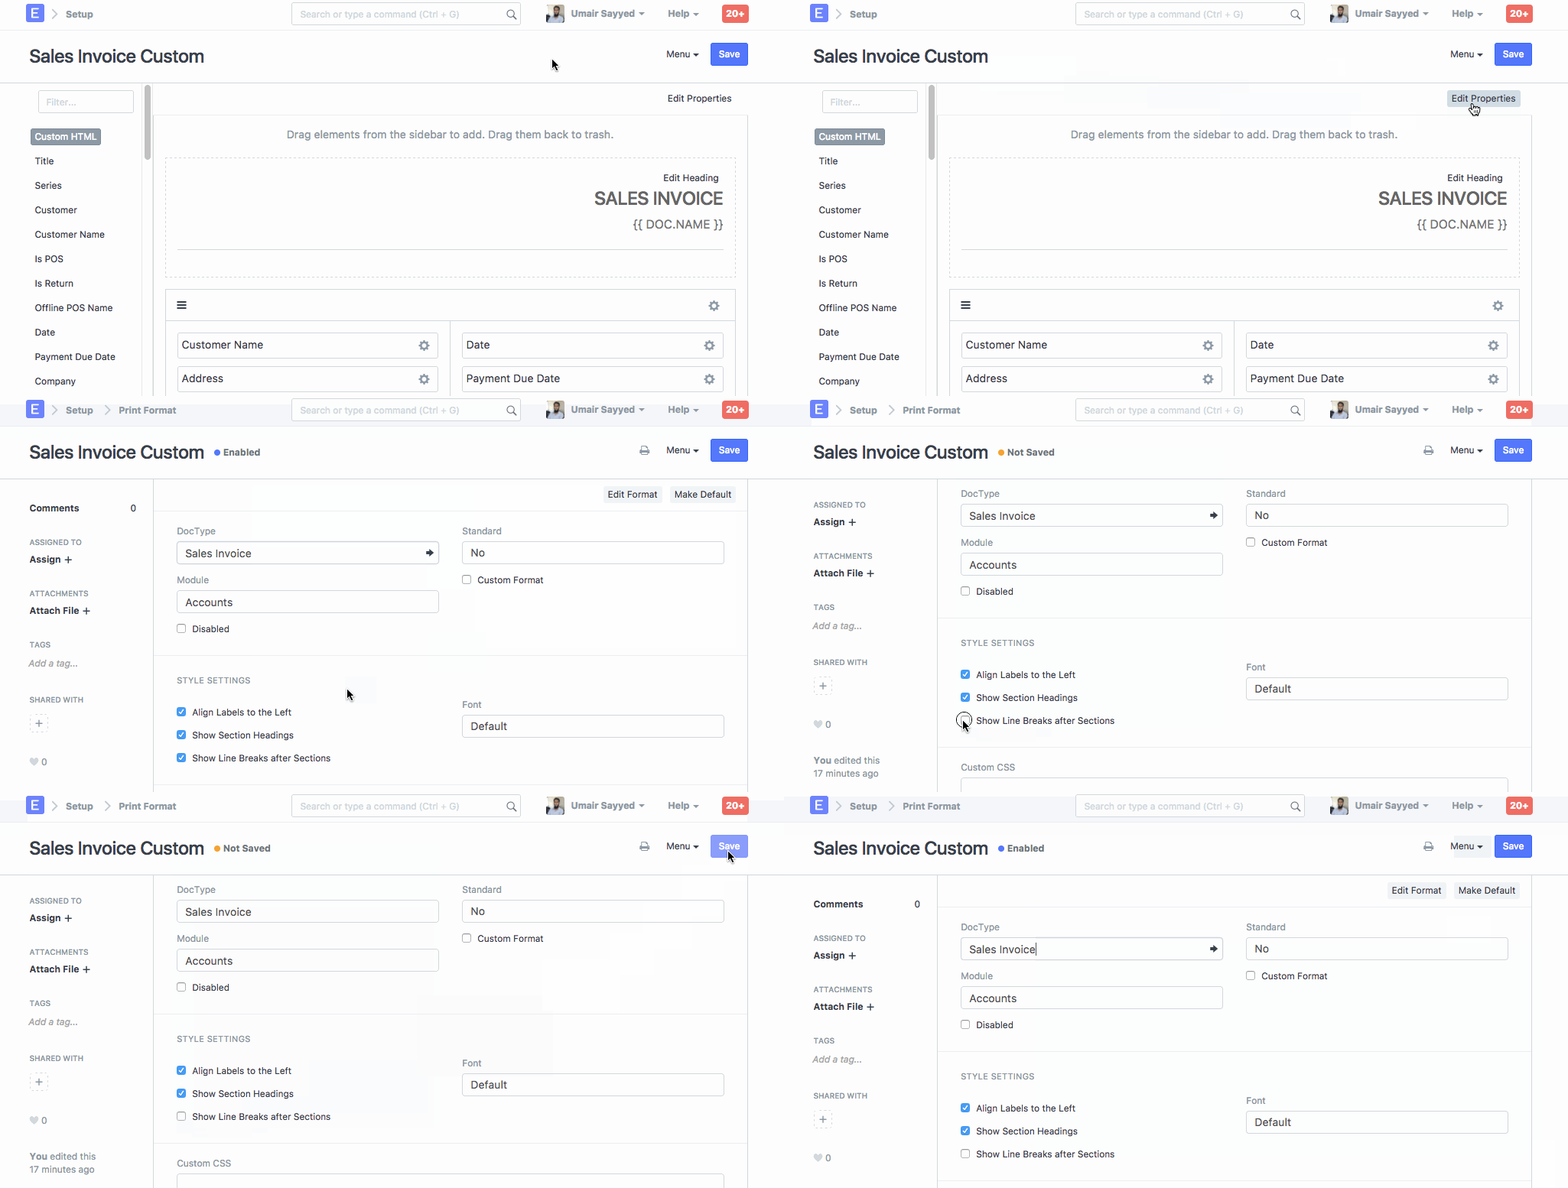
To disable line breaks for the section breaks, you should uncheck field “Show Line Breaks after Sections” in its Print Format.
Print Format Builder > Select Print Format > Edit Settings > Uncheck field “Show Line Breaks after Sections”
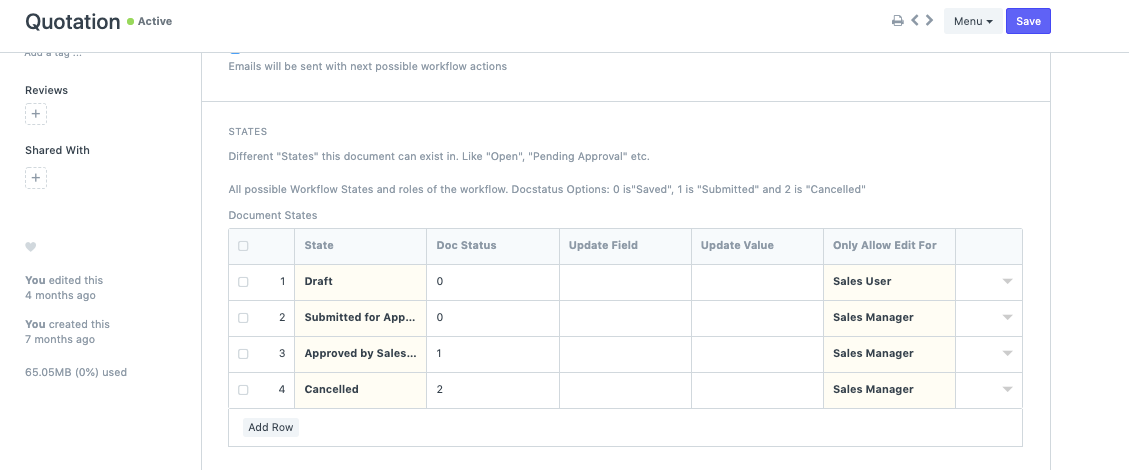
Easy steps to setup Workflow
- States
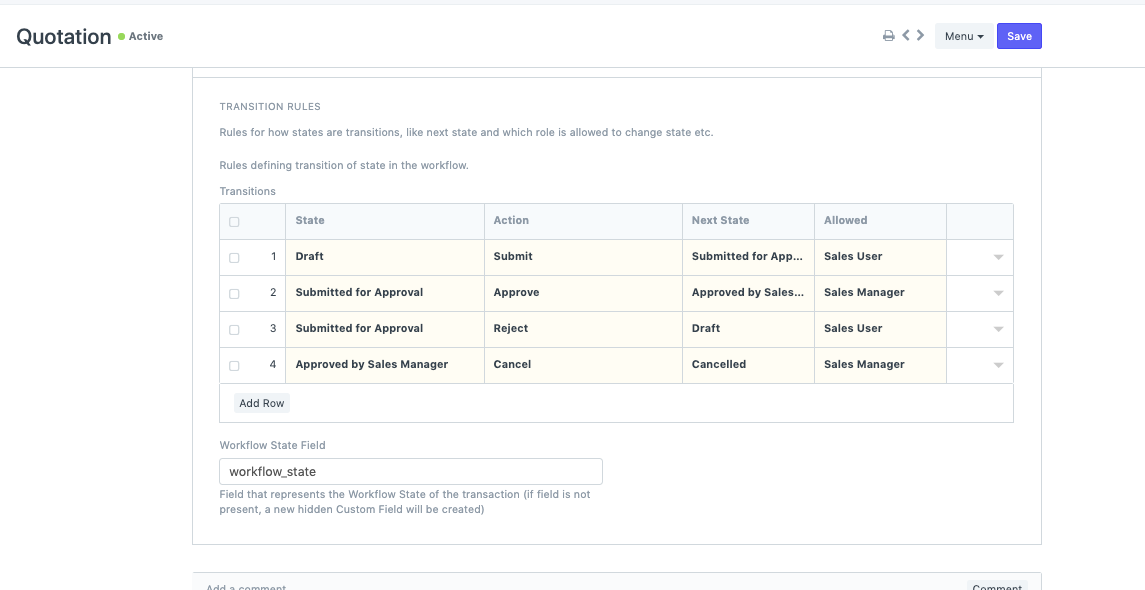
- Transition rules.
- States :
- Transition Rules :
To-Do Auto Creation
Every Document in IONIC ERP has an option called ‘Assign To’ in the side-bar. Using this option, any Document can be assigned to the user. The User would be assigned a ToDo simultaneously.
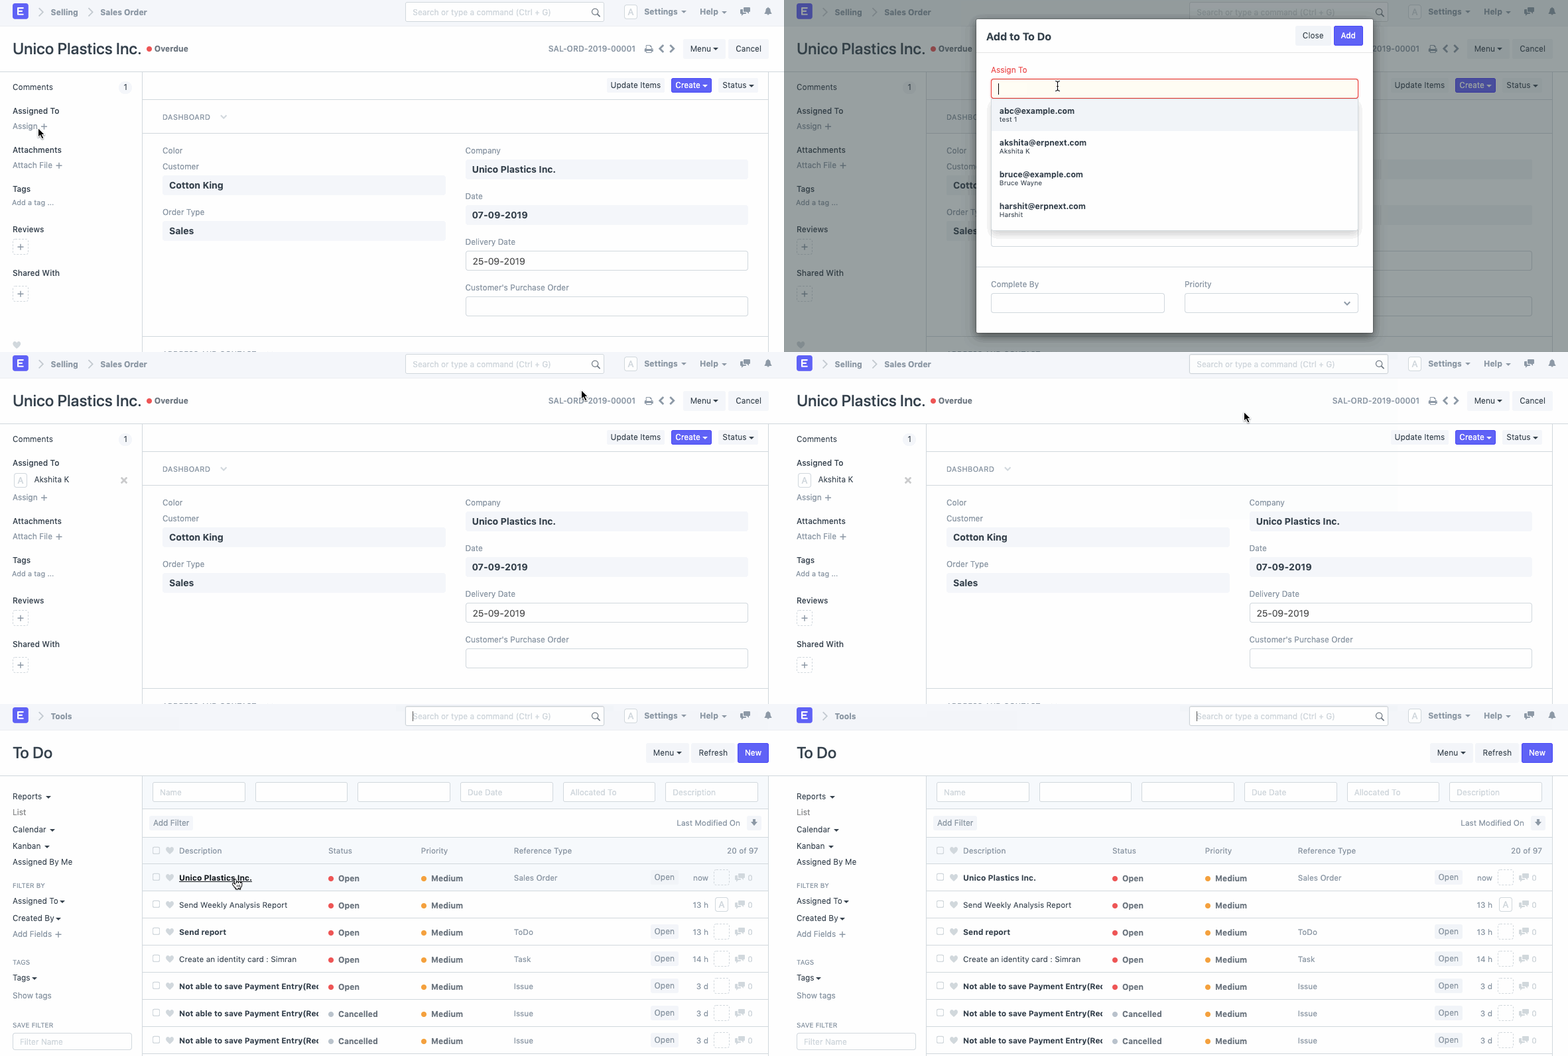
Under such conditions, the three ToDo statuses are defined as per the updates on the assignment.
Let’s consider a scenario where a ToDo is assigned via an Issue. Let’s say that there are 2 levels of Support in an organization L1 and L2 and every new support ticket is considered as an L1 support issue and assigned to relevant team members. In this case, the ToDo statuses would vary as follows:
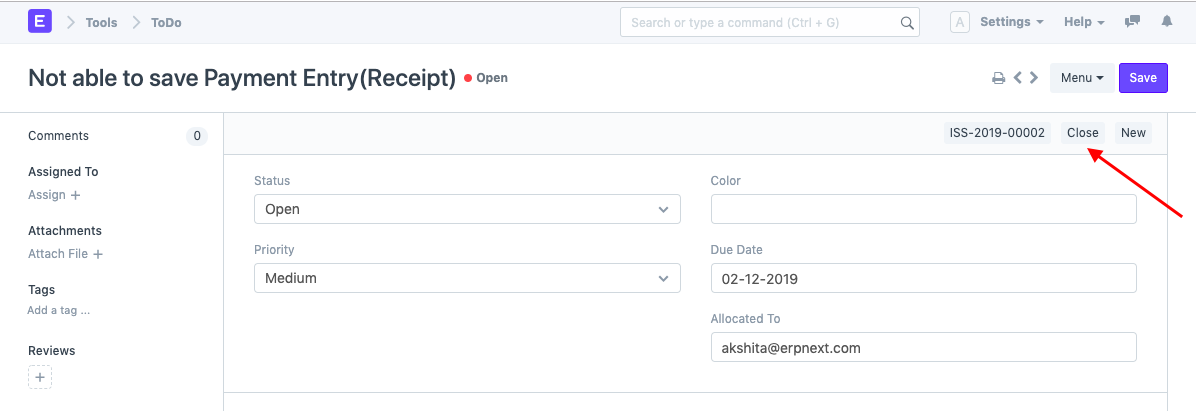
- Open: When an issue is created and assigned to an L1 support team member.
- Closed: L1 support team member identifies the issue and resolves it.
- Cancelled: L1 support team member identifies the issue as an L2 support level issue and assigns it to the relevant team member.
Reopening of Closed Assignments
In the same scenario as above, let’s say that the support ticket was marked close by an L1 support team member. However, the ISsue gets reopened if the ticket is reopened again, or there was an activity in this issue
Simultaneously the ToDo associated with the Support Ticket will also be reopened.
Tree Master Renaming
There are various documents in ERPNext which are maintained in a tree structure.
Read about managing tree structures to learn more.
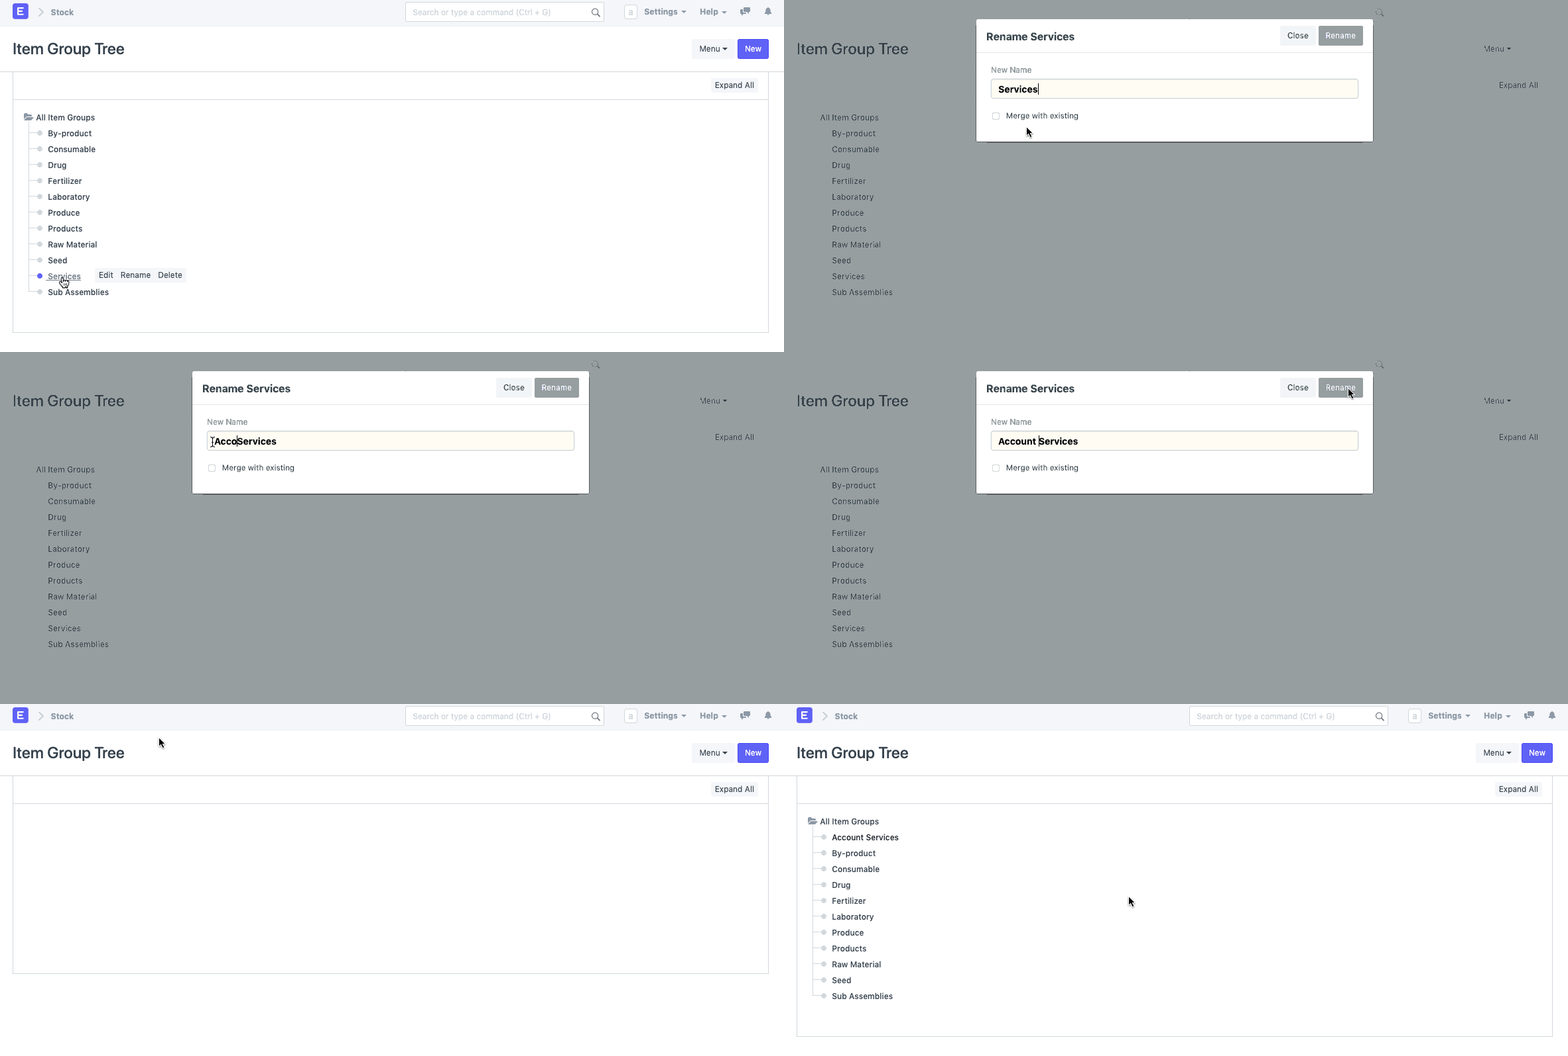
Following are the steps to be followed for renaming the ID of a master which is maintained in a tree structure. Let’s rename an Account for the instance.
- Step 1: Go to the Tree View of the Document
- Step 2: Go to the node of the Document which you wish to renameWhen you click on that node, you will have an option to ‘Rename’ the document.
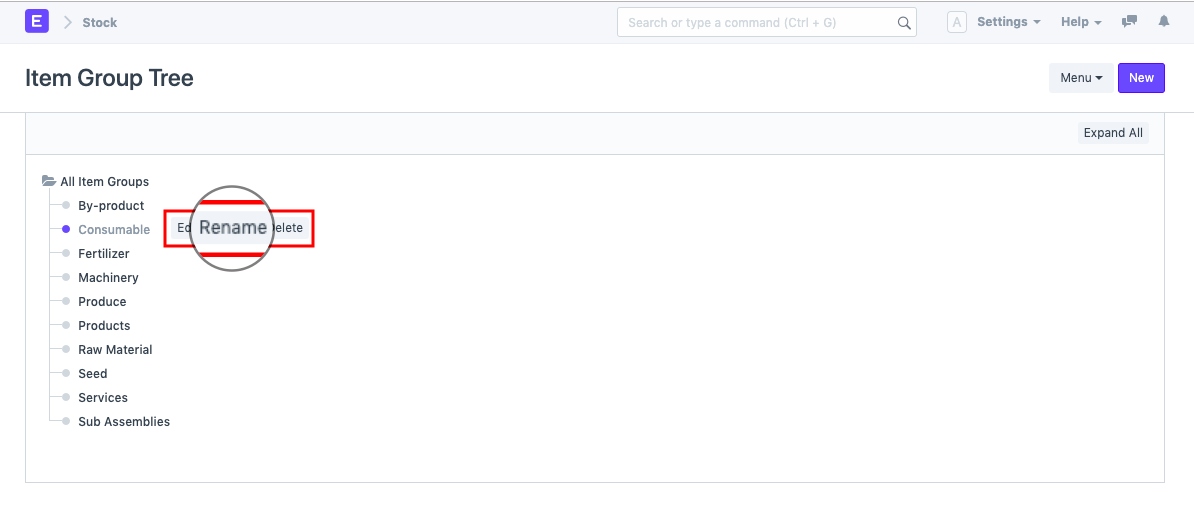
- Step 3: Rename AccountWhen you click on rename, a box will pop-up wherein you will be allowed to rename the document.
Letter Head in the Report
In the reports, Letter Head is fetched from the Company master.
To have the company’s Letter Head fetched correctly in the report, please ensure that you have updated the default Letter Head in the Company master.
Explore > Accounting > Company
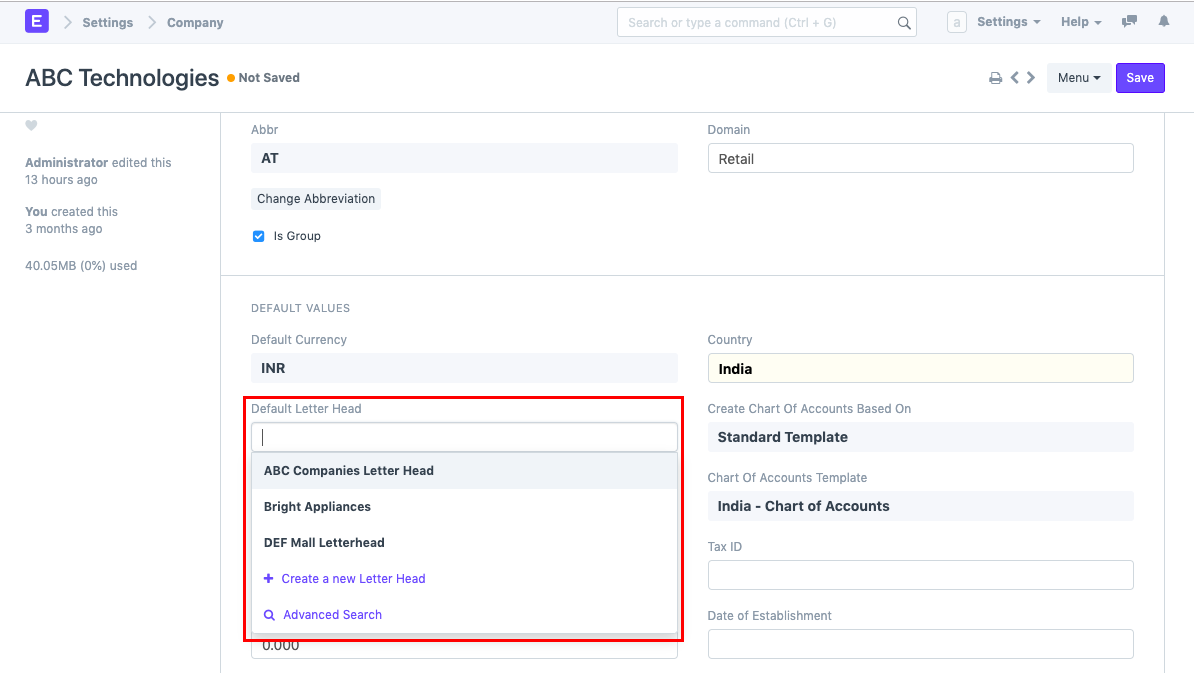
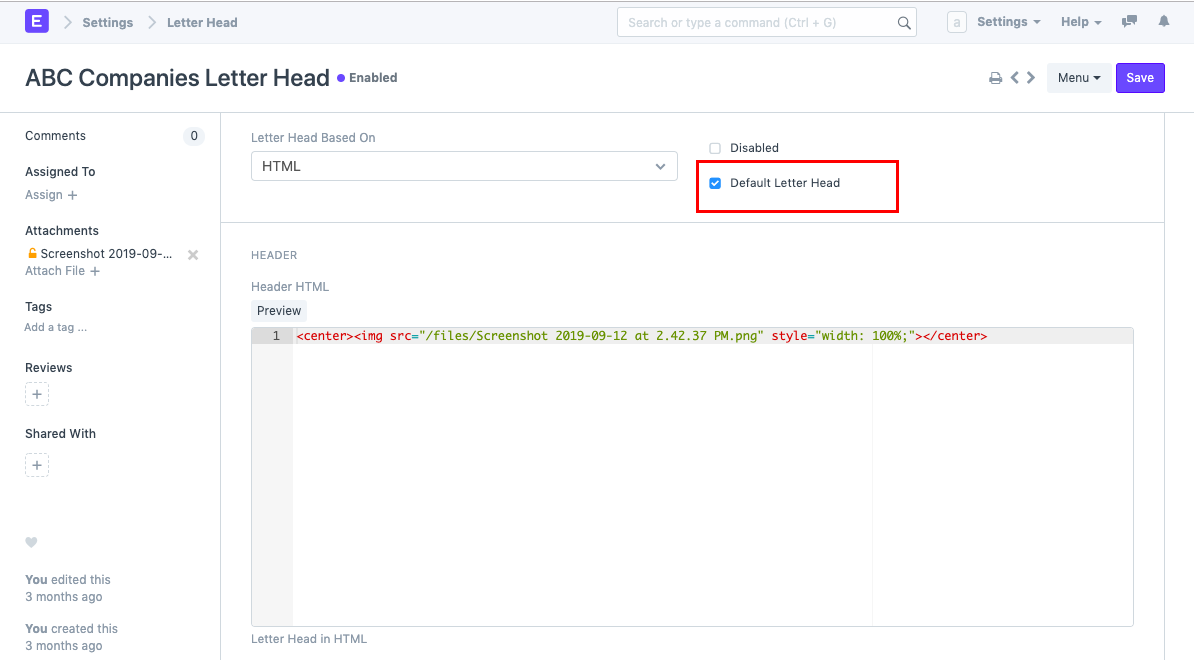
In a Company master, if no Letter Head is set as default, then in the reports, Letter Head having Default field checked will be fetched.
If you are managing multiple companies in a single IONIC ERP account, then ensure that for each Company, default Letter Head is set in the Company master.
After updating Letter Head in the Company master, refresh your IONIC ERP account, and then check the print format of a report.
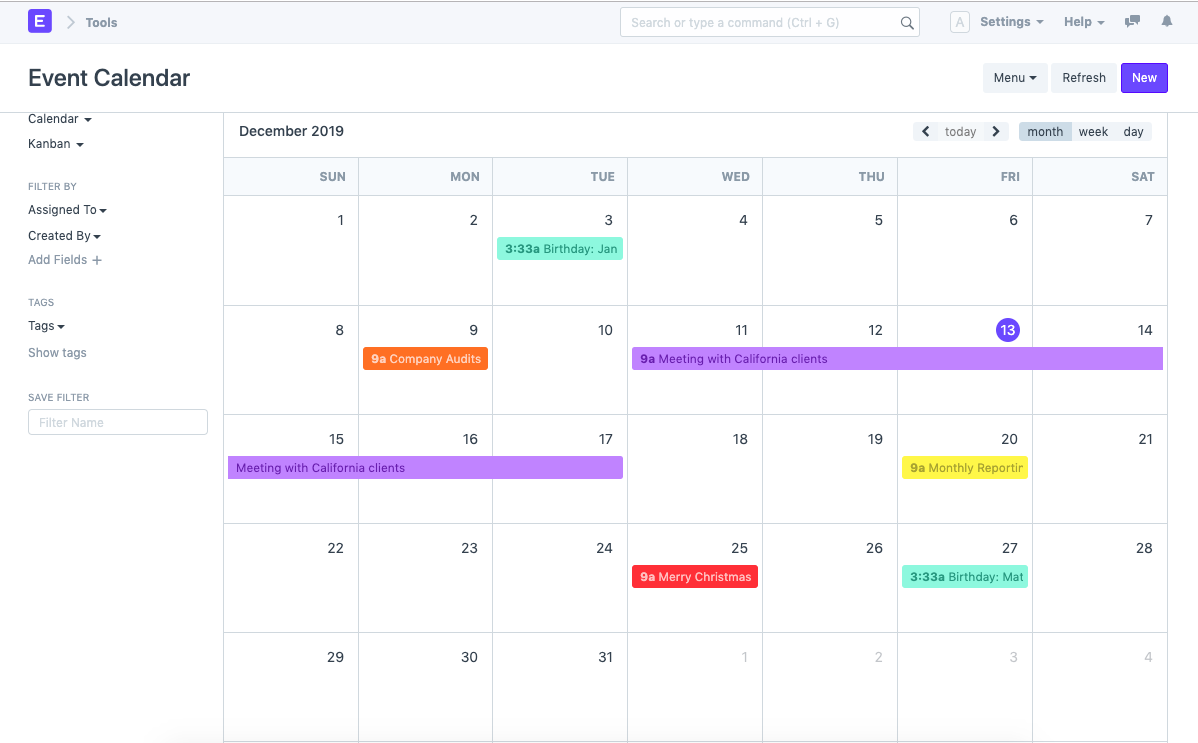
Sync DocTypes with Events Calendar
- Type ‘Calendar View List’ in the awesome bar/ Search bar.
- Click on new to create a new Calendar List
- Select the Reference Doc-Type you want to be view in the calendar. Eg: Sales Order
- Set the Start date and End date fields. Eg: Delivery Date.
- Save your changes.

Merging Accounts
For an account, if you have two records that are identical, and are meant for a common purpose, you can merge them into one record.
Following are steps to merge two accounts.
Step 1: Go to Chart of Accounts
Accounts > Documents > Chart of Accounts
Step 2: Go to Account
Click on the account that you wish to merge with another document, and then click on the ‘Edit’ option.
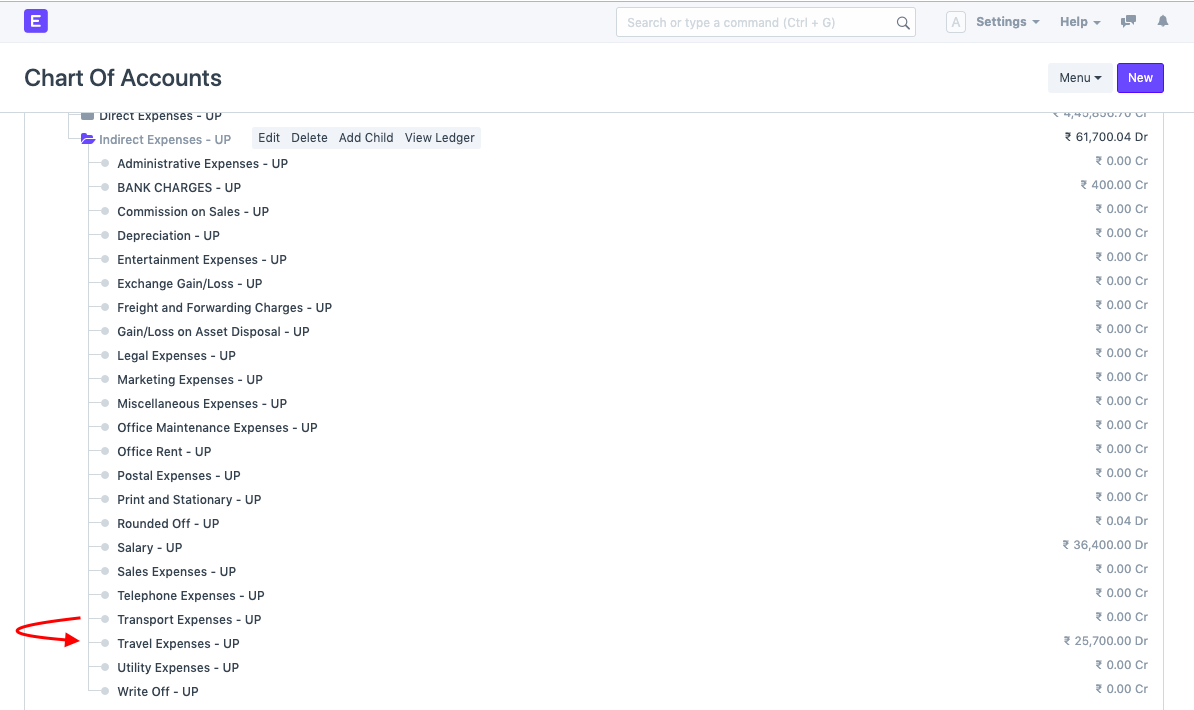
Step 3: Merge Account
The document will open with different options present on the top. Click on ‘Merge Account’. Enter the name of the account with which you want to merge the existing account.
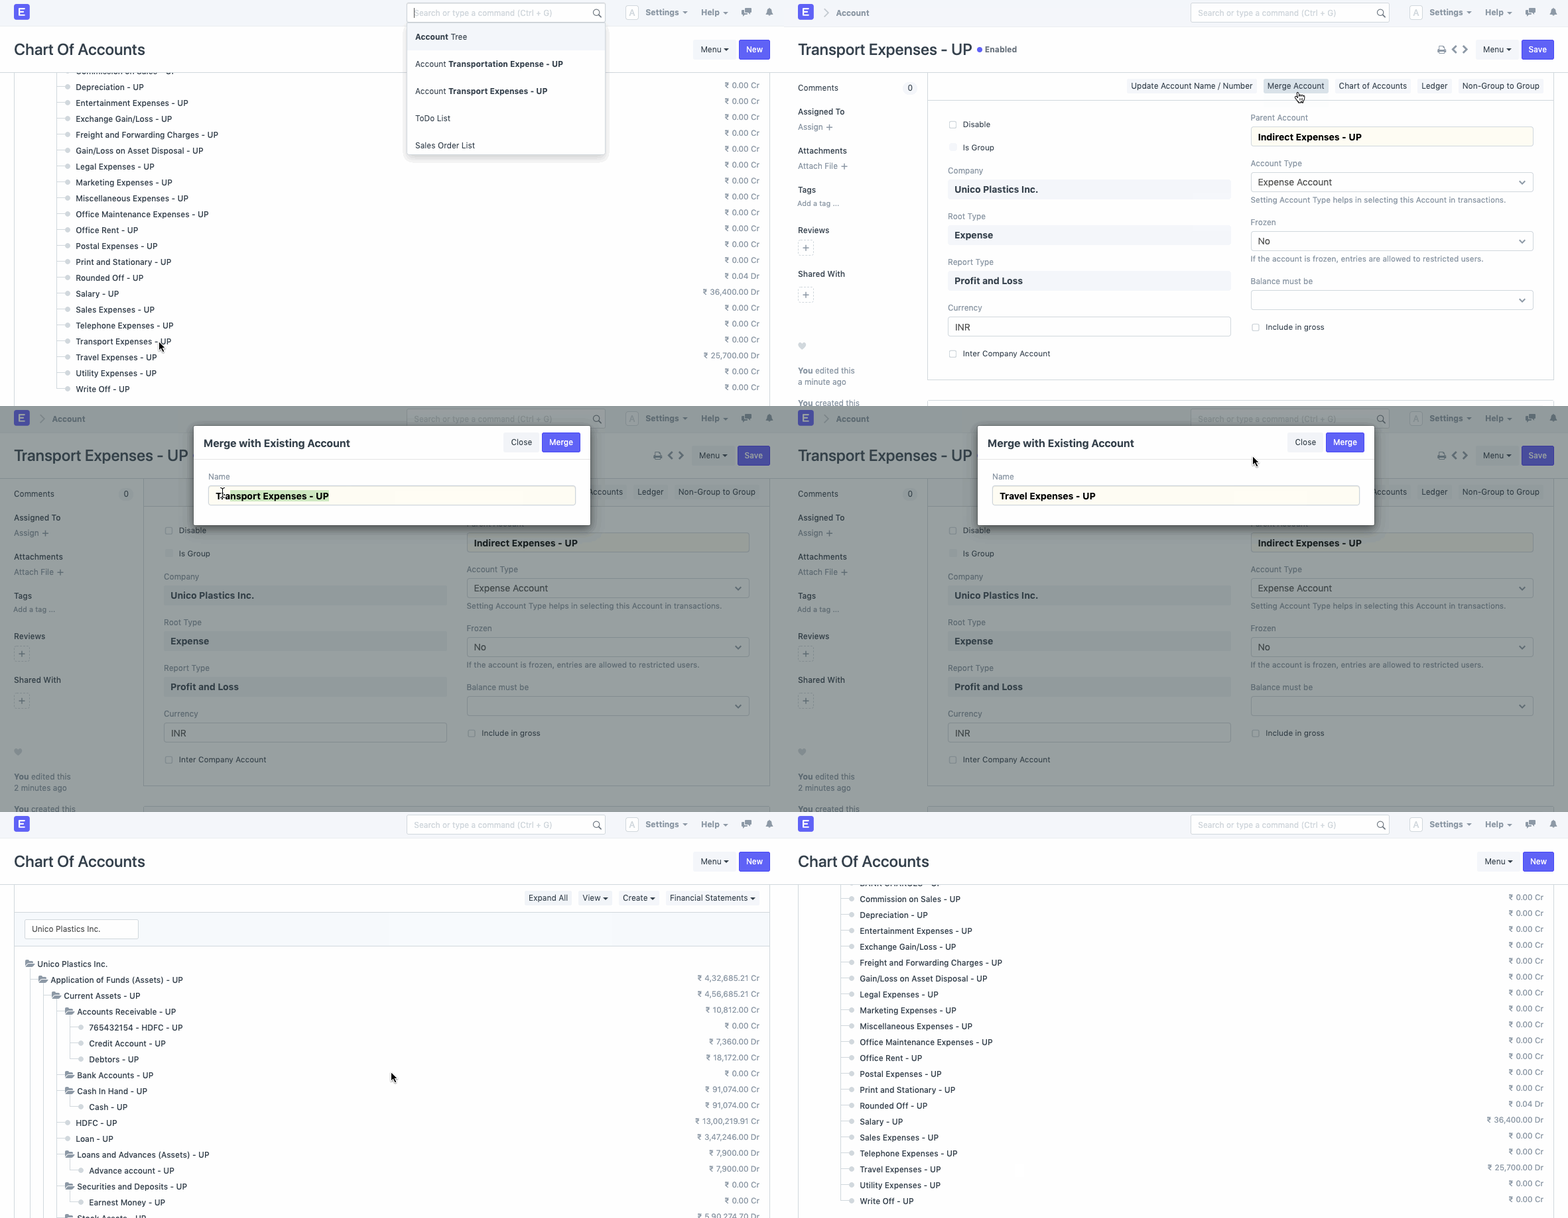
Effect of Merging
After Account is merged, the new name is updated in the existing transactions where an old account was selected.
Group Account cannot be merged into Child Account and vice versa.
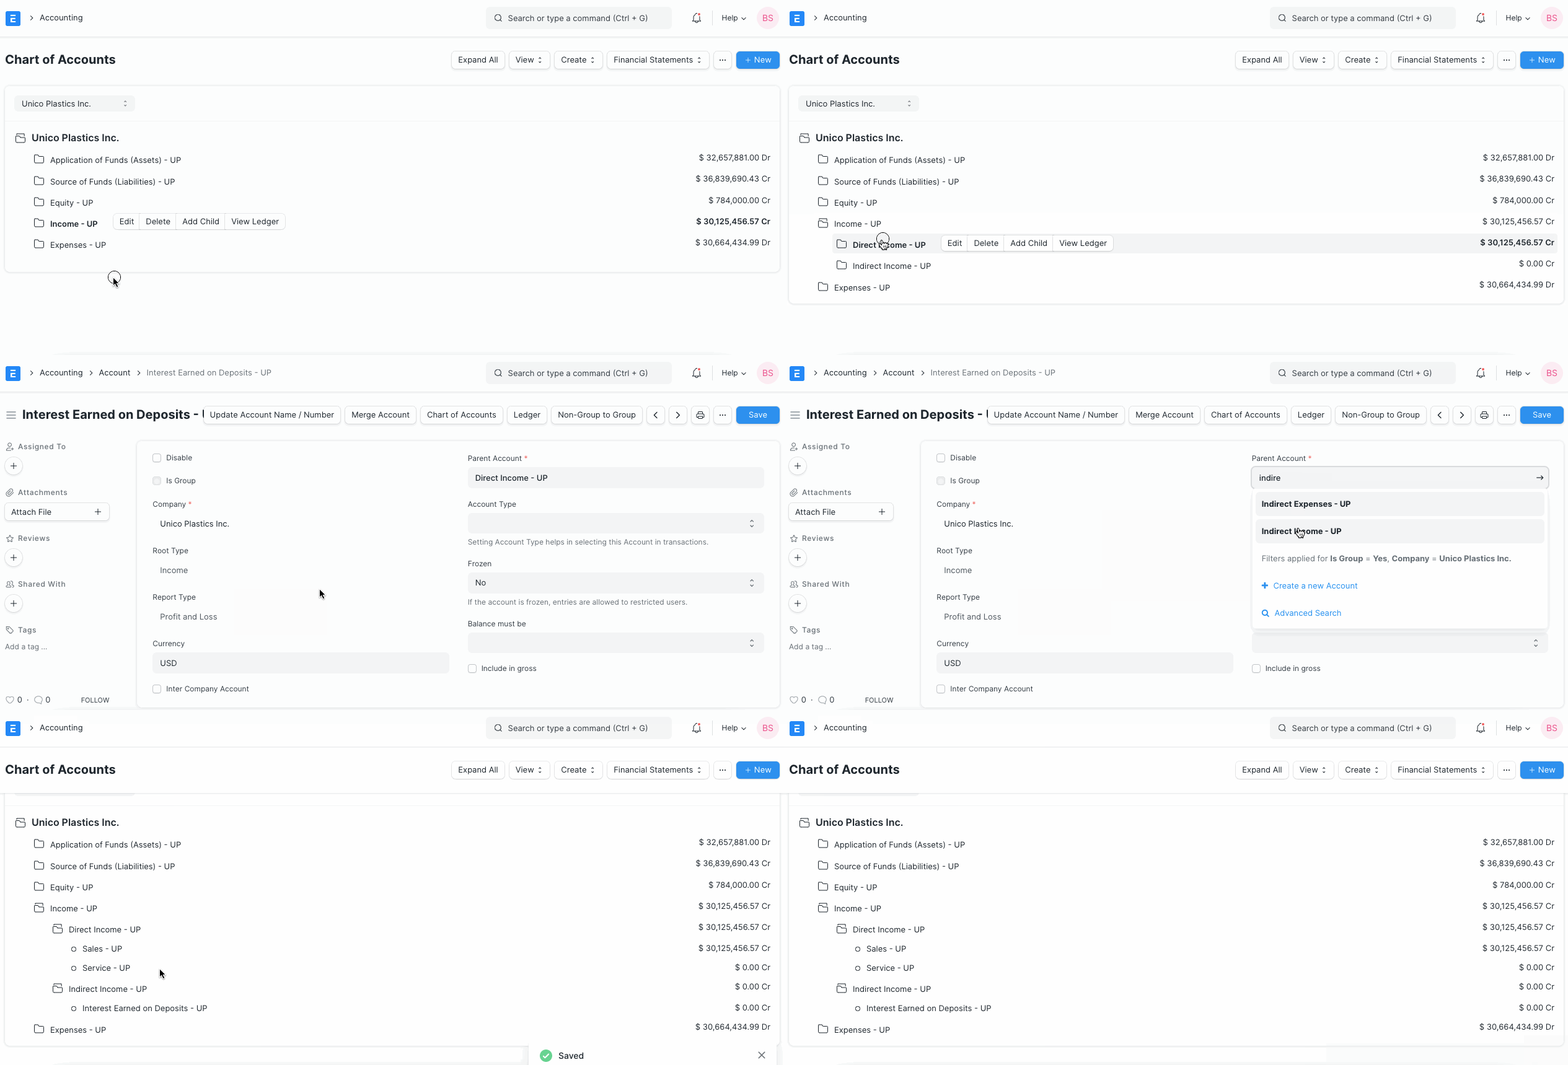
Changing Parent Account
Fiscal Year Creation
New Fiscal Year should be created each year, at the end of the current fiscal year. Creation of new Fiscal Year before its begining has been automated in IONIC ERP.
Three days prior to the end of the current Fiscal Year, system checks if new Fiscal Year for the incoming year is already created. If not, then system auto-creates new Fiscal Year.
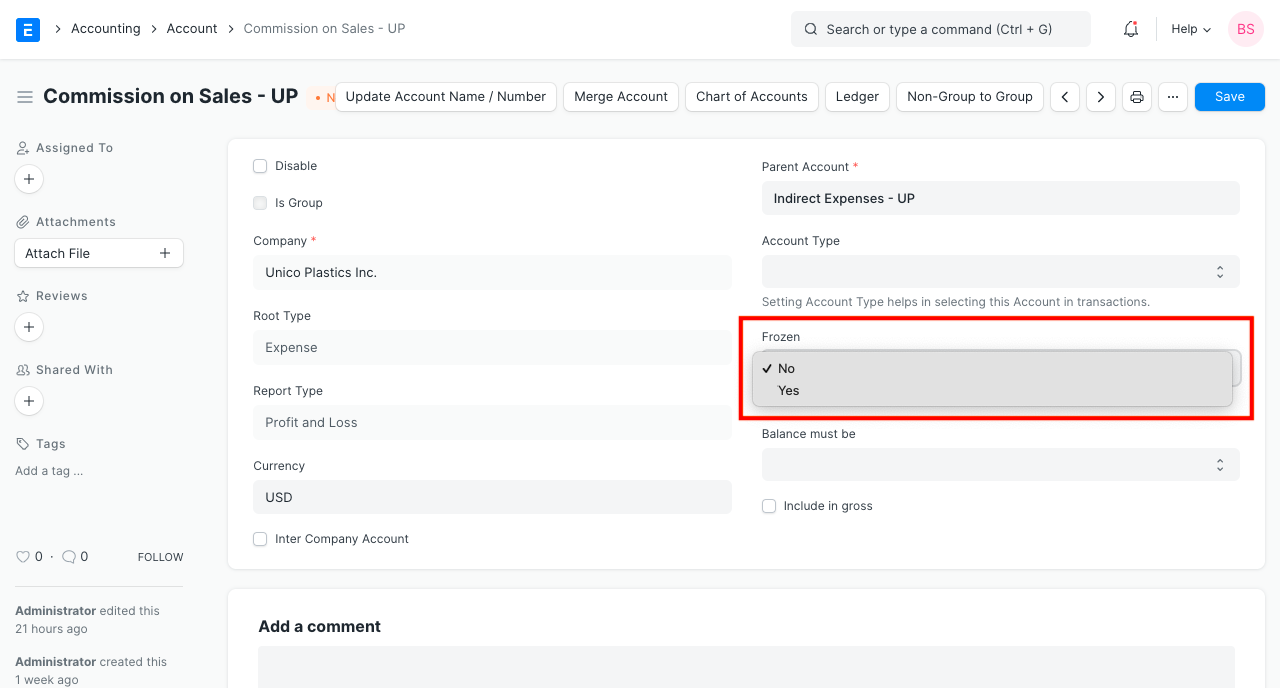
Freeze an Account
Once an Account is Frozen, you won’t be able to use it for any accounting transaction.
To freeze an Account, go to Chart of Accounts, and edit an Account.
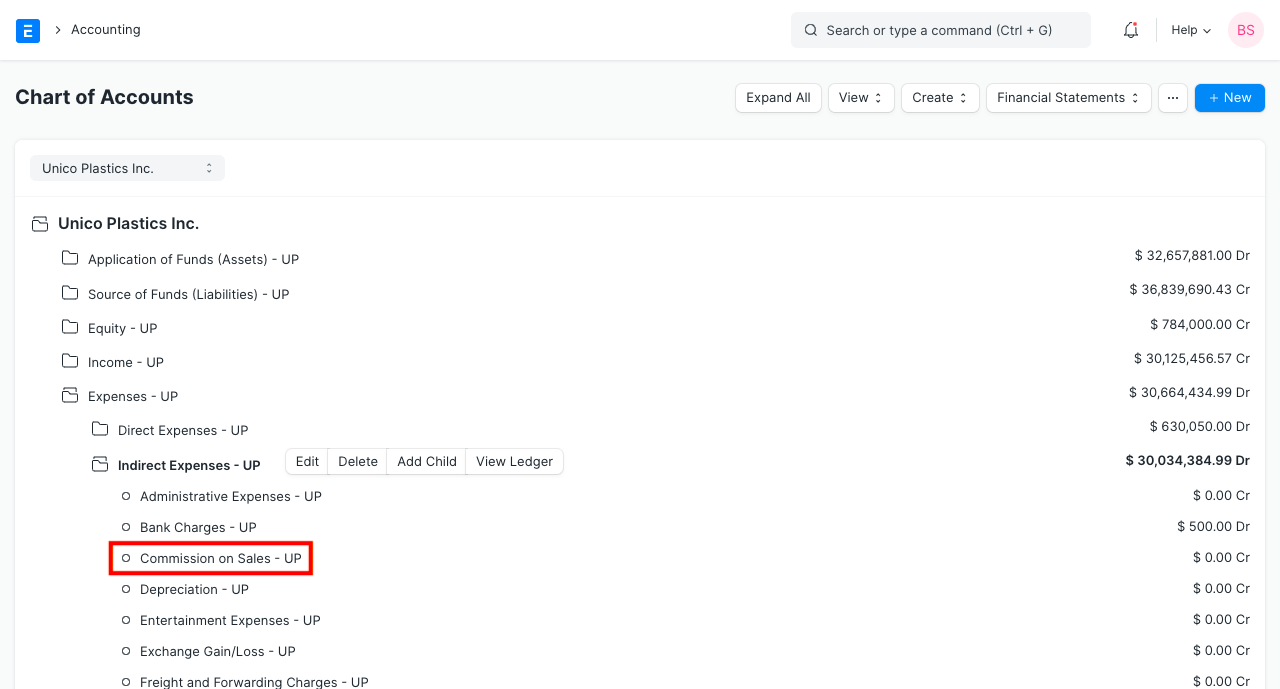
If User has Role define in the Account Setting assigned, then he/she will be able to set an Account as Frozen.
Freeze Accounting Entries
To freeze accounting entries upto a certain date, follow below given steps.
Step 1: Go to:
Accounting > Accounting Msters > Accounts Settings
Step 2: Set Date
Set date in the Accounts Frozen Upto field.
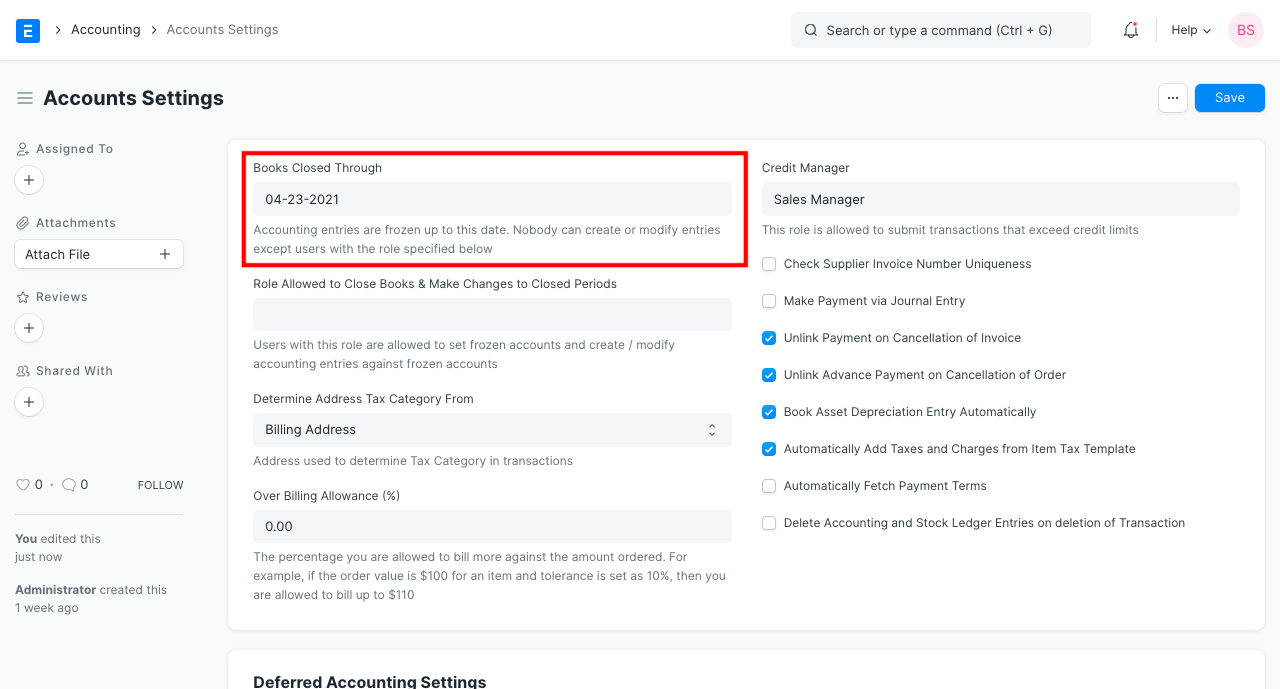
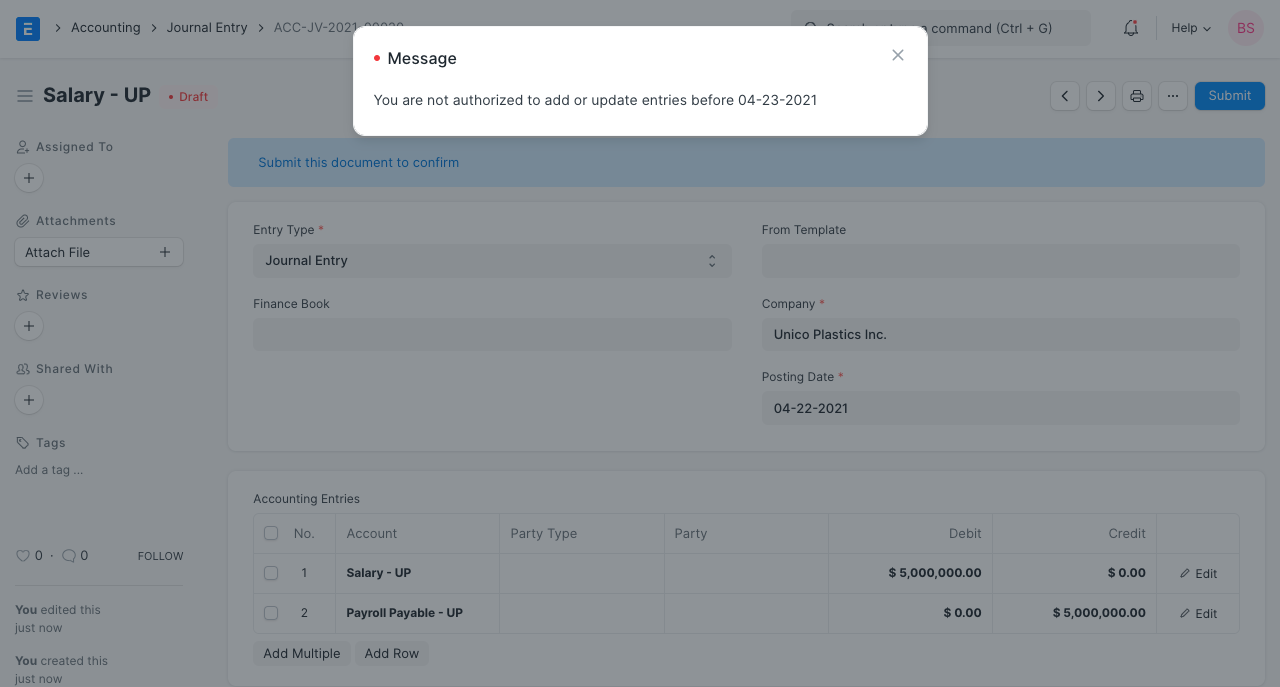
Now, the system will not allow to make any accounting entries before set date. If at all someone tries creating entries, system will show error message as below.
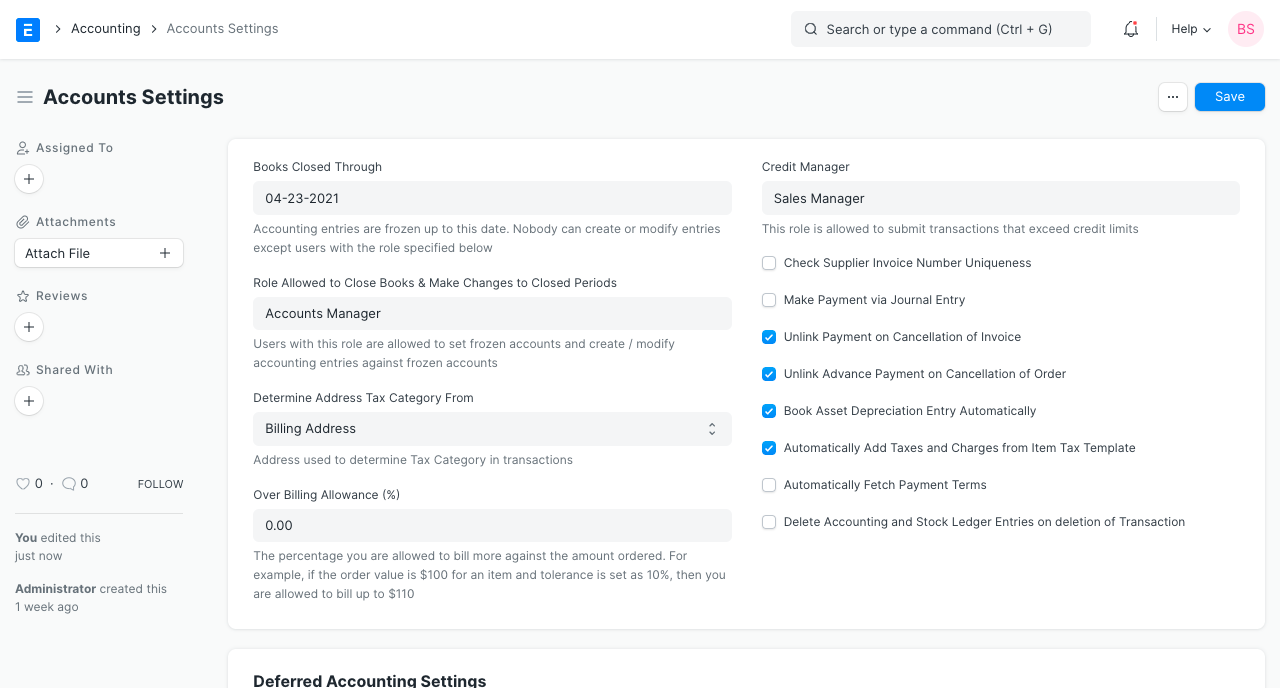
You can still allow user with certain role to create/edit entries within accounts frozen date. You can set that Role in the Account Settings itself.
Common Party Accounting
Common Party Accounting in IONIC ERP involves accounting of unusual transactions like creating a Sales Invoice against a primary Supplier.
Let’s assume an IONIC ERP user who has been making Purchase Invoices against a Supplier, wants to make a Sales Invoice against the same supplier and adjust this Sales Invoice against one of the previous purchases.
The above can be achieved by enabling Common Party Accounting.
Steps:
- Go to Accounts Settings and enable Common Party Accounting.
- Create a link between two parties
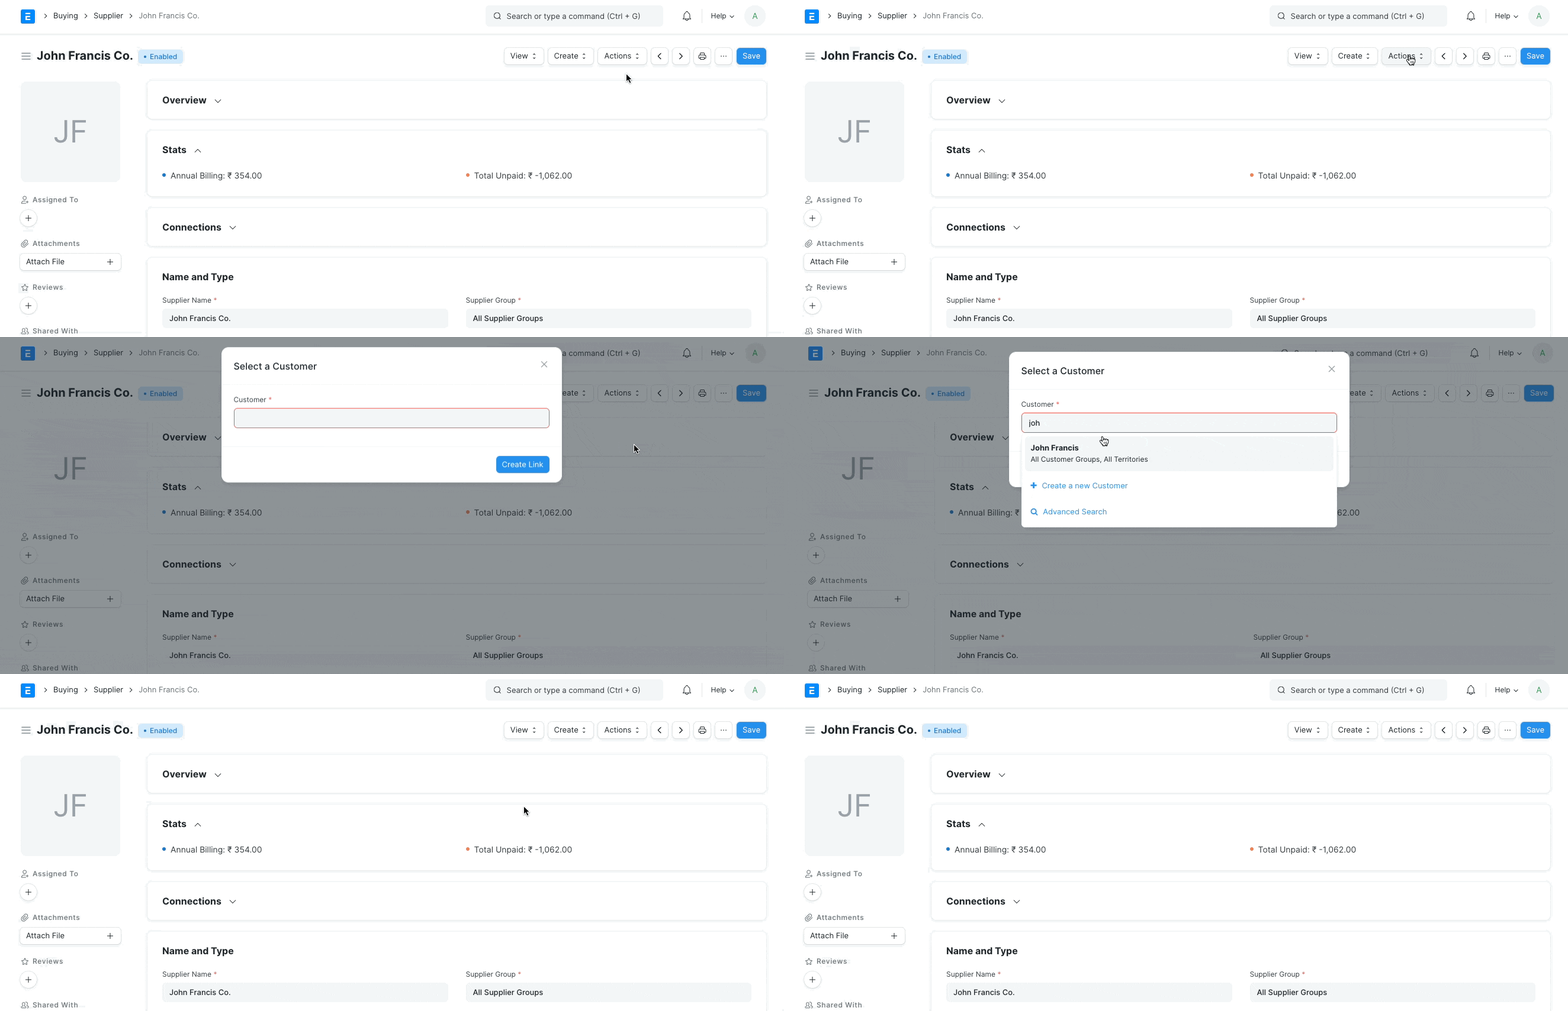
- If the primary role of the party is Supplier, then go to the Supplier Master and Click on Actions -> Link with Customer
- If the primary role of the party is Customer, then go to the Customer Master and Click on Actions -> Link with Supplier
- Create a Sales Invoice against the Customer that was set as Secondary Party in the 4th step.
- On submitting the Sales Invoice, a Journal Entry will be posted automatically that will create an advance balance against the linked Supplier.
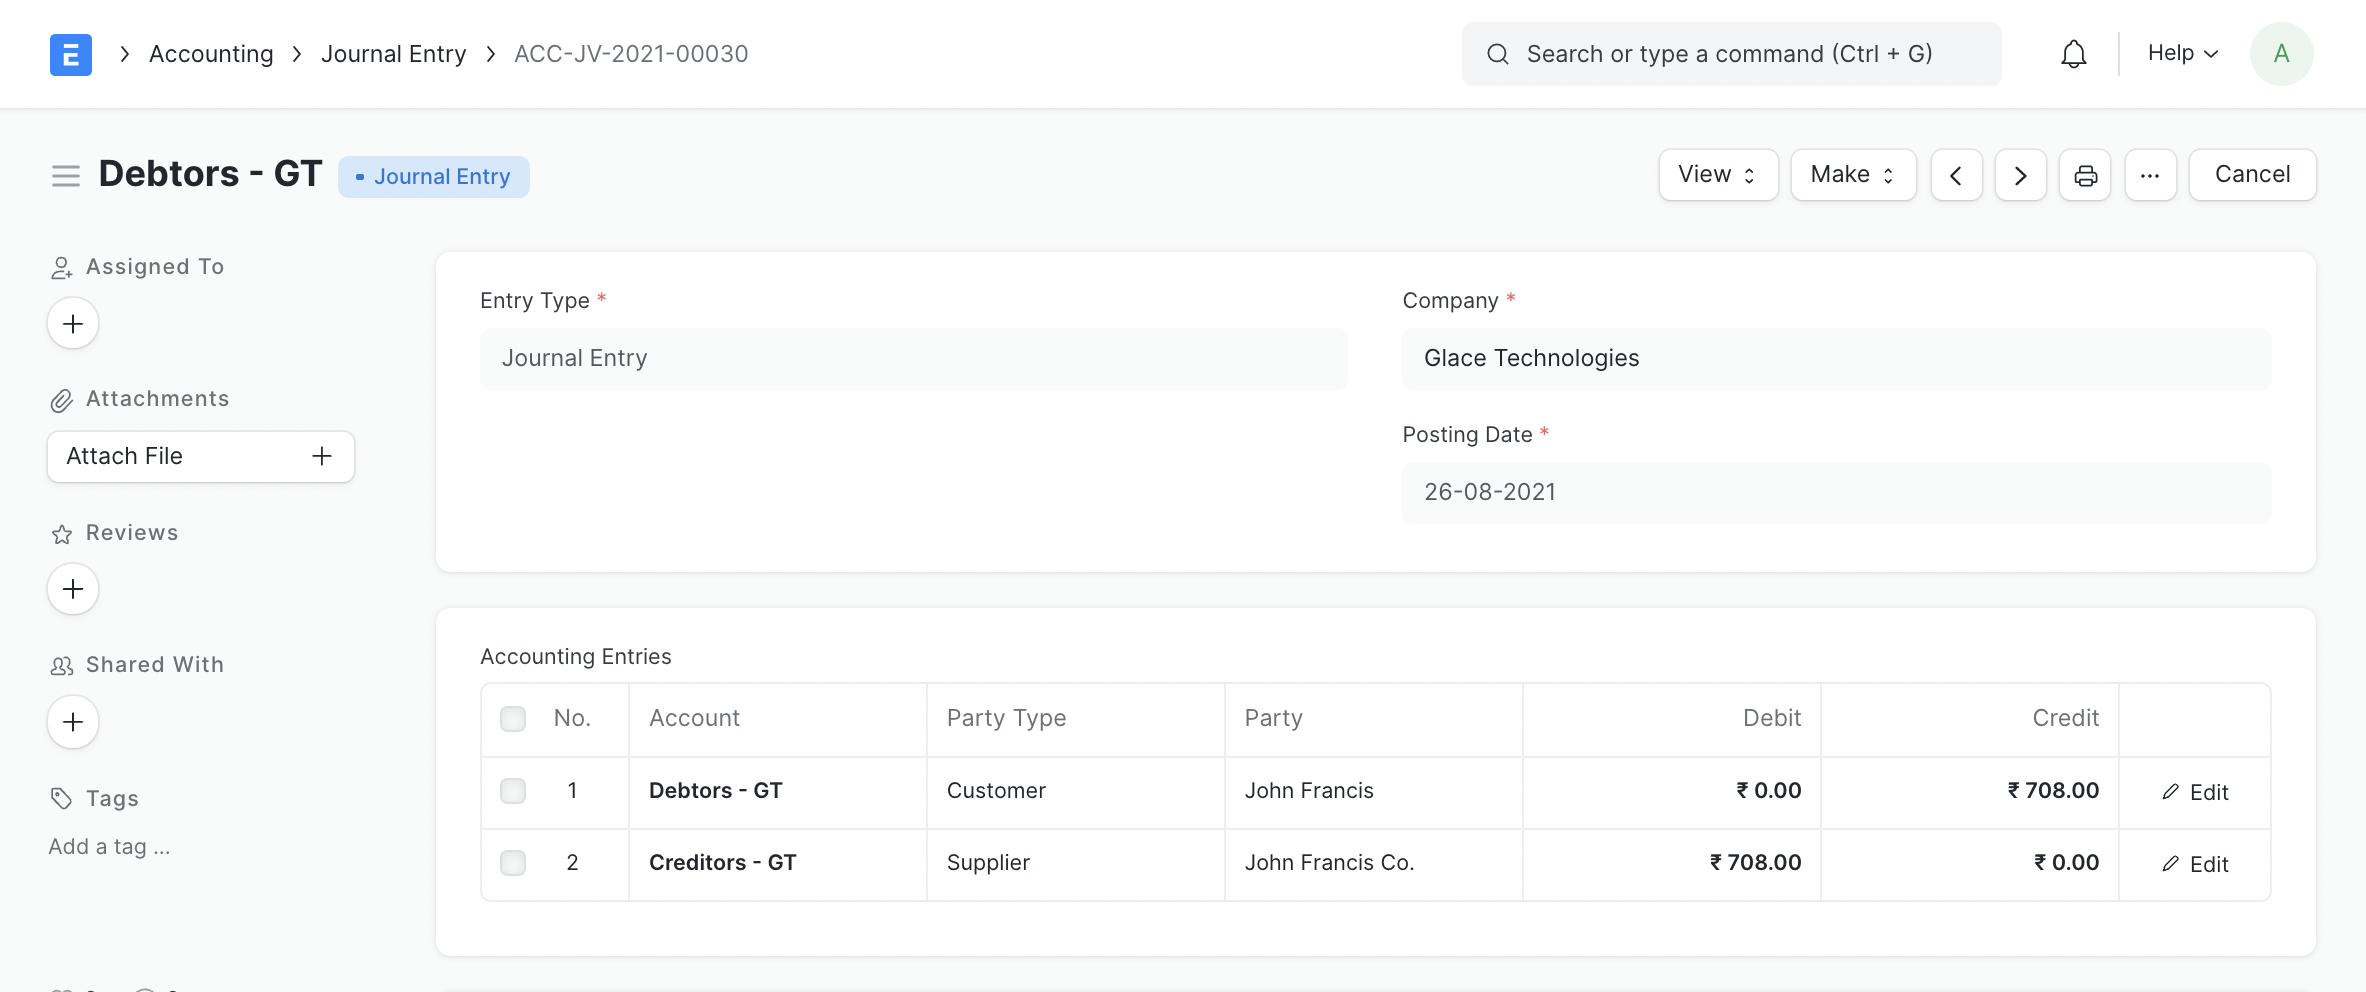
- Now this Journal Entry advance can be then used to reconcile against a Purchase Invoice.
Freeze Exchange Rate
In IONIC ERP, you can fetch Exchange Rates between currencies in real-time, or save specific exchange rates as well. In IONIC ERP, saved exchange rates are also referred as Stale Exchange Rate.
In your sales and purchase transactions, if the field of Currency Exchange Rate is frozen, that is because the feature of allowing stale exchange rates in transactions is enabled. To you wish to make Currency Exchange Rate field editable again, then disable the feature of Stale Exchange Rate from:
- Accounting > Accounting Masters > Accounts Settings
- Uncheck field “Allow Stale Exchange Rates”.
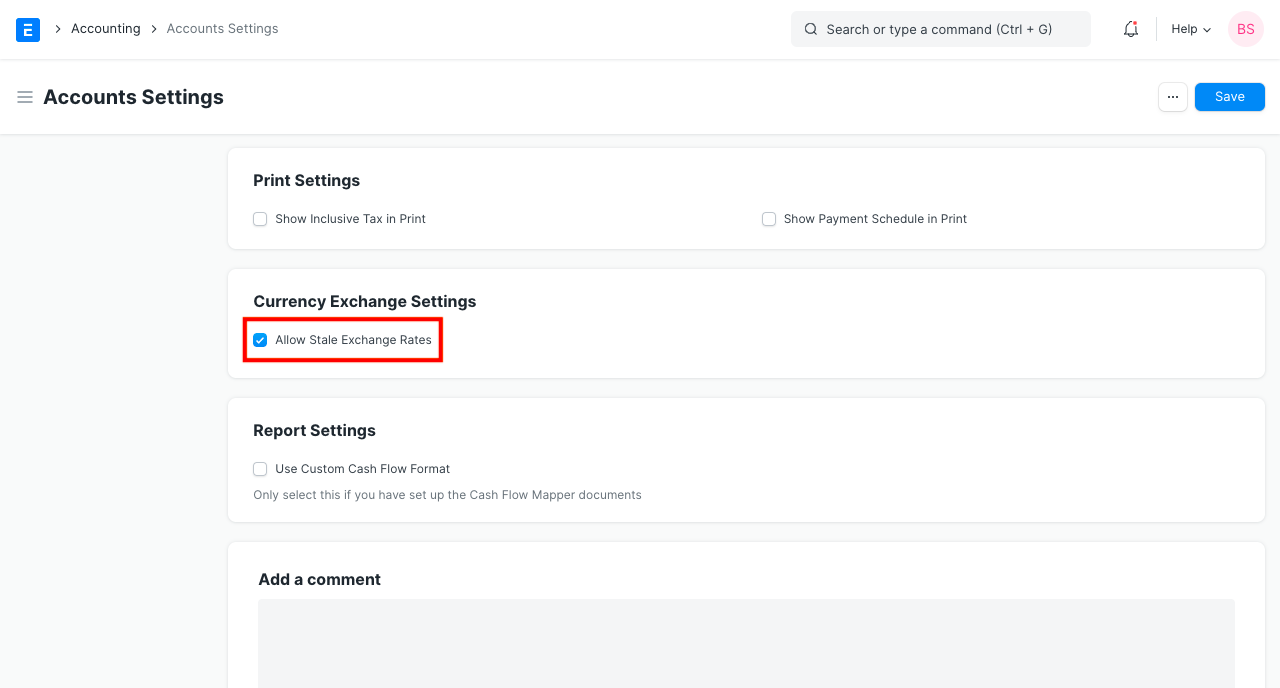
- Save Account Settings
- Refresh your IONIC ERP account
- Check Sales / Purchase transaction once again
After this setting, the Exchange Rate field in the transactions should become editable once again.
Linking stock warehouse and accounts
The value of stock stored in the warehouses needs to be tracked.
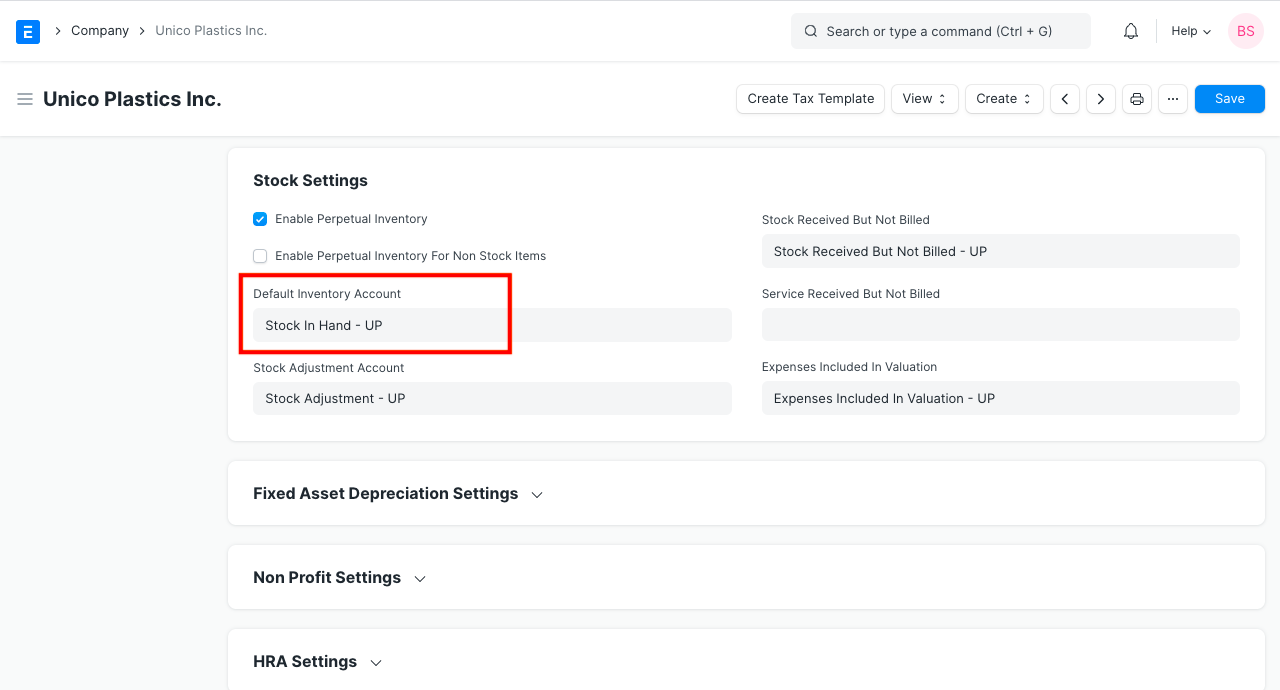
Each warehouse is linked to a ledger in chart of accounts through the ‘Account’ field in the warehouse.
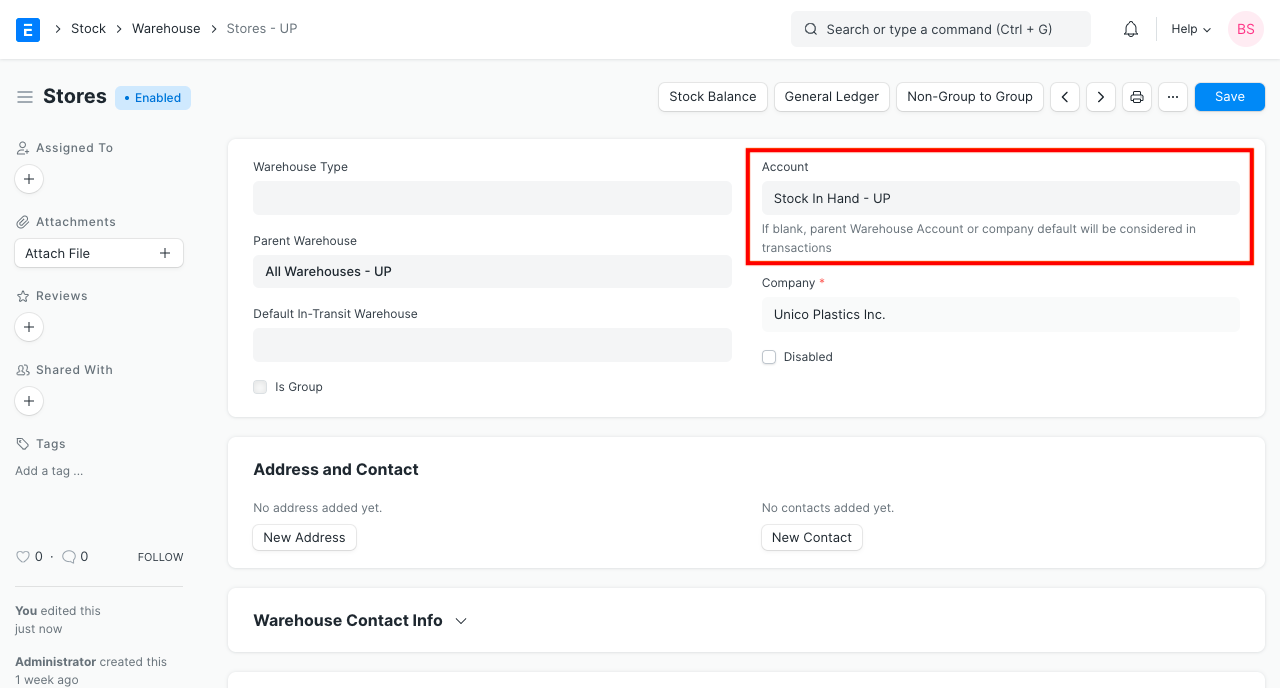
If the Account field is empty in a warehouse, then the Account mentioned in the parent of that warehouse is considered. If an Account could not be determined by tracing the hierarchy, then the Default Inventory Account mentioned in the Company record is considered.
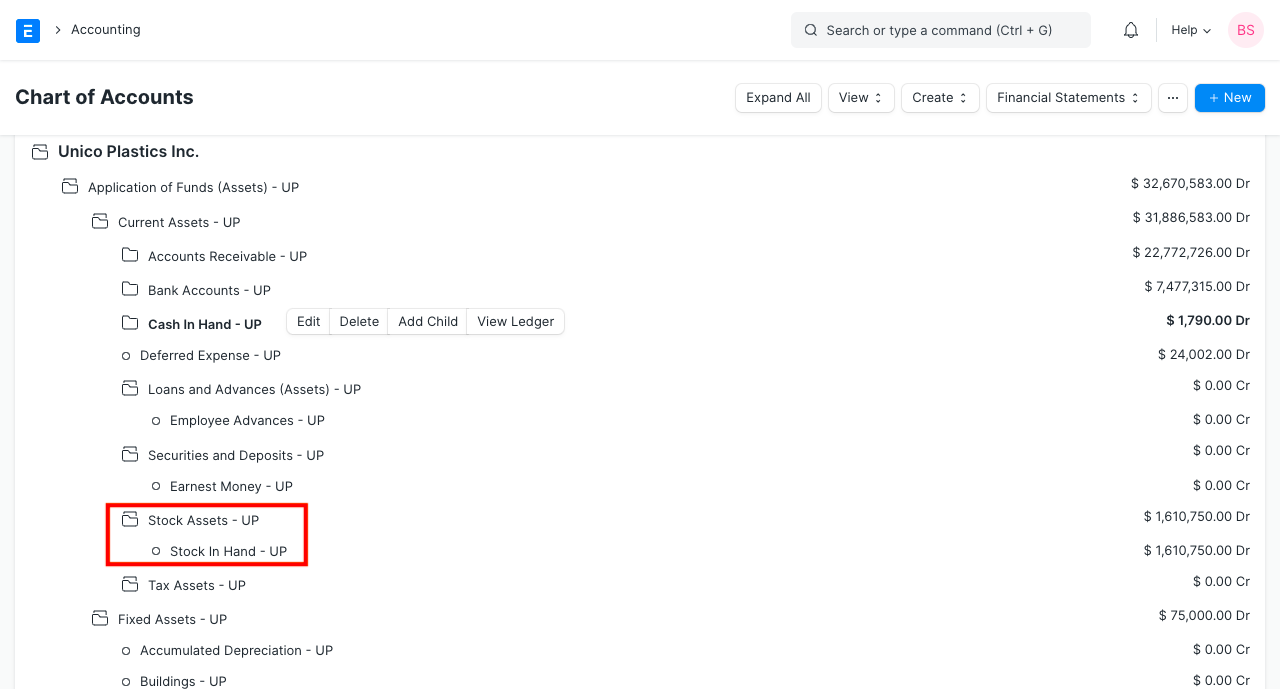
When a company is created, a ledger named ‘Stock In Hand’ is created by default in Chart of Accounts.
Chart of Accounts > Assets > Current Assets > Stock Assets > Stock In Hand.
If required, you can create additional ledgers under ‘Stock Assets’ group.
Print Cancelled Invoice
Default Receivable / Payable Account

Mode of Payment
In the sales and purchase transactions, there are various options to settle the payment. We can do it in cash, via bank transfer, via promotion voucher to list a few. In IONIC ERP, you can create Mode of Payments as per your requirement. In the Payment Entry, you can select the Mode of Payment applicable.
You can manage standard Mode of Payments and create new ones from:
Accounting > Setup > Mode of Payment
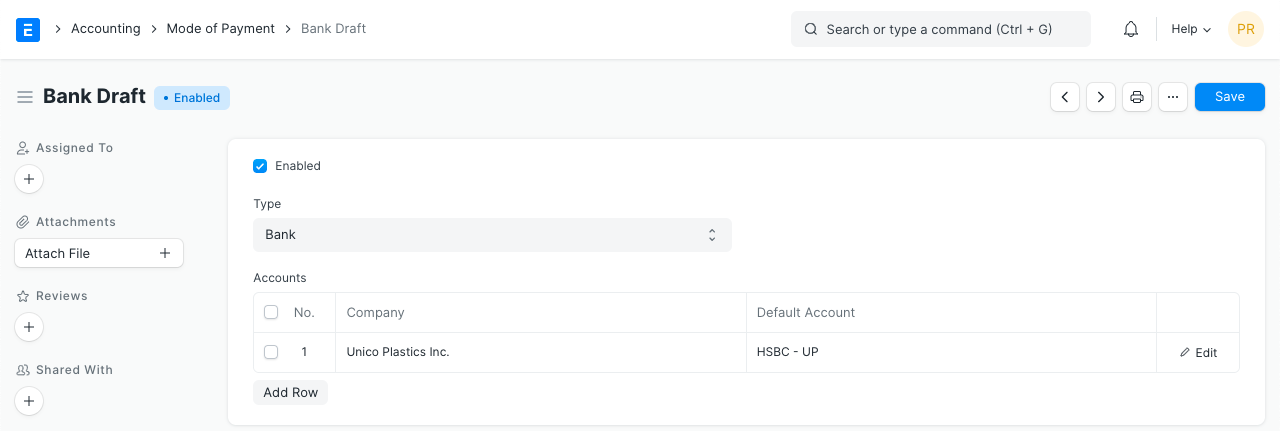
In each Mode of Payment master, you can also set a default payment account. On selection of Mode of Payment, the respective payment account will be fetched automatically in the transaction.
Maintaining Supplier’s Item Code In the Item master
For each item, code assigned might differ from the code your supplier has given to that same item. IONIC ERP allows you to track Supplier’s Item Code in the item master. Also you can fetch Supplier’s Item Code in your purchase transactions, so that they can easily recognize item referring to their Item Code.
1. Updating Supplier Item Code In Item
In the Item master, under Supplier Details section, enter Item Code as given by the Supplier to this item.

2. Supplier’s Item Code In Transactions
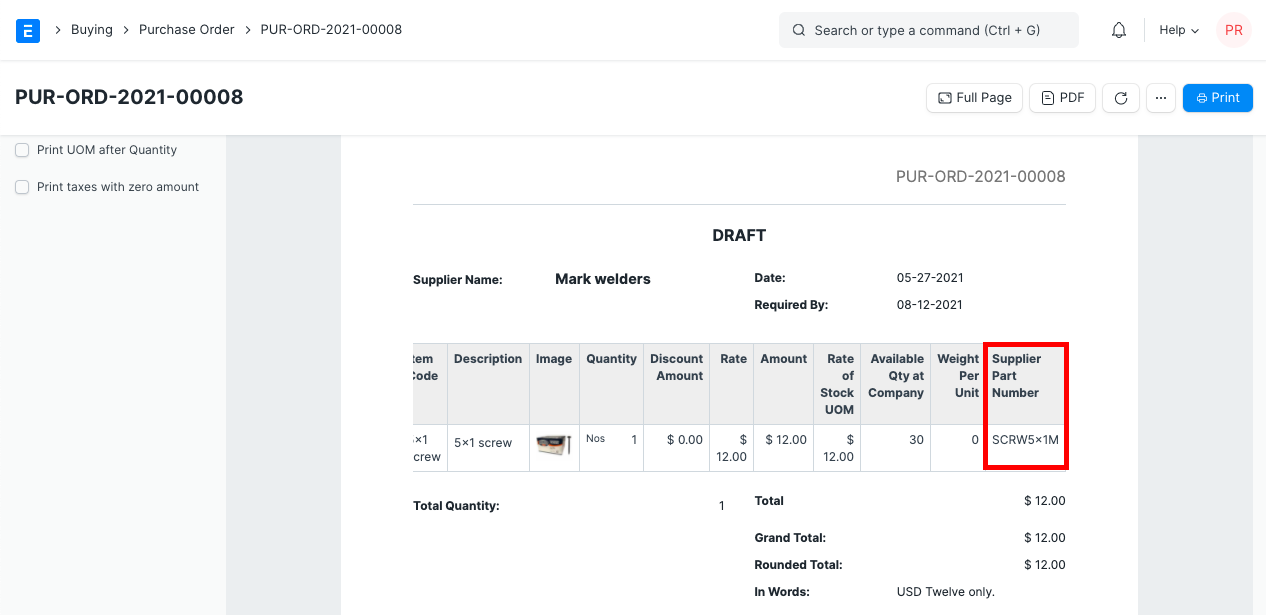
Each purchase transaction has field in the Item table where Supplier’s Item Code is fetched. This field is hidden in form as well as in the Standard print format. You can make it visible by changing property for this field from Customize Form.
Go to print view, click on Menu > customize, enter a new print format name, look for the Items table, click on the Select columns button in it. You’ll see the following screen. Now select the “Supplier Part Number” checkbox.
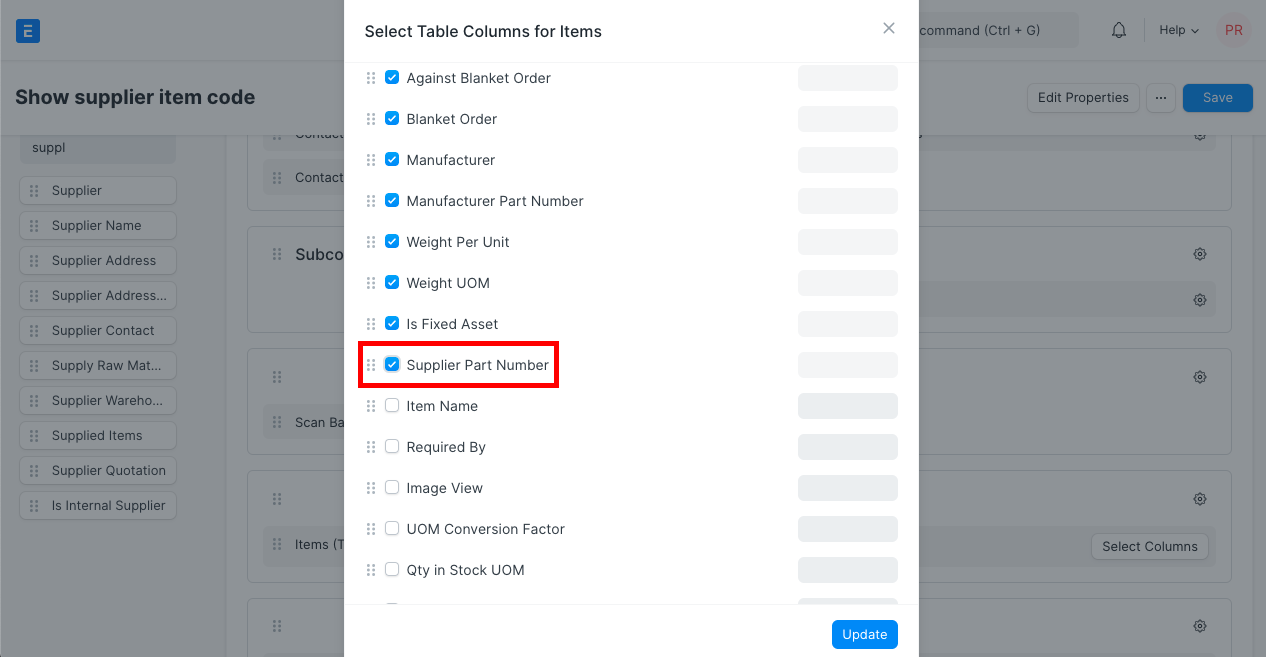
Supplier Item Code will only be fetched in the purchase transaction, if both Supplier and Item Code selected in purchase transaction is mapped with value mentioned in the Item master.
Purchasing in Different UOM
Each item has stock unit of measument (UOM) associated to it. For example UOM of pen could be numbers (Pcs) and sand could be stocked kgs. However, when we place an order with Supplier, UOM for an item could change. Like we can order 1 set/box of Pen, or one truck of sand to our Supplier. When creating purchase transacton, you can change Purchase UOM for an item.
Scenario:
Item Pen is stocked in Nos, but purchased in Box. Hence we will make Purchase Order for Pen in Box.
Step 1: Edit UoM in the Purchase Order
In the Purchase Order, you will find two UoM fied.
- UOM
- Stock UOM
In both the fields, default UOM of an item will be fetched by default. You should edit UOM field, and select Purchase UOM (Box in this case). Updating Purchase UOM is mainly for the reference of the supplier. In the print format, you will see item qty in the Purchase UOM.
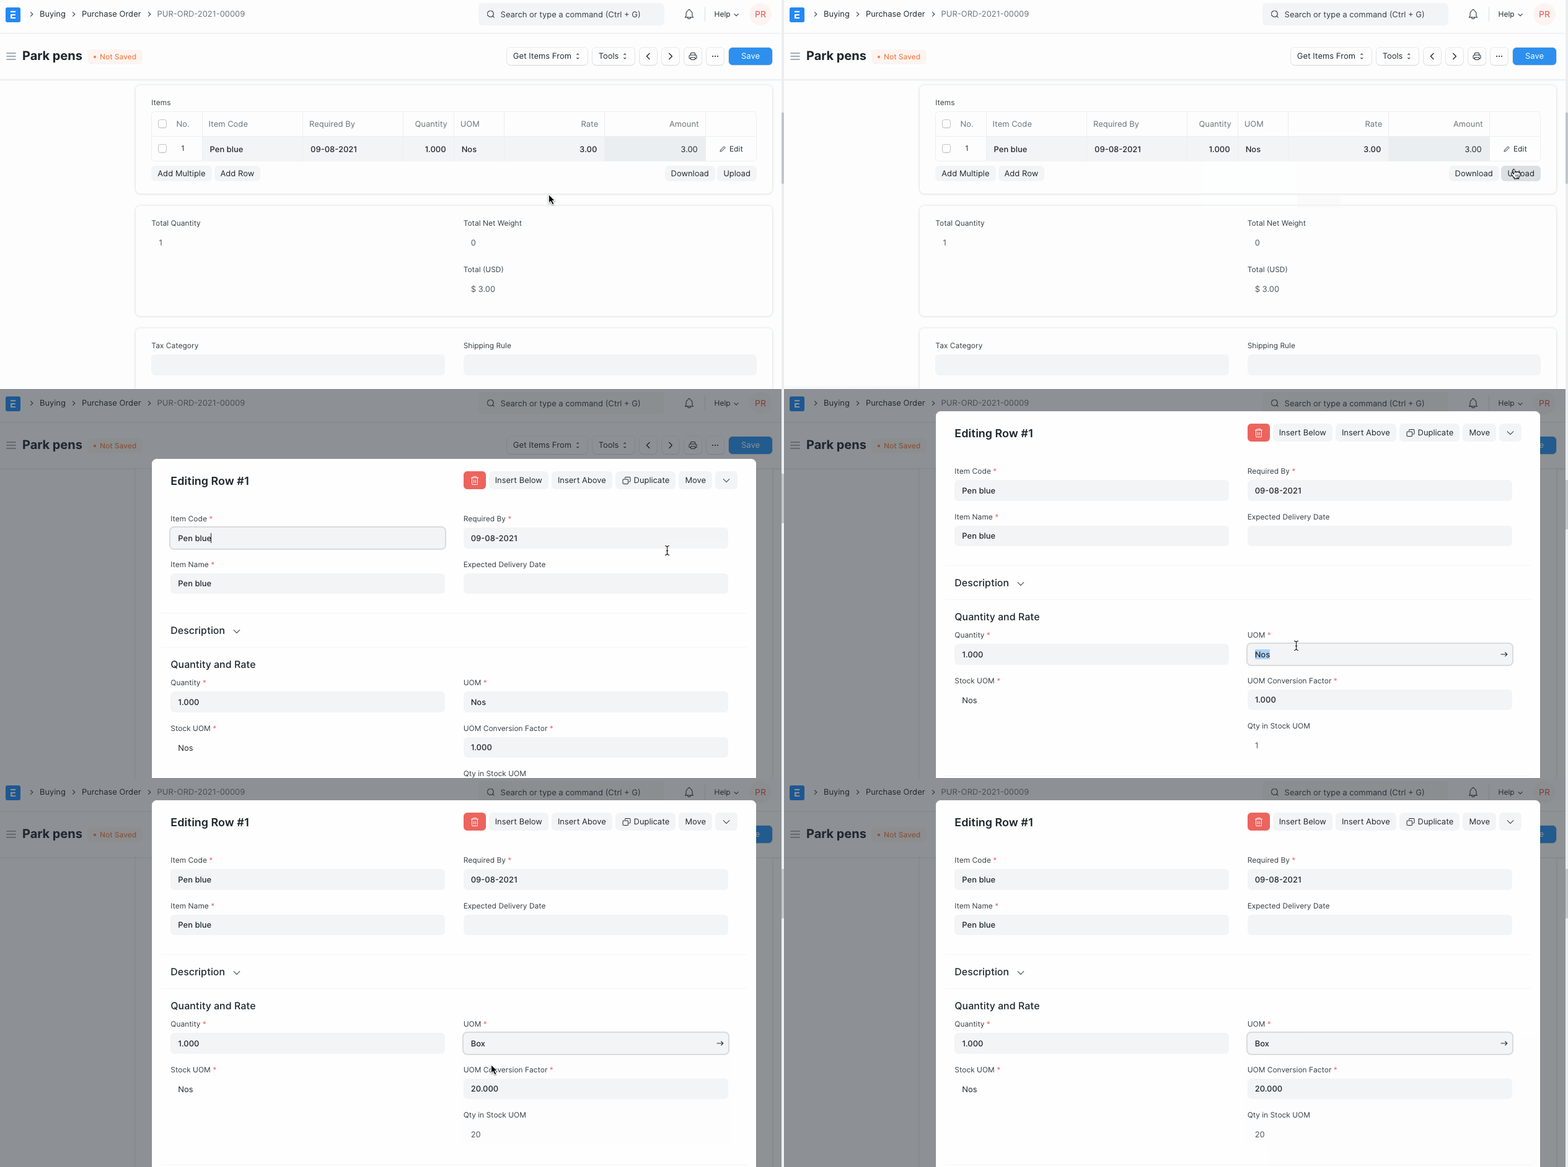
Step 2: Update UOM Conversion Factors
In one Box, if you get 20 Pcs. of Pen, UOM Conversion Factor would be 20.
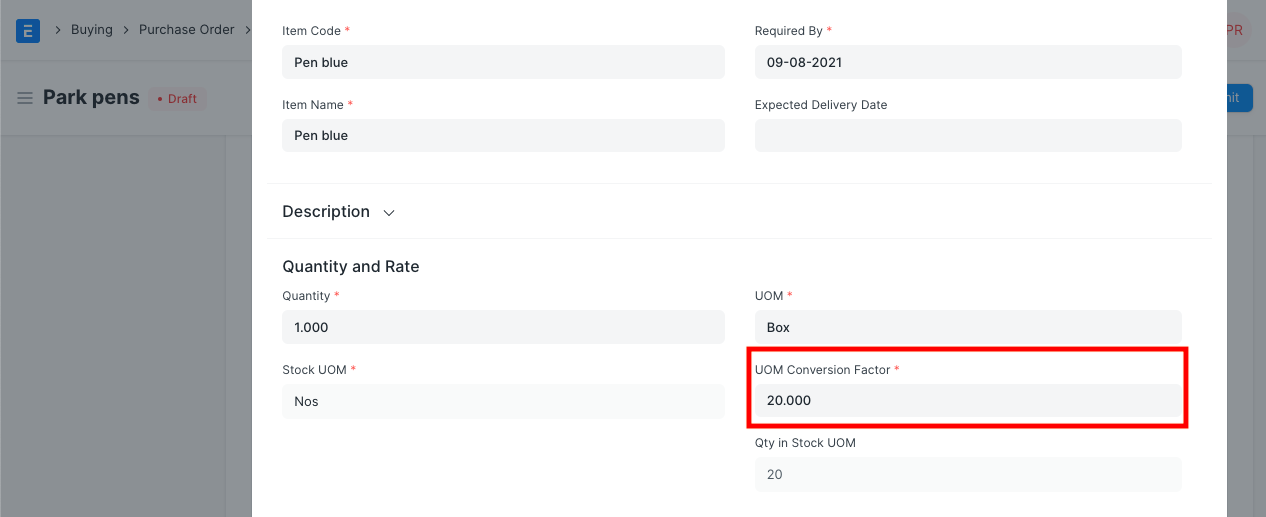
Based on the Qty and Conversion Factor, qty will be calculated in the Stock UOM of an item. If you purchase just one Box, then Qty in the stock UOM will be set as 20.

Stock Ledger Posting
Irrespective of the Purchase UOM selected, stock ledger posting will be done in the Default UOM of an item. Hence you should ensure that conversion factor is entered correctly while purchasing item in different UOM.
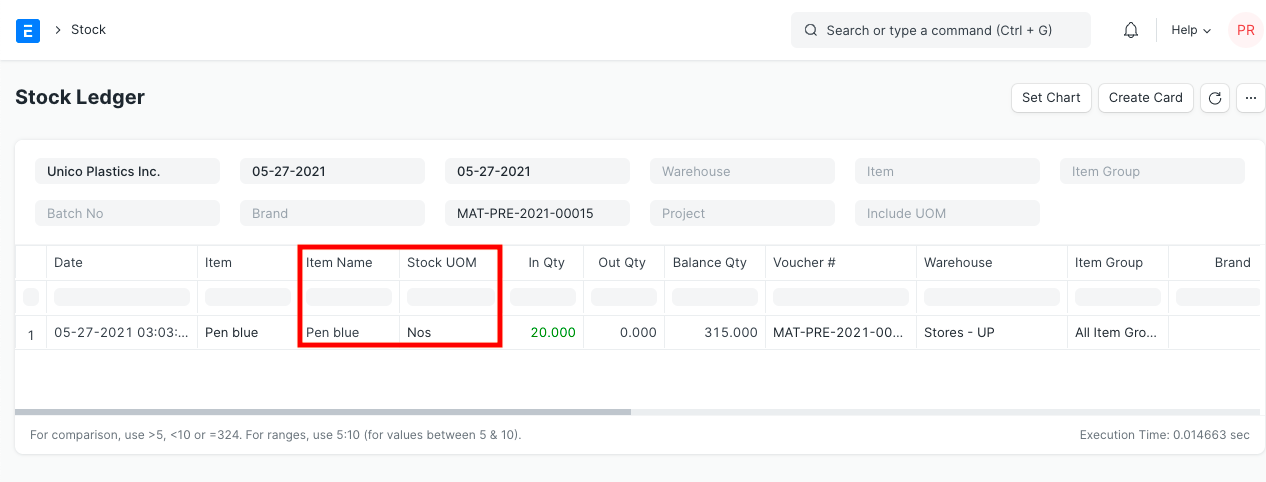
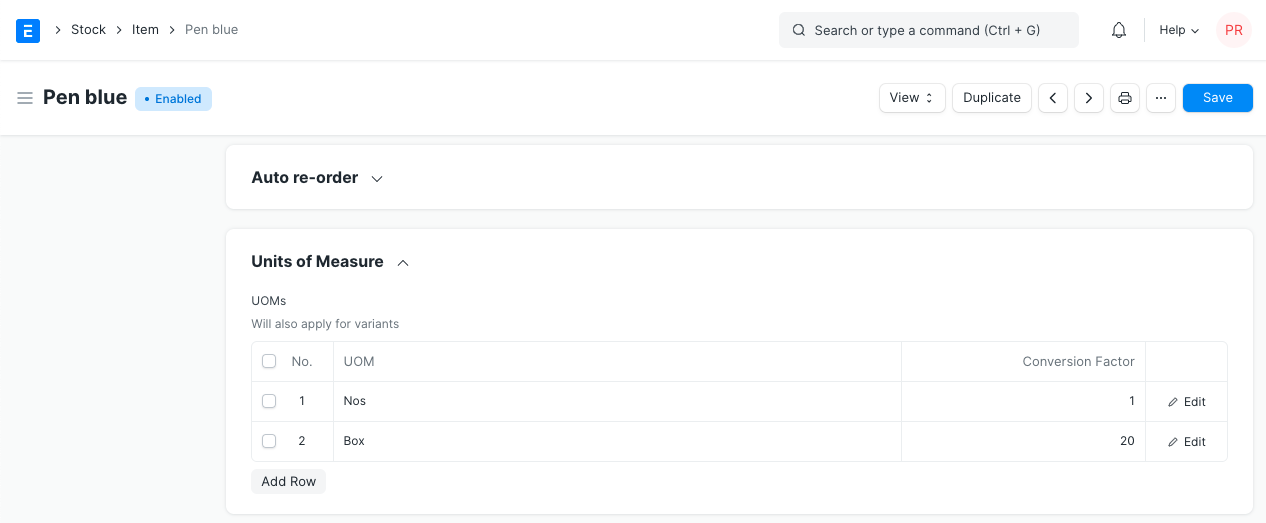
Set Conversion Factor in Item
In the Item master, under Purchase section, you can list all the possible purchase UOM of an item, with its UOM Conversion Factor.
Amending Purchase Order after Submit
Rate and Qty in Purchase Order can now be amended after Submit using the Update Items button.
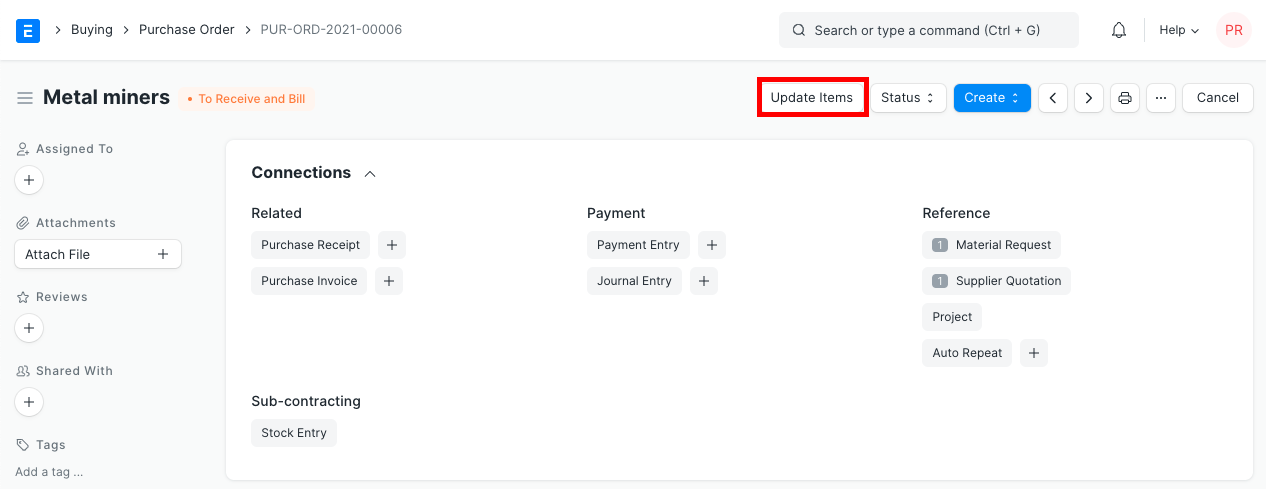
To Update Rate and Qty in a Submitted Purchase Order, click on the Update Items button. A dialog will pop up to let you make the change.
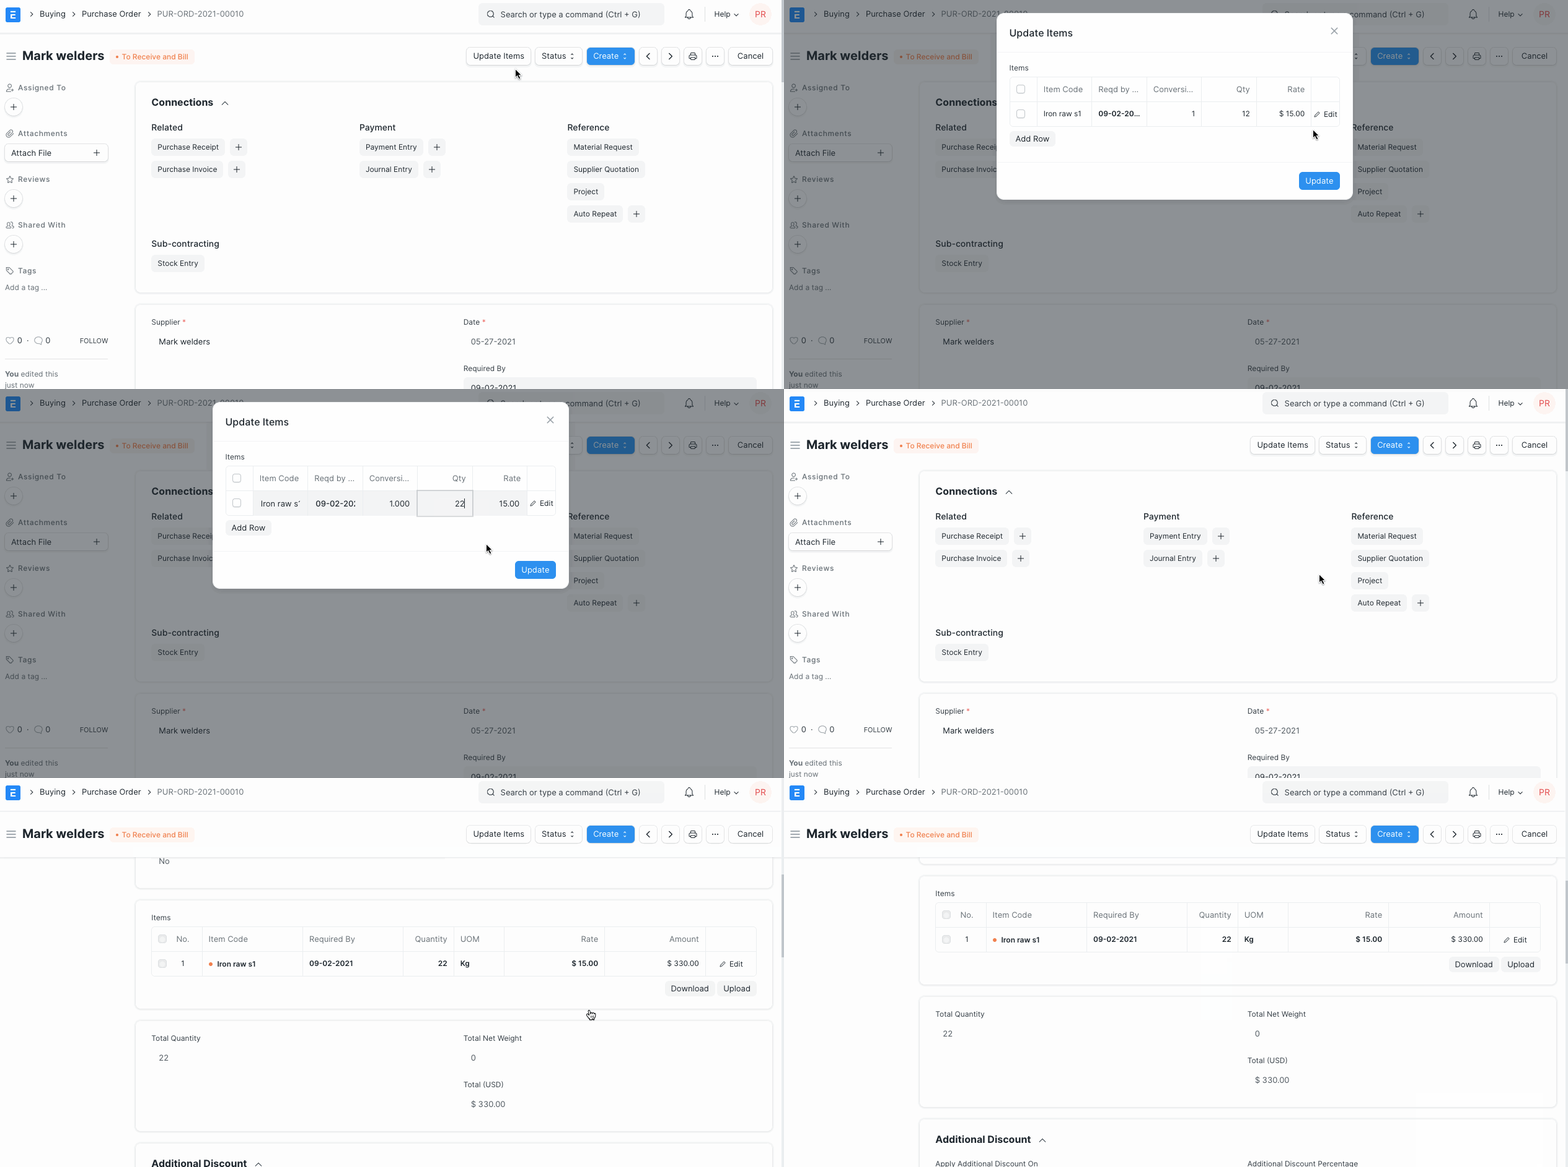
Please Note the following validations and usecases:
- Update Features checks if Purchase Order has Purchase Receipt and Purchase Invoice.
- Qty can be updated for un-received and for partially-received Purchase Order. For Purchase Order with completed Purchase Receipt, it cannot be updated.
- Rate can be updated for un-invoiced and partially-invoiced Purchase Order. For Purchase Order with submitted Purchase Invoice, it cannot be updated.
Setting Employee-wise Leave Approver
Use Case: Need to set up one Leave Approver per Employee.
Steps:
1) Go to the Employee’s master.
2) In “Attendance and Leave Details” section, select the Leave Approver for that particular Employee.
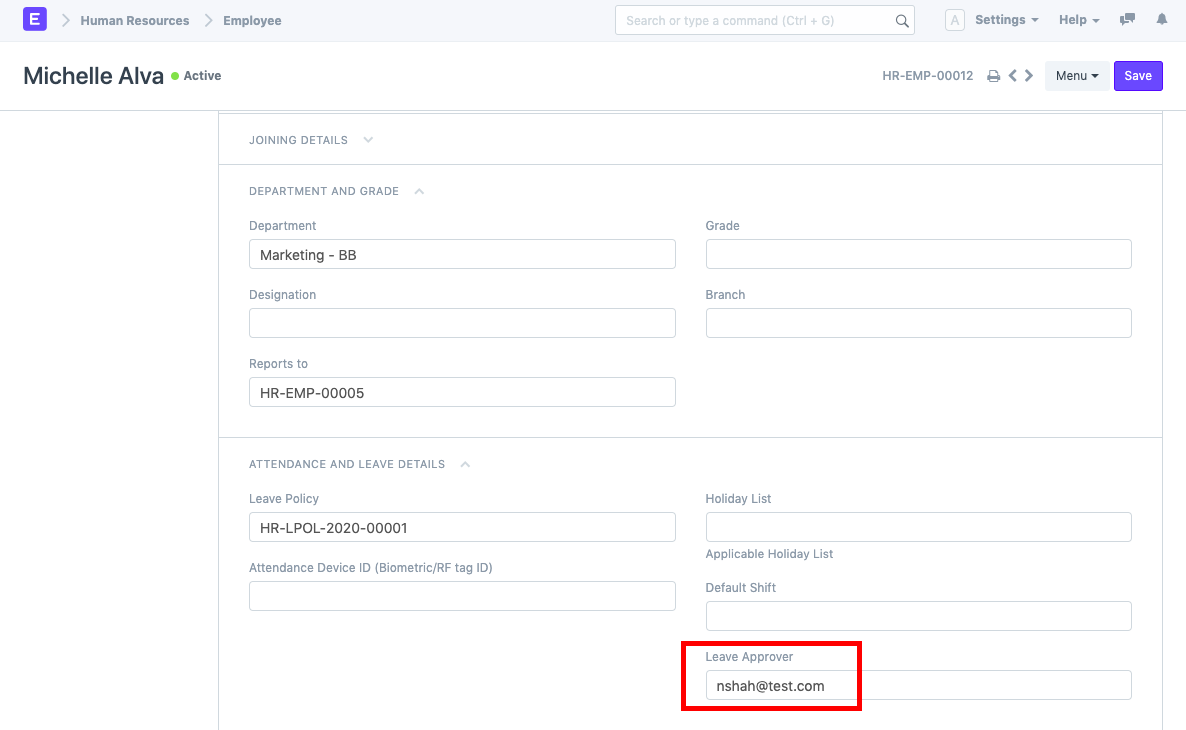
3) Assign a Leave Policy to the Employee through the Employee master and Grant leaves through Leave Period.
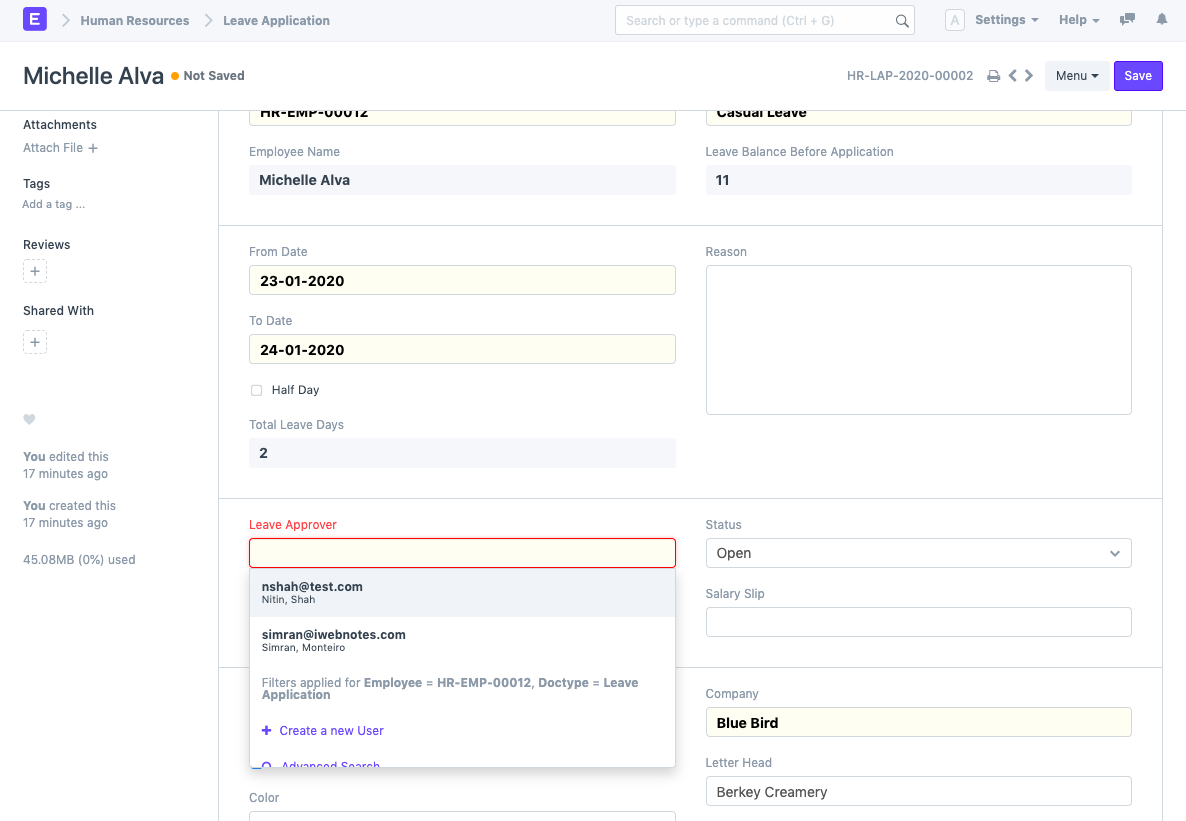
4) Create a new Leave Application for the Employee. The system automatically fetches the Leave Approver set for that particular Employee.
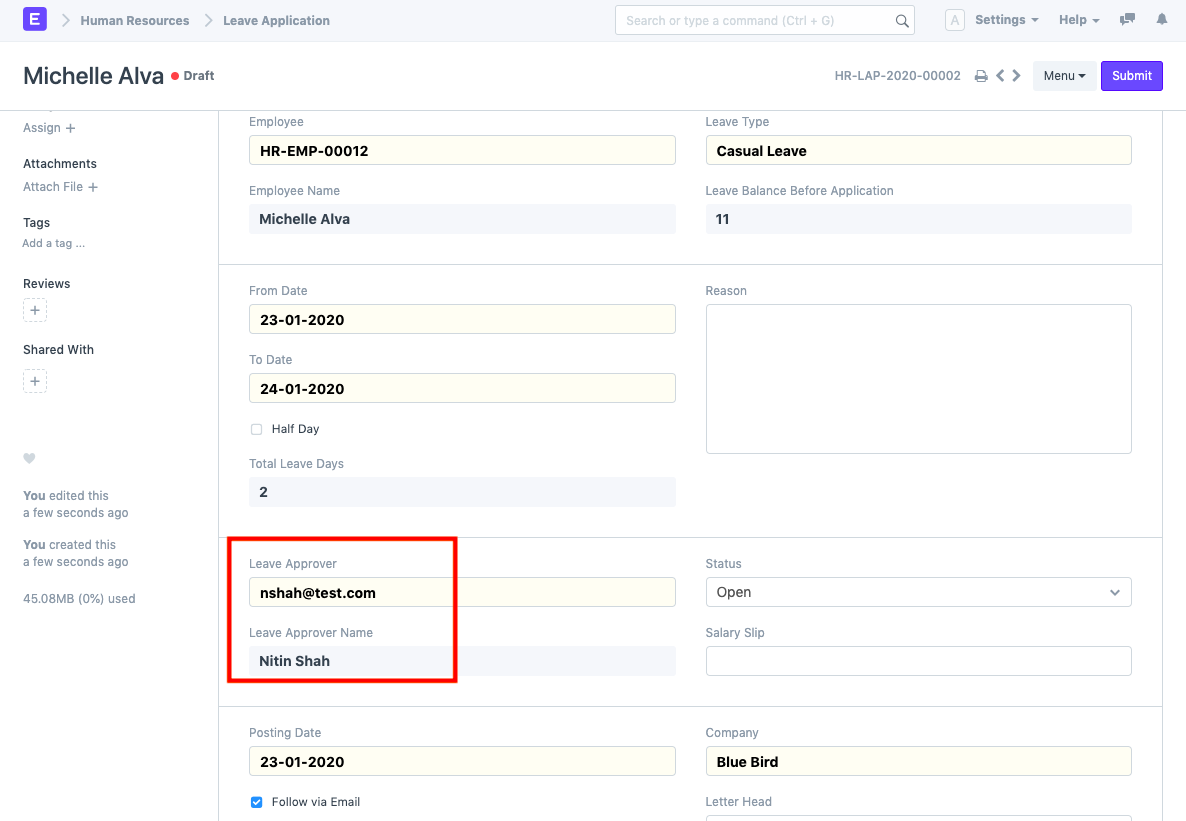
Note: In case you have set a Department for that Employee, and Leave Approvers are also set in that particular Department, then those Leave Approvers will also be fetched in the Leave Application. However, the default Leave Approver will always be the one set in the Employee master.
For example, a Leave Approver is set in the Department.
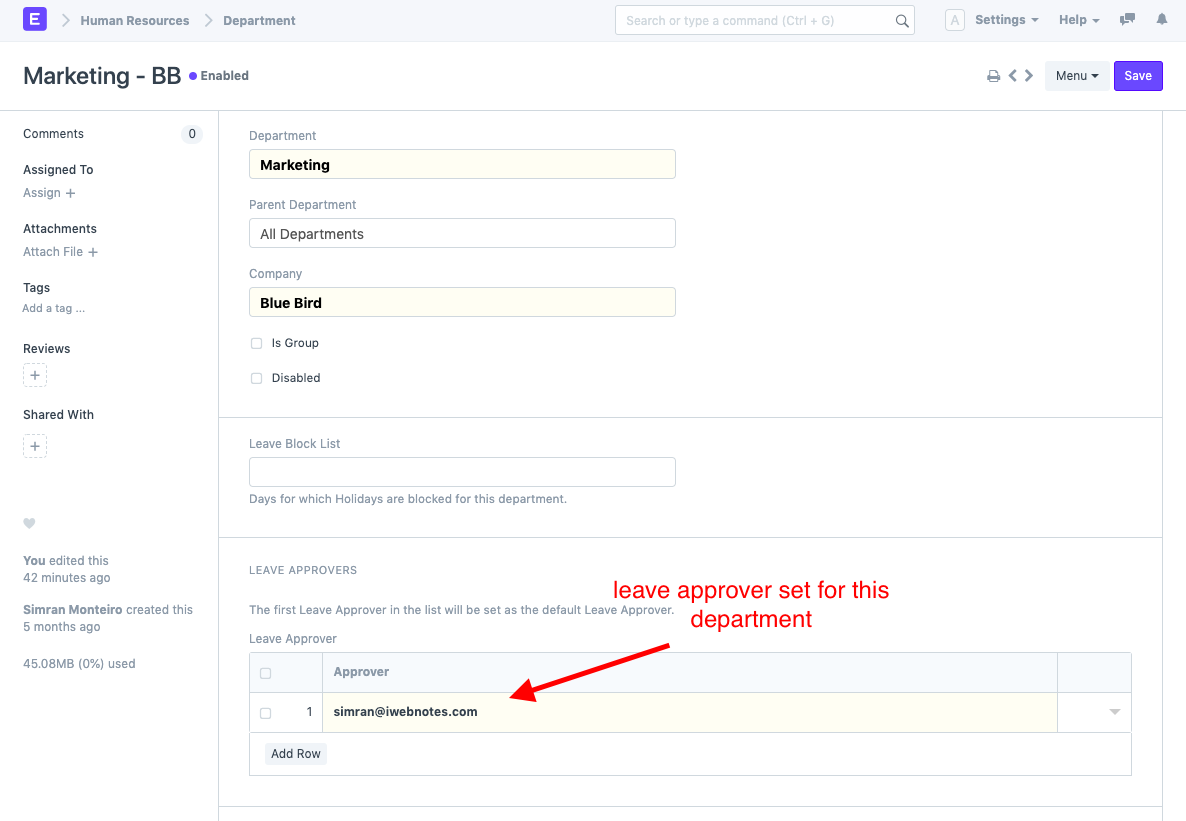
Now, if an Employee belonging to this Department creates a Leave Application, all the Leave Approvers set for this Department will also be fetched in his Leave Application.
Selling in Different UOM
A sell price unit of measure (UOM) is the UOM with which you price items. You can have multiple sell price UOMs for any inventory item. However, when Customer places, UoM for an item could change.
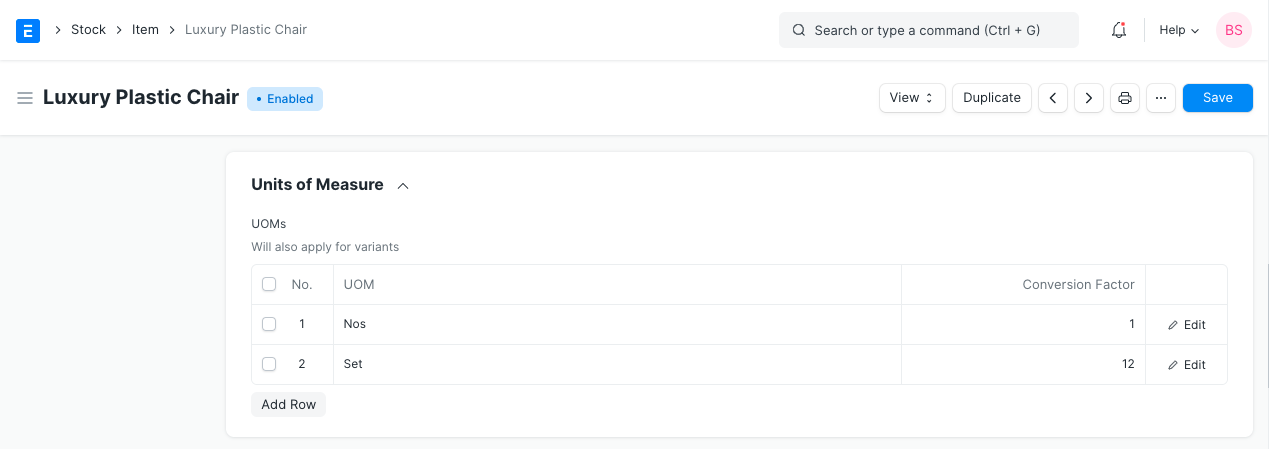
For example an Item Pen is stocked in Nos, but sold in Box. Hence we will make Sales Order for Pen in Box.
Step 1: In the Item master, under Unit of Measure section, you can list all the possible UoM of an item, with its UoM Conversion Factor. Update UoM Conversion Factors In one Box, if you get 10 Nos. of Pen, UoM Conversion Factor would be 10.
Setp 2: In the Sale Order, you will find two UoM fields
- UoM
- Stock UoM
In both the fields, default UoM of an item will be fetched by default. You should edit UoM field, and select Sale UoM (Box in this case). Updating Sales UoM is mainly for the reference of the Customer. In the print format, you will see item quantity in the Sales UoM.

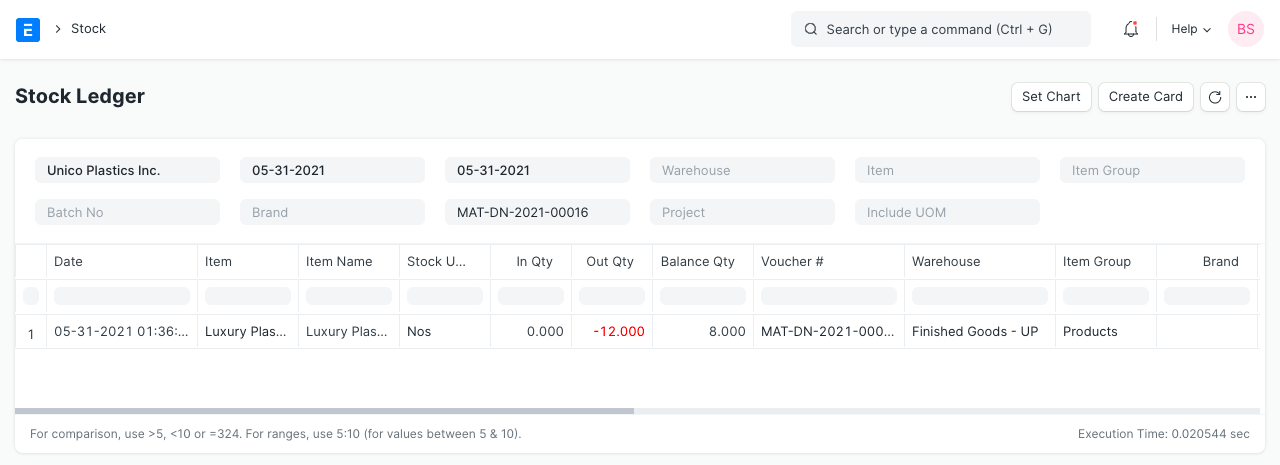
Based on the Qty and Conversion Factor, qty will be calculated in the Stock UoM of an item. If you sell just one Box, then Qty as per stock UoM will be set as 10.
Stock Ledger Posting
Irrespective of the Sales UoM selected in the Sale Order, stock ledger posting will be done in the Default UoM of an item. Hence you should ensure that conversion factor is entered correctly while selling item in different UoM.
Shipping Rule
Shipping Rule master helps in defining a rule based on which shipping charge is applied on a sales transactions.
Most of the companies (mainly retail) have shipping charge applied based on the invoice total. If invoice value is above certain value, then shipping charge applied are lesser. If invoice value is less, then shipping charges applied are bit more than high shipping charges applied on a high value invoice. You can setup Shipping Rule to address the requirement of varying shipping charge based on the Net Total of sales transaction.
To setup Shipping Rule, go to:
Selling > Setup > Shipping Rule or Accounts > Setup > Shipping Rule
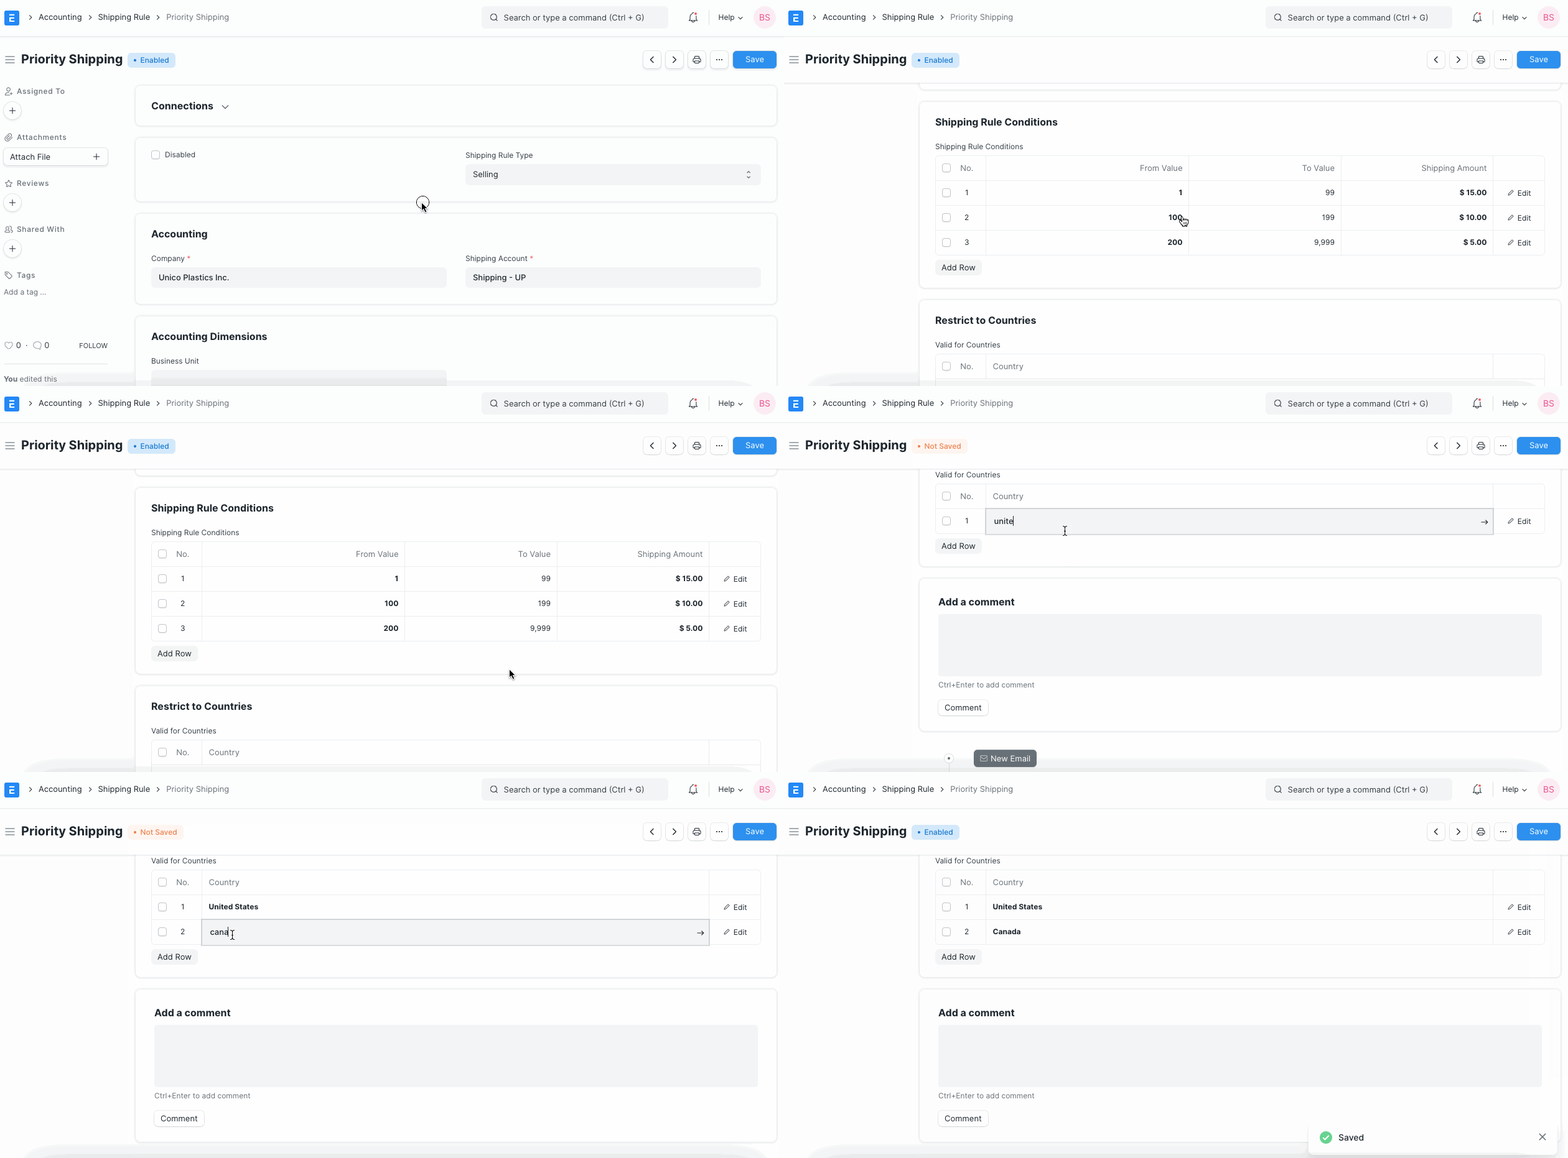
Shipping Rule Conditions
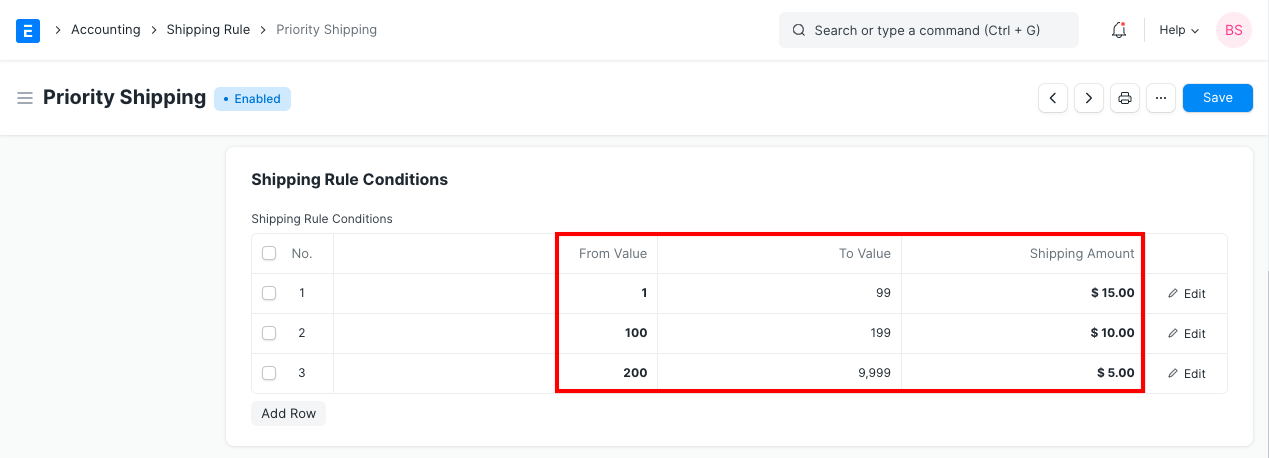
Referring above, you will notice that shipping charges are reducing as value is increasing. This shipping charge will only be applied if transaction total falls under one of the above range.
Valid for Countries
You can set Shipping Charges valid for all the countries, or specify specific Country. If specific countries mentioned, then Shipping Charges will be applied only if Customer’s country matches Country mentioned in the Shipping Rule.
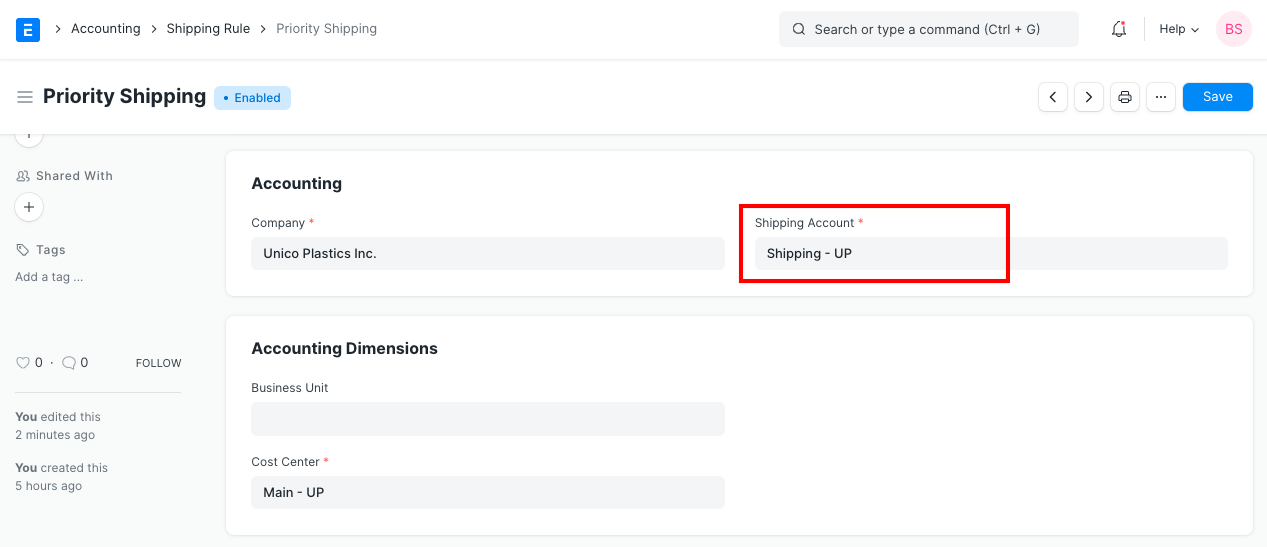
Shipping Account
If shipping charges are applied based on Shipping Rule, then more values like Shipping Account, Cost Center will be needed as well to add row in the Taxes and Other Charges table of transaction. Hence these details are tracked as well in the Shipping Rule.
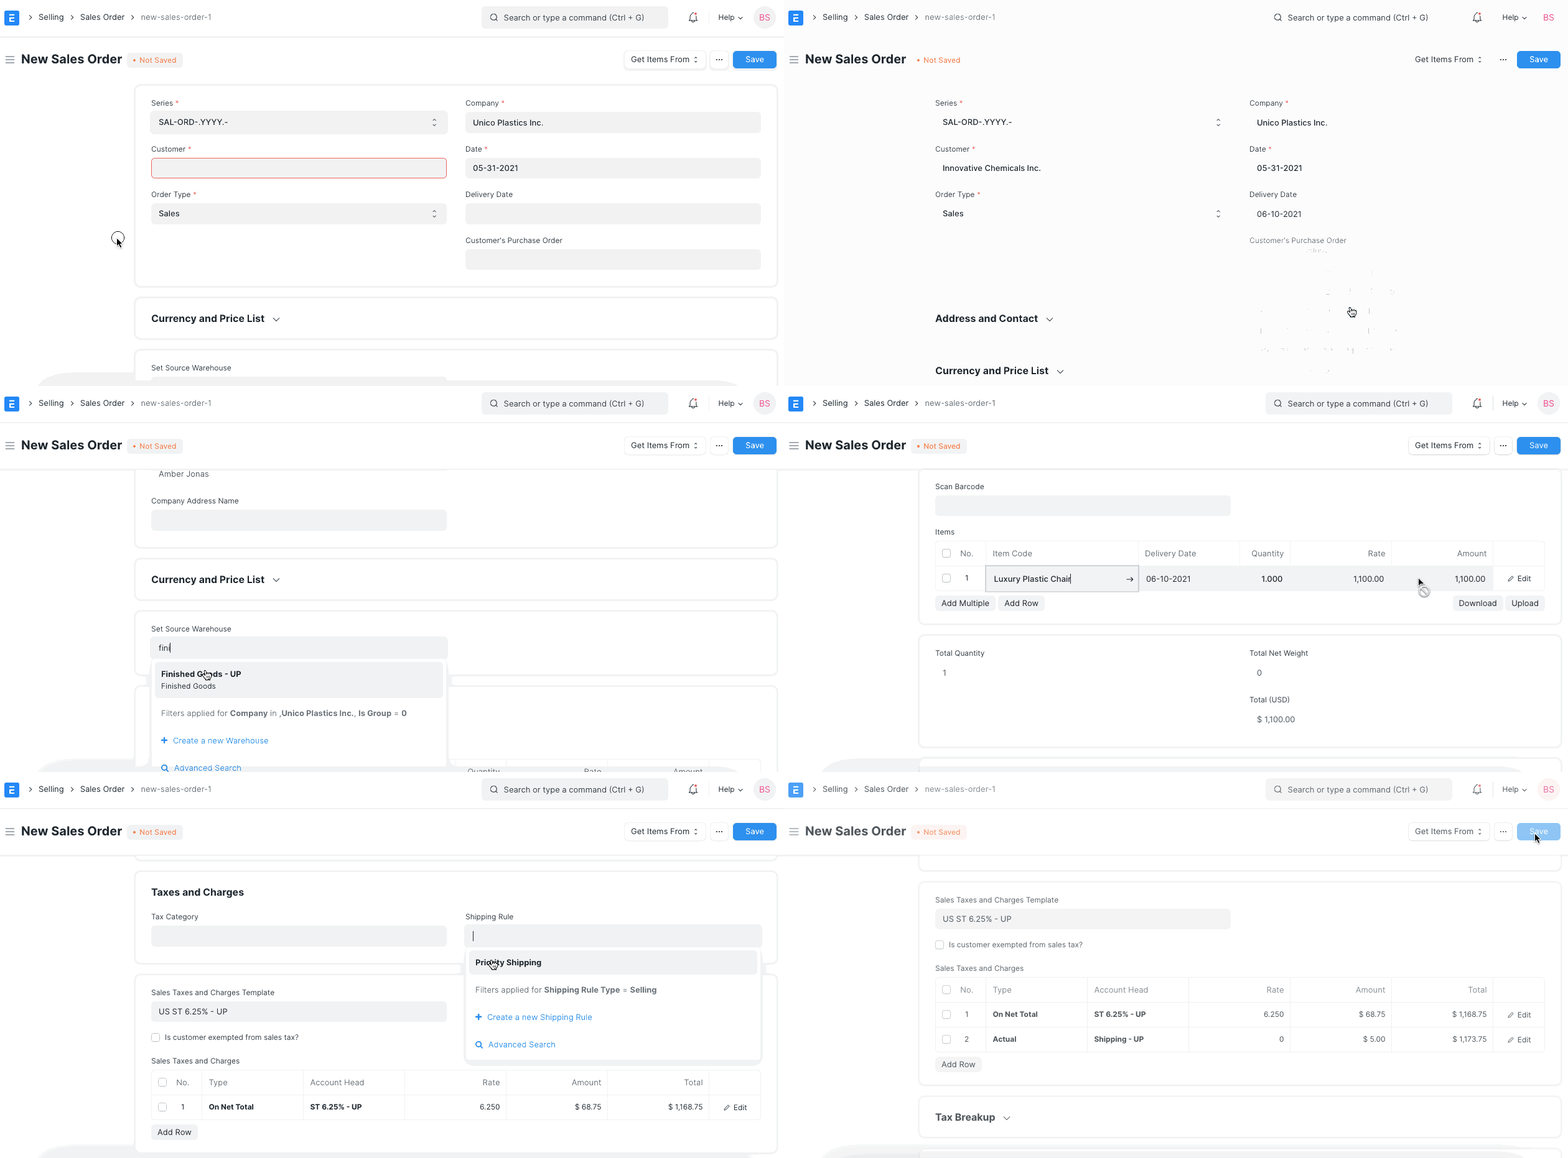
Shipping Rule Application
Following is an example of how shipping charges is auto-applied on Sales Order based on Shipping Rule.
Adding Margin
User Can apply the margin on Quotation Item and Sales Order Item using following two options. 1)Price Rule: With the help of this method user can apply the margin on Quotation and Sales Order based on condition. You can find the section margin on pricing rule where a user has to select the type of margin whether it is Percentage or Amount and Rate or Amount. The system will apply the margin on quotation item and sales order item if pricing rule is enabled.
To setup Pricing Rule, go to:
Selling > Setup > Pricing Rule or Accounts > Setup > Pricing Rule
Adding Margin in Pricing Rule

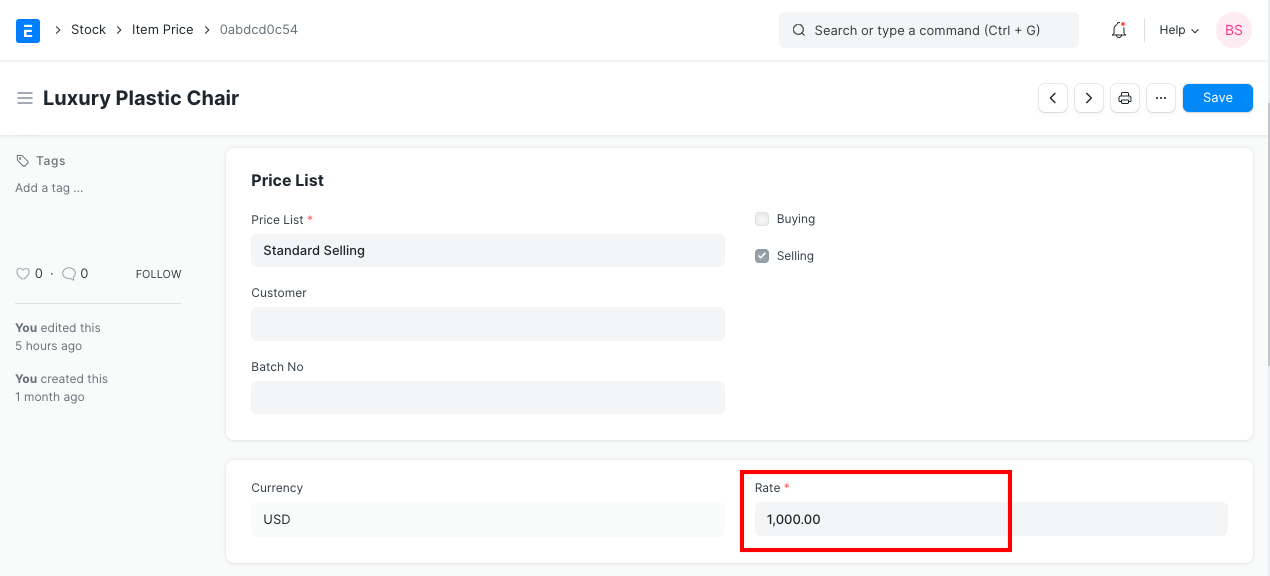
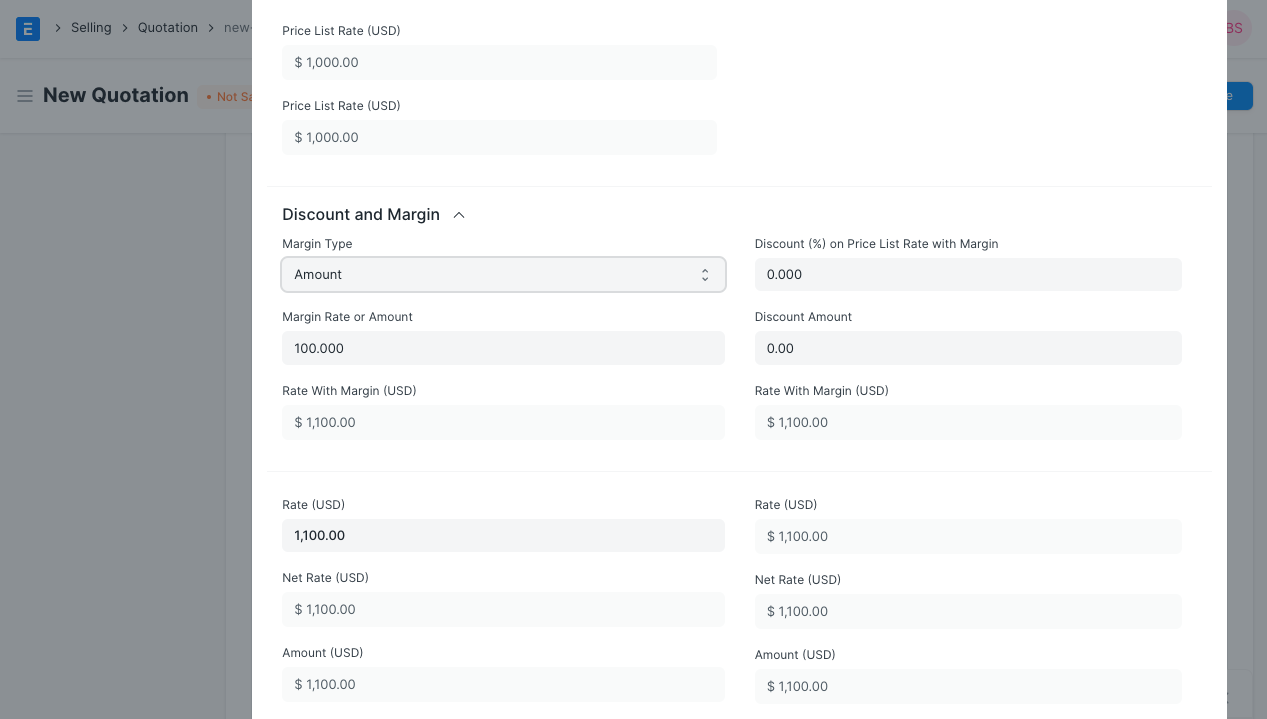
Total Margin is calculated as follows: Rate = Price List Rate + Margin Rate
So, In order to apply the Margin you need to add the Price List for the Item
To add Price List, go to:
Selling > Setup > Item Price or Stock > Setup > Item Price
Adding Item Price
2) Apply margin direct on Item: If user wants to apply the margin without pricing rule, they can use this option. In Quotation Item and Sales Order Item, user can select the margin type and rate or amount. The system will calculate the margin and apply it on price list rate to calculate the rate of the product.
To add margin directly on Quotation or Sales Order, go to:
Selling > Document > Quotation
add item and scroll down to section where you can find the Margin Type
Adding Margin in Quotation
Print Settings
You can print your quotation/sales order on your company’s letterhead. Know more here.
‘Group same items’ will group the same items added multiple times in the items table. This can be seen when your print.
Quotations can also be titled as “Proforma Invoice” or “Proposal”. You can do this by selecting a Print Heading. To create new Print Headings go to Setup > Printing > Print Heading. Know more here.
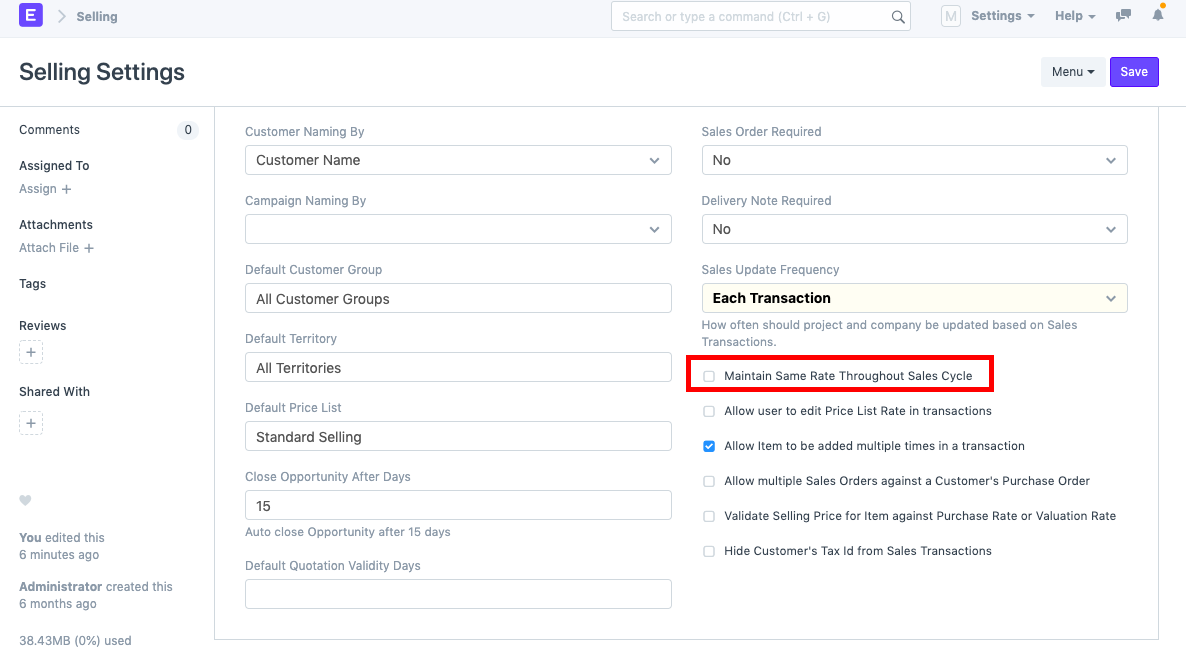
Change the Rate of Items in the Sales Cycle
IONIC ERP for Service Organization
Question: IONIC ERP looks primarily designed for the traders and manufacturers. Is IONIC ERP used by companies offering servies?
Answer:
About 30% of IONIC ERP customers are companies into services. These are companies into software development, certification services, individual consultants and many more. Being into service business ourselves, we use IONIC ERP to manage our sales, accounting, support and HR operations. Check following video to learn how IONIC ERP uses IONIC ERP.
Master Setup
The setup for a Service company differs primarily for Items. They don’t maintain the Stock for Items and thus, don’t have Warehouses.
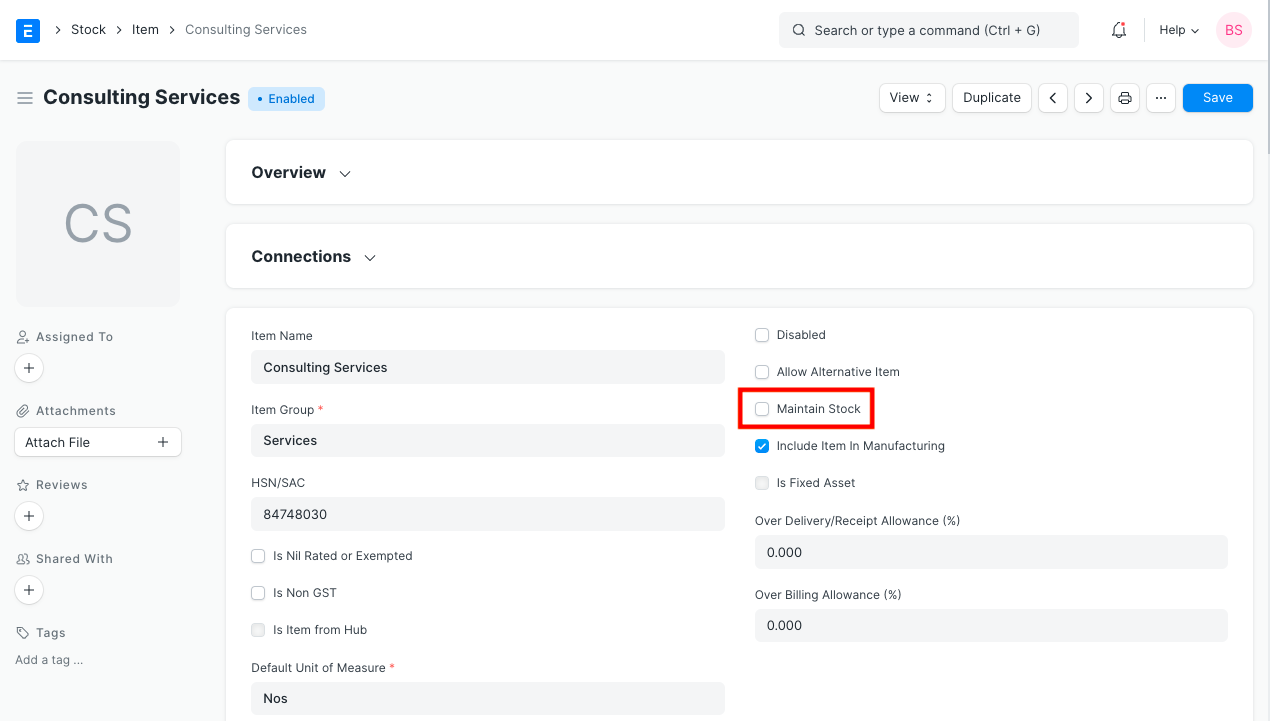
To create a Service (non-stock) Item, in the item master, uncheck “Maintain Stock” field.
When creating Sales Order for the services, select Order Type as Maintenance. Sales Order of Maintenance Type needs lesser details compared to stock item’s order like Delivery Note, item warehouse etc.
Service company can still add stock items to mantain their fixed assets like computers, furniture and other office equipments.
Hiding Non-required Features
Since many modules like Manufacturing and Stock will not be required for the services company, you can hide those modules from:
Setup > Permissions > Show/Hide Modules
Modules unchecked here will be hidden from all the User.
Permissions
IONIC ERP is the permission controlled system. Users access system based on permissions assigned to them. So, if user is not assigned Role related to Stock and Manufacturing module, it will be hidden from that User. Click here to learn more about permission management..
You can also refer to help video on User and Permissions setting in IONIC ERP.
Allow Over Delivery/Billing
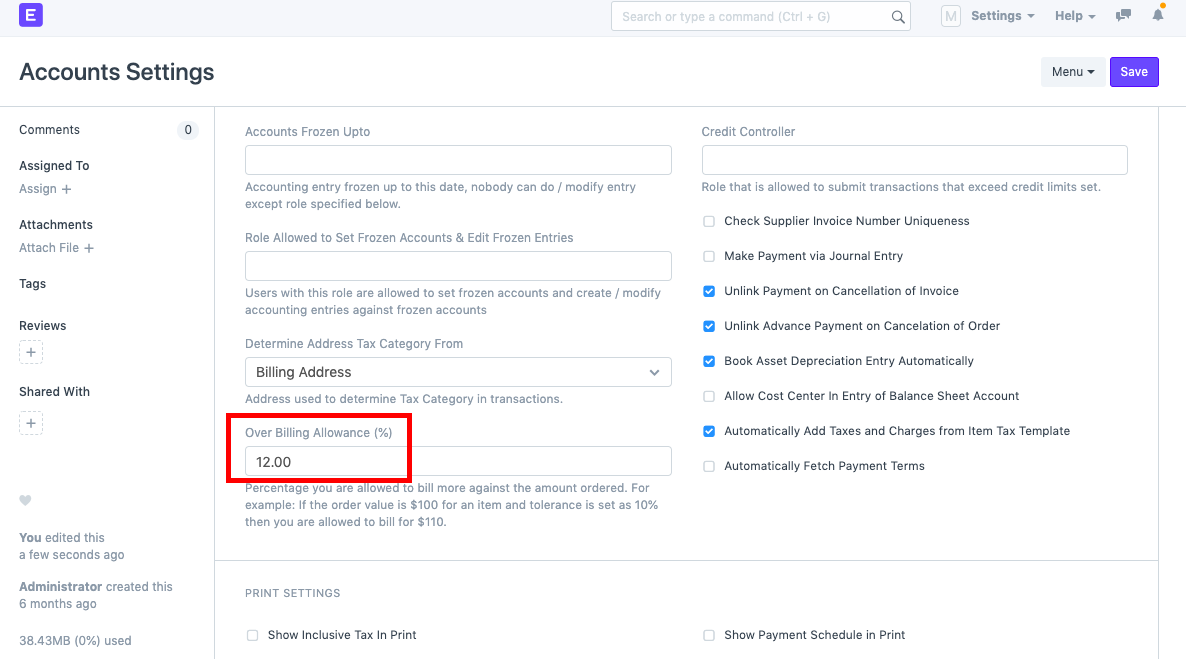
When creating a Delivery Note, system validates if item’s qty is same as in the Sales Order. If item’s qty has been increased, you will get the validation message of over-delivery or receipt.
Considering the case fo sales, if you want to be able to deliver more items than mentioned in the Sales Order, you should update “Allow over delivery or receipt upto this percent” in the Item master.
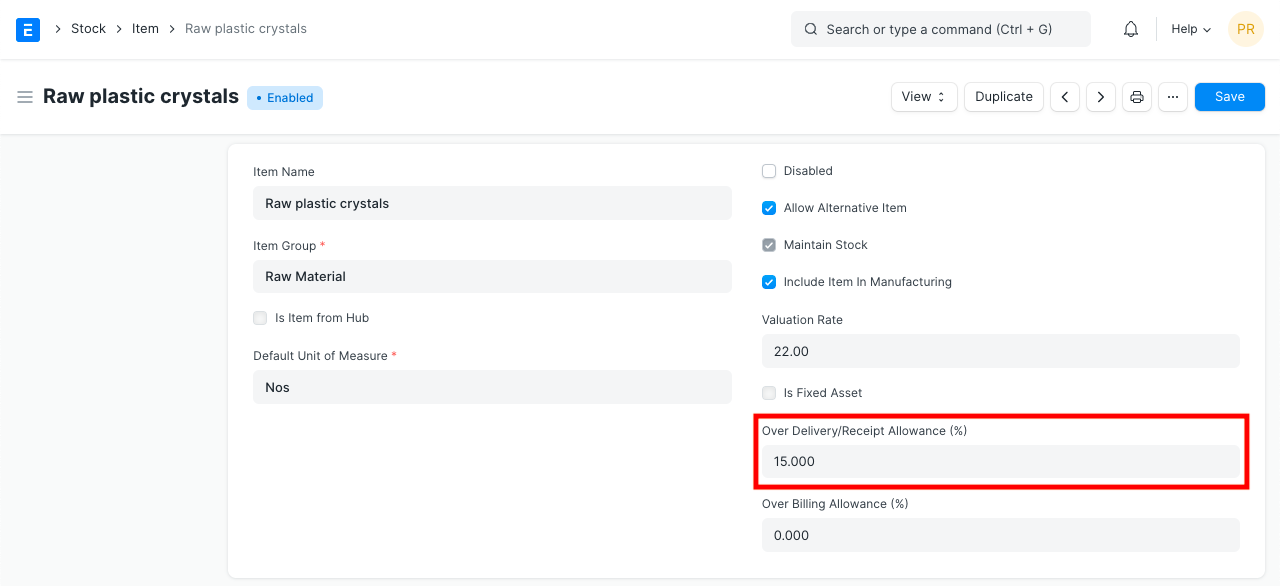
When creating an invoice, item’s rate is also validated based on the preceding transaction like Sales Order. This also applies when creating Purchase Receipt or Purchaes Invoice from Purchase Order. Updating “Allow over delivery or receipt upto this percent” will be affective in all sales and purchase transactions.
For example, if you have ordered 100 units of an item, and if item’s over receipt percent is 50, then you are allowed to make Purchase Receipt for upto 150 units.
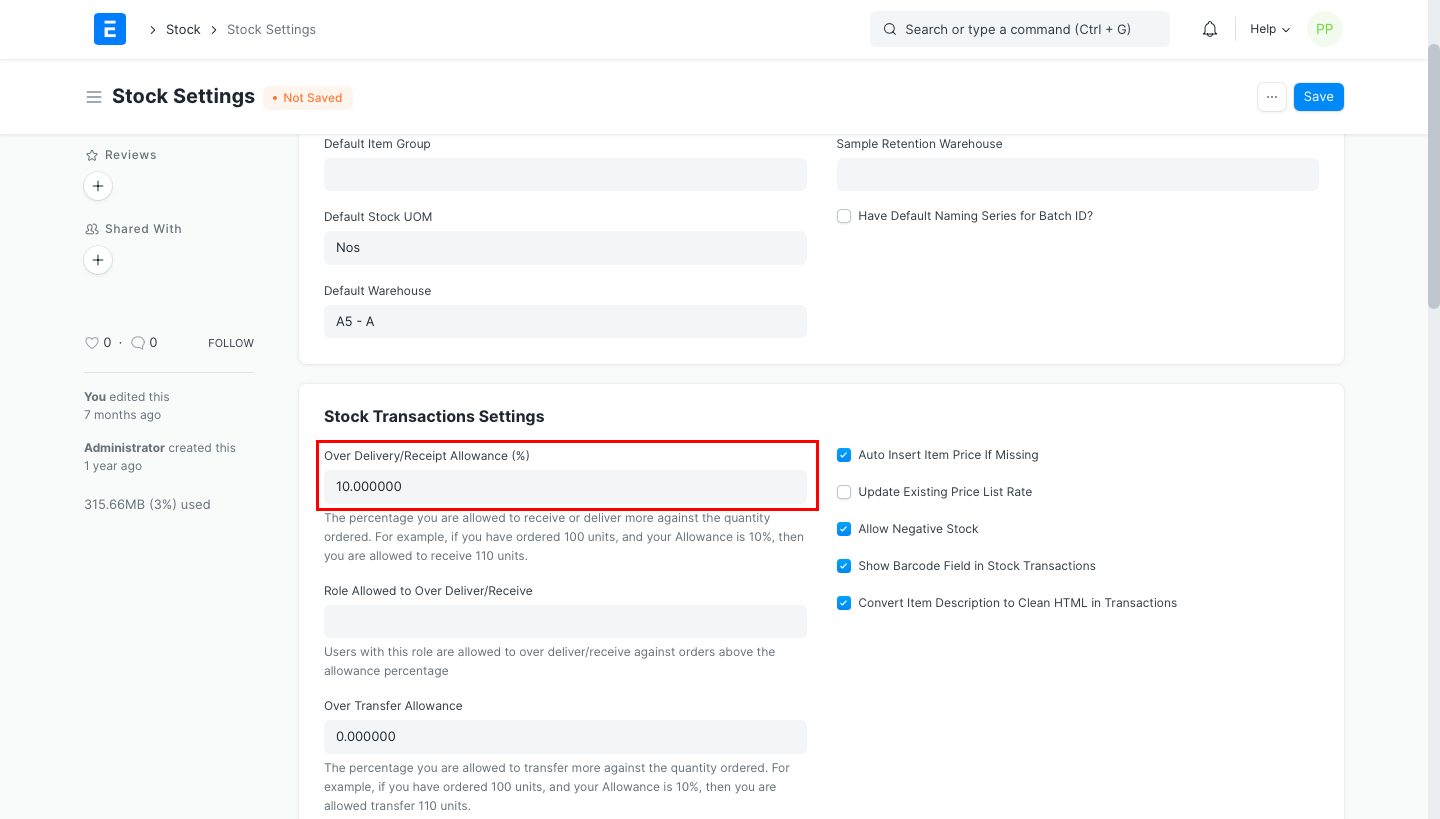
Update global value for “Allow over delivery or receipt upto this percent” from Stock Settings. Value updated here will be applicable for all the items.
- Go to
Stock > Setup > Stock Settings - Set
Limit Percentage. - Save Stock Settings.
Auto Creation of Material Request
To prevent stockouts, you can track item’s reorder level. When stock level goes below reorder level, purchase manager is notified and instructed to initiate purchase process for the item.
In IONIC ERP, you can update item’s Reorder Level and Reorder Qty in the Item master. If same item has different reorder level, you can also update warehouse-wise reorder level and reorder qty.

With reorder level, you can also define what should be the next action. Either new purchase or transfer from another warehouse. Based on setting in Item master, purpose will be updated in the Material Request as well.

When item’s stock reaches reorder level, Material Request is auto-created automatically. You can enable this feature from:
Stock > Setup > Stock Settings

A separate Material Request will be created for each item. User with Purchase Manager’s role will receive email alert about these Material Requests.
If auto creation of Material Request is failed, User with Purchase Manager role will be informed about error message. One of the most encountered error message is:
An error occurred for certain Items while creating Material Requests based on Re-order level. Date 01-04-2016 not in any Fiscal Year.
One of the reason of error could be Fiscal Year as well. Click here to learn more about it.
Item Codification
If you already have a full-fledged business with a number of physical items, you would have probably coded your items. If you have not, you have a choice. We recommend that you should codify if you have lot of products with long or complicated names. In case you have few products with short names, it is preferable to keep the Item Code same as Item Name.
Item codification has been a sensitive topic and wars have been fought on this (not joking). In our experience, when you have items that cross a certain size, life without codification is a nightmare.
1. Benefits
- Standard way of naming things.
- Less likely to have duplicates.
- Explicit definition.
- Helps to quickly find if a similar item exists.
- Item names get longer and longer as more types get introduced. Codes are shorter.
2. Challenges
- You have to remember the codes!
- Harder for new team members to pick up.
- You have to create new codes all the time.
3. Example
You should have a simple manual / cheat-sheet to codify your Items instead of just numbering them sequentially. Each letter should mean something. Here is an example:
If your business involves wooden furniture, then you may codify as follows:
Item Codification Summary Sheet (SAMPLE)
First letter: "Material"            Third letter: "Size"

- W - Wood                          - 0 - less than 1mm
- H - Hardware                      - 1 - 1mm - 5mm
- G - Glass                         - 2 - 5mm - 10mm
- U - Upholstery                    - 3 - 10mm - 10cm
- P - Plastic

Second Letter: "Type"

For Wood:                           For Hardware:

- S - Sheet                         - S - Screw
- B - Bar                           - N - Nut
- L - L-section                     - W - Washer
- M - Molded                        - B - Bracket
- R - Round
The last few letters could be sequential. So by looking at code WM304 – you know its a wooden molding less than 10cm in size
4. Standardization
If you have more than one person naming items, the style of naming items will change for everyone. Sometimes, even for one person, he or she may forget how they had named the item and may create a duplicate name “Wooden Sheet 3mm” or “3mm Sheet of Wood”?
5. Rationalizing
It is a good practice to have minimum varieties of items so that you keep minimum stock, housekeeping is simpler etc. When you are planning a new product and you want to know if you are already purchasing a part in some other product, the item codes will help you quickly determine if you are using a similar raw material in another product.
We believe if you do this small investment, it will help you rationalize things as your business grows, though its okay not to codify if you have less items.
Serial Number Naming
Serial Nos. is unique value assigned on each unit of an item. Serial no. helps in tracking item’s warranty and expiry details. Generally high value items like machines, computers, costly equipments are serialized.
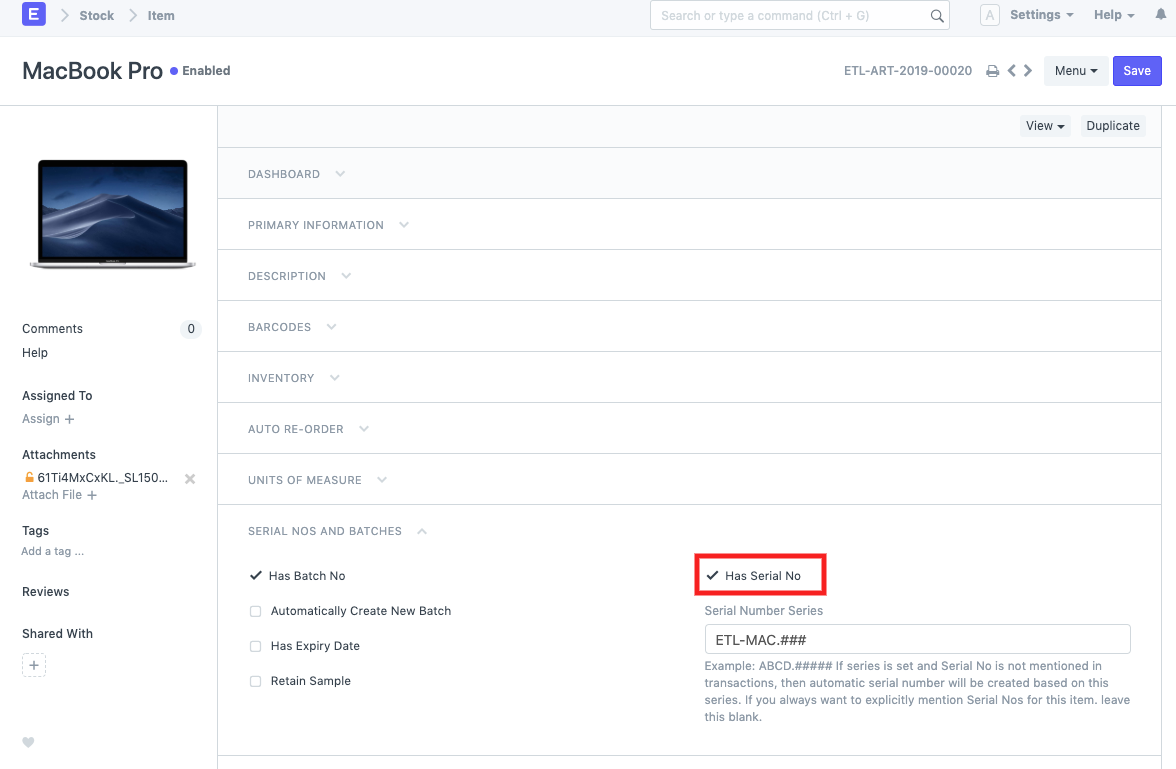
To make item Serialized, in the Item master, check Has Serial No.
There are two ways Serial no. can be generated in IONIC ERP.
1. Serializing Purchase Items
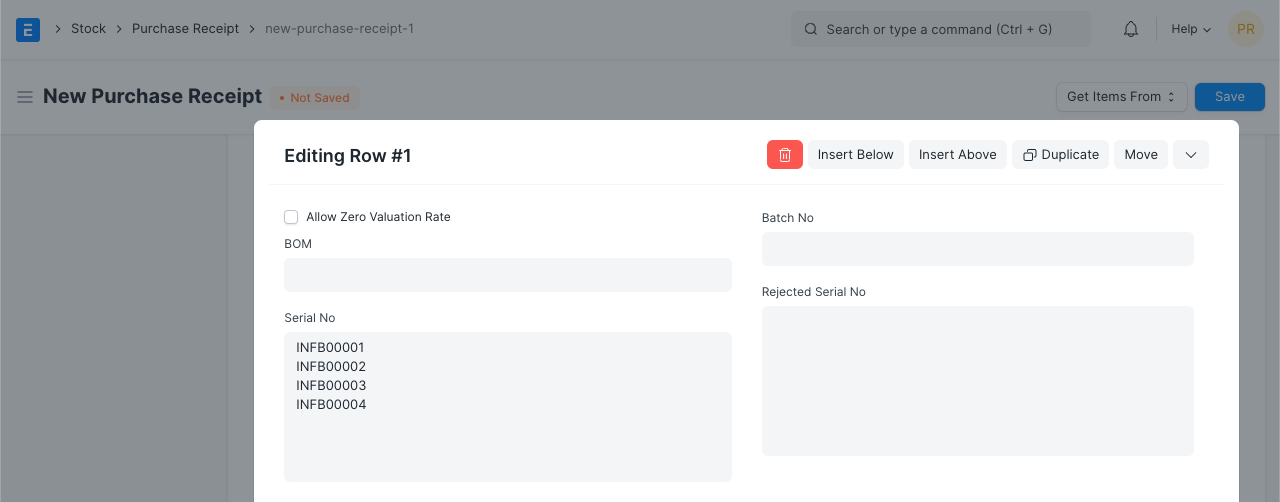
If purchased items are received with Serial Nos. applied by OEM (original equipment manufacturer), you can follow same Serial No in IONIC ERP as well. While creating Purchase Receipt, you shall scan or manually enter Serial nos. for an item. On submitting Purchase Receipt, Serial Nos. will be created in the backend as per Serial Nos. provided for an item. If using OEM’ Serial No., then in the Item master, Prefix should not be mentioned for serializalization. As per this scenaio, Prefix field should be left blank.
If received items already has its Serial No. barcoded, you can simply scan that barcode for entering Serial No. in the Purchase Receipt. Click here to learn more about it.
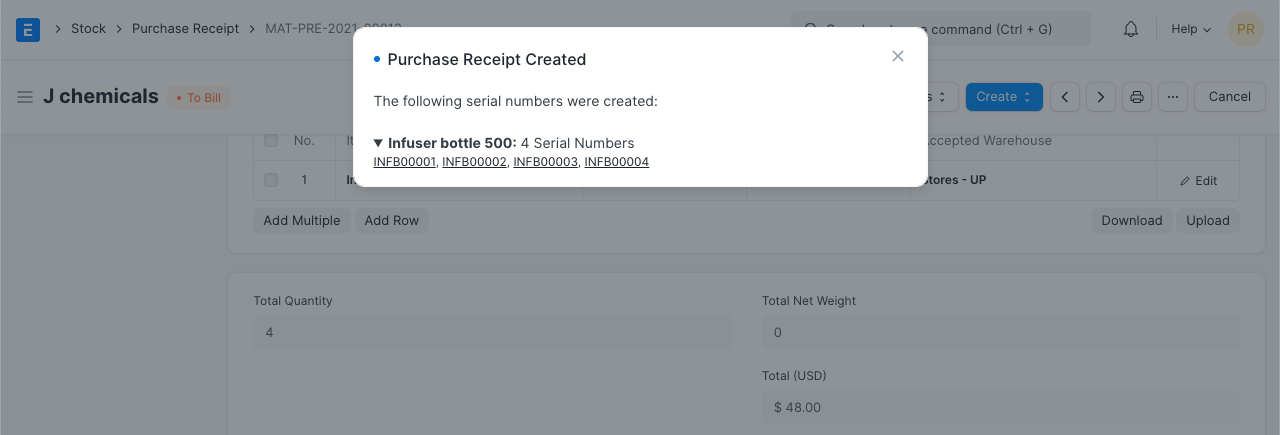
On submission of Purchase Receipt or Stock entry for the serialized item, Serial Nos. will be auto-generated.
Generated Serial numbers will be updated for each item.
2. Serializing Manufacturing Item
To Serialize Manufacturing Item, you can define Series for Serial No. Generation in the Item master itself. Following that series, system will create Serial Nos. for Item when its Production entry is made.
2.1 Serial No. Series
When Item is set as serialized, it will allow you to mentioned Series for it.

2.2 Production Entry for Serialized Item
On submission of production entry for manufacturing item, system will automatically generate Serial Nos. following Series as specified in the Item master.

Track Items Using Barcode
A barcode is a value decoded into vertical spaced lines. Barcode scanners are the input medium, like Keyboard. When it scans a barcode, the data appears in the computer screens at the point of a cursor.
Item Master
To set the barcode of a particular item, you will have to open the Item record. You can also enter barcode while creating a new item.

Once barcode field is updated in item master, items can be fetched using barcode. This feature will be available in Delivery Note, Sales Invoice, Purchase Receipt, and Stock Reconciliation transactions only.
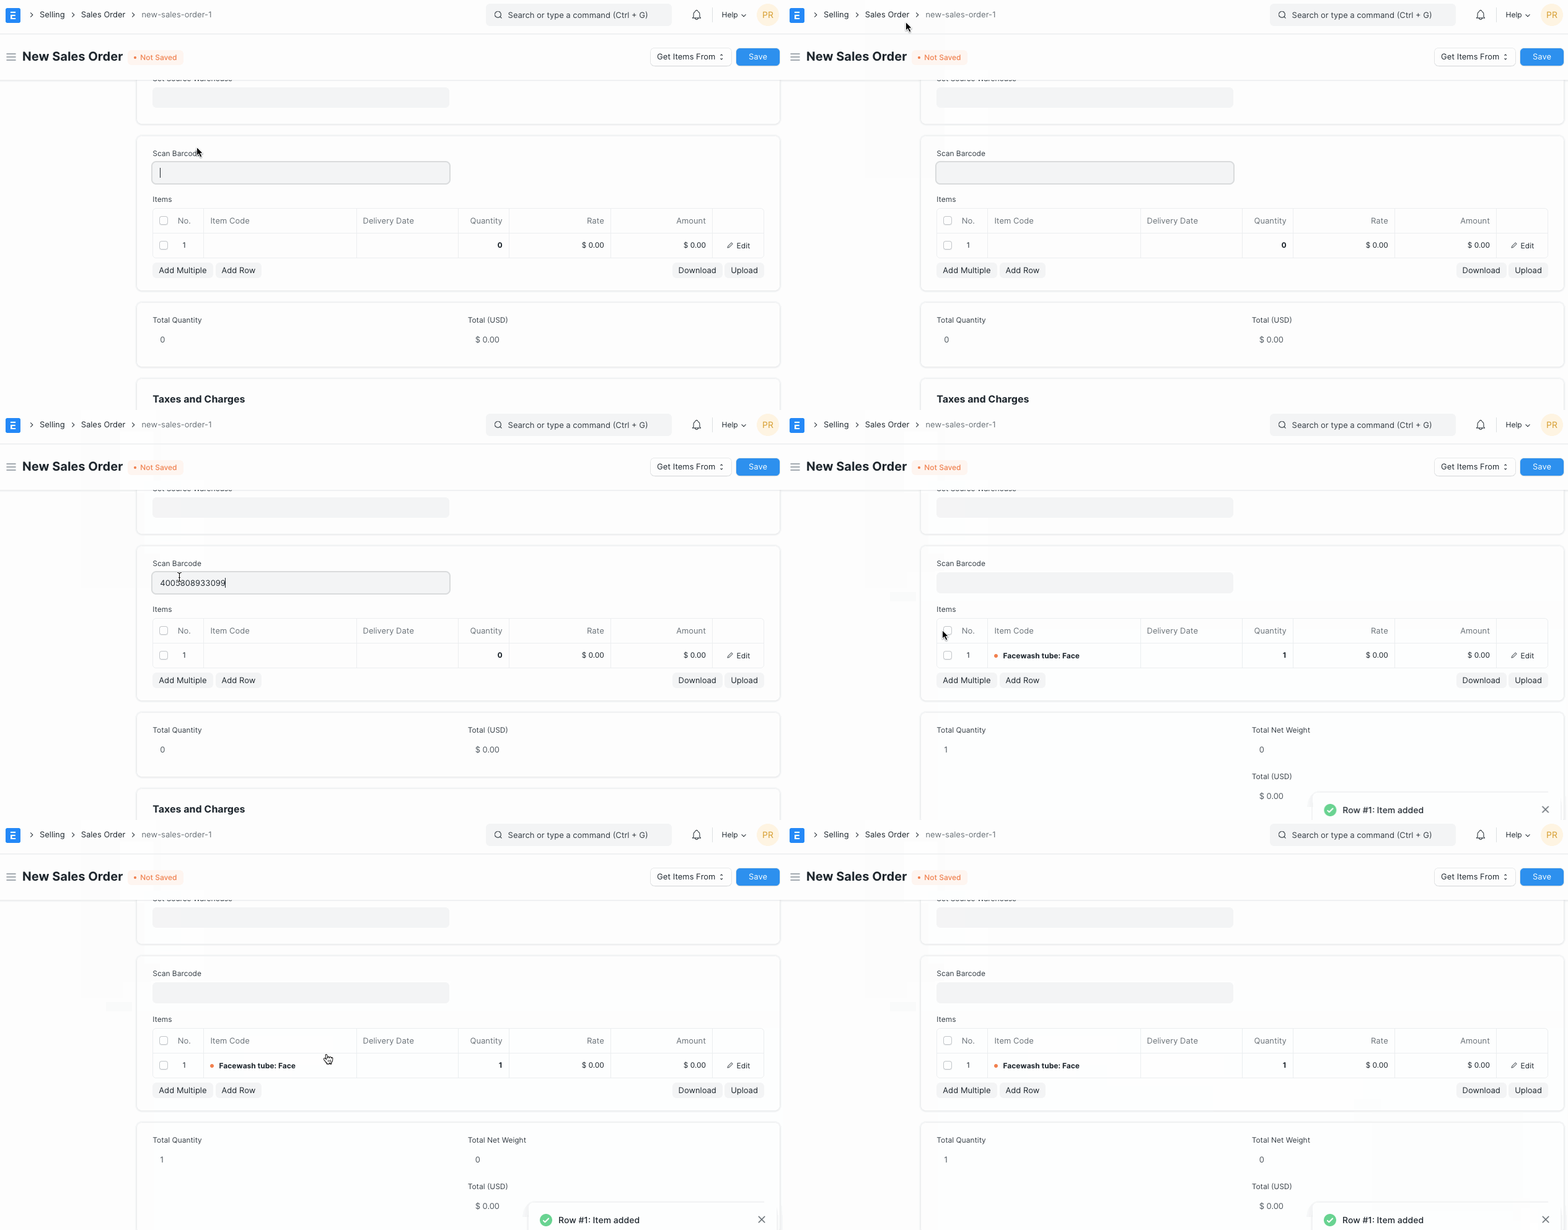
UOM specific barcode
You can also specify different barcode for different type of packaging of same item like unit and box. Select the UOM in Item Barcode table to get it auto selected when scanning items.

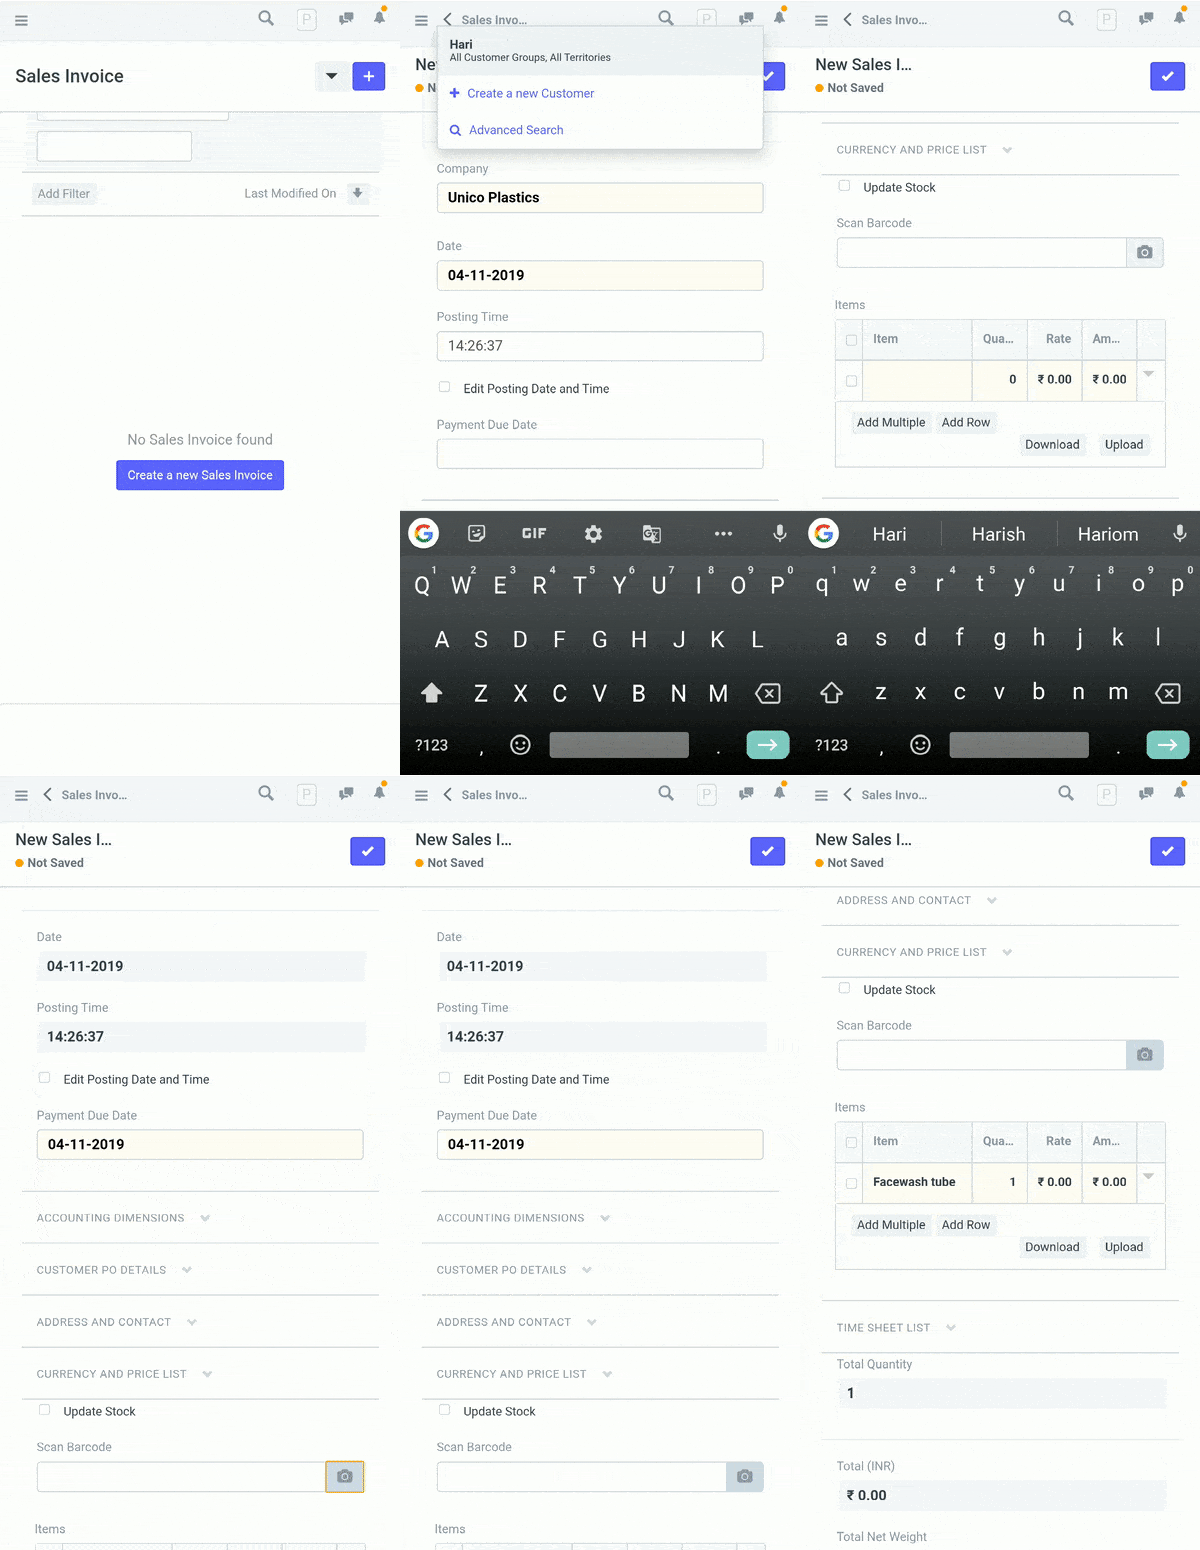
Using mobile phone / smartphone to scan and add items
Log in to your IONIC ERP account, go to the Item master and you’ll be able to scan barcodes and add Items right from your smartphone!
Managing Fractions in UOM
UoM stands for Unit of Measurement. Few examples of UoM are Numbers (Nos), Kgs, Litre, Meter, Box, Carton etc.
There are few UOMs which cannot have value in decimal places. For example, if we have television for an item, with Nos as its UoM, we cannot have 1.5 Nos. of television, or 3.7 Nos. of computer sets. The value of quantity for these items must be whole number.
You can configure if particular UoM can have value in decimal place or no. By default, value in decimal places will be allowed for all the UOMs. To restrict decimal places or value in fraction for any UoM, you should follow these steps.
UOM List
For UOM list, go to:
Stock > Setup > UoM
From the list of UOM, select UOM for which value in decimal place is to be restricted. Let’s assume that UoM is Nos.
Configure
In the UoOM master, you will find a field called “Must be whole number”. Check this field to restrict user from enter value in decimal places in quantity field, for item having this UOM.

Validation
While creating transaction, if you enter value in fraction for item whose UOM has “Must be whole number” checked, you will get error message stating:
Quantity cannot be a fraction at row #

Item Valuation Setup and Transactions
In ERPNext, Item’s stock valuation is updated on the creation of one of the following transaction.
- Purchase Receipt
- Stock Entry of type Material Receipt
- Stock Reconciliation made for updating stock opening balance
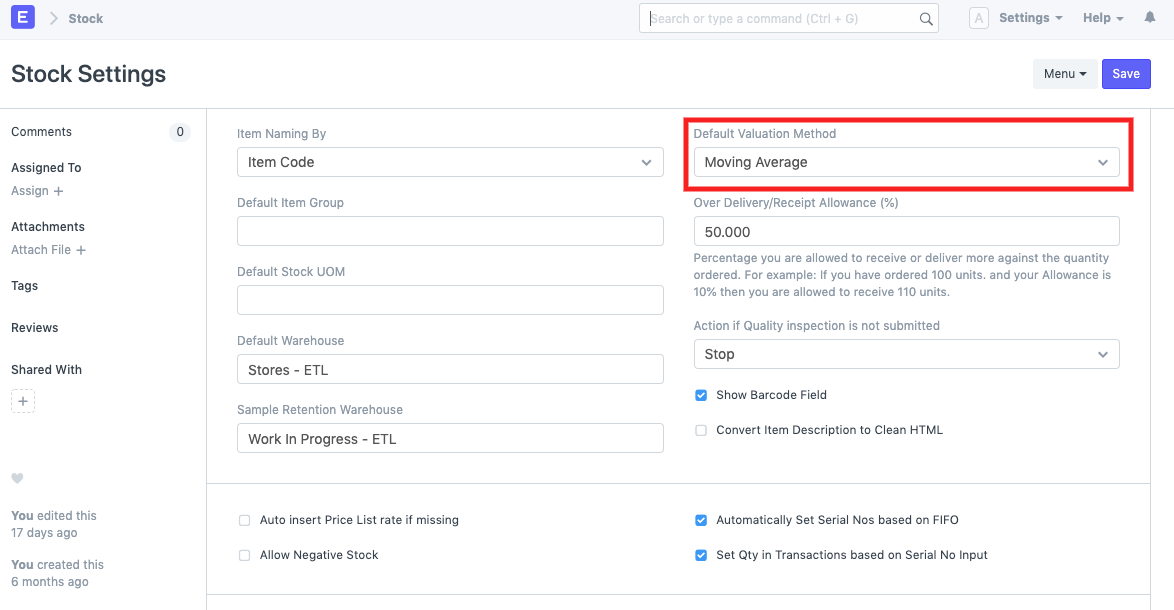
You can select valuation method based on which item’s value will be calculated. Valuation Method can be set globally for all the items from the Stock Settings.

You can also set Valuation Method in the item master, especially when a valuation method for an item is different from the default Method as seen in the following screenshot.
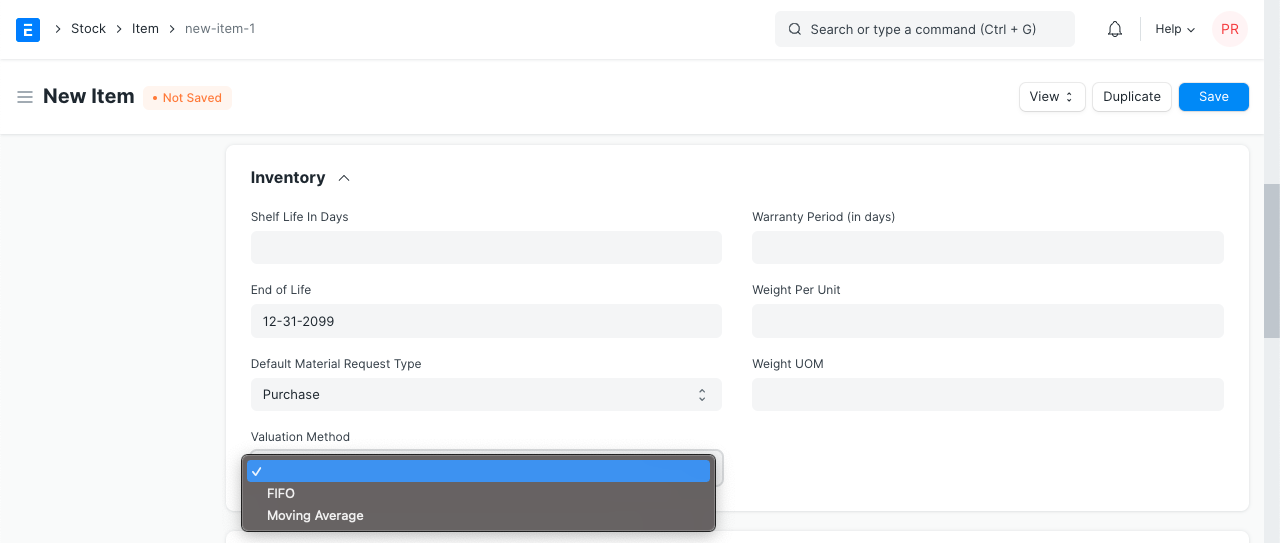
Note that once ledger entries are made for an item, this option will no longer be visible in the Item form.
Click here to learn about the valuation methods available in the IONIC ERP, and how it works.
FIFO and Moving Average calculation difference
Valuation Rate of an item is calculated based on the total expense incurred to make the product available for sale like freight, labour, cost of raw materials, etc.
In IONIC ERP, Valuation Rate is calculated based on the valuation method selected for the particular item.
An item can have either FIFO or Moving Average selected as a valuation method.
Consider the following example to know how it impacts your stock:
| Date | Transaction | Qty | Unit Cost |
| 1-4-2020 | Purchase | 10 | 100 |
| 6-4-2020 | Purchase | 20 | 120 |
| 10-4-2020 | Sale | 15 | ? |
Calculating Valuation Rate at the time of sale:
As per FIFO:
Since this is FIFO, we will consume quantities from the earliest transactions, therefore, to make a sale of 15 qty, we will take 10 qty from the first transaction and 5 qty from the second one.
(10 * 100) + (5 * 120) = 1600, which leaves us 15 qty in stock at cost of 120 amounting to 1800.
As per Moving Average:
In the Moving Average method, the value of an item is recalculated every time when an item is acquired. This is done by adding the cost of the newly acquired items to the existing inventory’s value and then dividing it by the total quantity available.
((10 * 100) + (20 * 120)) / 30 = 113.33
To make a sale of 15 qty, we will directly multiply it by the average value we received just now.
15 * 113.33 = 1700, which leaves us 15 qty in stock amounting to 1700.
If you check, even though the quantity is same the stock value is different but both amounts to a total of 3400 only.
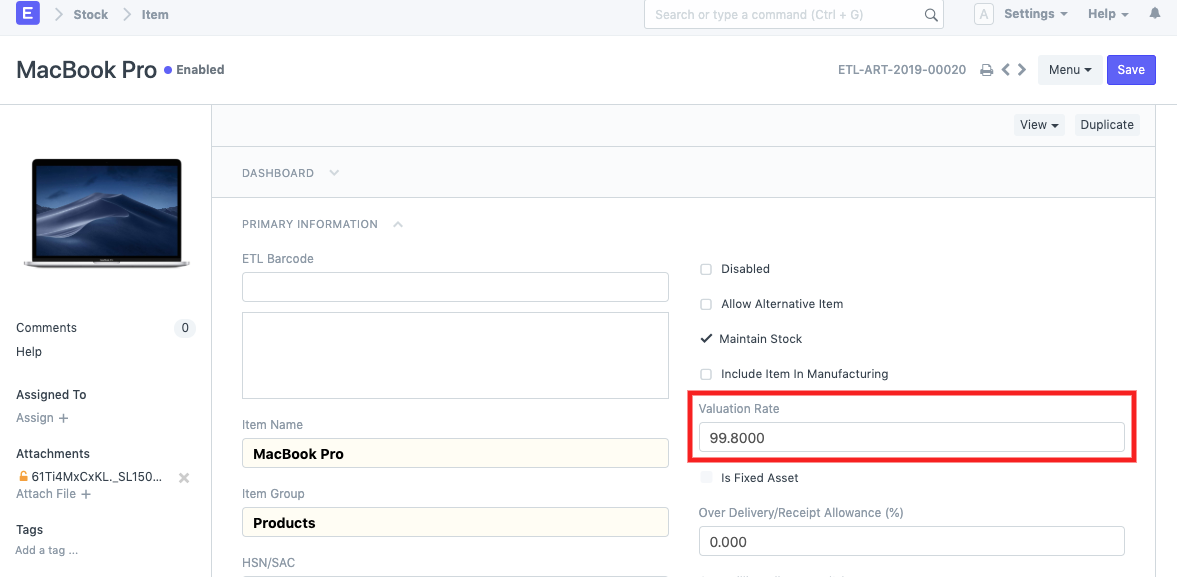
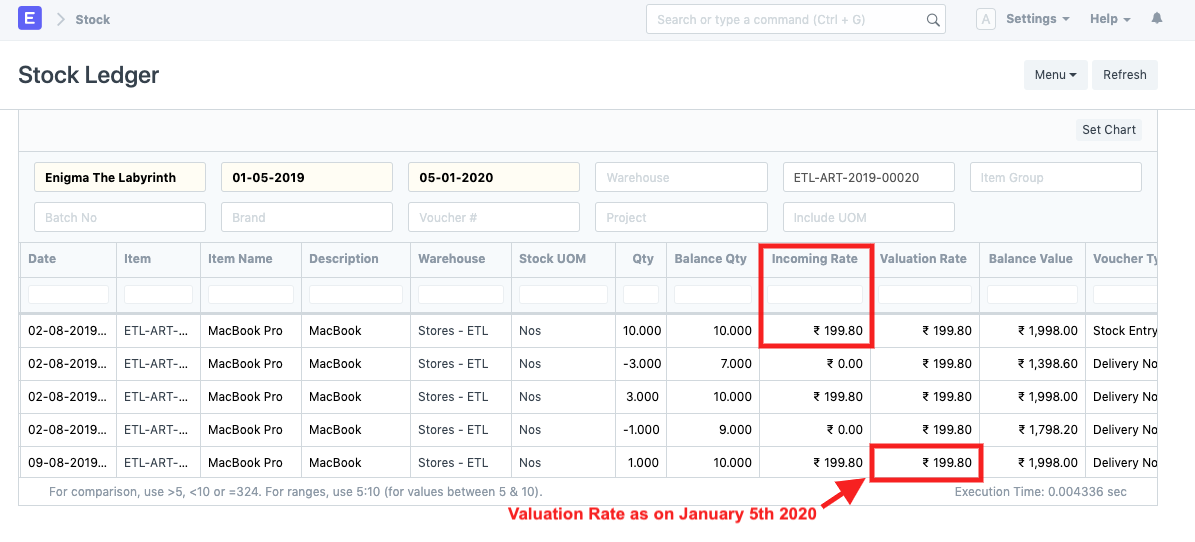
Serialised Item Valuation Rate calculation
- Purchase Receipt
- Stock Entry of type Material Receipt
- Stock Reconciliation made for updating stock opening balance
IONIC ERP supports 2 valuation types: FIFO & Moving Average.
Raw material valuation
Question: What are for various options in Valuation Based On in the Bill Of Materials (BOM)?
Answer: There are 3 available options in the Valuation Based On field:

Valuation Rate: Item valuation rate is defined based on it’s purchase or manufacture value.
For Purchase Item, it is defined based on charges entered in the Purchase Receipt. If you don’t have any Purchase Receipt made for an item or a Stock Reconciliation, then there won’t be any Valuation Rate for that item.
Price List Rate: This option allows to pull item rates from Price List.
Last Purchase Rate: It will be the last Purchase (Order) Rate of an item.
